

When it comes to creating a professional and polished email signature, there are several options available to you. One popular method is to use templates. These pre-designed signature designs can be easily customized to fit your needs, allowing you to upload your own logo and choose from a variety of font styles and colors.
If you prefer a more hands-on approach, you can create your email signature from scratch. This gives you total control over the design, allowing you to add your own images and format the text exactly as you want it.
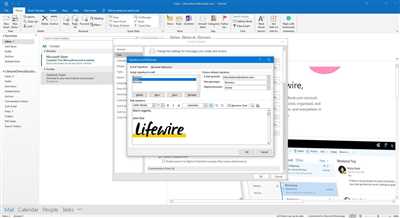
If you’re using Microsoft Outlook, you can access the signature options by clicking on “File” in the toolbar, then selecting “Options” from the drop-down menu. From there, choose “Mail” and click on “Signatures.” You will then be taken to a page where you can create and manage your email signatures.
One great feature of Outlook is the ability to schedule an email signature to appear only at certain times or when certain conditions are met. For example, you can have a different signature for emails sent during business hours versus after hours. This can be particularly useful for those who work with clients in different time zones.
If you prefer to use Outlook Web App (OWA) instead of the desktop version of Outlook, you can still create and manage your email signatures. The process is very similar, with a few minor differences. For example, instead of clicking on “Options” in the toolbar, you will click on the gear icon in the top-right corner of the page and select “Options” from the drop-down menu.
When it comes to adding images to your email signature, it’s important to check the file size. Large images can slow down the loading time of your messages and may even cause your emails to be marked as spam. To avoid this, make sure your images are compressed and optimized for the web.
Overall, creating a professional email signature is an important part of your online identity. It’s a way to make a good first impression, establish credibility, and provide your contact information in a convenient and visually appealing format. Whether you choose to use a template or create your own signature from scratch, take the time to make it reflect your personal brand and style.
Add a signature in Outlook Web Access OWA
Microsoft Outlook Web Access (OWA) is a web-based email client that allows users to access their email, calendar, and other features on the go. One important feature of OWA is the ability to add a signature to your emails.
To add a signature in OWA, follow these steps:
- Open Outlook Web Access (OWA) in your web browser.
- Click on the “Settings” icon in the top-right corner of the page.
- In the settings menu, click on “View all Outlook settings.”
- On the settings page, click on “Compose and Reply” in the left-hand menu.
- Scroll down to the “Email signature” section.
- Check the box that says “Automatically include my signature on new messages I compose.”
- Choose your signature from the drop-down menu. You can create a new signature or choose one that you’ve already created.
- Format your signature using the toolbar options. You can add an image, change the font size, and more.
- Click the “Save” button to save your changes.
Once you’ve added a signature, it will be automatically inserted into your outgoing emails. You can also choose to manually insert your signature by clicking on the signature icon in the toolbar when composing a new email.
Adding a signature can make your emails look more professional and consistent. You can use a signature template or create a custom signature that includes your name, contact information, and a logo or image. Make sure to check the formatting of your signature and test it by sending yourself an email to ensure that it appears correctly in the recipient’s inbox.
In addition to email signatures, OWA also allows you to customize other settings such as your calendar, inbox layout, and more. Explore the different options and features of OWA to personalize your experience and make the most out of your Microsoft Outlook web access.
Sources: https://www.honeybook.com/risingtide/how-to-add-your-signature-to-outlook-web-access/
Add a logo or image to your signature
If you want to add a logo or image to your email signature, you can do so by following these simple steps in your email client:
- First, open the toolbar or options menu in your email client.
- Look for an option or button that says “Signatures” or something similar.
- Click on it to access the settings related to your email signature.
- Choose the email signature you want to add the logo or image to, or create a new one if you haven’t done so already.
- When you have the signature selected or created, look for an option to insert an image or logo.
- Click on it to open the source options.
- You can either upload an image from your device or choose from the default image templates provided by your email client.
- If you choose to upload your own image, make sure it is in the appropriate format and size for your signature.
- Once you’ve selected or uploaded the image, it will be inserted into your signature.
Now, whenever you compose new email messages or reply to existing ones, your signature with the logo or image will be automatically added to the bottom of the email.
Please note that the process may vary depending on the email client or web-based email service you are using. For example, if you use Microsoft Outlook, you can follow these steps in Outlook Web App (OWA).
Don’t forget to check your signature by sending a test email to yourself or a colleague to ensure that everything looks as you intended.
Now you can add a touch of personalization to your emails by incorporating your company logo or a custom image into your signature!
Related Articles
- How to Create an Email Signature in Outlook
- How to Insert an Email Signature into Outlook Web App (OWA)
- How to Add a Signature to Microsoft Outlook
- How to Insert a Logo into Your Email Signature
- How to Create a Default Signature in Outlook
- How to Upload Signature to Honeybook
- How to Make an Email Signature in HTML Format
- How to Add Images to Your Email Signature
- How to Check for Messages in Your Inbox
- How to Schedule a Meeting in Outlook Calendar
- How to Choose the Right Signature Template
- How to Insert a Signature into an Email on Outlook
- How to Change the Font Size in Your Email Signature
- How to Create Signature Templates in Outlook
- How to Open Outlook in Web or Desktop
When you need more options or want to create a customized signature, you can check out the related articles for step-by-step guides on how to insert a signature into your email. Whether you use Microsoft Outlook, Outlook Web App (OWA), or a web-based email service, these articles will provide you with the necessary information and instructions to create and insert an email signature that matches your personal or company branding.
To create an email signature template

When it comes to creating an email signature, having a template can make the process much easier and ensure consistency across your messages. Here’s how to create an email signature template in Microsoft Outlook or Outlook on the web (OWA).
1. Open Outlook or OWA and go to your inbox.
2. Click on the Settings menu (represented by a gear icon) located in the toolbar.
3. In the Settings menu, choose “View all Outlook settings”.
4. Click on “Compose and reply” in the left sidebar.
5. Scroll down to the Email signature section and click on “Create or modify signatures”.
6. In the Signature settings page, click on “New” to create a new signature.
7. Enter a name for your signature template and click “OK”.
8. In the signature editor, you can format your signature using the options available. You can insert text, images, links, and more. To insert an image, click on the “Image” button and choose to upload an image from your computer or enter the URL of an image hosted online.
9. Customize your signature template by adding your name, job title, contact information, and any other details you want to include.
10. Once you’ve finished creating your signature template, click “Save” to save your changes.
11. You can choose to set this signature template as the default for new messages, replies, or both.
12. Click “OK” to close the Signature settings page.
Now, whenever you compose a new email or reply to a message, your signature template will be automatically inserted into your email. You can also schedule your signature to be added at specific times or dates, such as during working hours or when you’re on vacation.
By following these steps, you can easily create an email signature template in Microsoft Outlook or Outlook on the web. Remember to check additional articles and related sources for more tips and tricks on email signatures.
Sources
In order to create and insert an email signature in Outlook, you have a few options. Here are some sources you can use:
– Microsoft Outlook: Open the Outlook application on your computer and click on “File” in the toolbar. From there, select “Options” and then “Mail” to access the settings menu. Choose “Signatures” to open the page where you can create and add signatures to your email messages.
– Outlook Web App (OWA): If you prefer to use the web version of Outlook, called Outlook Web App (OWA), you can insert your email signature by clicking on the gear icon in the top-right corner of the page. Then, select “Options” and navigate to the “Mail” section. Under “Layout” and “Email signature,” you can insert your signature.
– Templates: You can also create a signature using email signature templates. There are many websites that offer free pre-designed templates that you can customize to fit your needs. Simply choose a template, open it, and make the necessary modifications to add your own logo, image, or more.
– Default signature: If you’re a part of a group or organization that has its own signature policy, you may have a default signature applied to your emails. In this case, you can check with your IT department or email administrator for more information on how to make changes to the default signature.
– Upload an image: If you have an image or logo you’d like to include in your email signature, you can upload it to an image hosting website or cloud storage platform, such as Dropbox or Google Drive. Once uploaded, you can insert the image by clicking on the “Insert image” option in the email signature settings.
By utilizing these sources and following the instructions provided, you’ll be able to create and insert an email signature that suits your style and preferences.


