

When it comes to design, creating transparent backgrounds for pictures can add a whole new level of creativity and professionalism. Whether you’re using Microsoft Word, PowerPoint, or Photoshop, knowing how to make a picture transparent is a skill you’ll want to master. By removing the background from an image, you can easily isolate certain parts or shapes that you want to highlight in your project.
One of the quickest and easiest ways to make a picture transparent is by using the “Quick Select” tool. This powerful tool allows you to mark the areas you want to keep in the image and remove the background with just a few clicks. Once you insert your picture into the software, simply select the “Quick Select” tool and outline the shape or parts of the image you want to keep. The tool will automatically select the entire shape, and you can then adjust the transparency level using a slider.
If you’re working with Microsoft Word or PowerPoint, you can also make a picture transparent without the need for additional software. After inserting the picture into your document or slide, select the image and go to the “Format” tab. From there, click on the “Color” option and choose “Set Transparent Color.” Once you click on the color you want to remove, it will become transparent, leaving only the shape or parts of the image you want to keep.
For more advanced users, Photoshop offers a wide range of tools and techniques to make pictures transparent. You can use the “Magic Wand” tool to select and remove backgrounds, or create a layer mask to manually control the transparency of different parts of the image. Photoshop also allows you to save your transparent image in various file formats, such as PNG, which preserves the transparency.
No matter which tool or software you choose to use, knowing how to make a picture transparent can greatly enhance your design projects. It allows you to create visually appealing graphics, highlight specific shapes or parts of an image, and seamlessly blend pictures with different backgrounds. So, whether you’re a beginner or an experienced designer, mastering this skill will undoubtedly take your designs to the next level.
- How to Make an Image Transparent without Photoshop
- Using Microsoft Word
- Using Microsoft PowerPoint
- Why Do You Need To Make a Picture Transparent In PowerPoint
- 2 In Microsoft Word
- Removing the Background
- Saving the Transparent Image
- Create and save images with transparent backgrounds
- Using Microsoft PowerPoint
- Using Adobe Photoshop
- How to Remove Image Background to Make it Transparent in PowerPoint
- Video:
- [SOLVED] How to Make Image Transparent in Word | Make Image Transparent in Word Document Background
How to Make an Image Transparent without Photoshop
Creating transparent images can be a quick and easy process, even without the need for a complex design software like Photoshop. Whether you want to remove a background or create transparent shapes within an image, Microsoft Word and PowerPoint offer useful tools that can help you achieve the desired effect.
Using Microsoft Word
If you’re looking to remove the background from an image and make it transparent, Microsoft Word can be a handy tool. Here’s how you can do it:
- Insert the image you want to make transparent into a Word document.
- Click on the image to select it, and then click on the “Format” tab at the top of the screen.
- Next, click on the “Color” option located in the “Adjust” group of tools.
- A drop-down menu will appear. Select the “Set Transparent Color” option.
- A cursor will turn into a small pencil icon. Click on the background color you want to remove from the image.
- All areas that match the color you selected will be marked as transparent.
- Click on “File” and select “Save As” to save the image in a different format with the transparent background.
This method allows you to remove the background from your image and keep only the parts you want to be visible, making it transparent and ready to be used in any design project.
Using Microsoft PowerPoint
If you’re working with shapes and want to create transparent areas within an image, Microsoft PowerPoint can be a great option. Here’s what you need to do:
- Insert the image you want to work with into a PowerPoint slide.
- Click on the image to select it, and then click on the “Format” tab at the top of the screen.
- In the “Adjust” group of tools, click on the “Remove Background” option.
- A pink outline will appear around the subject of the image, while the background will be removed and replaced with a checkered pattern, indicating transparency.
- If there are areas that you want to keep but were removed, use the “Mark Areas to Keep” and “Mark Areas to Remove” tools located on the Format panel to fine-tune the selection.
- Once you’re satisfied with the transparent areas, click on “File” and select “Save As” to save the image in a format that supports transparency, such as PNG.
These steps will allow you to create an image with transparent areas, making it suitable for overlaying on different backgrounds or enhancing the overall design of your projects. No Photoshop skills required!
Why Do You Need To Make a Picture Transparent In PowerPoint
When working with PowerPoint, you often need to create visually appealing presentations that engage your audience. One way to enhance your design is by using images and pictures. However, sometimes the background of the image may clash with your slide’s color scheme or distract from the overall message.
That’s where the need to make a picture transparent in PowerPoint arises. By adjusting the transparency level, you can make certain parts of an image or the entire background less prominent, allowing your text or shapes to stand out better. This can significantly improve the visual appeal and impact of your presentation.
So, how do you make a picture transparent in PowerPoint?
First, you need to insert the image you want to make transparent into your PowerPoint slide. Once you have the image in place, select it by clicking on it.
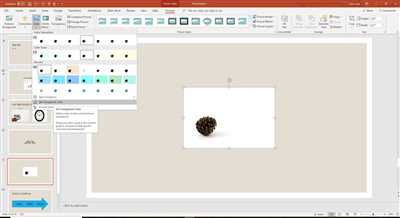
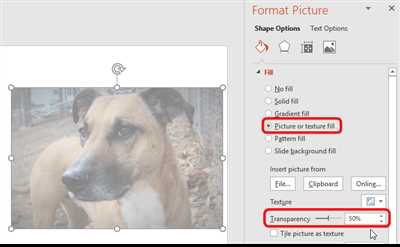
Next, go to the Format tab, which appears when you select the image. Under the Adjust group, you will find the Color tools. Click on the Recolor option to bring up a dropdown menu.
In the dropdown menu, click on Set Transparent Color. Your cursor will turn into a small pencil icon with a selection slider.
This slider allows you to mark specific areas of the image that you want to make transparent. Simply click and drag over the parts of the image that you want to remove the background from. PowerPoint will automatically detect similar colors and make them transparent as well.
If you’re still not satisfied with the transparency level, you can go ahead and use the Transparency slider in the same menu to adjust it to your liking.
Once you’re done, click outside of the image to see the result. Your image now has transparent areas defined by the areas you marked, and you can move it around and position it on your slide.
Unlike using third-party tools like Photoshop, making a picture transparent in PowerPoint is quick and easy.
Now that you know how to make a picture transparent in PowerPoint, you can enhance your presentations by using images with transparent backgrounds. Remember that this technique works not only with photos but also with shapes and clip arts that you insert from Microsoft Word’s image tools.
So, why wait? Start creating impactful and visually appealing presentations by using transparent images in your PowerPoint slides!
2 In Microsoft Word
If you do not have access to software like Photoshop or PowerPoint, you can still make a picture transparent using Microsoft Word. This handy tool allows you to easily remove the background of an image and create a transparent design.
To start, insert the picture into your Word document. You can do this by clicking on the “Insert” tab at the top of the screen and selecting “Pictures” from the dropdown menu. Find the image you want to work with and click “Insert”.
Once the picture is inserted, click on it to select it. You will see a “Format” tab appear at the top of the screen. Click on this tab to reveal additional formatting options.
Removing the Background
To remove the background of the picture, click on the “Remove Background” tool in the Adjust group of the Format tab. This tool will analyze the image and mark the areas that it believes should be removed.
If you want to keep a certain part of the image, use the “Mark Areas to Keep” tool from the background removal options. Click and drag over the areas you want to keep with the tool. Word will automatically adjust the outline to include those areas in the final image.
Next, use the “Mark Areas to Remove” tool to select the parts of the image that you do not want to include. Click and drag over these areas to mark them for removal.
Once you have marked the areas you want to keep and remove, click “Keep Changes” in the top left corner of the screen. Word will update the image and remove the selected background areas, making them transparent.
Saving the Transparent Image
After creating a transparent image in Word, you may want to use it in other programs or projects. To do this, right-click on the image and select “Save as Picture” from the dropdown menu.
Choose a location to save the image and select the file format you prefer. The most common formats for transparent images are PNG and GIF. These formats support transparency and will preserve the transparent background you created in Word.
Now you know how to make a picture transparent using Microsoft Word. This quick and easy tool can help you remove backgrounds from images without the need for more advanced software. Give it a try and see how it can enhance your design!
Create and save images with transparent backgrounds
When it comes to designing graphics or editing photos, there may be times when you need to remove the background of an image and make it transparent. This can be useful if you want to overlay the image onto a different background or if you simply want the image to blend seamlessly into your design.
There are several tools and software available that allow you to create and save images with transparent backgrounds. Here, we will focus on two popular options: Microsoft PowerPoint and Adobe Photoshop.
Using Microsoft PowerPoint
If you have Microsoft PowerPoint installed on your computer, you can use it to quickly create images with transparent backgrounds.
- First, open PowerPoint and insert the image that you want to remove the background from.
- Once the image is inserted, select it and click on the “Format” tab at the top of the PowerPoint window.
- In the “Adjust” group, click on the “Remove Background” option. PowerPoint will automatically try to remove the background from your image.
- Next, you can use the “Mark Areas to Keep” and “Mark Areas to Remove” options to fine-tune the background removal process.
- Use the slider to adjust the size of the markings, and use the “Add Marking” and “Remove Marking” tools to mark the areas you want to keep or remove from the background.
- Once you are satisfied with the background removal, click “Keep Changes” to save the image with a transparent background.
Using Adobe Photoshop
If you have access to Adobe Photoshop, you can also use it to create images with transparent backgrounds.
- First, open the image you want to remove the background from in Photoshop.
- Select the “Magic Wand” tool from the toolbar on the left side of the Photoshop window.
- Click on the areas of the image that you want to remove. Photoshop will automatically select similar colors and shapes.
- If the selection is not accurate, you can adjust the “Tolerance” setting in the top toolbar.
- Once you have selected the background, press the “Delete” key on your keyboard to remove it.
- To make the background transparent, go to the “File” menu and select “Save As”. Choose a file format that supports transparency, such as PNG or GIF.
- Specify a location to save the image and click “Save”. Your image with a transparent background is now ready to use!
Now that you know how to create images with transparent backgrounds, you can use this technique to enhance your designs and create eye-catching visuals. Whether you’re using Microsoft PowerPoint or Adobe Photoshop, these tools provide quick and easy ways to remove backgrounds and make your images stand out.
How to Remove Image Background to Make it Transparent in PowerPoint
If you’re working with pictures in Microsoft PowerPoint and need to remove the background to make it transparent, there’s a quick and easy way to do it without using a complex image editing tool like Photoshop. This tutorial will show you how to remove the background from an image and create a transparent picture in PowerPoint.
First, insert the image you want to remove the background from into your PowerPoint slide. Select the image and click on the “Format” tab at the top of the screen. Then, click on the “Remove Background” button in the “Adjust” group.
PowerPoint will automatically try to guess which parts of the image you want to keep and which areas should be removed. It will mark the background with a transparent overlay and create a quick outline of the image.
You can adjust the selection using the “Mark Areas to Keep” and “Mark Areas to Remove” tools. The “Mark Areas to Keep” tool is a green marker that you can use to mark areas you want to keep, while the “Mark Areas to Remove” tool is a red marker that you can use to mark areas you want to remove.
If the automatic selection didn’t capture the entire object or if there are parts of the background you want to remove that weren’t automatically selected, you can manually mark those areas using the markers.
Once you’ve marked the areas you want to remove, click on the “Keep Changes” button in the “Close” group. PowerPoint will remove the selected background and make it transparent.
After removing the background, you can save your transparent picture and use it in your PowerPoint design or export it for use in other programs. Just right-click on the image, select “Save as Picture”, and choose the desired file format.
That’s how you can easily remove the background from an image and make it transparent in PowerPoint without the need for Photoshop or other complex image editing tools. Use this feature to create professional-looking presentations with transparent images.


