

If you own an Android device, you probably know that the Google Play Store is the go-to source for downloading and updating apps. But before you can start using it, you need to create a Playstore ID.
To begin, open the Google Play Store app on your phone or tablet. If you don’t have it installed, you can download it from the Playstore. Once you’re in the store, scroll down and tap on the “Sign In” button located at the bottom of the screen.
If you already have a Google account, you can sign in with your existing credentials. If not, you’ll need to create a new account by tapping on “Create account” below the sign-in form. Follow the onscreen prompts to provide your email address and other required information. Make sure to select a strong password and agree to the terms of service.
After you’ve signed in or created a new account, you’ll need to configure your Playstore ID. Tap on the profile icon located in the upper-right corner of the screen and select “Settings” from the menu that appears.
In the Settings menu, scroll down and tap on “Account” to open your account settings. Then, tap on “Payment methods” to add your preferred payment method. You can use a credit or debit card, or if you prefer, you can use Google Wallet to make payments.
Before you’re able to publish apps or make any purchases, you’ll need to enroll as a developer and pay the necessary fees. To do this, go to the Google Play Developer Console website on your computer and sign in with your Playstore ID.
On the Developer Console, you’ll be prompted to provide some additional information about yourself and your company. Once you’ve provided all the required details, you can start uploading and publishing your Android apps to the Playstore. Note that there may be a waiting period before your app is reviewed and approved for publication.
Creating a Playstore ID is an essential step if you want to make your apps available to a wide audience of Android users. By following the steps outlined above, you can get started on your journey to becoming a successful app developer.
Publishing Apps to Google Play App Inventor 2
If you are an app developer, you may want to publish your applications on the popular Google Play Store. With Google Play App Inventor 2, you can easily create and publish your own Android apps without the need for advanced coding skills.
Before you can publish your app, you will need to enroll in the Google Play App Inventor 2 program. Once enrolled, you can start building your app using the App Inventor 2 platform. Create all the necessary screens and add the desired functionality to make your app work like a charm.
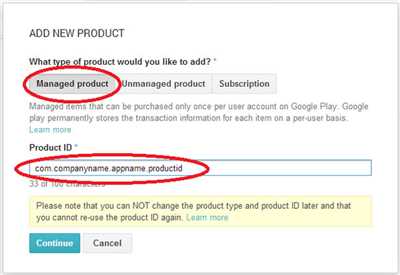
Once your app is ready, you will need to sign it with a unique application ID, or package name. This ID will be used to identify your app on the Google Play Store. The ID should be in the format “com.yourdomain.yourappname” or “yourdomain.yourappname”.
To publish your app, go to the Google Play Developer Console and create a new application. Fill in all the required information, such as the app’s name, description, screenshots, and icon. You will also need to provide a version name and number for your app.
If you plan to charge for your app or offer in-app purchases, you will need to set up payment options. Google Play offers various payment methods, including credit card payments, carrier billing, and Google Wallet. Configure the payment settings according to your preferences.
Before you can publish your app, you will also need to create a digital certificate, or a keystore file. This will prove that the app you are publishing is owned by you. The keystore file can be generated using tools like the Keytool command-line utility or the Android Studio integrated development environment.
Once you have completed all the necessary steps, you can publish your app to the Google Play Store. It may take some time for your app to appear in the store, as the review process can take a few hours to several days. You will receive a message or email notification when your app is live and available for download.
Note that the process of publishing apps for Apple devices is different from the process for Android devices. If you would like to publish your app on the Apple App Store, you will need to follow a different set of instructions.
In summary, publishing apps to Google Play App Inventor 2 involves enrolling in the program, building your app, signing it with a unique ID, creating a Google Play Developer Console profile, configuring payment options, creating a keystore file, and finally publishing your app to the store. Remember to check all the guidelines and requirements before submitting your app.
Before you start
Before you start the process of creating a Play Store ID, there are a few things you need to make sure you have:
- Wallet: You will need a Google Wallet account in order to receive payments for your apps.
- Email: Make sure you have a valid email address that you can use for registration.
- Phone: You will need a phone number that can receive text messages for verification purposes.
- VersionName and VersionCode: These are important parameters that determine the version of your app. Make sure you select the appropriate values for your app.
- Work profile: If your app is managed by Intune or another device management solution, you will need to configure a work profile for your app.
Once you have these items, you can start the publishing process. Open the Google Play Console, select the app you want to publish, and fill in the necessary information such as the app title, description, and screenshots. Make sure to check the app’s content rating and provide all the required information.
It is also important to note that there may be fees associated with publishing your app on the Google Play Store. These fees will appear in your Google Developer account and you will need to pay them before your app can be published.
Before your app can be published, you will also need to create a payment profile in the Google Play Console. This is where you will provide all the necessary information for users to make payments for your app.
Lastly, make sure to check the app’s compatibility with different devices and regions. You can see the number of devices that your app can be installed on and the region availability in the Google Play Console. If your app is also available on the Apple App Store, make sure to follow the guidelines provided by Apple.
Once you have completed all these steps, you can proceed to publish your app on the Google Play Store and start reaching a wider audience with your Android applications!
Configure Google Wallet and pay registration fees

In order to publish and distribute your Android app on the Google Play Store, you need to configure Google Wallet and pay the registration fees. Follow the steps below to complete this process:
Step 1: Create a Google Wallet Merchant Account
To get started, you will need to create a Google Wallet Merchant Account. This account will be used for all financial transactions related to your app publishing. Make sure to provide accurate information during the account creation process.
Note: If you already have a Google Wallet Merchant Account, you can skip this step and proceed to step 2.
Step 2: Configure Google Wallet for your app
After creating the Google Wallet Merchant Account, you need to configure Google Wallet for your app. Follow these steps:
- Open the Google Play Console and sign in with the Google account associated with your Developer Profile.
- Select the app you want to configure Google Wallet for.
- Go to the “Monetization” section and click on “Payment Settings”.
- Click on “Manage Configuration”.
- Provide the required information, including your Merchant ID and payment profile details.
- Click on “Save” to save your configuration.
Step 3: Pay the registration fees
After configuring Google Wallet for your app, you will need to pay the registration fees. Follow these steps:
- Go to the “Settings” section in the Google Play Console.
- Click on “Developer account” and then select “Payment settings”.
- Click on “Add a payment method” and provide the required payment information.
- Click on “Save” to save your payment method.
- Go back to the “Payment settings” page and click on “Pay registration fees”.
- Choose the desired payment method and complete the payment process.
Note: The registration fees may vary depending on your region and the number of apps you have published or plan to publish. Make sure to check the current fees before proceeding with the payment.
Once you have completed these steps, your Google Wallet will be configured, and the registration fees will be paid. Your app will now appear on the Google Play Store for Android users to download and enjoy.
Create your Apple ID on another device
If you are a minor and do not have your own device, you may ask someone who owns an Apple device to help you create an Apple ID. After you have your own device, you can then follow the steps below to create your Apple ID:
- Open the App Store on your device.
- Select any free app to download.
- Tap on the “Get” button, and then you will be prompted to sign in.
- Tap on “Create New Apple ID”.
- Select your region and then tap “Next”.
- Read and agree to the terms and conditions.
- Provide your email address, password, security questions, and date of birth.
- On the next screen, you will need to enter your payment information. If you do not want to add a payment method at this time, you can select “None”.
- Enter your billing address details and tap “Next”.
- An email will be sent to the email address you provided. Follow the instructions in the email to verify your Apple ID.
- After your Apple ID is verified, you can sign in with your new Apple ID on your own Apple device.
Once you have created your Apple ID, you can start downloading apps from the App Store, like games, apps for work, apps that can help you manage your finances, and more.
It is important to note that if you are registering as a developer to publish apps on the App Store, there are certain additional steps and fees involved. You will need to enroll in the Apple Developer Program and check the developer fees associated with it. You will also need to configure your development environment, like Xcode on a Mac, to start developing your app.
If you have any other questions or need further assistance, you can reach out to Apple support or visit their website to see the frequently asked questions and helpful guides.
Create your Apple ID on the web
To start using Apple’s App Store and other services, you need an Apple ID. With an Apple ID, you can download apps, see your purchase history, manage your payment methods, and more. Follow the steps below to create an Apple ID on the web.
Before you begin, make sure you have a valid email address that is not already associated with an Apple ID. If you don’t have one, you can easily create a new email account with services like Gmail, Yahoo, or Outlook. It is also advisable to check if your device is compatible with the latest version of iOS.
1. Open a web browser and go to the Apple ID account creation page.
2. Provide your personal information, including your full name, email address, and date of birth.
3. Choose a strong password for your Apple ID, which should include a combination of uppercase and lowercase letters, numbers, and special characters.
4. Select your security questions and provide the answers. These will be used to verify your identity if you forget your password or need to make changes to your account.
5. Agree to the terms and conditions and review Apple’s privacy policy.
6. Click on the “Continue” button to proceed.
7. If prompted, enter a payment method for use with the App Store. If you don’t wish to add one at this time, you can select “None.” Note that certain features, such as in-app purchases, may require a payment method to be added later.
8. Choose your region and confirm your phone number. This is important as some apps and services may vary by region.
9. Verify your email address by entering the verification code sent to your email account.
10. Follow the onscreen instructions to complete the registration process.
Once your Apple ID is created, you can start using it to download apps from the App Store, configure your Apple Wallet, enroll in Apple’s developer program to publish your own apps, and much more. Keep in mind that some features may require additional fees or verification.
If you already have an Apple ID that you use with your other Apple devices, you can sign in with that same ID on your Android phone to access certain services like iCloud or Apple Music. However, keep in mind that not all features and apps available on iOS will be available on Android.
Creating an Apple ID on the web is a quick and easy process that allows you to access all the benefits of Apple’s ecosystem and enjoy the wide range of apps, services, and entertainment available through the App Store and iTunes.
If you see a message that you need to sign in to iTunes
If you see a message on your phone that you need to sign in to iTunes, it means that your device is currently managed by an organization or managed by Intune. In this case, your applications on the Google Play Store will be managed and your payment information will not be visible.
To resolve this issue, you will need to sign in to iTunes by following the onscreen instructions. After signing in, you can start publishing your applications on the Google Play Store.
Before you can publish your app, you will need to make sure that you have a unique package name and version name. The package name is used as a unique identifier for your app, while the version name represents the current version of your app. Make sure to register this information with Google Play Store.
If you already have an Apple ID, you can use it to sign in. If not, you will need to create a new Apple ID. To create a new Apple ID, follow the prompts provided on the sign-in screen.
Once you have signed in to iTunes, you can configure your app details like the app name, description, and screenshots. You can also select the region in which your app will be available. Make sure to provide accurate and up-to-date information for each field.
If you see another message on your screen that you need to enroll in the Apple Developer Program or pay fees to publish your app, it means that you would need to enroll in the program first before you can publish your app. Follow the instructions provided to complete the enrollment process.
After you have completed the enrollment process, you can start publishing your app on the Google Play Store. Your app will appear in the Play Store search results and users will be able to download and install it on their devices.
Make sure to check your email regularly for any updates or notifications related to your app. Apple may require you to provide additional information or make changes to your app before it can be published on the store.
If you have any other questions or encounter any issues during the process, you can contact the Apple Developer Support team for assistance. They can provide guidance and help resolve any problems you may have.
Источники
When you create an app for the Google Play Store, you will need to provide certain information and follow a registration process. Below are some sources of information that can help you through the process:
- Google Play Console: This is the web portal where you can manage your apps and track their performance. It is owned and operated by Google and is the main platform for publishing Android applications.
- Google Wallet: If you want to charge fees for your app or provide in-app purchases, you will need to set up a Google Wallet merchant account. This will allow you to receive payments from users.
- App Store Optimization (ASO) Tools: There are various tools available that can help you optimize your app’s visibility in the Play Store. These tools provide insights into keywords, rankings, and other factors that can affect your app’s performance.
- Android Developer Documentation: Google provides extensive documentation for developers that covers all aspects of app development and publishing. This documentation is regularly updated and covers topics like app design, development, testing, and distribution.
- Play Console Help Center: If you encounter any issues or need assistance with any aspect of the Play Console, you can refer to the official help center. Here, you will find detailed guides, FAQs, and troubleshooting tips.
- Developer Support: If you need personalized assistance or have specific questions that are not covered in the documentation or help center, you can reach out to Google’s developer support team. They can provide guidance and assistance with any issues you may face.
These sources should help you navigate the process of creating and publishing your app on the Google Play Store. Make sure to check each source for the most up-to-date information and follow the guidelines provided.


