

If you have items that need to be tracked and inventoried, barcodes can be a great solution. Barcodes are unique identifiers that can be scanned to quickly and accurately identify a product or item. There are different types of barcodes, but one of the most commonly used is the UPC-A barcode.
To generate a barcode, you will need a licensed barcode software. There are many online tools available that can help you generate barcodes for your products. These tools usually allow you to enter a description or item name, along with other metadata, and then generate a barcode that can be printed or saved as an image.
One popular software for generating barcodes is Microsoft Office. In programs like Word or PowerPoint, you can easily insert a barcode into a document. To do this, go to the “Insert” tab, and then click on the “Barcode” command. From here, you can choose from different barcode types and configure the properties of the barcode, such as its size and appearance.
Once the barcode is inserted into your document, you can move it to the desired location and resize it as needed. You can also add a description or other text next to the barcode to provide more information about the product or item. This can be helpful for consumers and shipping purposes.
It’s important to note that barcoding your items does not automatically track them. Barcodes are simply a way to uniquely identify a product or item. If you need to track your inventory and keep a record of when items are sold or shipped, you will need to use a separate inventory management system that is capable of scanning and recording barcode information.
By following these steps, you can create a barcode for your items and start using it to track and manage your inventory more efficiently. With a barcode in place, you can easily identify and locate your products, keep track of what has been sold or shipped, and ensure that your inventory is up to date.
How to Create a Barcode
In today’s digital age, barcodes have become an essential tool for businesses to efficiently track and manage their inventory. Whether you are selling items in a physical store or online, having a unique barcode can make the process much easier and more streamlined. In this guide, we will show you how to create a barcode for your products.
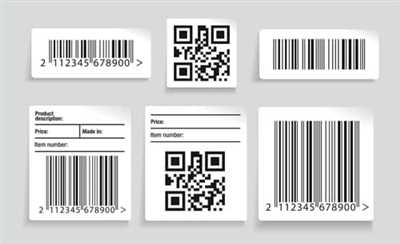
The first step in creating a barcode is to decide which barcode format you will use. The most common format is UPC-A, which appears as a series of black and white bars. This format is widely recognized and can be easily read by scanners. However, there are also other formats available, such as Code 128 and QR codes, depending on your specific needs.
Once you have decided on the format, you can generate the barcode using an online barcode generator or barcode software. There are many free options available that allow you to input the data you want to encode, such as the product’s description, item number, or metadata. The generator then configures this data into a barcode image that can be saved and printed.
If you are using Microsoft Office, such as Word or PowerPoint, you can easily insert a barcode into your document. Simply go to the “Insert” tab, click on “Barcode,” and select the type of barcode you want to use. You will be prompted to enter the data for the barcode, such as the item number or product description. Once entered, the barcode will be inserted into your document.
For businesses that sell items in a physical store, it is necessary to have the barcodes printed on labels or product packaging. This ensures that the barcode can be easily scanned at the point of sale. There are specialized barcode printers available that can print high-quality barcodes onto labels or stickers.
For businesses that sell items online, it is important to include the barcode in the product’s metadata. This allows consumers and shipping providers to easily track and identify the item. Many online platforms and marketplaces have built-in barcode functionality, which automatically assigns a unique barcode to each product listed.
Overall, barcoding is an essential tool for businesses to efficiently track and manage their inventory. By creating a barcode for each item, you can easily generate, insert, and print barcodes to label your products. This allows for accurate tracking, streamlined inventory management, and enhanced customer satisfaction.
| Sources: |
|---|
| – Online barcode generators or barcode software |
| – Microsoft Office (Word or PowerPoint) |
| – Specialized barcode printers |
| – Online platforms and marketplaces |
Create a Product and Generate a UPC-A Barcode
If you are a business owner, it is important to have a unique barcode for each of your products. By using a UPC-A barcode, you can efficiently track and manage your inventory, as well as provide accurate information to your customers.
To create a product and generate a UPC-A barcode, you will first need to gather the necessary data. This includes the product description, unique item number, and any other relevant metadata.
Once you have collected all the required information, you can create a new document in your office suite software, such as Microsoft Word or PowerPoint. In Word, you can do this by opening a blank document and selecting the “Insert” tab. From there, choose the “Barcode” command, which will allow you to insert a barcode into your document.
In PowerPoint, you can create a new slide and then select the “Insert” tab. From there, click on the “Barcode” command and choose the location where you want the barcode to appear in your presentation.
There are several online sources where you can find licensed barcode generators. These generators typically allow you to input your data and then generate the barcode. Make sure to specify that you want to create a UPC-A barcode as this is the most common type of barcode used for products.
Once you have generated the barcode, you can save the document or presentation. It is a good idea to save the document with a descriptive name that includes the product name or item number for easy reference.
Now that you have created a product and generated a UPC-A barcode, you can use this barcode to track and manage your inventory. When the product is sold or shipped, the barcode can be scanned to quickly retrieve all the necessary information about the item. This can save time and ensure accuracy in your business operations.
Remember, each product should have its own unique UPC-A barcode. By properly configuring your barcoding system and adhering to the necessary policies, you can efficiently manage your inventory and provide accurate information to your consumers.
Insert a barcode into an Office document

If you need to track items or inventory, adding barcodes to your Office documents can be a practical and efficient solution. Barcodes are unique identifiers that can be scanned to quickly retrieve information about a product or item. In this guide, we will show you how to insert a barcode into an Office document, such as Word or PowerPoint.
Step 1: Generate a barcode
- Start by generating a barcode for the item or product you want to track. There are online barcode generators available that allow you to create barcodes with different formats, such as UPC-A or Code 128.
- Once you have generated the barcode, save it in a format that can be inserted into your Office document, such as PNG or JPEG.
Step 2: Insert the barcode into your Office document
- In the Office document where you want to insert the barcode, go to the location where you want the barcode to appear.
- Open the Insert tab and click on the “Pictures” command to insert the barcode image into your document.
- Locate the saved barcode image and select it. The barcode will be inserted into your Office document.
Step 3: Configure the barcode
After the barcode is inserted into your Office document, you may need to configure it to meet your specific needs. For example, you can add a description or metadata to the barcode, such as the item’s name or location.
Additionally, if you are using barcodes for shipping or inventory purposes, you may need to link the barcode to a data source. This can be done by using the built-in barcode functionality in Office or by using a third-party barcode plugin or extension.
Once the barcode is configured, you can use it to track items, manage inventory, or provide a unique identifier for your products.
By incorporating barcodes into your Office documents, you can streamline your tracking processes and provide a more efficient system for managing items and products.
Track your inventory with barcodes
Barcodes are a powerful tool for tracking inventory and managing your products. By using barcodes, you can easily keep track of the items you have in stock, their location, and even their expiration date. This can greatly simplify the process of managing a large inventory, especially for businesses that sell a wide range of products.
To track your inventory with barcodes, you will first need to generate a unique barcode for each item. There are many online resources and software available that can help you create barcodes, such as barcode generators or barcode templates in word or powerpoint. Simply enter the description or metadata of the item, and the software will generate a barcode that can be printed and attached to the item.
Once you have generated the barcodes for your items, you can then insert them into your documents or online listings. For example, if you are selling jars of honey, you can insert the barcode into your product listing, so that when a customer purchases the item, the barcode can be scanned during the shipping process. This allows you to easily track the shipping status and location of the item.
When a barcode is scanned, the barcode reader reads the barcode and converts it into data. This data is then used to identify the item and retrieve its associated information, such as the item’s description, location, and any other relevant data. This data can be saved in a central database, allowing you to easily search and retrieve information about your inventory.
By using barcodes to track your inventory, you can save time and effort, as well as reduce errors and improve accuracy. Barcodes provide a quick and efficient way to record and update information about your products, making it easier to manage your inventory and ensure that you have the right products in stock at all times.
| Barcode Type | UPC-A |
|---|---|
| Description | A licensed, fixed-length barcode format used to identify products for sale in North America |
| How to generate | Use a barcode generator or template to create the barcode and then insert it into your document |
| How to insert | If using Microsoft Office, go to the “Insert” tab and click on “Barcode” in the “Illustrations” group. You will be prompted to select the type of barcode you want to insert, and then you can configure the barcode using the options provided. |
Sources

If you’re wondering how to create a barcode, there are a few different methods you can use. One option is to use a command line tool to generate barcodes. There are many open-source and licensed programs available that can generate barcodes using a variety of formats, such as UPC-A or QR codes. These tools typically take data you provide and transform it into a unique barcode image.
Another option is to use a dedicated barcode generator, either online or as a standalone software. These tools often have user-friendly interfaces where you can input the necessary data and generate barcodes without using any command lines.
If you have Microsoft Office, you can also generate barcodes using Word or PowerPoint. Both applications have built-in features that allow you to insert barcodes into your documents. This can be useful for labeling items in an inventory or adding barcodes to shipping documents for tracking purposes.
There are also barcode generator libraries available for programming languages such as Java or Python. These libraries can be used to integrate barcode generation into your own software or applications, giving you more control over the barcode generation process.
When creating barcodes, it’s important to consider the format and metadata you include. The barcode itself should contain the necessary information for consumers or systems to identify the product or item. Additionally, you may want to include additional metadata, such as a description or location, to further track and manage your inventory.
Remember that the appearance of the barcode can be configured to meet your needs. You can choose the size, color, and placement of the barcode to ensure it fits seamlessly into your documents or packaging.


