

Have you ever wondered how to make a lampshade? It’s easier than you might think! In this step-by-step guide, we will show you how to create your own unique lampshade. Whether you want to update an old lamp or make a completely new one, this tutorial will provide you with all the information you need.
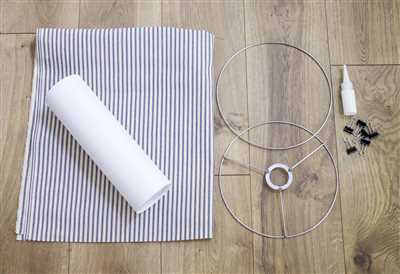
To make a lampshade, you will need a few basic materials: fabric, laminate paper, glue, markers, scissors, and a lampshade making kit. You can find these supplies at your local craft store or order them online. Once you have everything you need, you can start the process.
The first step is to measure the height and circumference of your lampshade frame. This will determine the size of the fabric you need. Cut the fabric to the appropriate size, leaving an extra 2 inches on each side for seams. Press down the edges of the fabric and fold them over, gluing them down to create a clean finish. Make sure to measure and cut a strip of fabric to cover the top and bottom edges of the lampshade frame.
- Step 2 – Laminate your fabric to your lampshade paper
- Materials you will need:
- Dip-Dye Lampshade
- Making a Miniature Lampshade by Pat Carlson
- Materials Needed:
- Step 1: Cut out the Pattern
- Step 2: Fold and Glue
- Step 3: Apply Decorative Laminate or Fabric
- Step 4: Add Color
- Step 5: Finish the Lampshade
- Video:
- How To make Lampshades using Lampshade Stitch
Step 2 – Laminate your fabric to your lampshade paper
After you have chosen the color and pattern for your lampshade, it’s time to laminate the fabric to your lampshade paper. This process will ensure that your fabric stays in place and gives a finished look to your lampshade.
Materials you will need:
- Lampshade paper
- Fabric of your choice
- Glue
- Scissors
Follow these steps to laminate your fabric to your lampshade paper:
| Step 1: Lay your lampshade paper on a flat surface. Make sure to place it with the back side facing up. | Step 2: Roll out your fabric and place it on top of the lampshade paper. Make sure to align the edges and remove any wrinkles or folds. | Step 3: Apply glue to the back side of the lampshade paper, covering the entire surface. Be sure to press down firmly to ensure the fabric sticks. |
| Step 4: Gently fold the fabric over the edges of the lampshade paper, overlapping it slightly. Press down firmly to secure the fabric in place. | Step 5: Trim any excess fabric along the bottom and top edges of the lampshade. Make sure to leave a small seam allowance for folding. | Step 6: If you want to add any additional decorations or designs, such as decoupage or dip-dye, now is the time to do it. Be creative and make sure to let your personal style shine through! |
| Step 7: Allow the glue to dry completely. This may take a few hours, so be patient. | Step 8: Once the glue is dry, carefully flip your lampshade over and test the strength of the fabric. Gently press and pat the fabric to make sure it is securely attached. | Step 9: Trim any excess fabric that may be sticking out from the edges of the lampshade. |
By following these steps, you can laminate your fabric to your lampshade paper, creating a beautiful and personalized lampshade. Remember to always ask for permission to use someone else’s artwork or patterns, and have fun making your own unique lampshade!
Dip-Dye Lampshade
If you want to add a pop of color to your lampshade, why not try dip-dyeing it? This easy and fun technique will give your lampshade a unique and trendy look. Here’s how you can do it:
1. Start by gathering all the materials you’ll need. You’ll need a lampshade, fabric dye in the color of your choice, water, and a container to mix the dye in.
2. Remove the lampshade from the lamp and gently unfold it. Lay it flat on a protected surface, like a plastic tablecloth or a garbage bag, to catch any drips.
3. Mix the fabric dye with water according to the package instructions. Make sure to use gloves to protect your hands and follow the manufacturer’s safety guidelines.
4. Dip the bottom edge of the lampshade into the dye mixture. Hold it in the dye for a few seconds, then slowly pull it out. Pat the excess dye off using a clean cloth or paper towel.
5. If you want to create a gradual color change, you can dip the lampshade higher up in the dye mixture and leave it for a longer time. Experiment with different dipping depths and times to achieve the desired effect.
6. Once you’re happy with the color, lay the lampshade flat to dry. Make sure to place a paper towel or a cloth underneath to catch any drips.
7. After the lampshade has dried, you can add some embellishments to it. Use decoupage tool or fabric markers to create patterns or designs. You can also glue on trimmings or lace for a more romantic look.
8. Now, it’s time to put the lampshade back on the lamp. Carefully roll the lampshade back into its original shape, starting from one side. Make sure to align the seams and folds properly.
9. Use a small amount of glue or double-sided tape to secure the bottom edge of the lampshade. This will keep it in place and prevent it from unfolding.
10. Finally, plug in your lamp and turn it on to see the finished dip-dye lampshade in action. Enjoy the soft and colorful glow it adds to your space!
Remember, when making any adjustments to your lampshade, ensure you have the right tools and always follow safety guidelines. If you’re unsure about any step, be sure to consult with a professional or do more research to make sure you’re doing it correctly.
By Rachel Carlson-Smith
CDHM “How To” with Permission
Making a Miniature Lampshade by Pat Carlson
This tutorial is made with the permission of Rachel Carlson (CDHM) by Pat Smith
If you’re looking to add a unique touch to your miniature lamp, making your own lampshade is a great way to do it. You can customize the color, pattern, and style to match your decor perfectly.
Materials Needed:
| – | Miniature Lampshade Pattern |
| – | Cardstock or Paper |
| – | Decorative Laminate or Fabric |
| – | Decoupage Glue |
| – | Scissors |
| – | Glue Stick |
| – | Markers or Dip-Dye |
| – | Water |
| – | Gluing Tool |
Step 1: Cut out the Pattern
Using the Miniature Lampshade Pattern as a guide, trace and cut out the shape on the cardstock or paper. Make sure to remove any excess paper and keep the edges clean.
Step 2: Fold and Glue
Fold the cut-out pattern along the indicated lines, ensuring the seam is on the bottom. Use a glue stick to secure the edges in place, creating a cylindrical shape.
Step 3: Apply Decorative Laminate or Fabric
If you’re using decorative laminate, carefully roll it around the cylindrical shape, overlapping the edges slightly. Glue it down gently using the glue stick. If you’re using fabric, cut it to size and apply decoupage glue to the inside of the lampshade. Press the fabric onto the glue, smoothing out any wrinkles.
Step 4: Add Color
If desired, you can use markers or dip-dye to add color to your lampshade. Test the markers on a small piece of paper before applying them to the lampshade. For dip-dye, dilute the desired color in water and dip the lampshade, allowing the color to seep in. Let it dry completely before moving on to the next step.
Step 5: Finish the Lampshade
When the lampshade is completely dry, remove any excess glue and trim any uneven edges. Use a gluing tool to create a small hole at the top of the lampshade for the bulb’s attachment point. Be careful not to tear the paper. Your miniature lampshade is now ready to be placed onto your miniature lamp!
Remember, this tutorial is written by Pat Smith and made with the permission of Rachel Carlson (CDHM). Do not copy or distribute without permission.


