

If you are using a Mac, there is an automatic feature that allows you to save your slide show. You can simply press the “Save Slide Show” button and your slide show will be saved on your computer. This feature is very convenient and time-saving. In just a few clicks, you can have your slide show saved and ready to be shared with your friends and family.
When you save a slide show, it will create a folder that contains all the necessary files, such as the images, audio, and any video files that you have included in your project. You can find this folder easily on your Mac, in the “Pictures” section. Within this folder, you will find a folder with the name of your slide show, and within that folder, you will find the individual slides of your slide show, displayed as image files.
In order to save the slide show as a video, you can click on the “Export” button and select the “Save as Video” option. This will create a video file of your slide show, which you can then share with others or upload to platforms such as YouTube. The output options for the video file include the format, resolution, and quality of the video.
If you want to save the slide show for specific purposes, such as sharing it on social media or using it as a screensaver, you can click on the “Save as Screensaver” button. This will save the slide show as a screensaver file, which you can then load onto your computer or iPhone. This allows you to have your favorite photos or memories on display whenever your device is idle.
When you save a slide show, it is important to name it properly so that you can easily find it later. You can add a name to your slide show by clicking on the “Add Name” button and typing in the desired name. It is also recommended to add a description to the slide show, so that you can remember what it contains or what it is about. This description can be displayed when you open the slide show or share it with others.
- PowerPoint How to Add Audio to PowerPoint on Windows 10 and Mac
- Adding Audio in PowerPoint for Windows 10
- Adding Audio in PowerPoint for Mac
- Export PowerPoint Slide as Image
- Option 1: Save slide as an image within PowerPoint
- Option 2: Export slide as an image for automatic slideshow
- Option 3: Export slide as an image with audio and video included
- Sharing Slideshows and Screensavers
- Part 3 How to Save Slideshow on iPhone
- Option 1: Save as a Video
- Option 2: Save as Photos
- Option 3: Share with Friends and Family
- Slide show
- Video:
- iPhone 14’s/14 Pro Max: How to Create A Slide Show And Save It As A Video
PowerPoint How to Add Audio to PowerPoint on Windows 10 and Mac
If you want to enhance your PowerPoint presentation with audio, you can easily add audio files to your slides. Whether you’re using Windows 10 or a Mac, PowerPoint offers various options for incorporating audio into your slideshows.
Adding Audio in PowerPoint for Windows 10
To add audio to your PowerPoint presentation on Windows 10, follow these steps:
- Select the slide where you want to add audio.
- Click on the “Insert” tab in the top menu.
- Click on the “Audio” button in the “Media” group.
- A drop-down menu will appear with three options: “Online Audio,” “Audio on My PC,” and “Record Audio.” Choose the desired option.
- If you select “Audio on My PC,” browse your computer to find the audio file you want to add and click “Insert.”
- If you choose “Record Audio,” a pop-up window will appear, allowing you to record audio directly within PowerPoint.
- Once the audio file is added, you can click on it to access additional options, such as setting the playback volume, choosing a start time, or adding fade effects.
- To preview the audio, select the audio icon on the slide and press the “Play” button from the media playback controls.
Adding Audio in PowerPoint for Mac
If you’re using a Mac to create your PowerPoint presentation, here’s how you can add audio:
- Open your PowerPoint presentation on Mac.
- Select the slide where you want to add audio.
- Click on the “Insert” tab in the top menu.
- Click on the “Audio” button and choose the source of your audio: “Audio on My Mac” or “Record Audio.”
- If you select “Audio on My Mac,” browse your computer to find the audio file and click “Insert.”
- If you choose “Record Audio,” a small recording window will appear, allowing you to record audio using your Mac’s microphone.
- After adding the audio file, you can adjust the playback options like starting automatically, looping, or hiding the audio icon.
- To test the audio, select the audio icon on the slide and click the “Play” button from the options that appear.
By following these steps, you can easily add audio to your PowerPoint presentation on both Windows 10 and Mac. Whether you want to include background music, narration, or sound effects, audio can greatly enhance the overall impact of your slideshow. So, feel free to get creative and make your presentations more engaging for your audience, whether it’s for work, school, or personal projects.
Export PowerPoint Slide as Image
If you have a PowerPoint slide that you would like to save as an image, there are several options you can choose from. Please note that the steps may vary depending on whether you are using a Mac or a Windows computer. In this article, we will provide you with general instructions on how to export your PowerPoint slide as an image.
Option 1: Save slide as an image within PowerPoint
To save a slide as an image within PowerPoint, follow these steps:
- Open your PowerPoint project and navigate to the slide you want to save as an image.
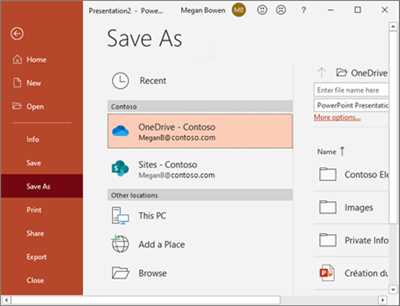
- Click on the “File” tab and select “Save As”.
- In the “Save As” dialog box, choose a location to save the image on your computer.
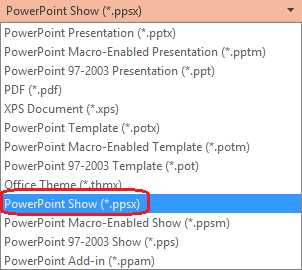
- In the “Save As Type” dropdown menu, select the image file format you wish to save the slide as, such as JPEG or PNG.
- Click the “Save” button to complete the process.
By following these steps, the selected slide will be saved as an image file on your computer.
Option 2: Export slide as an image for automatic slideshow
If you wish to export a slide as an image for an automatic slideshow, you can use the following steps:
- Open your PowerPoint project and go to the slide you want to export as an image.
- Click on the “File” tab and select “Save As”.
- In the “Save As” dialog box, choose a location to save the image on your computer.
- In the “Save As Type” dropdown menu, select the image file format you want to save the slide as.
- Check the “Save every slide” checkbox to export all slides as images.
- Click the “Save” button to complete the process.
By following these steps, all slides within the PowerPoint file will be saved as separate image files, which can be used for screensavers, shared with friends and family, or used for other purposes.
Option 3: Export slide as an image with audio and video included
If you want to export a slide as an image while including any audio or video files within the slide, you can use the following steps:
- Open your PowerPoint project and navigate to the slide you want to export.
- Click on the “File” tab and select “Save As”.
- In the “Save As” dialog box, choose a location to save the image on your computer.
- In the “Save As Type” dropdown menu, select the image file format you wish to save the slide as.
- Check the “Embed fonts in the file” checkbox to include any fonts used in the slide.
- Check the “Include your slide timings and narrations” checkbox to include any audio or video files.
- Click the “Save” button to complete the process.
By following these steps, the selected slide will be saved as an image file with any audio or video files included. This can be useful if you want to share your slideshow with others.
In conclusion, PowerPoint provides several options to export your slides as images. You can save a single slide as an image within PowerPoint, export all slides as separate images for an automatic slideshow, or export slides as images while including audio and video files. Choose the option that best suits your needs and enjoy sharing your PowerPoint presentations in image format!
Sharing Slideshows and Screensavers
If you want to share your slideshow with others, there are several options available to you. By default, PowerPoint creates output files that can be easily shared and displayed on both Mac and Windows computers.
To save your slideshow, click on the “File” menu and then select “Save As.” Choose a location on your computer where you want to save the slideshow. You can also choose to save it on external storage devices such as USB drives or DVDs.
If you want to share your slideshow with friends and family who don’t have PowerPoint, you can export it as a video file. In the “File” menu, click on “Export” and then select “Create a Video.” Choose the desired video quality and click on the “Create Video” button.
If you want to share your slideshow on your iPhone or iPad, you can save it as an image and then load it onto your device. To do this, click on the “File” menu, select “Save As,” and then choose the “JPEG” or “PNG” image format.
In order to share your slideshow as a screensaver, you will need to find the location of the slideshow files. On Mac, you can generally find the slideshow files within the “Pictures” folder. On Windows, the files are typically located within the “My Pictures” folder.
To set your slideshow as a screensaver on Mac, you can open the “Desktop & Screen Saver” settings within “System Preferences.” Click on the “+” button, select “Add Folder of Pictures,” and then navigate to the folder containing your slideshow files.
On Windows, right-click on your desktop and select “Personalize.” Click on “Screen Saver” and then choose “Photos” or “Slideshow” as the screensaver type. Click on the “Settings” button and then browse for the folder containing your slideshow files.
Once you have selected the folder, you can customize the screensaver settings, such as the slide duration and transition effects. Click on the “Apply” or “OK” button to complete the process.
With these options, you can easily share your slideshow with friends and family, whether they have PowerPoint or not. You can also create screensavers to automatically display your slideshow when your computer is idle.
Part 3 How to Save Slideshow on iPhone
If you have created a slideshow on your iPhone and want to save it, here are some options:
Option 1: Save as a Video
If you want to save your slides as a video, you can do so by following these steps:
- Open the slideshow project on your iPhone.
- Click on the “…” button to open the menu options.
- Select the “Save as Video” option.
- Choose the desired settings for your video, such as resolution and frame rate.
- Press the “Export” button to save the slideshow as a video.
Option 2: Save as Photos
If you wish to save each slide as individual photos, you can follow these steps:
- Open the slideshow project on your iPhone.
- Click on the “…” button to open the menu options.
- Select the “Save as Photos” option.
- Choose the images you want to save and click on the “Save” button.
If you want to save all slides, select the “Save All” option. If you only want to save specific slides, select the “Save Selected” option and choose the slides you wish to save.
Option 3: Share with Friends and Family
If you want to share your slideshow with friends and family, you can do so by following these steps:
- Open the slideshow project on your iPhone.
- Click on the “…” button to open the menu options.
- Select the “Share” option.
- Choose the method of sharing that you prefer, such as email or messaging.
- Complete the sharing process by following the on-screen prompts.
These are some of the options available to save your slideshow on an iPhone. Choose the one that best suits your needs and preferences.
Slide show
A slide show is a complete presentation or display of images, photos, or slides in a specific order. It is a popular feature in programs like Microsoft PowerPoint and Keynote. Slide shows can be used for various purposes, such as creating presentations for work or school projects, sharing photos with family and friends, or even creating screensavers for your computer.
To create a slide show, you’ll need to add your desired images or slides to the presentation software. For example, in PowerPoint, you can click on the “Insert” tab and then select “Pictures” to add your photos. Once you have added the slides, you can arrange them in the order you wish them to be displayed.
In addition to displaying images, slide shows can include other media elements such as audio or video. For example, you can add background music to your slide show or even include a video clip within certain slides. To add audio or video, you can use the “Insert” tab and select the appropriate options.
Once your slide show is complete, you can save it to your computer or other storage devices. Most presentation software will have an “Export” or “Save” option that allows you to save the slide show as a file. The file can then be shared with others, loaded onto different devices, or used for various purposes.
For example, on a Mac, you can click “File” and then “Save” or “Export”. On Windows, you can click the “File” tab, select “Save As”, and choose the desired file format. Some presentation software may also have specific options for saving as a video or creating an automatic slide show.
If you want to share your slide show with others, you can send them the file or display it on a compatible device. For example, you can open the slide show on a computer, projector, or even an iPhone. The slides will be displayed sequentially, allowing viewers to follow along with your presentation.
In general, slide shows are a versatile tool that can be used for various purposes. Whether you need to create a professional presentation or simply share your family photos, slide shows offer a visually appealing and engaging way to present your content. Please note that different presentation software may have unique features and options, so it’s important to explore and familiarize yourself with the specific tools available.


