

Adding a signature to your digital documents is a crucial step that adds a personal touch and authenticity to your files. With the advancements in technology, you no longer need to print, sign, and scan documents. Instead, you can easily create and insert your signature directly on your Mac computer.
There are several ways to add a signature on your Mac, depending on your preferences and the software you are using. One way is to use the built-in Preview app, which allows you to sign PDFs and other documents using your trackpad or the camera on your Mac. Another way is to use third-party applications like Adobe Acrobat or Pages.
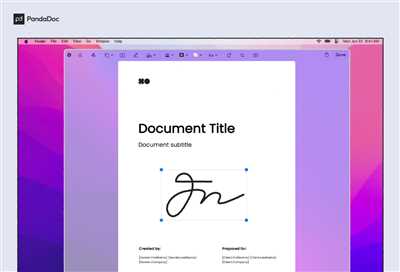
If you choose to use the Preview app, the process is straightforward. First, open the document you want to sign in Preview. Then, click on the “Markup Toolbar” icon, which looks like a pencil. From the toolbar, click on the “Signature” button, and select “Create Signature” or “Camera.”
If you choose “Create Signature,” you can sign using your trackpad or by holding up a piece of paper with your signature on it to the camera. If you choose “Camera,” you can sign your name on a white piece of paper and hold it up to the camera. After capturing your signature, you can adjust the size and position as needed.
Once you have your signature in the desired format, you can simply click on the document where you want to insert it. You can also add additional information like your name, date, or any other details. If you would like to add a signature line for others to sign, you can create a line using the “Line” tool in the Markup Toolbar.
In addition to the Preview app, there are other software and online tools available that allow you to create digital signatures on your Mac. Some popular options include Adobe Acrobat, Pages, and even some email clients like Apple Mail. These tools offer more formatting options and support for a variety of file formats, making them ideal for professional use.
No matter which method you choose, adding a signature to your documents on your Mac is a simple and efficient process. It not only saves time and paper but also gives your documents a professional touch. Whether you are signing a contract, sending an invoice, or just adding a personal touch to a message, learning how to add a signature on your Mac is a valuable skill that will come in handy since the digital era has made electronic signatures a default option.
So, next time you need to sign a document, don’t fret over finding a printer, paper, and a pen. Instead, follow these easy steps to create, insert, and track your electronic signature on your Mac.
How to add a signature to a PDF on Mac Preview
If you need to add a signature to a PDF document on your Mac using the Preview app, there are a few simple steps you can follow. Whether you want to insert an electronic signature into a document or create a digital signature from your written signature, Preview provides an easy-to-use tool for adding signatures.
1. Using your Mac’s Trackpad
- Open the PDF document you want to sign in Preview.
- Click on the “Markup Toolbar” icon at the top of the Preview window (it looks like a toolbox).
- From the toolbar, click on the “Signature” button, then choose “Create Signature.”
- A small window will appear, showing a white box with a camera icon inside. If you have a trackpad, you can draw your signature using your finger on the trackpad. If you don’t have a trackpad, you can use the camera on your Mac to capture your signature on a white piece of paper.
- Click “Done” when you are finished creating your signature. It will be saved for future use.
- To add your signature to the PDF document, click on the “Signature” button from the toolbar again, then choose your signature from the dropdown menu.
- Click on the location in the PDF where you want to insert your signature. You can resize and reposition the signature as needed.
- When you’re done, save the document.
2. Using your iPhone/iPad
- Open the PDF document on your iPhone/iPad using the Preview app.
- Tap on the “Markup” icon in the top-right corner of the screen (it looks like a pencil tip inside a circle).
- Tap on the “+” button in the bottom-right corner of the screen, then select “Signature.”
- A popup will appear, giving you the option to create a signature using your finger or Apple Pencil, or to insert a signature from a document.
- Choose the method you prefer and follow the on-screen instructions to add your signature.
- Once your signature is added, you can resize and reposition it on the PDF document.
- When you’re finished, tap “Done” and save the document.
Adding a signature to a PDF document on Mac Preview is a quick and straightforward process. Whether you prefer to use your Mac’s trackpad or your iPhone/iPad, there are multiple ways to create and insert your signature. With the variety of signature options available, you can easily add a professional touch to your documents without the need for printing and scanning.
Create an email signature
If you want to add a personal touch to your email messages, you can create a customized email signature. An email signature is a block of text that is automatically added to the end of your email. It can include your name, contact information, company logo, or even a photo.
There are several ways to create an email signature on a Mac. Here are 3 different methods you can choose from:
1. Using the Mail app on your Mac
If you only want to add a basic email signature, you can do it directly in the Mail app. Here’s how:
– Open the Mail app on your Mac.
– Go to the “Mail” menu and choose “Preferences”.
– Click on the “Signatures” tab.
– In the left panel, select the email account for which you want to add a signature.
– On the right panel, click the “+” button to add a new signature.
– Type your desired signature in the text box.
– Optionally, you can format the signature by changing the font, size, or adding extra formatting such as bold or italics.
– If you want to add an image, such as your company logo or a photo, you can drag and drop it into the signature field.
– Once you’re done, close the Preferences window. Your signature will be automatically added to new email messages.
2. Using the Preview app on your Mac
If you prefer to use a standalone application to create your email signature, you can use the Preview app that comes pre-installed on your Mac. Here’s how:
– Open the document or image that you want to use as your signature in the Preview app.
– Go to the “Tools” menu and choose “Annotate” > “Signature” > “Manage Signatures”.
– A new window will appear where you can add, remove, or edit signatures.
– Click the “+” button to add a new signature.
– If you have a camera on your Mac or an iPhone/iPad that is signed in to the same Apple ID, you can create a signature using your finger or a pen on a piece of paper, and then capture it with the camera. Alternatively, you can choose to type your signature using the keyboard.
– Once your signature is created or inserted, click the “Done” button.
– Your signature will now be available to insert into documents, including your email messages.
3. Using a PDF or image file as your email signature
If you already have a signature in a PDF or image format, you can simply insert it into your email messages. Here’s how:
– Open the document or image file that contains your signature.
– Select the signature by clicking and dragging the cursor around it.
– Copy the signature to the clipboard by pressing “Command” + “C”.
– Open the email message in which you want to add the signature.
– Click on the place where you want to insert the signature.
– Paste the signature from the clipboard by pressing “Command” + “V”.
– You may need to resize or reposition the signature to fit in the email message.
– Finally, send the email with the inserted signature to the recipient.
By using one of these methods, you can easily create an electronic or digital signature that will add a personal and professional touch to your email messages.
Apple Pages
If you’re using a Mac, there are a few different ways you can add a signature to a document in Apple Pages. Here are three methods to choose from:
1. Using your Trackpad or Camera:
If you have a Mac with a trackpad or a computer with a built-in camera, you can easily add your signature directly on the document. Here’s how:
- Open the document in Apple Pages.
- Click on the location where you want to add your signature.
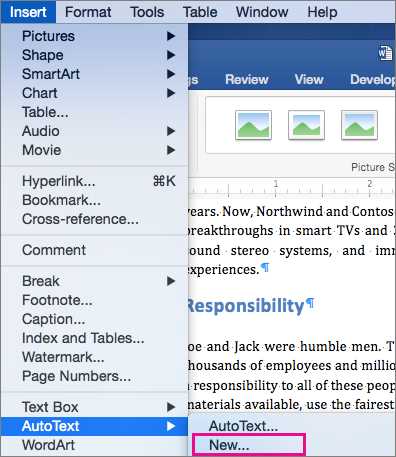
- From the menu bar, select “Insert” and then “Signature”.
- In the pop-up menu that appears, choose either “Trackpad” or “Camera” as the source for your signature.
- If you choose “Trackpad”, simply use your finger or a stylus to draw your signature on the trackpad. If you choose “Camera”, hold your signature on a sheet of paper up to your computer’s camera and click “Done” once the signature is captured.
2. Using an Image of your Signature:
If you already have a digital image file of your signature, you can easily insert it into your document in Apple Pages. Here’s how:
- Open the document in Apple Pages.
- Click on the location where you want to add your signature.
- From the menu bar, select “Insert” and then “Image”.
- Choose the image file of your signature from your computer or external drive.
- Click “Insert” to add the image of your signature to the document.
3. Using the Default Signature:
If you don’t have a signature ready and want to quickly add one, Apple Pages offers a default electronic signature. Here’s how:
- Open the document in Apple Pages.
- Click on the location where you want to add your signature.
- From the menu bar, select “Insert” and then “Signature”.
- Choose the default signature option from the pop-up menu.
- The default signature will be added to your document.
Remember, there are a variety of ways to add a signature in Apple Pages. Choose the method that works best for you and your desired formatting. Whether it’s using your trackpad, camera, or inserting an image of your signature, Apple Pages makes it easy to sign your documents on a Mac.
There are a variety of ways to create a signature
When it comes to adding a signature to your documents or email messages on a Mac, there are several options available. Whether you prefer a digital signature, an electronic signature, or even a handwritten signature, you can easily create one to add a personal touch to your messages.
Here are three ways to add a signature on a Mac:
| 1. Using Preview If you want to create a signature using your trackpad or the camera on your Mac, you can do it directly in the Preview app. Here’s how:
| 2. Using an image of your signature If you have a digital image of your signature that you want to use, you can easily insert it into a document or email message. Here’s how:
| 3. Using an e-signature service If you don’t want to go through the process of creating a signature yourself, you can use an e-signature service like Adobe Sign or DocuSign. These services allow you to sign documents digitally and securely. All you need to do is upload your document and choose the type of signature you want to use. |
Whichever method you choose, adding a signature on a Mac is a simple and quick process. Whether you need to sign a PDF, an email message, or any other document, there’s an option that will suit your needs. So go ahead and add that extra touch of professionalism to your messages!
1 Trackpad
If you want to add your signature to electronic documents on your Mac, you can do so using the trackpad. Here’s how:
1. Open the document or PDF that you want to add your signature to.
2. Click on the place within the document where you want to insert your signature.
3. A pop-up window will appear. Click on the “Trackpad” option.
4. Put your finger on the trackpad and sign your name. Make sure to sign within the line provided.
5. When you’re done, click on “Done” to create your e-signature.
6. Your signature will now appear in the document. You can preview it and make any necessary formatting changes if you want.
Using the trackpad is a quick and easy way to add your signature to documents on your Mac. It’s especially convenient if you don’t have access to a printer or if you prefer to keep everything in a digital format. Plus, you can use this method on both your Mac and iPad since Apple devices provide a variety of ways to sign documents.
2 Camera
Another way to add a signature on a Mac is by using the built-in camera. This method allows you to create a signature using a pen and paper or even your finger. Here’s how you can do it:
- Open the document or image that you want to sign.
- Click on the “Edit” button, then select “Insert Signature”.
- Choose the “Camera” option from the dropdown menu.
- A preview of your camera will appear on the screen. Position the paper or your finger on the trackpad within the guidelines.
- Click and hold the trackpad to start capturing your signature. Make sure to sign as you would on paper.
- Release the trackpad to save your signature.
- You can now resize, move, or clear your signature if needed.
- Click “Done” to add the signature to your document or image.
This method is especially useful if you don’t have access to an electronic version of the document or if you prefer a hand-drawn signature. It’s a quick and easy way to add a personal touch to your digital files.
3 iPhone/iPad
If you want to add a signature to your documents on your iPhone or iPad, there are a few ways you can do it. Here are three methods you can use:
- Using Apple’s built-in Markup feature:
- Open the document you want to sign in the default Mail app or any other app that supports Markup.
- Tap on the Markup icon, which looks like a pencil
- Tap on the plus sign (+) and then select “Signature”.
- Choose the option to create a signature using your finger or Apple Pencil.
- Sign your name on the screen
- Once you’re done, tap “Done” to save your signature and insert it into the document.
- Using a scanned signature:
- Open the document you want to sign in the default Mail app or any other app that supports Markup.
- Tap on the Markup icon, which looks like a pencil
- Tap on the plus sign (+) and then select “Signature”.
- Choose the option to insert a saved image of your signature.
- Locate the image of your signature in your photo library or any other location where it’s saved.
- Select the image and it will be inserted into the document.
- Using a third-party app:
- Download and install a third-party app for adding signatures to documents, such as Adobe Acrobat Reader or PDF Expert.
- Open the app and import the document you want to sign.
- Follow the app’s instructions to create or import your signature.
- Select the signature and place it in the document.
- Once you’re done, save the document with the added signature.
The easiest way to add a signature to a document on your iPhone or iPad is by using Apple’s built-in Markup feature. This feature allows you to draw your signature directly onto the document using your finger or Apple Pencil.
Here’s how to do it:
If you have a scanned image of your signature saved on your iPhone or iPad, you can easily insert it into your documents.
Here’s how to do it:
If you want more advanced features and options for adding signatures to your documents, you can use a third-party app from the App Store. There are many apps available that offer a variety of tools for creating and inserting digital signatures.
Here’s how to do it:
With these three methods, you can easily add a signature to your documents on your iPhone or iPad. Whether you choose to draw your signature with your finger, insert a scanned image of your signature, or use a third-party app, the process is simple and can be done in just a few steps.
Adding a signature to your message
When creating an email, it is important to include a signature at the bottom of the message. This signature typically includes your name, contact information, and any other necessary details. Adding a signature can give your email a more professional and polished look.
On a Mac, there are several ways to add a signature to your messages. Here are three simple methods you can try:
- Using the default email application:
- Open the email application on your Mac.
- Click on “Preferences” in the menu bar.
- Select the “Signatures” tab.
- Click on the “+” button to create a new signature.
- Type the necessary information into the signature field.
- Click “OK” to save your signature.
- Using the Preview application:
- Open the document or email you want to insert the signature into in the Preview application.
- Click on the “Markup” button in the toolbar.
- Click on the “Signature” icon in the toolbar.
- If you haven’t already created a signature, select “Create Signature”. If you have a signature saved, choose “Choose Signature”.
- Use your trackpad or camera to create a digital signature or insert a pre-made signature.
- Click “Done” when you’re finished.
- Using a third-party application:
- Open the third-party application on your Mac.
- Create or import the signature you want to use.
- Copy the signature.
- Go back to your email application and paste the signature into the “Signature” field.
Regardless of the method you choose, make sure your signature is clear, professional-looking, and properly formatted. You can also choose to add extra formatting, such as a line or photo, to make your signature stand out.
By learning how to add a signature to your messages, you can easily include important information and add a personal touch to your emails. Whether you’re using a Mac, iPad, iPhone, or another device, the process is simple and can be done in just a few steps.


