

If you send a lot of emails and want to add a personal touch to your messages, setting up an email signature in Microsoft Outlook can be a great way to do it. A signature is a block of text that appears at the bottom of every email you send, containing your name, contact information, and any other details you choose to include. Not only does it look professional, but it also saves you time since you don’t have to manually add the same information to each email.
Outlook 365 provides a variety of benefits when it comes to creating and editing your email signatures. You can choose from a selection of pre-designed signature templates and customize them to fit your style and brand. Whether you’re a marketing professional looking to show off your company’s logo and slogan, or you simply want a clean and minimal signature that includes only your name and contact information, Microsoft Outlook has a tool for you.
It’s important to note that changing your signature in Outlook will not affect any messages you’ve sent in the past. Only new messages will include the updated signature. If you want to apply a new signature to old messages, you’ll need to manually edit them.
If you’re working with Outlook for Windows, follow these steps to create or edit your signature:
- Open Outlook and click on the “File” tab on the top-left corner of the window.
- In the menu that opens, click on “Options” at the bottom.
- A new window will open. In the left-hand menu, click on “Mail”.
- In the “Compose messages” section, click on the “Signatures” button.
- A “Signatures and Stationery” window will open. Here, you can manage your signatures.
- To add a new signature, click on the “New” button and give it a name.
- In the “Edit signature” section, you can type or paste the text you want to include in your signature. You can also format the text using the toolbar options.
- When you’re done, click “OK” to close the signature window.
- Back in the “Signatures and Stationery” window, you can assign the signature to a specific email account or set it as the default for new messages.
- Click “OK” to close the window and save your changes.
If you’re using Outlook.com or Outlook for Mac, the steps may be slightly different. However, the main idea remains the same. Look for the “Settings” or “Preferences” option in your Outlook menu, and navigate to the “Signatures” section to create or update your signature.
Having a professional email signature can make a big difference in how you and your messages are perceived. Take the time to choose a design that reflects your personality and brand, and follow the steps above to create or update your Outlook signature. Whether you’re sending emails for personal or business reasons, a well-crafted signature adds a touch of credibility and professionalism to every message you send.
- Legacy Microsoft Outlook 2007 Working with Signatures
- Create a New Signature
- Edit an Existing Signature
- Delete a Signature
- What are the benefits of Outlook signatures 🤔
- It’s professional 👩⚖️
- For Windows users using Outlook 2007, 365, or Outlook.com 🖥️
- For Mac users using Outlook for Mac 🔧
- It’s personal 👤
- It’s a great marketing tool 🔧
- How to Add or Change Your Email Signature in Microsoft Outlook
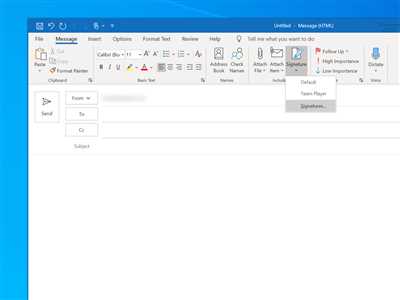
- Open a new email message
- Click Signature along the top menu bar
- Click New
- Name your new signature
- Design your signature
- Assign your new signature to an email address
- Close the email you opened to start using your signature
- How to automatically add signatures to Outlook
- How to edit a signature in Outlook
- Change email signature in Outlook for Windows
- Update signature in Outlook for Mac
- Changing your signature in Outlook 365
- Video:
- How to Add Your Signature Automatically To All Outlook Emails
Legacy Microsoft Outlook 2007 Working with Signatures
If you’re using Microsoft Outlook 2007, you’ll need to manually create and manage your email signatures. While newer versions of Outlook, like Outlook 365, have made it easier to add and edit signatures, Outlook 2007 requires a few more steps to get the job done. In this section, we’ll show you how to create, edit, and assign signatures in Outlook 2007.
Create a New Signature
- Open Outlook 2007 and click on the “Tools” menu at the top of the window.
- In the dropdown menu, select “Options”.
- A new window will open. In this window, click on the “Mail Format” tab.
- Within the “Mail Format” tab, click on the “Signatures” button.
- A new window will appear, showing a list of signatures. To create a new signature, click on the “New” button.
- Give your signature a name. This name will help you identify the signature later on, so make it something descriptive.
- In the “Edit Signature” section, you can enter the text you want to appear in your signature. You can also format the text using the options available.
- Once you’re done editing your signature, click “OK” to close the window.
- You will return to the “Signatures and Stationery” window. Here, you can assign your new signature to a specific email account by selecting it from the dropdown menu.
- Click “OK” to close the window and save your changes.
Edit an Existing Signature
If you need to make changes to an existing signature, you can follow these steps:
- Open Outlook 2007 and go to the “Tools” menu.
- Select “Options” from the dropdown menu.
- In the new window, click on the “Mail Format” tab.
- In the “Mail Format” tab, click on the “Signatures” button.
- In the “Signatures and Stationery” window, select the signature you want to edit from the list.
- Make the necessary changes to the signature in the “Edit Signature” section.
- Click “OK” to save your changes and close the window.
Delete a Signature
If you no longer need a signature, you can delete it using the following steps:
- Open Outlook 2007 and access the “Tools” menu.
- Select “Options” from the dropdown menu.
- In the new window, click on the “Mail Format” tab.
- In the “Mail Format” tab, click on the “Signatures” button.
- In the “Signatures and Stationery” window, select the signature you want to delete from the list.
- Click on the “Delete” button to remove the signature.
- Click “OK” to save your changes and close the window.
Note: It’s a great idea to regularly update and review your signatures, especially if you’re using them for professional emails. A well-designed signature can help convey a sense of professionalism and make a great impression on recipients. Make sure to also include your contact information, such as your name, address, and phone number, to avoid any confusion.
What are the benefits of Outlook signatures 🤔
An email signature is a default text block, contact information, or an image that appears at the bottom of every email you send. In Outlook, you can create and edit your signatures to include a variety of information that reflects your personal or professional identity.
Here are some benefits of using Outlook signatures:
| Professional appearance: | By adding a signature, your emails will have a more polished and professional design. You can choose from a variety of pre-defined templates or create your own signature to make it unique. |
| Marketing tool: | Your signature can also be used as a marketing tool. You can include links to your website, social media profiles, or any other promotional content to increase brand visibility and drive traffic. |
| Time-saving: | Once you’ve set up your signature, it will automatically appear at the end of every email you compose. This eliminates the need to manually add your contact information or any other desired text. |
| Easy updates: | If your contact information or any other details change, you can easily update your signature in just a few clicks. This ensures that every email you send includes the most up-to-date information. |
| Consistency: | Using Outlook signatures helps maintain a consistent look and feel across all your emails. Whether you’re working on Windows or Mac, the chosen signature will always appear in the same location. |
| Avoid manual repetition: | Instead of typing your contact information or a personalized note at the end of every email, you can assign a signature and save time by avoiding manual repetition. |
| Personal touch: | Outlook signatures give you the flexibility to add a personal touch to your emails. You can include a quote, a favorite saying, or any other text that reflects your personality. |
| Help in identification: | If you’re working in a team or a large organization, signatures can help recipients easily identify who the email is from. This is especially helpful when dealing with a large number of emails every day. |
By using Outlook signatures, you can enjoy these benefits and more. So, whether you’re a small business owner, a freelancer, or anyone who frequently uses email, setting up a signature in Outlook is a great way to enhance your email communication.
It’s professional 👩⚖️
If you’re using Microsoft Outlook for your emails, having a professional signature can be a great tool. Whether you’re working in a legal field 👩⚖️, marketing, or any other industry, your signature is an important part of every message you send. It’s a quick way to show your name, contact information, and any other details you choose to include.
Outlook allows you to create and apply signatures with ease, whether you want to use a default design or create your own. In this section, we’ll walk you through the steps on how to add or update your signature in Outlook.
For Windows users using Outlook 2007, 365, or Outlook.com 🖥️
- Open Outlook and click on the “File” tab at the top left of the window.
- From the drop-down menu, click on “Options”.
- A new window will appear. Click on the “Mail” tab at the top.
- In the “Compose messages” section, click on the “Signatures” button.
- A “Signatures and Stationery” window will open. Here, you’ll see a list of signatures that you’ve created or that are available by default.
- To add a new signature, click on the “New” button. Give your signature a name, and then type the text you want to appear in the signature box.
- You can use the options in the formatting toolbar to customize the appearance of your signature, such as font, size, and color.
- If you want to include an image in your signature, click on the “Picture” button and browse for the image you want to use. You can also add hyperlinks or change the alignment of the text using the other options available.
- Once you’re done designing your signature, click “OK” to save the changes.
- If you want to assign the newly created signature as the default for all outgoing emails, select it from the “New messages” drop-down menu and optionally from the “Replies/forwards” drop-down menu as well.
- You can also choose to manually add the signature to individual messages by clicking on the “Signature” button in the message composition window.
These steps apply to various versions of Outlook on Windows, so regardless of whether you’re using Outlook 2007, Outlook 365, or Outlook.com, the process should be similar.
For Mac users using Outlook for Mac 🔧
- Open Outlook for Mac and go to the “Outlook” menu at the top.
- Click on “Preferences”.
- A new window will open. Click on “Signatures” in the “Email” section.
- In the Signatures window, you’ll see a list of signatures that you’ve created or that are available by default.
- To create a new signature, click on the “+” button and give your signature a name.
- In the right pane, type the text you want to appear in the signature box. You can format the text using the options provided, such as font, size, and color.
- If you want to include an image, you can drag and drop it into the signature box.
- Once you’re done, close the Signatures window to save your changes.
- Your new signature will now appear in the drop-down menu under “Default Signature”.
- Outlook for Mac does not automatically apply the signature to all outgoing messages. To add it to your emails, you’ll need to manually select it from the drop-down menu in the message composition window.
Now that you know how to create a signature in Outlook, you can customize it to fit your personal or professional style. Keep in mind that you can always go back and make changes to your signature if needed. Whether you choose to use a simple text signature or a more complex design with images and links, having a professional signature will help you make a lasting impression with every email you send.
It’s personal 👤
When working with Microsoft Outlook, you have the option to create a personalized signature for your emails. A signature is a quick text or an HTML section which can include your name, contact information, address, and more. It’s a great way to add a professional touch to your messages and also avoid manually typing this information every time you start a new email.
Here’s how to create a personalized signature in Outlook:
- Open Outlook and click on the “File” menu at the top.
- In the menu bar, click on “Options”.
- A new window will open, showing the Outlook options. Click on “Mail” in the left sidebar.
- In the “Compose messages” section, click on the “Signatures” button.
- In the Signatures window, click on the “New” button to create a new signature.
- Give your signature a name. This name will only be used within Outlook to help you identify it.
- In the “Edit signature” section, you can type in the text you want to appear in your signature. You can also use the formatting toolbar to change the design of your signature, like applying bold or italic styles, assigning colors, and more.
- If you’re familiar with HTML, you can also switch to the HTML tab and edit the signature using HTML code.
- Once you’re done creating or editing your signature, click “OK” to save the changes.
- Your new signature will now appear in the “Choose default signature” section. You can select it for new messages, replies/forwards, or both.
- Click “OK” to close the Signatures window.
- Now, every time you start a new email, Outlook will automatically insert your signature.
Note that these steps may vary slightly depending on the version of Outlook you’re using. The specific steps provided here are for Outlook 2007 and Outlook 365. If you’re using Outlook.com or Outlook for Mac, the process may be slightly different. It’s also worth noting that changes made to your signature will not apply to emails that are already opened, so if you decide to change your signature, you’ll need to manually update those messages.
With the help of this tool in Outlook, you can customize your signature and make it reflect your personal or professional style. Whether you want to include some marketing information, show off your new job title, or just add a personal touch, the signature feature in Outlook is a great way to do it.
So, start personalizing your emails and let your signature be one more way to communicate who you are!
It’s a great marketing tool 🔧
Having a professional email signature is not only a great way to enhance your personal brand but also a powerful marketing tool. When you communicate with others via email, your signature can provide important information and make a lasting impression. Here’s how to create and use a signature in Outlook:
- Open Outlook and click on the “File” tab at the top left corner of the window.
- In the File menu, click on “Options” and then select “Mail” from the left-hand side menu.
- In the Mail options section, click on “Signatures”.
- A new window will open where you can create and manage your signatures.
- Click on the “New” button and give your signature a name.
- In the Edit Signature section, you can choose to manually enter your signature using text, or you can select an already created signature from the dropdown menu.
- Edit the text if needed and format it using the available options. You can add your name, job title, contact information, website, and more.
- You can also add a logo or an image to your signature by clicking on the “Picture” icon in the toolbar.
- Once you’ve made all the necessary changes, click on “OK” to close the Signature and Stationery window.
- Back in the Mail options section, you can assign your signature to a specific email account and choose whether it should appear at the top or bottom of your messages.
- Click on “OK” to close the Mail options window.
Now, every time you compose a new email or reply to a message, Outlook will automatically apply the chosen signature. It’s a time-saving feature that adds a professional touch to every email you send. Along with the benefits of a well-designed signature, you can also update your signature whenever there are changes in your personal or marketing information.
If you’re working with a legacy version of Outlook (like Outlook 2007), here’s how to add or change your signature:
- Click on the “Tools” menu at the top of the Outlook window.
- In the Tools menu, click on “Options”.
- In the Options window, click on the “Mail Format” tab.
- Click on the “Signatures” button to open the Signature window.
- Follow steps 5 to 10 from the instructions above to create and manage your signature.
By following these steps, you can ensure that your email signatures are always up-to-date and in line with your marketing strategy. So, whether you’re an individual looking to add a personal touch to your emails or a business aiming for a professional appearance, a well-crafted email signature is a must-have tool in your Outlook arsenal. 🤔👤
How to Add or Change Your Email Signature in Microsoft Outlook
Adding or changing your email signature in Microsoft Outlook is a quick and easy process. Whether you want to automatically include a professional signature on every email you send or you’d like to choose different signatures for different messages, Outlook has a variety of options to help you make these changes. Here’s a step-by-step guide on how to add or change your email signature in Microsoft Outlook:
- Open Microsoft Outlook using the desktop app or the online version, Outlook.com.
- In Outlook, click on the “File” menu located at the top left-hand corner of the window.
- From the dropdown menu, choose “Options” to open the Outlook Options window.
- In the Outlook Options window, select the “Mail” section from the menu on the left-hand side.
- Scroll down to the “Compose messages” section and click on the “Signatures” button.
- In the Signatures window, you have the option to create a new signature, edit an existing one, or delete a signature you no longer want to use.
- If you want to add a new signature, click on the “New” button and give your signature a name.
- In the “Edit signature” text box, you can type in the text you want to include in your signature. You can also use formatting tools to change the font, size, and color of the text.
- If you want to include a logo or image in your signature, use the “Insert Picture” button to add it to your signature.
- Once you’re done creating or editing your signature, click on “OK” to apply the changes.
- In the “Choose default signature” section, you can select a signature to automatically appear in the “New messages” and/or “Replies/forwards” dropdown menus.
- If you want to manually choose a signature for each email you send, select the “Don’t use the default signature” option.
- Click on “OK” to close the Signatures window.
- Note that if you’re using an older version of Outlook, such as Outlook 2007, the steps for adding or changing your signature may be slightly different.
By following these steps, you can easily add a professional or personal signature to every email you send using Microsoft Outlook. It’s a great way to avoid manually typing your signature every time and ensure that your emails have a consistent and professional appearance. Take advantage of this helpful tool and start enhancing your email communication!
Open a new email message
When it comes to creating or updating an Outlook signature, the first step is to open a new email message. This will allow you to choose the email account and the signature that will be applied to the message. Here’s how you can do it:
1. Open Outlook on your Windows or Mac computer.
2. Click on the “New Email” button at the top left corner of the Outlook window. This will open a new email message.
3. In the new email message window, you’ll see a variety of options and tools for composing your message. If you’re working with Microsoft Outlook 2007 or earlier, you may need to click on the “Insert” menu at the top of the window to access the signature options.
4. If you have already created a signature, it may appear automatically in the email message. If not, you can assign a signature to your email by clicking on the “Signatures” button in the toolbar. This will open a menu where you can choose the signature you want to use.
5. If you’re creating a new signature or want to make changes to an existing one, click on the “Signatures” button in the toolbar and then select “New” or “Edit” to open the signature editor. From there, you can add or delete text, change the font or color, add an image or a hyperlink, and apply any other formatting or design changes you desire.
6. Once you’ve made the necessary changes to your signature, click on “OK” to save the changes and close the signature editor.
7. To ensure that your signature appears automatically in every new email message you send, make sure the “New messages” option is selected in the “Choose default signature” section of the signature editor.
8. Close the email message window without sending it to save your changes.
By following these steps, you can easily open a new email message in Outlook and apply a signature of your choice. Whether you want to add a personal touch to your emails or create a professional and polished appearance, using email signatures can be a great marketing tool. They help to provide essential information about yourself or your company, and they can also save you time by automatically adding your signature to every message you send.
Click Signature along the top menu bar
If you want to add or change your signature in Outlook, you can easily do so by following these steps. Whether you’re using Outlook on Windows or Mac, the process is quite similar. It’s important to note that these steps apply to Microsoft Outlook 2007 or later, as well as Outlook.com and Outlook for Microsoft 365.
When working in Outlook, signatures can be a great way to add a personal touch to your emails. They help you avoid manually typing your contact information, and they also allow you to include marketing or other important information at the end of your messages. By default, Outlook includes a signature section at the bottom of every new email you start composing.
To change or edit your signature, here’s what you need to do:
- Open Outlook and click on the “File” tab at the top menu bar.
- In the opened window, click on “Options” from the menu on the left side.
- In the Outlook Options window, select the “Mail” category from the left sidebar.
- Scroll down to the “Compose messages” section and click on the “Signatures” button.
A new window will appear with all your signatures listed. If you haven’t created any signatures before, the list will be empty. You can now add, edit, or delete signatures using the buttons provided.
To create a new signature, click on the “New” button. You can assign a name to your signature and choose whether it will be used for new messages, replies, or both.
When creating or editing a signature, you have a variety of options to customize it. You can add text, change the font, apply formatting, and even add images or links. The signature editor provides you with a set of formatting tools to design your signature according to your preferences.
Once you have made the necessary changes to your signature, click “OK” to save and close the window. Your new or updated signature will now appear in the signatures list.
From the signatures list, you can choose a default signature for new messages, assign different signatures to replies or forwards, or even set a different signature for each email account you have set up in Outlook.
Now, every time you compose a new email or reply to a message, your signature will automatically appear at the bottom. If you don’t want to include a signature in a particular email, you can simply remove it or choose not to insert one.
That’s it! You have successfully learned how to add or change your signature in Outlook. Remember, signatures can be a useful tool for personalization and branding in your emails, so take advantage of them to make your messages stand out.
Click New
In Microsoft Outlook, you have a variety of options when it comes to creating and managing email signatures. Whether you’re using Outlook for personal or business purposes, having a professional signature can help you make a great impression with every message you send.
Here’s how to create a new signature in Outlook:
- Open Outlook and click on the File menu.
- In the menu, choose Options.
- A new window will appear. In the left sidebar, click on the Mail tab.
- Scroll down until you find the “Signatures” section.
- Click on the “Signatures” button.
- A Signatures window will open, where you can manage your signatures.
- Click on the “New” button to create a new signature.
- Give your signature a name and click OK.
- In the text box, you can now edit your signature. You can include text, links, images, and even customize the design of your signature.
- When you’re finished, click OK to close the Signatures window.
You can now assign your newly created signature as the default signature for all new emails you send, or choose to manually add it to individual messages.
Note that the steps above are for Outlook 365, Outlook 2019, and Outlook 2016. If you’re using Outlook.com or an older version of Outlook, the steps may vary slightly. However, the general process will be similar.
Name your new signature
When it comes to creating an outlook signature, naming is an important step. Your signature should have a name that reflects its purpose and helps you easily identify it when you need to make changes or assign it to your emails.
You can start by coming up with a descriptive name that includes information like your name, your title, or the department you work in. For example, if you’re creating a signature for your marketing team, you could name it “Marketing Signature” or “John Smith – Marketing.”
It’s also a good idea to choose a name that’s unique and doesn’t conflict with any existing signatures you may have. This will help you avoid confusion and make it easier to find the correct signature when you need to apply it to your emails.
Whether you’re using the desktop version of Outlook for Windows or the web version (Outlook.com or Outlook 365), the steps to name your new signature are relatively the same.
Here’s what you need to do:
- Open Outlook and click on the “File” menu.
- Choose the “Options” section from the menu.
- In the Outlook Options window, select “Mail” from the left-hand side.
- In the “Compose messages” section, click on the “Signatures” button.
- In the Signatures window, you’ll see a list of your existing signatures. If you’re starting from scratch, this list may be empty.
- Click on the “New” button to create a new signature.
- In the “Enter a name for your new signature” field, type in the name you’ve chosen for your signature.
- Click “OK” to save your new signature.
- Close the Signatures window.
- You can now edit your new signature and make any necessary changes to the design and content.
Note that if you’re using Outlook on a Mac, the steps may be slightly different. However, the concept remains the same – you’ll need to name your new signature at some point during the process.
By giving your signature a clear and descriptive name, you’ll not only save yourself time in the long run, but you’ll also have a professional and polished signature ready to go in just a few quick steps. Happy signature designing!
Design your signature
When it comes to creating a signature in Outlook, you have the opportunity to showcase your personal and professional information in a visually appealing way. Whether you’re using Outlook on Windows or Mac, Microsoft provides a variety of tools to help you design the perfect signature for your emails.
If you’re using Outlook 365, you can start by opening the “Settings” menu and selecting “View all Outlook settings.” Then, under the “Mail” section, choose “Compose and reply.” Within this section, you’ll find the option to create a new signature or update your existing one.
When designing your signature, you can include information such as your name, address, contact details, and even a personal or company logo. You can also decide whether you want your signature to appear automatically for every message or only when you choose to add it.
Microsoft provides a user-friendly signature editor tool that allows you to easily make changes to your signature. You can edit the text, format it to your liking, and choose from a variety of font styles and sizes. You can also include hyperlinks to your website or social media profiles.
If you’re using an older version of Outlook, like Outlook 2007, you may need to manually create and edit your signature. In this case, go to the “Tools” menu, select “Options,” and click on the “Mail Format” tab. From there, you can enter your desired signature in the text box provided.
One great feature of Outlook is the ability to have multiple signatures. This is particularly helpful if you have different email accounts or use your Outlook for both personal and professional purposes. You can easily switch between signatures when composing a new message or choose to have a default signature for all outgoing emails.
When designing your signature, be sure to keep it professional and avoid using excessive colors or graphics. A simple and clean design will make your signature look more polished and will ensure that it’s easily readable across different devices and email clients.
Remember, your signature is an important part of your email marketing strategy, so take the time to design a signature that will leave a positive impression on your recipients. Whether you’re a business owner or an individual, a well-designed signature can help build your brand and establish credibility.
So, take advantage of the design tools available in Outlook and start creating your signature today!
Assign your new signature to an email address
Once you’ve created your new signature in Outlook, you’ll want to assign it to an email address so that it will automatically appear at the bottom of every email you send from that address. This will save you time and make your emails look more professional.
To assign your new signature to an email address in Outlook, follow these steps:
- Open Microsoft Outlook (2007, 2010, 2013, 2016, or 365) on your Windows or Mac computer, or Outlook.com if you are using the web version.
- Click on the “File” tab or the gear icon (🔧) depending on the version of Outlook you are using.
- In the menu that appears, click on “Options” or “Settings” (👩⚖️).
- In the Options or Settings window, select “Mail” from the left-hand sidebar.
- In the Mail section, scroll down to the “Compose messages” or “Compose and reply” section.
- Click on the “Signatures” button or link.
- In the Signatures window, you’ll see a list of email accounts you have set up in Outlook.
- Choose the email account that you want to assign your new signature to.
- In the “Choose default signature” section, you’ll see a drop-down menu with your new signature and any other signatures you have created.
- Select your new signature from the drop-down menu to assign it to the chosen email account.
- If you want your signature to appear at the top of every new message as well, you can select it from the drop-down menu in the “New messages” section too.
- Click “OK” or “Apply” to save your changes.
- Close the Options or Settings window.
Now, whenever you start a new email using the email account you assigned the signature to, your new signature will automatically appear at the bottom of the email window. If you’re manually editing or changing your signatures, these steps will help you decide which signatures are working the best for your personal or marketing needs.
Here’s a pro tip: you can also assign different signatures for replies and forwards by selecting them from the drop-down menu in the “Replies/forwards” section.
Assigning your new signature to an email address is a quick and easy process that can have a variety of benefits. It helps you save time, maintain a professional design in every message, and show off a personal touch. So go ahead and add your new signature now!
Close the email you opened to start using your signature
Once you have created or edited your signature in Microsoft Outlook, you may want to start using it right away. In this guide, we will show you how to close the email you opened and apply your signature to all your messages.
If you are working in Outlook on the web (outlook.com), follow the steps below:
- Open Outlook on the web and click on the “Settings” gear icon on the top right corner of the window.
- In the dropdown menu, click on “View all Outlook settings.”
- In the left sidebar, click on “Compose and reply.”
- Scroll down to the “Email signature” section.
- If you want to create a new signature, click on the “+ New” button and give it a name.
- Edit your signature by typing the text directly in the editing window. You can also use the formatting toolbar to change the font, size, color, and alignment of your text.
- If you have multiple signatures, select the one you would like to include in new emails from the “Choose default signature” dropdown menu.
- Click “Save” to apply the changes.
If you are working in Outlook for Windows or Outlook for Mac, follow the steps below:
- Open Outlook and click on “File” in the top-left corner of the window.
- In the dropdown menu, click on “Options” (for Windows) or “Preferences” (for Mac).
- In the left sidebar, select “Mail” or “Email.”
- Click on “Signatures” to open the Signatures window.
- If you want to create a new signature, click on the “New” button and give it a name.
- Edit your signature by typing the text directly in the editing window. You can also use the formatting toolbar to change the font, size, color, and alignment of your text.
- If you have multiple signatures, choose the one that you want to assign as the default signature for new messages.
- Click “OK” to save the changes and close the window.
By following these steps, you’ll be able to not only close the email you opened to start using your signature but also update and edit your signature at any time. It’s a great tool to personalize your emails and provide necessary contact information to every recipient. Whether you’re working in Outlook on the web or using Outlook for Windows or Mac, changing and assigning your signature is easy and can help you avoid manually typing the same information in every email.
How to automatically add signatures to Outlook
If you’re a Microsoft Outlook user, you’ll know how important it is to have a professional email signature. Adding a signature to your emails not only makes them look more polished and professional but also helps to avoid any confusion about your contact information.
Instead of manually adding a signature to every email you send, you can set up Outlook to automatically include a signature for you. This can save you time and ensure that your signature is consistently applied to all of your outgoing messages.
Here’s how you can set up automatic signatures in different versions of Outlook:
Outlook 365:
- Open Outlook and click on the “File” menu.
- Click on “Options.”
- In the Outlook Options window, click on “Mail” in the left sidebar.
- Under the “Compose messages” section, click on the “Signatures” button.
- In the Signatures tab, click on the “New” button to create a new signature.
- Give your signature a name and choose whether you want to include it for new messages, replies, or both.
- In the Edit Signature section, you can design your signature using the available options.
- Once you’ve finished designing your signature, click on “OK” to save your changes.
- Close the Outlook Options window. Your chosen signature will now automatically be added to every new email you start.
Outlook.com:
- Open Outlook.com and click on the gear icon in the top right corner of the window.
- In the Settings menu, click on “View all Outlook settings.”
- Click on “Compose and reply” in the Mail section.
- Scroll down to the “Email signature” section.
- Add or edit your signature in the text box provided.
- Click on “Save” to apply your changes.
Outlook 2010, 2013, and 2016:
- Open Outlook and click on the “File” tab.
- Click on “Options.”
- In the Outlook Options window, click on “Mail” in the left sidebar.
- Click on the “Signatures” button in the right-hand pane.
- In the Signatures tab, click on the “New” button to create a new signature.
- Give your signature a name and choose whether you want to include it for new messages, replies, or both.
- In the Edit Signature section, you can design your signature using the available options.
- Once you’ve finished designing your signature, click on “OK” to save your changes.
- In the Outlook Options window, click on “OK” to close it.
By following these quick and easy steps, you can ensure that you have a professional signature added to every email you send, whether you’re using Outlook on Windows or Mac. This will save you time and make a great impression on your recipients. So, why not take advantage of this feature and update your Outlook signature today?
Note: The following steps may vary slightly depending on the version of Outlook you are using.
How to edit a signature in Outlook
If you’re working in a professional environment or want to add a personal touch to your emails, having a signature is a great way to do it. In Microsoft Outlook, you have the option to create and edit your own signature, allowing you to customize the information that appears at the end of every message you send.
Here’s how you can edit a signature in Outlook:
- Open Outlook and click on the “File” tab at the top left corner of the window.
- In the following menu, click on “Options” to open the Outlook Options window.
- On the left side of the Outlook Options window, click on “Mail” and then select the “Signatures” button.
- In the Signatures section, you’ll see a variety of options for managing your signatures. You can decide whether to include a default signature for new messages, replies, or forwards, as well as assign specific signatures for different email accounts if you have multiple.
- To edit an existing signature or create a new one, select it from the list and click on the “Edit” button.
- A new window will open with a text bar where you can make changes to the signature. You can edit the text, apply formatting using the available tools, and even add images or links.
- Once you’re satisfied with your changes, click “OK” to save them. You can then close the Outlook Options window.
Now, every time you compose a new email, reply, or forward a message, your edited signature will appear at the end. This is a quick and easy way to personalize your emails and avoid the hassle of manually adding your information every time.
Keep in mind that these steps apply to Outlook 365, Outlook.com, and legacy versions like Outlook 2007. The process may vary slightly depending on the version of Outlook you’re using, but the general steps should still be applicable.
Change email signature in Outlook for Windows
If you’re using Outlook for Windows, you can easily change your email signature to give your messages a more professional and personalized touch. Whether you’re working with Outlook 2007, Outlook 365, or the legacy version of Outlook.com, here’s a step-by-step guide on how to update your signature:
- Open Outlook on your Windows device.
- In the top menu bar, click on “File”.
- From the dropdown menu, choose “Options”.
- In the left-hand sidebar, click on “Mail”.
- Scroll down until you see the “Signatures” section, and click on “Signatures”.
- In the “Choose default signature” section, select the email account to which you want to assign the signature.
- If you want to edit an existing signature, select it from the list. To create a new signature, click on “New” and give it a name.
- Now you can design your signature. You can include various information like your name, address, job title, contact information, marketing message, or even a personal quote.
- Use the text editing tool to change the font, color, size, and style of your signature, to make it look more professional or match your brand image.
- Once you’ve made the necessary changes, click on “OK” to save your signature.
- Close the window and start composing a new email to see how your new signature will appear.
- If you’d like to have different signatures for different types of emails, like one for internal messages and another for external communications, you can set up separate signatures for each account. Just repeat the steps above for each account.
- If you no longer need a signature, you can delete it by selecting it and clicking on “Delete”.
Note that if you’re using Outlook for Mac or Outlook on the web, the steps to change your email signature may be slightly different. Make sure to check the Microsoft Help Center for specific instructions.
With these simple steps, you’ll be able to change and update your email signature in Outlook for Windows, allowing you to show a professional and personal touch with every message you send.
Update signature in Outlook for Mac
If you are using Outlook for Mac and want to update your signature, here are the steps you need to follow:
- Open Microsoft Outlook for Mac.
- Click on the “Outlook” menu at the top of the screen.
- In the menu bar, choose “Preferences”.
- In the Preferences window, click on the “Signatures” tab.
- In the Signature section, you’ll see a list of the signatures you have created.
- To edit a signature, select the one you want to change.
- In the text window, you can manually edit the signature or apply changes using the formatting tools.
- If you want to add a new signature, click on the “+” button below the list of signatures.
- In the New Signature window, you can choose whether the signature should be applied automatically or manually assigned to emails.
- Add the desired information to your signature, like your name, email address, contact information, or a marketing message.
- You can also design a professional-looking signature using the variety of design tools.
- Once you have made the desired changes, click “OK” to save the signature.
- Now, every time you start a new email or reply to a message, your updated signature will appear at the top.
By following these steps, you can easily update your signature in Outlook for Mac and ensure that your emails have a professional and personal touch. It’s a quick and easy way to make changes and avoid manually typing your signature on every email. So go ahead and give it a try!
Changing your signature in Outlook 365
If you’re working with Microsoft Outlook 365 and want to update or change your email signature, here’s a step-by-step guide to help you along the way. Having a professional signature is a great tool for email marketing, as it helps to show your top-notch professionalism to every opened message.
1. First, open Outlook, and go to the top menu. Here, you’ll find the “File” option.
2. Click on “File,” and a new window will open. Choose “Options” from the menu.
3. In the Outlook Options window, click on “Mail” along the left side.
4. In the Mail section, you’ll see a “Signatures” button – click on it.
5. A new window will open with a list of signatures. You can choose the one you want to edit or create a new one by clicking on the “New” button.
6. If you choose to edit an existing signature, select it from the list. You can also assign a default signature for new messages and replies/forwards.
7. Now, you can manually edit the text of your signature in the text box. You can include a variety of information such as your name, address, contact information, or even a quick note along with it.
8. If you’d like to add a logo or image to your signature, click on the “Picture” icon (🖼️) in the toolbar. You can browse and select the image you want to include in your signature.
9. After making the necessary changes, click on “OK” to apply the changes. You can also click on “Save As” if you want to save a copy of the edited signature for future use.
10. Close the Outlook Options window, and your updated signature will now be applied to all new emails you compose in Outlook 365.
Note that these steps may vary slightly depending on the version of Outlook you are using. For example, if you’re using Outlook 2007, you can find the “Signatures” option under the “Tools” menu.
Follow these steps to easily change your signature in Outlook 365, and always keep your email messages looking professional and up-to-date!


