

Google Forms is a versatile tool that can be used for various purposes within and outside of the educational setting. One of the chosen features educators often utilize is its ability to create quizzes. Whether you’re a teacher looking to assess your students’ knowledge or a student looking for a fun way to review, creating a quiz with Google Forms might just be the answer to your needs.
Creating a quiz with Google Forms is simple and user-friendly. The first step you should take is to log in to your Google account. Once you’re on your Google Drive, click on the “New” button, then choose “Google Forms” from the drop-down menu. You will be directed to a new untitled form. Give your quiz a title by clicking on the “Untitled form” symbol and entering the desired title.
Next, you can start adding questions to your quiz. Google Forms provides a variety of question types, such as multiple-choice, short answer, and more. To add a question, click on the “+” symbol, and a dialog box will appear. Type your question in the space provided, then choose the question type from the drop-down menu. You can also add answer choices or alternative answers depending on the question type you chose. Repeat these steps for each question you want to include in your quiz.
Google Forms also allows you to customize the appearance of your quiz. You can choose a theme from the available options or upload your own image as a background. Additionally, you can change the order in which the questions appear by clicking on the vertical ellipsis symbol next to each question and selecting “Move up” or “Move down.”
Once you’ve finished creating your quiz, there are a few more steps you should take before sharing it with your students. First, you might want to add instructions or any additional information at the beginning of the form. To do this, click on the “+ Add description” button below the title and enter the text you want to include.
If you want to make your quiz self-grading, you can add answer keys to the multiple-choice questions. Simply click on the vertical ellipsis symbol next to a multiple-choice question, select “Answer key,” and choose the correct answer(s). Google Forms will automatically grade the quiz for you based on the answer key you provided.
Before sharing your quiz, make sure to review the questions and answers to ensure their accuracy. You can test the quiz yourself by clicking on the “Preview” button at the top right corner of the page. If you find any mistakes or want to make changes, click on the “Edit” button within the preview window.
Now that you’ve successfully created your self-grading quiz with Google Forms, you can share it with your students or other individuals via email or by generating a shareable link. Students can access the quiz on any device, including iPads, by simply clicking on the link you provide. After completing the quiz, they will receive immediate feeback on their answers, making it a useful tool for both teaching and learning.
In conclusion, creating a self-grading quiz with Google Forms is a straightforward process that can be done in just a few steps. By following the steps outlined in this post, you’ll be able to easily create quizzes that can be used for a variety of purposes, whether for educational or personal purposes. So why not give it a try and see the benefits it can bring to your teaching or learning experience?
How to Make a Google Forms Quiz – 5 Steps
If you’re looking to create a quiz using Google Forms, you’re in luck! Google Forms provides a simple and efficient way to create quizzes with self-grading capabilities. In this post, we will guide you through the process of creating a Google Forms quiz in just 5 steps.
Step 1: Create a New Form
First, you should go to Google Forms and create a new form. You can choose to start with a blank form or use one of the easy-to-use templates available. Forms can be named, titled, and untitled, so choose a title that clearly indicates that it’s a quiz.
Step 2: Add Questions and Answers
Next, you can start adding questions to your form. You have a variety of question types to choose from, such as multiple-choice, short answer, or checkbox questions. For each question, you can add answer choices, and mark the correct answer. You can also provide feedback for each question, which will appear after the quiz is submitted.
Step 3: Customize the Quiz
When creating your quiz, you can customize it by adding images or videos, reordering the questions, or using a variety of question settings. You can also choose if you want to collect email addresses or limit the quiz to one response per person. Additionally, you can enable the “Respondents can see the summary chart and correct answers after submitting” option to allow students to see their scores and review their answers.
Step 4: Share and Distribute
Once your quiz is created, you can share it with your students. Google Forms provides you with a link that you can share through email, post on your class website, or share it on social media platforms such as Pinterest. You can also send the link directly to your students via email. Forms can be completed on a computer, tablet, or mobile device (such as an iPad), providing flexibility for students to take the quiz.
Step 5: Review and Analyze Responses
After students have completed the quiz, you can review and analyze their responses. Google Forms automatically grades multiple-choice and checkbox questions, providing instant feedback to students. You can also view individual responses as well as a summary of all responses. This is useful for identifying areas where students might need additional support or review.
In conclusion, Google Forms is a powerful and easy-to-use tool for creating quizzes. By following these 5 simple steps, you can create a self-grading quiz that is interactive and engaging for your students. So go ahead and start creating your first Google Forms quiz today!
Creating a New Form
When you will first open Google Forms, it will automatically create an untitled form for you. To begin creating your quiz, you need to give your form a title. Click on the untitled form and type in a descriptive title that will make it easy for you to locate and identify the quiz you have created.
Once you have given your form a title, you can start adding questions to it. You can choose from a variety of question types, such as multiple choice, checkbox, short answer, or dropdown. The chosen question types will appear in order on your form as you add them. You can also choose to add an alternative text option for each question, which can be useful for students with disabilities.
After adding the questions, you can reorder them if needed. You can simply drag and drop the questions into the desired order. If you want to delete a question, you can easily do so by clicking on the trash can symbol next to it. You can also add feedback for correct and incorrect answers by using the “Answer key” option.
Within the form, you have the option to choose whether the quiz will be self-grading or if you will review and grade the answers manually. If you choose the self-grading option, Google Forms will automatically calculate the scores and provide immediate feedback to the students. If you choose the manual grading option, you will need to review and grade the answers yourself.
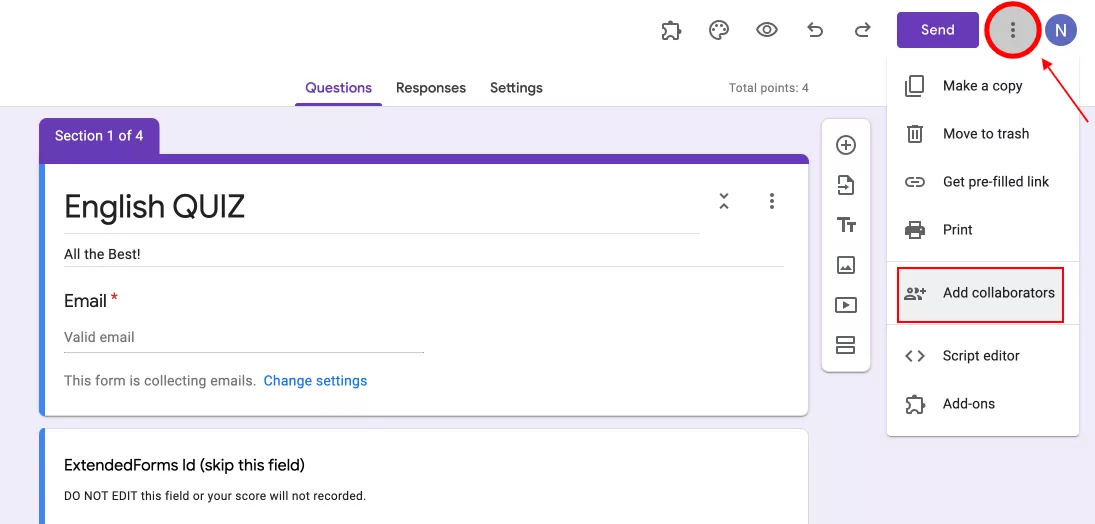
Once you have finished creating your quiz, you can share it with your students. Google Forms provides you with different options for sharing, such as sending it through email, sharing a link, or embedding it into a website or blog post. You can also choose to post the quiz on social media platforms like Facebook, Twitter, or Pinterest.
Google Forms also allows you to customize the appearance of your form by choosing themes and adding images. You can choose from a variety of pre-designed themes or create your own custom theme. Adding images can make your quiz more engaging and interactive for the students.
In addition to these features, Google Forms has several other useful options that you can explore while creating your quiz. You can choose to have questions appear one at a time or all at once. You can set a time limit for completing the quiz or allow the students to answer at their own pace. You can also use the “shuffle questions” option to randomize the order in which the questions will appear for each student.
Google Forms is a user-friendly tool that can be used for creating quizzes and collecting responses. Whether you are a teacher looking for a quick and easy way to create a quiz or a student looking for an alternative to a traditional pen-and-paper test, Google Forms can provide you with a simple and efficient solution. Just open Google Forms and start creating your quiz using a computer, laptop, tablet, or even an iPad.
Creating a Google Form Quiz on the iPad
Creating a self-grading quiz on Google Forms is a convenient and efficient way to assess students’ knowledge. With the iPad, you can easily create and share quizzes that provide feedback and a variety of question formats.
To begin, open the Google Forms app on your iPad. If you don’t have it, you can download it from the App Store.
Once you have the app open, tap on the “+” symbol at the bottom right corner to create a new form. You can choose from a blank form or select a template provided by Google. For this tutorial, we will start with a blank form.
Next, you can give your quiz a title by tapping on “Untitled form” at the top of the screen. You can also add a description if you’d like.
Now, let’s start adding questions. To add a question, tap on the “+” symbol on the right side of the screen. You have a variety of question types to choose from, such as multiple choice, checkbox, short answer, and more.
Select the question type that you want to use, and then enter the question and provide the answer options. You can also choose whether the question is required or not by tapping on the toggle switch next to the question.
If you want to add additional questions, just repeat the process. You can reorder the questions by tapping on the three horizontal lines icon on the left side of the question and dragging it up or down.
Once you have added all the questions, you can go to the settings of the form by tapping on the gear icon at the top right corner. In the settings, you can enable the option to collect email addresses or limit the number of responses, among other options.
When you are satisfied with your quiz, tap on the “Send” icon at the top right corner to share it with your students. You can generate a link to share or send the quiz through email. If you want to embed the quiz on a website, you can also select the “Embed” option and copy the code provided.
Students can now access the quiz on their iPads or other devices and submit their answers. The self-grading feature of Google Forms will automatically score the quizzes and provide instant feedback to the students.
Using Google Forms on the iPad to create quizzes can be a useful alternative for students with disabilities or those who prefer a digital format. With just a few steps, you can easily make and share a self-grading quiz, allowing for a more interactive and efficient learning experience.
Using the Answer Key and Adding Feedback
Once you have created a quiz using Google Forms, you can make use of the answer key feature to automatically grade the quizzes and provide feedback to students. This is a useful option for self-grading quizzes that can save you time and effort.
To add an answer key and feedback to your quiz, follow these steps:
- Open the Google Form with the quiz you want to add an answer key and feedback to.
- Click on the “Answer Key” button, which should appear in the upper-right corner of the form.
- In the “Answer Key” section, choose the correct answer for each question from the available choices.
- You can also choose whether to allow the option for “Accept any answer” or “Add feedback” for each question. This can be useful for providing additional information or explanations to the students.
- If you choose to add feedback, click on the “Add feedback” button and type in the feedback you want to provide for each option.
- Once you have chosen the correct answer(s) and added feedback (if desired) for all the questions, click on the “Done” button to save your answer key and feedback.
After adding the answer key and feedback, you can share the quiz with your students through email, a link, or other means. Now, when students take the quiz, they will receive immediate feedback on their answers based on the answer key you have created.
Keep in mind that the feedback you provide can be used to guide students in their review and repeat of the quiz. It can also be used as a teaching tool to help students learn from their mistakes and improve their understanding of the subject matter.
Additionally, if you have chosen the option to “Accept any answer,” you might consider deleting the option that appears as “Untitled Question.” This can help ensure that students choose a valid answer from the available choices.
Using the answer key and adding feeback within Google Forms can be a valuable tool for creating quizzes that engage students and provide personalized feedback. This alternative to traditional paper-based quizzes can be particularly useful for teachers working with a large number of students or those using technology like iPads in the classroom.
Which Google Forms quiz alternative will you choose
When it comes to creating quizzes, Google Forms is a popular choice for many. However, there are also several alternative quiz options available that you might find useful for your needs. Let’s explore some of these alternatives and see which one you should choose.
- Forms on Pinterest: Pinterest has a variety of pre-made quiz templates that you can use to create your quizzes. These templates have different designs and styles, so you can choose the one that fits your quiz best.
- Form key symbol: With this option, you can make your quiz self-grading. You just need to assign the correct answers to each question, and Google Forms will automatically grade the quizzes that students submit.
- Untitled quiz: This option allows you to create a quiz without adding a title. It can be useful if you want to create a quick quiz or if you prefer a minimalist design.
- Quiz with feedback: By using this alternative, you can provide feedback to students based on their answers. You can set up custom feedback messages that will appear when students answer certain questions.
- Order questions: If you want to create a quiz with specific question order, you can use this option. You can easily rearrange the questions within the quiz to suit your needs.
These are just a few of the alternatives to Google Forms quizzes that you can choose from. Each one has its own unique features and benefits. It’s important to review each alternative and consider how it aligns with your specific needs and goals.
By going through these options, you will be able to find the alternative that best suits you. Whether it’s a form on Pinterest, a self-grading quiz with a key symbol, an untitled quiz, a quiz with feedback, or an ordered quiz, you have the freedom to choose the one that will make your quiz experience more enjoyable and effective.
Remember, the steps for creating a quiz may vary depending on the alternative you have chosen. Make sure to follow the instructions provided for each alternative to ensure a smooth quiz creation process.
Share your chosen alternative with your students and let them answer the quiz in order to assess their understanding. You can also share the quiz with others through email or post it on various platforms for more engagement.
With these alternative quiz options, you can expand your quiz-making capabilities and enhance the learning experience for your students. So go ahead and explore the variety of choices available to you!


