

Are you working on a PowerPoint presentation and want it to continuously loop? Whether you’re creating a slideshow for a business meeting or a school project, looping your PowerPoint can be a great way to ensure that your message is delivered effectively. In this article, we’ll show you how to loop a PowerPoint presentation in just a few simple steps.
First, let’s clarify what we mean by “looping” a PowerPoint presentation. When you loop a PowerPoint, it means that the presentation will automatically start again from the beginning as soon as it reaches the last slide. This is especially useful if you want your presentation to run continuously, without the need for you to manually stop and restart it.
If you’re using Microsoft Office 365, looping a PowerPoint presentation is a straightforward process. Simply open your presentation and go to the “Slide Show” tab in the top menu. Look for the “Set Up Slide Show” option and click on it. A window will appear with several tabs. In the “Show options” section, you’ll see a checkbox that says “Loop continuously until ‘Esc'”. Check this box, and your presentation will automatically loop when you start it.
But what if you’re not using Office 365? Don’t worry – you can still loop your PowerPoint presentations in earlier versions of PowerPoint. The process may be slightly different, but it’s just as easy. All you need to do is add a trigger to your presentation that will tell it to repeat once it reaches the end.
To add a trigger to your PowerPoint presentation, first select the slide that you want to trigger the loop. Then, go to the “Animations” tab in the top menu and click on “Animation Pane”. A pane will appear on the right side of your screen, showing all the animations you’ve added to your slides. Click on the animation you want to trigger the loop, and then go to the “Animations” tab in the top menu again. In the “Advanced Animation” group, click on “Trigger” and select the “On Slide Exit” option. From the drop-down menu, choose “Play Animation” and select the animation you want to play when the loop restarts. Then, save your presentation and click “Play” to see the loop in action.
Looping a PowerPoint presentation can be a helpful feature when you want to create a continuous and engaging slideshow. Whether you’re presenting in a business setting or sharing a school project, looping your presentation can ensure that your audience stays focused and interested. So, follow these simple steps and start looping your PowerPoint presentations today!
- FAQs About Looping PowerPoint Presentations
- How to Loop a Powerpoint Office 365 Slideshow
- FAQs
- How do I set a continuous slideshow in PowerPoint
- What does loop mean in PowerPoint
- Which option is to repeat the animation
- Can I loop multiple elements in PowerPoint
- How can I stop a Microsoft PowerPoint presentation from running continuously
- How do you make a video loop on YouTube
- Why won’t my MS PowerPoint slides advance automatically
- Add narration or sound
- Save for Video Playback
- PowerPoint Templates
- Video:
- How to create a Continuously Looping Slideshow in PowerPoint
FAQs About Looping PowerPoint Presentations
Q: Can I loop a PowerPoint presentation with narration or sound?
A: Yes, you can loop a PowerPoint presentation with narration or sound. Simply add the narration or sound to your presentation, and it will play continuously when the loop restarts.
Q: What does the “Browsed at a kiosk (full screen)” option mean?
A: The “Browsed at a kiosk (full screen)” option is a playback option in PowerPoint that allows you to present your slides in a full-screen mode without any menus or toolbars visible. This can create a more immersive and streamlined presentation experience.
Q: How do I make my PowerPoint presentation loop automatically when I email it to someone?
A: To make your PowerPoint presentation loop automatically when you email it to someone, save it as a PowerPoint Show (file extension .ppsx) instead of a PowerPoint Presentation (file extension .pptx). When the recipient opens the file, it will automatically play in a continuous loop.
Q: Can I loop a PowerPoint presentation on YouTube?
A: No, you cannot loop a PowerPoint presentation on YouTube directly. However, you can save your PowerPoint presentation as a video file (.mp4, .wmv, etc.), and then upload that video file to YouTube. In YouTube’s video settings, you can set the video to loop indefinitely.
How to Loop a Powerpoint Office 365 Slideshow
If you’re using Powerpoint Office 365 and want to make your slideshow loop continuously, there are a few steps you can follow to achieve this. Looping a powerpoint presentation ensures that it plays on a continuous loop, without the need for manual intervention.
Here’s how to loop a Powerpoint Office 365 slideshow:
- Open your Powerpoint presentation in Office 365.
- Go to the “Slideshow” tab in the menu bar.
- Click on the “Set Up Slide Show” button.
- In the “Set Up Show” window that appears, select the “Loop continuously until ‘Esc'” option.
- Click “OK” to save your changes.
By selecting the “Loop continuously until ‘Esc'” option, your Powerpoint slideshow will continuously loop back to the first slide after it reaches the end. This means that your presentation will run in a continuous loop until you manually stop it by pressing the “Esc” key.
It’s important to note that if you have embedded video or audio files in your presentation, they will also loop along with the slides. This means that if you have a narration or background music, it will continuously play as your slideshow loops.
If you want to add animations or triggers to your slides, you can do so using the Animation Pane. Simply select the element you want to animate, and then click on the “Add Animation” button in the Animation Pane. You can also set triggers to make certain animations or narrations play when specific actions are taken, such as clicking on a certain part of the slide.
To make sure your slideshow plays in full-screen mode when looping, go to the “Slide Show” tab, click on the “Set Up Slide Show” button again, and this time select the “Show type: Browsed at a kiosk (full screen)” option.
It’s also worth noting that if you’re working with multiple presentations, you can loop them all together by selecting the “Loop continuously until ‘Esc'” option for each presentation.
If you’re still having trouble getting your Powerpoint slideshow to loop, here are a few FAQs that might help:
- Q: Why doesn’t my slideshow loop?
- A: Make sure you have selected the “Loop continuously until ‘Esc'” option in the “Set Up Show” window.
- Q: How do I resume my slideshow from where it left off?
- A: Simply press the “S” key on your keyboard to resume the slideshow from the last viewed slide.
- Q: What does “Loop continuously until ‘Esc'” mean?
- A: It means that your slideshow will keep playing in a continuous loop until you manually stop it by pressing the “Esc” key.
- Q: What if my Powerpoint Office 365 version doesn’t have the looping option?
- A: If the looping option is not available in your version of Powerpoint, you can consider saving your slideshow as a video and then looping the video on platforms like YouTube.
By following these steps and tips, you can easily loop your Powerpoint Office 365 slideshow and make it run continuously without any interruptions.
FAQs
Q: Why should I make my PowerPoint show loop?
A: Looping a PowerPoint show means that it will continuously play the slides in a sequence, without stopping. This can be useful when you want to create a continuous loop of information or when you want to showcase multiple presentations without having to manually restart each one.
Q: How do I loop a PowerPoint presentation?
A: To loop a PowerPoint presentation, you can use the “Loop continuously until ‘Esc'” option in the PowerPoint Advanced Slide Show settings. This feature allows the presentation to automatically loop and continuously play without user intervention.
Q: What does it mean to set up a looping PowerPoint show?
A: Setting up a looping PowerPoint show means configuring the presentation to run continuously without stopping. This can be done by selecting the “Loop continuously until ‘Esc'” option in the Advanced Slide Show settings.
Q: Can I loop a PowerPoint presentation for a specific period of time?
A: No, the looping feature in PowerPoint does not have an option to specify the duration for which the presentation should loop. It will continue to loop until the user presses the ‘Esc’ key to exit the presentation.
Q: How do I add narration to a looping PowerPoint presentation?
A: To add narration to a looping PowerPoint presentation, you can use the Record Slide Show feature. This allows you to narrate your presentation and synchronize the audio with the slides. When the presentation loops, the narration will play along with the slides.
Q: Can I loop a PowerPoint presentation with sound?
A: Yes, you can loop a PowerPoint presentation with sound. When you add sound to your slides or use audio narration, the sound will play along with the slides as the presentation loops.
Q: What happens if I use animations or triggers in my looping PowerPoint presentation?
A: If you use animations or triggers in your looping PowerPoint presentation, they will continue to work as normal. The animations and triggers will play in sequence along with the slides, even when the presentation loops.
Q: How can I make a PowerPoint loop automatically on a continuous loop in Microsoft Office 365?
A: To make a PowerPoint loop automatically on a continuous loop in Microsoft Office 365, you can select the “Loop continuously until ‘Esc'” option in the Advanced Slide Show settings. This will make the presentation play continuously without interruption.
Q: How do I loop a PowerPoint slideshow on YouTube?
A: Unfortunately, it is not possible to loop a PowerPoint slideshow directly on YouTube. PowerPoint features like looping and narration won’t work when you upload the presentation to YouTube. However, you can create a video of the PowerPoint presentation with a continuous loop and upload that to YouTube.
Q: Does the loop feature in PowerPoint work with all slide transitions and animations?
A: Yes, the loop feature in PowerPoint works with all slide transitions and animations. When you set up a loop in your presentation, the transitions and animations will play as intended, in sync with the slides.
Q: Can I have a looping PowerPoint show and still use triggers to advance slides?
A: Yes, you can have a looping PowerPoint show and still use triggers to advance slides. Triggers allow you to set up specific actions that will advance the slides when certain conditions are met. These triggers will work even when the presentation is set to loop continuously.
How do I set a continuous slideshow in PowerPoint
If you want your PowerPoint presentation to continuously loop or play without stopping, you can use the looping feature in Microsoft PowerPoint. Follow these steps to set up a continuous slideshow:
- Open your PowerPoint presentation in Microsoft PowerPoint.
- Click on the “Slide Show” tab in the top menu.
- In the “Set Up” section of the menu, click on the “Set Up Slide Show” option.
- A pop-up window titled “Set Up Show” will appear. In this window, under the “Show options” section, select the “Loop continuously until ‘Esc'” option.
- Click on the “OK” button to save the changes.
- Now, when you start your slideshow, it will automatically loop and play continuously until you press the “Esc” key to stop it.
This looping feature is particularly useful when you have multiple presentations to display, or when you want to create a sequence of slides that continuously loop.
It’s important to note that the looping feature won’t work if you have recorded narrations or added any triggers or animations to your slides. In such cases, you can use the “Rehearse Timings” option to manually set the timing for each slide.
Also, if you’re using PowerPoint templates, make sure the template you’ve selected supports continuous looping. Some templates may have restrictions that prevent the slideshow from looping.
By following these simple steps, you can make your PowerPoint slideshow continuously loop, allowing you to create an uninterrupted and engaging presentation.
What does loop mean in PowerPoint
In PowerPoint, the term “loop” refers to the action of continuously replaying a slideshow or a specific sequence of slides. This feature is especially useful when you want your presentation to play automatically in a continuous loop without any interruptions.
When you save your presentation as a slideshow, it will typically play from the beginning to the end and then stop. However, by enabling the loop feature, you can make the slideshow repeat or loop, so it plays continuously.
To loop a presentation in PowerPoint, you can follow these steps:
- Open your presentation in Microsoft PowerPoint (MS PowerPoint 365 or the latest version).
- Go to the “Slide Show” tab in the menu bar.
- Click on the “Set Up Slide Show” option in the “Set Up” group.
- In the “Set Up Show” window, under the “Show options” section, check the “Loop continuously until ‘Esc'” option.
- Click on the “OK” button to save your changes.
Once you have set up the loop feature, your presentation will play continuously, starting from the first slide and repeating until you manually stop it by pressing the “Esc” key on your keyboard.
It’s important to note that looping a presentation in PowerPoint doesn’t affect any animations or narrations you have included. If you have set up animations or narrations on a specific slide, they will play as usual, and the loop will only affect the overall sequence of slides being displayed.
Additionally, if you want to loop a specific part of your presentation rather than the entire slideshow, you can do so by adding triggers to your slides. Triggers are elements (such as text, images, or buttons) that you can set to perform specific actions, including advancing to the next slide or triggering animations.
In summary, the “loop” feature in PowerPoint allows you to play your presentation continuously, without any interruptions. By enabling this feature, your slideshow will automatically repeat in a loop, starting from the first slide and ending only when you manually stop it or press the “Esc” key.
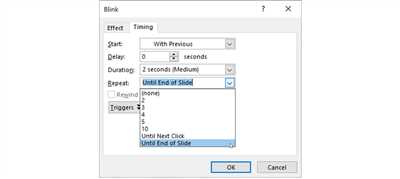
Which option is to repeat the animation
If you want to loop a PowerPoint presentation and repeat the animation, there are a few options you can choose from. The steps may vary depending on which version of Microsoft Office (such as PowerPoint 365 or PowerPoint 2019) you are using, but the general process remains similar.
First, open the presentation you want to loop. Then, click on the “Slide Show” tab in the menu bar at the top of the screen. Look for the “Set Up” group, which is usually located on the far right side of the menu bar.
In this group, you will find the “Rehearse Timings” option. Click on it, and a separate window will appear. This window allows you to record timings for each slide and set the duration of the presentation as well as the transitions between slides.
In the “Rehearse Timings” window, you will see the slide show running in the main window, with a timer displaying the elapsed time. To repeat the animation, make sure the “Use Timings” option is selected. This option tells PowerPoint to follow the recorded timings and repeat the animation sequence in a continuous loop.
If you want to add a narration to your presentation or include audio elements, you can also use the “Record narration” feature in the “Set Up” group. This feature allows you to record voiceovers or add background music to your slides.
Once you have set up the timings and any narrations or audio, go back to the main PowerPoint window and click on the “Slide Show” tab again. Look for the “Play From Start” option in the “Start Slide Show” group. This will start the slideshow from the beginning, and the animation will play continuously in a loop as per your settings.
To stop the looping and exit the slide show, simply press the “Esc” key on your keyboard or right-click on the screen and select the “End Show” option from the menu.
In case you are wondering why PowerPoint doesn’t have a built-in loop option like some other presentation software or YouTube, there is a reason. Unlike video players, PowerPoint is designed to be a flexible tool for creating dynamic and interactive presentations.
By allowing you to control the progression of slides, animations, and transitions, PowerPoint gives you the freedom to navigate through your content at your own pace or adjust the flow based on audience interaction or specific requirements.
However, if you want to create a continuous loop for your slides or presentations, the steps outlined above should work for you. Just remember to set up the timings and ensure that the “Use Timings” option is selected.
If none of the options provided in this article work for your version of PowerPoint, you may want to consider using a different software or explore advanced features that might offer looping functionalities.
Remember, PowerPoint is a powerful tool with many possibilities, and it’s always worth exploring the available options and features to make your presentations more engaging and effective!
Can I loop multiple elements in PowerPoint
Yes, you can loop multiple elements in PowerPoint to create a continuous and seamless presentation experience. Whether you want to loop a video, a sound, or a set of slides, PowerPoint provides options to make it happen.
If you have a video or a sound file that you want to loop, you can simply click on the file in the pane, and then navigate to the Playback tab in the menu bar. From there, click on the “Loop until stopped” option, and your video or sound will continuously repeat during the slideshow.
To loop a sequence of slides, you can use the “Custom Slideshow” feature. First, navigate to the Slide Show tab and click on the “Set Up Slide Show” option. In the Set Up Show window, select the “Custom show” option and choose the slides you want to loop in the “Slides in custom show” section. Then, check the “Loop continuously until ‘Esc'” box and click on the “OK” button. Your selected slides will play in a loop until you press the Esc key.
If you want to loop multiple elements like animations or triggers, PowerPoint has advanced features to help you achieve that. You can set up triggers to make elements repeat or advance in a sequence, or use animations to create looping effects. Simply navigate to the Animation tab and explore the different options available to make your presentations more dynamic and engaging.
It’s important to note that looping may not work if your PowerPoint presentation is recorded with narration or if you have set specific timings for each slide. In such cases, the presentation will play back as intended and won’t loop automatically. However, you can manually make it loop by following the steps mentioned above.
Overall, Microsoft PowerPoint offers a wide range of features and options to create looping presentations. Whether you want to loop videos, sounds, slides, animations, or other elements, you can easily achieve it using the capabilities provided by PowerPoint.
How can I stop a Microsoft PowerPoint presentation from running continuously
If you have created a PowerPoint presentation and want to stop it from running continuously, there are a few different methods you can use depending on your specific needs. The method you choose will depend on whether you want to stop the presentation completely, temporarily pause it, or control it in a specific way.
Method 1: Stop the presentation from looping
If your PowerPoint presentation is set to loop continuously, you can easily disable this feature. First, open your presentation in Microsoft PowerPoint. Then, click on the “Slide Show” tab in the menu bar at the top of the screen. In the “Set Up” section, click on the “Set Up Slide Show” button. In the “Set Up Show” window, under the “Show options” section, uncheck the “Loop continuously until ‘Esc'” option. Click “OK” to save your changes. This will stop the presentation from continuously looping.
Method 2: Use triggers to control slide playback
If you want more control over the playback of specific slides in your presentation, you can use triggers. Triggers allow you to link specific elements on a slide to various actions, such as advancing to the next slide or playing a sound. To use triggers, first, select the element on your slide that you want to use as a trigger. Then, go to the “Animations” tab in the menu bar. In the “Advanced Animation” section, click on the “Trigger” button. Choose the action you want to link to the trigger, such as “On Click” or “With Previous”. This will give you more control over when and how your slides are played.
Method 3: Stop a running presentation temporarily
If your presentation is currently running and you want to temporarily pause it, you can press the “Esc” key on your keyboard. This will stop the presentation and bring you back to the slide editing window. Press the “F5” key to resume playing the presentation from where you left off.
By utilizing these methods, you can easily control the playback of your PowerPoint presentation and ensure that it doesn’t run continuously as desired. Whether you want to stop the looping, use triggers to control slide playback, or temporarily pause the presentation, Microsoft PowerPoint provides various features and options to suit your needs.
How do you make a video loop on YouTube
If you want to make a video loop on YouTube, it’s a very simple process. Here’s a step-by-step guide on how to do it:
| Step 1: | Open the YouTube video you want to loop in your web browser. |
| Step 2: | Add “-repeat” to the end of the URL in the address bar. |
| Step 3: | Press Enter or simply click “Go” to reload the page. |
| Step 4: | The video will now start playing in a continuous loop. |
| Step 5: | If you want to loop a specific part of the video, you can add the time parameters to the URL. |
| Step 6: | You can also add multiple triggers to control when the looping will happen. |
That’s it! Now your YouTube video will play continuously and loop back to the beginning once it reaches the end. This feature can be useful for presentations, background elements, or simply for watching your favorite videos on repeat.
Why does this feature work? YouTube has implemented the loop functionality to the embedded video player. When you add the “-repeat” parameter to the URL, it tells the player to continuously repeat the video.
It’s important to note that this looping feature works only on YouTube’s website and not on the YouTube mobile app. So, if you want to loop a video on your mobile device, you’ll need to use a different method.
If you prefer using YouTube’s advanced features, such as creating a playlist or adding animations to your video loop, you can try using YouTube Studio or other video editing software. These tools will provide you with more control over your looped videos.
Still, wondering why your YouTube video doesn’t loop automatically? It could be due to the autoplay feature being disabled or restricted by YouTube’s settings. Make sure you check your video’s playback options and adjust them accordingly.
So, whether you’re using Microsoft Office PowerPoint or YouTube, looping a video is a great way to make it play continuously. Just follow the steps above, and you’ll be able to enjoy your favorite videos or create seamless presentations with ease.
Why won’t my MS PowerPoint slides advance automatically
One of the common issues that users encounter when working with MS PowerPoint is that their slides won’t advance automatically. This can be frustrating, especially when you are trying to create a seamless and interactive presentation. However, there are several reasons why this issue may occur and steps you can take to resolve it.
First, make sure that the “Automatically After” option is selected for each slide in your presentation. To do this, go to the “Transitions” tab in the PowerPoint menu and check if the “After” option is set to a specific time. If it is not, select a desired time for each slide to automatically advance.
If you are using animations or triggers in your presentation, make sure that they are not set to override the automatic advancement of slides. Animations and triggers can be a great way to enhance your presentation, but they can also interfere with the automatic slide advancement. Check the “Animation Pane” or “Trigger” pane to see if there are any animations or triggers that are set to pause or stop the slide advancement. Adjust these settings accordingly to allow for automatic advancement.
Another common reason why slides may not advance automatically is if there is an embedded video or audio that is set to play automatically. PowerPoint has a feature that allows you to trigger the video or audio playback when the slide is clicked. If this option is selected, the slide will not advance automatically until the video or audio is played. To fix this, go to the “Playback” tab for the video or audio and select the option to “Automatically” play the media.
If you are running your presentation in full-screen mode, check if the slide show is set to run continuously. Sometimes, by default, PowerPoint is set to stop the slide show after the last slide is reached. To change this setting, go to the “Slide Show” tab and uncheck the “End with black slide” or “End with gray slide” option. This will allow the slides to continuously loop and advance automatically.
It is also worth checking if there are any narration or timings set for the slides. If you have recorded narrations or timings for your presentation, PowerPoint will follow these timings instead of advancing the slides automatically. To remove the timings, go to the “Slide Show” tab, click on “Record Slide Show”, and select the “Clear” option under the “Advance slides” section.
If none of these solutions work, make sure that you have the latest version of MS PowerPoint or Microsoft Office 365 installed. Sometimes, outdated software can cause compatibility issues, including problems with automatic slide advancement. Updating to the latest version can often resolve these problems.
In conclusion, there are several reasons why your MS PowerPoint slides may not advance automatically, including incorrect settings, animations or triggers that pause or stop slide advancement, embedded videos or audio with manual playback, continuous loop option not selected, or recorded narrations or timings that override automatic slide advancement. By checking and adjusting these settings, you can ensure that your slides advance automatically and create a seamless presentation experience.
Add narration or sound
If you want to add narration or sound to your PowerPoint presentation, Microsoft Office provides a feature that allows you to do so. This can be useful if you want to provide additional information or explanation for certain slides or if you want to include background music or audio effects.
To add narration or sound to your presentation, follow these steps:
- Open your PowerPoint presentation in Microsoft PowerPoint.
- Click on the slide to which you want to add the narration or sound.
- In the top menu, click on the “Insert” tab.
- In the “Media” section, click on the “Audio” button.
- A menu will appear with options to insert audio from various sources. Select the desired option, such as “Audio from File” to insert an audio file from your computer.
- Locate and select the audio file you want to insert. Click on the “Insert” button.
- A speaker icon will appear on the selected slide, indicating that the audio has been added.
- To adjust the audio playback settings, click on the speaker icon. A playback pane will appear on the right side of the window.
- In the playback pane, you can set the audio to play automatically or on-click, adjust the volume, and choose whether the audio should loop until the end of the slide or be triggered by a specific animation or trigger element.
- Once you have made the desired adjustments, you can play the presentation to check if the audio is working correctly. Note that in the continuous loop option, the audio will continuously play from the selected slide until the end of the slideshow.
If you have multiple slides with audio, you can set a narration timeline for each slide to ensure that the audio plays in sequence. This way, when you advance to the next slide, the audio from the previous slide will stop, and the audio for the current slide will start.
It’s important to note that if you save your presentation as a video or upload it to a platform like YouTube, the audio will be included. However, if you plan to distribute your PowerPoint presentation as a file, make sure to save it with the narration or sound files included to ensure that the audio plays correctly on other devices.
If you encounter any issues or have further questions about adding narrations or sounds to your PowerPoint presentations, Microsoft provides FAQs and support resources on their official website.
Save for Video Playback
One advanced feature in PowerPoint is the ability to save your presentation for video playback. This means that instead of running the slideshow in PowerPoint, you can simply save it as a video file and play it back on any device or platform.
To save your PowerPoint presentation for video playback, follow these steps:
- Click on the “File” menu in PowerPoint.
- Select the “Save As” option.
- In the “Save As” pane that appears, choose the location where you want to save the video.
- Select the “MP4” option from the “Save as type” dropdown menu.
- Click on the “Save” button.
When you save your presentation as a video, all animation elements, transitions, and narrations will be preserved in the video file. This means that if you have set up triggers or timed sequences, they will still work in the video playback.
One thing to note is that if you have recorded narration or added sound effects to your presentation, they won’t be saved in the video file by default. To include audio in your video, you need to select the “Use Recorded Timings and Narrations” option in the “Save As” pane.
Another option you have is to save your presentation as a “Continuous” or “Browsed by an individual (window)” slideshow. If you choose the “Continuous” option, the video will loop and play continuously without stopping. If you choose the “Browsed by an individual (window)” option, the video will stop at the end and display a black screen until the viewer presses a key to go back to the first slide.
So, if you want your PowerPoint presentation to loop and play continuously as a video, select the “Continuous” option when saving for video playback. This will ensure that the video starts over automatically once it reaches the end.
It’s important to note that when you save your presentation as a video, the quality of the video will depend on the settings you choose. PowerPoint offers different options for video quality, ranging from “Ultra HD (4K)” to “Standard Definition”. You can choose the appropriate video quality based on your needs and preferences.
Now that you know how to save your PowerPoint presentation for video playback, you can share it on platforms like YouTube or use it in your Microsoft Office presentations. This feature is especially useful when you want your presentation to run in a loop or when you have multiple presentations that you want to play in sequence.
For more information and FAQs on PowerPoint video playback, you can visit the official Microsoft Office 365 support website.
PowerPoint Templates
PowerPoint templates are a great way to create visually appealing and professional-looking slideshows. Whether you’re using PowerPoint for work presentations, school projects, or personal use, templates can save you time and make your slideshows look more polished.
There are many different PowerPoint templates available, both from Microsoft and from other sources online. These templates are pre-designed slide layouts that you can use as a starting point for your own slideshow. They often include placeholders for text, images, charts, and other elements, making it easy to add your own content.
One of the main benefits of using PowerPoint templates is that they can save you time when creating a slideshow. Instead of starting from scratch and designing each slide individually, you can simply select a template that matches the look and feel you want for your presentation. This means you can focus on creating content rather than worrying about the design.
Another advantage of using PowerPoint templates is that they can help you create more engaging slideshows. Many templates come with built-in animations, slide transitions, and other visual effects, which can make your presentation more dynamic and interesting. You can also customize these elements to be as subtle or as eye-catching as you want.
Additionally, PowerPoint templates can be a useful tool for ensuring consistency throughout your presentation. By using the same template for all your slides, you can maintain a professional and cohesive look. This can be especially helpful if you’re working on a team or presenting to a larger audience.
When using PowerPoint templates, it’s important to remember that they are just a starting point. You can customize them to fit your specific needs and preferences. You can change the color scheme, font styles, and layout of the slides to make them match your branding or personal style.
Overall, PowerPoint templates are a valuable resource for creating high-quality and visually appealing presentations. They can save you time, add visual interest, and help you maintain consistency throughout your slideshows. Whether you’re a beginner or an advanced PowerPoint user, templates can be a valuable tool in your presentation design process.


