

If you work with images and presentations, you might have come across the need to make a picture transparent. This can be useful when you want to combine multiple pictures into a single slide, create layered shapes, or just remove the background of an image. While many powerpoint tools allow you to insert and select images, not all provide the option to make them transparent. However, there are free and powerful tools like Adobe Illustrator (AI) that can help you accomplish this task.
When it comes to making a picture transparent, there are several methods you can use. One of the most popular options is to use the background remover tool in AI. To do this, open the image you want to make transparent in AI, select the parts of the picture you want to keep, and then flatten the image. This will remove the background, making it transparent. However, note that this method works best with images that have simple backgrounds.
If you have a more complex image with many shapes and backgrounds that you want to make transparent, you might need to use a different approach. Instead of using the background remover tool, you can try merging multiple layers with different transparency levels. By carefully selecting and merging the layers, you can create a transparent picture that retains the desired parts.
It’s important to note that not all images are suitable for making transparent. Some images, like JPEGs or pictures with solid backgrounds, might not provide the necessary transparency information. In such cases, you may need to manually remove the background by carefully selecting and erasing the unwanted parts. This can be a time-consuming process, but it allows you to have full control over the transparency of the image.
In conclusion, knowing how to make a picture transparent can be a valuable skill when working with images and presentations. Whether you’re creating layered shapes, combining multiple pictures, or just removing the background of an image, there are several methods you can use to achieve the desired result. From using AI’s background remover tool to manually selecting and erasing parts of the image, the choice depends on the complexity of the image and the level of control you want to have over the transparency.
How to Make Part of An Image Transparent – AI Background Remover
When it comes to creating presentations or combining multiple images into a single picture, you might want to make certain parts of an image transparent. This is where an AI background remover tool can be extremely useful.
AI background remover tools are designed to remove the background from an image, leaving only the selected shape or object. This can be particularly handy when you need to insert an image into a slide or combine multiple images together. Instead of manually selecting and removing the background, an AI background remover can do it for you in just a few clicks.
Here’s how you can use an AI background remover to make part of an image transparent:
- Select the image or images you want to make transparent. You can either upload them from your computer or open them directly in the AI background remover tool.
- Using the tool, select the shape or part of the image that you want to keep. The AI algorithm will automatically remove the background, leaving only the selected part.
- If you have multiple images that you want to combine into a single picture with transparent backgrounds, you can do so by uploading all the images into the AI background remover tool and selecting the shapes you want to keep in each image.
- Once you have selected the desired shapes or parts, you can flatten the images to create a single picture with transparent backgrounds. Depending on the AI background remover tool you’re using, there might be an option to flatten the images directly in the tool, or you can do it manually using an image editing software.
It’s important to note that not all AI background remover tools are free, and some might have limitations on the number of images you can process or the quality of the output. However, there are also free AI background remover tools available, although they may not offer the same level of accuracy or features as paid tools.
So, if you’re tired of spending long hours manually removing backgrounds from images or want to create stunning presentations with transparent images, consider using an AI background remover tool. It can save you time and effort, allowing you to focus on the content and visuals of your presentations.
Why Do You Need To Make a Picture Transparent In PowerPoint
In PowerPoint, there may be times when you want to make a picture transparent. There are several reasons why you might need to do this.
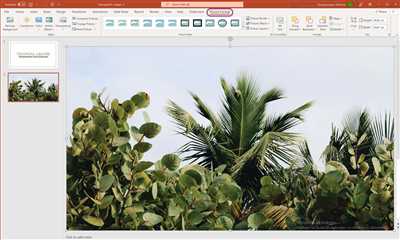
One reason is to combine multiple pictures into a single image. When you insert images into PowerPoint, they are placed on separate layers. By making the picture transparent, you can merge them into one background.
Another reason is to create custom backgrounds. You can use a picture as the background for a PowerPoint slide, but you might want to make it more subtle or have text overlayed on top. By making the picture transparent, you can achieve this effect.
Furthermore, making a picture transparent can be useful when making presentations. You can use transparent images to highlight specific parts of a slide or to create custom shapes. By selecting the shape tool and choosing “picture” instead of a color, you can easily insert a transparent image into a shape.
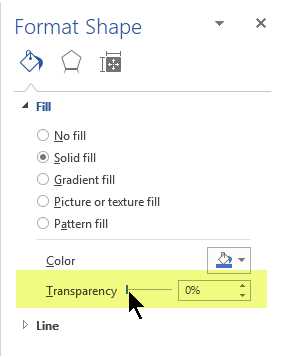
There are many ways to make a picture transparent in PowerPoint. One option is to use the built-in “Remove Background” tool. This tool allows you to select the parts of the image that you want to keep and the parts that you want to remove. It will then automatically make the selected parts transparent.
If you have Adobe Illustrator (AI), you can also use it to make a picture transparent. Simply open the image in AI, select the background, and choose “flatten.” This will remove the background and create a transparent image.
It’s important to note that not all images can be easily made transparent. Some images may have complex backgrounds or gradients that make it difficult to remove the background completely. In these cases, you may need to use advanced image editing techniques or find free online background remover tools.
In conclusion, making a picture transparent in PowerPoint can be helpful in many situations. Whether you want to combine multiple images, create custom backgrounds, or make your presentations more visually appealing, it’s a useful tool to know how to use.
Transparent shapes – Make only parts of the background transparent
When you want to make only specific parts of an image’s background transparent, there are several methods you can use in different software applications.
In Adobe Illustrator (AI), for example, you can open the image and select the specific part of the background you want to remove. Then, using the “Background Remover” tool, you can make that part transparent.
Another option is to use PowerPoint. In PowerPoint, you can insert the image and select it. Then, go to the “Format” tab and choose the “Remove Background” option. By selecting the specific part of the image you want to make transparent, PowerPoint will automatically remove the background from that part.
If you have multiple images and you want to make only certain parts transparent, you might consider merging them into a single picture in an image editing software like Adobe Photoshop. By combining the images and making the desired parts transparent, you can create a new picture with transparent backgrounds only in those specific areas.
Why would you want to make only parts of the background transparent? When creating presentations or slides, this technique can be useful to overlay images or text on top of each other without having the entire background visible. This can help to create more visually appealing and professional-looking slides.
Keep in mind that some software applications might have limitations when it comes to making only parts of the background transparent. In such cases, you might need to use additional tools or techniques to achieve the desired result.
One final note, when making transparent shapes or backgrounds, it’s important to remember that transparency is achieved by flattening the layers of the image or shape. This means that once an area of the background is made transparent, it can no longer be edited separately from the rest of the image or shape.
| Software | Method |
|---|---|
| Adobe Illustrator (AI) | Use the “Background Remover” tool to make specific parts of the background transparent |
| PowerPoint | Insert the image, select it, and use the “Remove Background” option to make specific parts transparent |
| Adobe Photoshop | Merge multiple images and make specific parts transparent to create a new picture with transparent backgrounds |


