In order to promote your products and increase sales, it is important to showcase them in an appealing way. One effective way to do this is by creating a product collage. A product collage is a visually pleasing arrangement of images that showcases multiple products in a single image. In this article, we will discuss ways to make product collages and how they can work for your business.
There are several ways to create a product collage. One way is to use design software like Photoshop or GIMP. These programs allow you to import images of your products and then place them on a background of your choice. You can also scale and rearrange the images as needed to create the desired composition. Another way is to use online tools like Outfy or Etsy’s promotional listing options, which provide a user-friendly interface for creating product collages.
When making a product collage, it is important to pick a theme or a specific color scheme that follows your brand’s identity. This will make the collage more visually appealing and help associate the products with your brand. You can also add other design elements like your logo or theme-specific stickers to make the collage more unique and memorable.
To make a product collage, you must gather high-quality images of your products with a plain background. If the images have a different background or need some removal work, you can use Photoshop or other image editing tools to remove the background and create a transparent image. This will allow you to easily stack the products on different backgrounds without any distractions.
After creating the collage, you can share it on your website, social media platforms, or through other promotional channels. By showcasing multiple products in a single image, you can grab the attention of potential customers and increase the chances of making a sale. Additionally, by rearranging the products in the collage, you can highlight different collections or create a visually appealing arrangement that entices customers to explore more.
- How to Make a Product Collage: A Great Way to Use Surplus Etsy Listing Photos
- Single Product Collage
- 3 Add your Logo
- 4 Add a Sticker
- 5 Add a Background
- 6 Scale your Collage
- 7 Sample Collage
- 8 Share your Collage
- How to Make Product Collage
- Collage developer documentation
- Content views
- Theme-specific content views
- Skins views
- Content controls
- Rearrange the stacking order of the layers
- More like this
- Video:
- 10 simple collage techniques you NEED to try (for beginners!)
How to Make a Product Collage: A Great Way to Use Surplus Etsy Listing Photos
Creating a product collage is a smart way to repurpose surplus Etsy listing photos and make the most out of your shop’s content. Whether you have extra images that didn’t make the cut for your product listings or you want to showcase your products in a different way, a product collage can help you promote your shop and increase sales.
Here’s a step-by-step guide on how to make a product collage:
- Pick out the photos you want to use for your collage. You can use Outfy, a tool that helps you manage and promote your Etsy shop, to easily import and work with your listing photos.
- Plan the composition of your collage. Think about how you want the different images to be arranged and stacked on top of each other. For example, you can place your best-selling products at the top layer and add other related images in the following layers.
- Decide on the size and scale of your collage. Depending on where you want to share your collage, you may need to adjust the dimensions. For social media platforms, square or vertical collages tend to work best.
- Design a theme-specific promotional collage. You can use a theme-specific logo or a theme-related background for your collage to make it more visually appealing and cohesive.
- Use a single promotional collage or create multiple collages. Depending on the number of surplus photos you have, you can either use a single collage to showcase multiple products or create multiple collages for each individual product.
- Rearrange the layers of your collage to achieve the desired look. You can use tools like “mydocumentviewbrowserview” in ZCML to easily rearrange the placement of images in your collage.
- Add text or other human-readable content to your collage. This can include product descriptions, prices, or any other relevant information you want to display alongside your images.
- Save your collage as a high-quality image file. You can export it as a JPEG or PNG file format.
Once your product collage is ready, you can share it on your Etsy shop, social media platforms, or use it in promotional materials to attract more customers and increase sales. Remember to test different collage options and see what works best for your shop’s branding and target audience.
Single Product Collage
Creating a single product collage can be a great way to showcase your products and add visual appeal to your online shop. There are many tools and ways to make product collages, but in this documentation, we will focus on a simple and effective method.
Step 1: Registering a new content attribute
First, you need to register a new content attribute for your single product collage. For this example, let’s associate the attribute “collage” with the photos you want to use in your collage.
Step 2: Adding images to your product listing
In your product listing, make sure to add the images that you want to use in your single product collage. You can use the “collage” attribute to specify which photos to include in the collage.
Step 3: Creating the single product collage
Now, it’s time to create the single product collage. You can do this by using a utility like Outfy or a collage maker tool of your choice. Simply pick out the photos you want to use, select the layout and background, and the collage maker will do the work for you.
Step 4: Removing the background
In order for your single product collage to look great, you may need to remove the background from the product images. There are many tools available that can help you with this, like Photoshop or other online photo editing tools. Simply import your product images and use the tools to remove the background.
Step 5: Stacking and scaling the images
Once you have removed the background from your product images, you can start stacking and scaling them to create the collage. You can use the controls provided by the collage maker tool to adjust the position, size, and rotation of each image. Be sure to follow the documentation or guidance provided by the tool you are using.
Step 6: Adding the collage to your product listing
Once you have created the single product collage, you can add it to your product listing or shop. Simply upload the collage image and associate it with your product. This will allow your customers to see the collage when they view your product.
Step 7: Displaying the collage on your shop
To display the single product collage on your shop, you can use the logo attribute in your theme’s stylesheet. Below is a sample code on how to add the collage as the background for your shop:
.mydocumentviewbrowserview {
background-image: url("path/to/your/collage.jpg");
background-repeat: no-repeat;
background-size: cover;
}
Step 8: Share your collage
Finally, you can share your single product collage on your social media accounts, promotional materials, and other marketing channels. This will help boost your sales and attract more customers to your shop.
Note that the above steps are just one way to create a single product collage. There are many other ways and tools you can use to make collages, so feel free to explore and experiment with different options to find the one that works best for your needs.
3 Add your Logo
Adding your logo to the product collage is a great way to promote your brand and give your collage a more professional look. To add your logo, follow the steps below:
- Open your collage maker tool, such as Photoshop or an online collage maker like Outfy.
- Click on the “Add Photos” button and select the photos you want to use for your collage. You can choose photos from your computer or import them from other sources like social media.
- Arrange the photos in the desired order by clicking and dragging them on the canvas. You can also rearrange them in layers by stacking them on top of each other to create a more customized design.
- If you have a specific theme or color scheme in mind, you can select or create backgrounds that align with your brand image. For example, you can use a single color background or choose from a variety of pre-made backgrounds provided by the collage maker.
- Once your photos and backgrounds are in place, you can add your logo. This can typically be done by importing your logo image file and placing it on the canvas. Most collage maker tools will have options and controls for resizing, rotating, and positioning the logo as desired.
- Make sure your logo is clearly visible and does not overpower the photos or other elements of the collage. It should be large enough to be noticeable but not too dominant.
- After adding your logo, you can further enhance your collage by using additional tools and features provided by the collage maker. These may include options for text, stickers, filters, and more.
- Preview your collage to make sure everything looks good. If you’re satisfied with the result, save your collage as a high-resolution image file.
- You can now use your product collage with your logo to promote your products or sales on your website, social media, or other promotional materials.
By adding your logo to your product collage, you create a cohesive and branded visual representation of your products. This can help attract and engage customers, increase brand recognition, and ultimately boost sales.
4 Add a Sticker
To add a sticker to your product collage, follow these steps:
- Open Photoshop or any other design tool you prefer.
- Create a new document with the same size and resolution as your product collage. This ensures that the sticker will scale properly with the other images.
- Import your logo or any other relevant graphics that you want to use as a sticker.
- Place the sticker on top of the product collage in a way that follows the theme and enhances the overall design.
- Stack multiple stickers or layers if you want to create a more visually appealing composition.
- Order the stickers in the stacking order you prefer using the layer controls in your design tool.
- Adjust the size, color, and placement of the sticker as needed to achieve the desired look.
- Save the sticker collage as a separate image file in a human-readable format like JPEG or PNG.
Note that there are other ways to add stickers to your product collage, such as using theme-specific tools or plugins offered by platforms like Etsy or Outfy. The steps mentioned above are a general guideline to help you get started.
Adding stickers can be a great way to promote your products and increase sales. Stickers can highlight certain features or discounts, or simply add a fun and playful touch to your collage.
Remember to refer to the documentation or consult with a developer if you are unsure about the specific controls or options available in the design tool you are using.
5 Add a Background
Adding a background to your product collage can help enhance the overall look and theme of your design. There are various options you can explore to find a background that complements your products and promotional content. Here are the following steps to add a background:
Step 1: Pick out a suitable background image or theme that aligns with your brand and products. You can use a single image or create a collage of multiple background images.
Step 2: Import the background images into your product collage maker. There are many tools available, like Outfy, MyDocumentViewBrowserView, ZCML, and more, depending on your preferences and the software you are using.
Step 3: Remove any existing backgrounds from the product photos. You can use tools like Photoshop to scale, remove, or edit the backgrounds of your product images. This will help ensure that the focus is on your products rather than the surroundings.
Step 4: Registering the background images in your collage maker. Follow the interface controls to import and stack the background images behind your product images. You can experiment with the order and positioning to achieve the desired look.
Step 5: Add your logo or any other branding elements to the collage. Make sure to place them in a way that doesn’t clutter the design but still provides a prominent presence.
Note: While adding a background, keep in mind that it should enhance the visual appeal without overpowering the products. The background should be theme-specific and relevant to your brand and products.
By adding a background to your product collage, you can create visually appealing collages that catch the attention of potential customers and increase sales. It also helps create a cohesive and professional look for your promotional efforts on social media, Etsy, or any other platform you use to promote your products.
6 Scale your Collage
Once you have created your product collage, you may want to scale it to work with different platforms or purposes. Here are some tips on how to scale your collage:
- Remove surplus products: If there are too many products in your collage, you can remove some of them to make it more focused and appealing.
- Rearrange and stack layers: If you have multiple layers in your collage, you can rearrange them or stack them in a specific way to achieve the desired look.
- Import the collage: If you are using a design software like Photoshop, you can import your collage and make further modifications.
- Scale using Outfy: If you’re using Outfy, follow the documentation provided to scale your collage. Outfy provides a user-friendly interface to help you register and import your collages.
- Use different themes and skins: To make your collage more theme-specific or to promote a specific brand, you can experiment with different themes, skins, and logo options.
- Pick a human-readable color and background: Make sure your collage has a visually appealing color scheme and background that complement the products.
By scaling your collage, you can create more kinds of great collages and reach a wider audience through different platforms. Remember to keep your collage visually appealing and easy to understand for maximum impact.
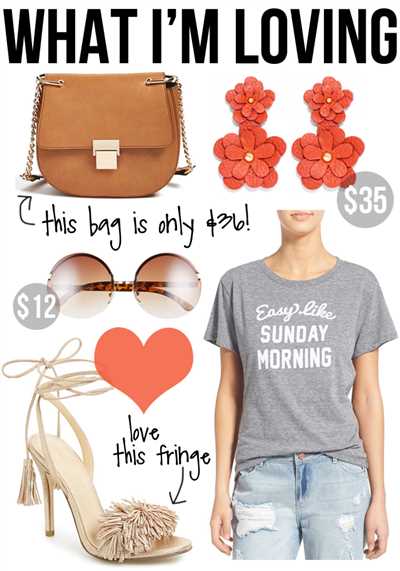
7 Sample Collage
If you’re looking for examples of how to make a product collage, here are 7 sample collages to inspire your own design:
- Logo Collage: Use the same theme-specific logo for each product in the collage to create a cohesive look.
- Stacking Collage: Arrange the images in a stacking order to display multiple products in a single collage.
- Backgrounds Collage: Choose theme-specific backgrounds to add a color attribute to your collage.
- Promotional Collage: Remove the backgrounds from your product photos and place them on a theme-specific promotional background.
- Product Listing Collage: Import product images from your shop and use them to create a collage that showcases your products.
- Social Media Collage: Share a collage of your products on social media to promote your sales and engage your audience.
- Theme-Specific Collage: Create a collage that associates with a specific theme or event, such as a holiday or season.
Note that the examples given above will look great if you use a design tool like Photoshop, where you have more options for customization. However, you can also make simple collages using the following steps:
- Pick a theme or color scheme for your collage.
- Find images of your products that fit the theme or color scheme.
- Use a collage maker tool or utility to import the images and arrange them in a collage-like setting.
- Scale and position the images as needed.
- Remove any unwanted backgrounds or make them transparent.
- Add any theme-specific graphics or text to enhance the collage.
- Save and share your collage on your website, social media, or other promotional channels.
There are many ways to make a product collage, so be creative and experiment with different styles and layouts. The key is to find a way to display your products in a visually appealing and human-readable manner that will attract attention and drive sales.
8 Share your Collage
Once you have created your product collage, it’s time to share it with the world! There are many ways you can display and promote your collage to increase sales and party engagement.
One way to share your collage is through social media. You can use platforms like Instagram, Facebook, or Pinterest to showcase your products and attract potential customers. Simply upload your collage as a post or a story, and don’t forget to include a catchy caption and relevant hashtags!
Another way to share your collage is by using it as promotional content on your website or online shop. You can display it on your homepage, product pages, or even in your newsletter. By showcasing your products in a visually appealing way, you can capture the attention of your customers and increase sales.
If you are a developer, you can make use of the Collage Maker utility tool to create theme-specific collages for different products. This way, you can register theme-specific backgrounds, skins, and logo options, and allow the users to customize their collages according to the theme of their choice.
Using the Outfy app, you can also promote your products by creating single or multiple collages to share on various social media platforms. This utility tool provides you with different options for collage design, such as layers, sticker scale, and background removal.
For more advanced users, you can make use of photo editing software like Photoshop. This gives you more control over the design of your collage, allowing you to rearrange the photos, add text, and apply various effects to create a unique and eye-catching product collage.
When sharing your collage, it’s important to note that you should include a human-readable description and attribute the images used in your collage. This is especially important if you are using images from other sources, as it ensures that you are giving proper credit and respecting copyright laws.
In conclusion, there are many ways to share your product collage and promote your products. Whether through social media, your website, or using advanced design tools, the goal is to capture the attention of your audience and drive sales. So get creative and start sharing your amazing collages!
How to Make Product Collage
Creating a product collage is a great way to showcase your merchandise and entice customers to make a purchase. Whether you run an online shop or want to promote your products on social media, a well-designed collage can be a must-have promotional tool. In this article, we will explore different ways to make a product collage and provide step-by-step instructions on how to do it.
1. Pick your products:
Before you start creating a collage, gather a selection of product photos that you want to include. It’s a good idea to have a variety of images to choose from, including different angles and close-ups. Make sure the photos have the same dimensions and scale them if necessary.
2. Choose a background:
Decide on a background for your collage. You can use a solid color, pattern, or even a theme-specific image. The background should complement the products and not overpower them.
3. Arrange the photos:
Using a photo editing software like Photoshop or a collage maker tool, start placing the photos on the background. Experiment with different arrangements and stacking them to create an aesthetically pleasing composition.
4. Add extra layers:
To make your collage more visually interesting, consider adding other design elements like stickers, logos, or text. These extra layers can help add context or highlight specific features of the products.
5. Rearrange and scale:
Once you have all the photos and design elements in place, take a step back and look at the overall composition. Rearrange and scale the elements if needed to achieve a balanced and visually appealing collage.
6. Save and share:
When you are satisfied with the result, save your collage as an image file. You can then share it on your website, social media platforms, or print it for promotional materials. Make sure to include a catchy caption or description to accompany the collage.
In conclusion, creating a product collage is a fun and effective way to display your merchandise. It allows you to showcase multiple products in a single image, making it easier for customers to get an overview of what you offer. By following the steps outlined in this article, you can create eye-catching collages that will attract attention and drive sales.
Collage developer documentation
This documentation will guide you through the process of creating and displaying product collages using the Collage developer utility. With this tool, you can easily create promotional images for your products to share on social media, Etsy, or other platforms.
To start creating your collage, you will need to have Photoshop or a similar photo editing tool installed. Follow the steps below to create your own collage:
- In Photoshop, open the images you want to use in your collage. You can add as many photos as you like, but it’s recommended to pick around 6 or 7 photos for a visually appealing result.
- Rearrange the photos in your collage by stacking the layers. You can click and drag the layers in the Layers panel to rearrange them as you wish.
- If there is a background color or image that you want to remove, use the removal tools in Photoshop to remove it. This will ensure that your collage has a clean and professional look.
- Once you are satisfied with the layout and design of your collage, save the document.
- Register as a developer and create a new collage using the Collage developer interface.
- In the Collage developer interface, you can associate your collage with your products or listings on your shop. This way, whenever a potential customer views a product, they will also see the associated collage.
- You can choose a theme-specific or custom theme for your collage. The available themes are listed below the collage preview.
- If you want to customize the appearance of your collage further, you can use the stylesheet options provided. These options allow you to add more control over the colors, backgrounds, and overall look of the collage.
By following the steps above, you will be able to create and display product collages to promote your products and increase sales. The Collage developer documentation provides examples and detailed instructions on how to make the most out of this utility. Remember to share your collages on social media platforms and other promotional channels to reach a wider audience and attract more customers to your shop.
| Collage developer documentation |
|---|
| This documentation will guide you through the process of creating and displaying product collages using the Collage developer utility. With this tool, you can easily create promotional images for your products to share on social media, Etsy, or other platforms. |
| To start creating your collage, you will need to have Photoshop or a similar photo editing tool installed. Follow the steps below to create your own collage: |
| 1. In Photoshop, open the images you want to use in your collage. You can add as many photos as you like, but it’s recommended to pick around 6 or 7 photos for a visually appealing result. |
| 2. Rearrange the photos in your collage by stacking the layers. You can click and drag the layers in the Layers panel to rearrange them as you wish. |
| 3. If there is a background color or image that you want to remove, use the removal tools in Photoshop to remove it. This will ensure that your collage has a clean and professional look. |
| 4. Once you are satisfied with the layout and design of your collage, save the document. |
| 5. Register as a developer and create a new collage using the Collage developer interface. |
| 6. In the Collage developer interface, you can associate your collage with your products or listings on your shop. This way, whenever a potential customer views a product, they will also see the associated collage. |
| 7. You can choose a theme-specific or custom theme for your collage. The available themes are listed below the collage preview. |
| 8. If you want to customize the appearance of your collage further, you can use the stylesheet options provided. These options allow you to add more control over the colors, backgrounds, and overall look of the collage. |
| By following the steps above, you will be able to create and display product collages to promote your products and increase sales. The Collage developer documentation provides examples and detailed instructions on how to make the most out of this utility. Remember to share your collages on social media platforms and other promotional channels to reach a wider audience and attract more customers to your shop. |
Content views
When creating a product collage, you have many options for how to arrange and display your content. One popular way is to use content views, which allow you to display your products in a visually appealing and organized way.
Content views can be created using a variety of tools and methods, depending on your design preferences and the platform you are working with. For example, on Etsy, you can create content views using the Etsy Collage Maker. This tool allows you to select up to 5 photos from your listings and place them on a sample interface. You can then rearrange and resize the photos to create a collage that showcases your products.
If you prefer a more custom approach, you can also create content views using Photoshop or other design software. In this case, you would design the collage yourself, using the background, photos, and other elements of your choice.
To make your content views work on your website or online store, you will need to import them into your platform’s interface. The exact process will vary depending on the platform you are using, but in general, you will need to register the content view, pick a theme or create a theme-specific design, and then add the content view to your page.
It’s important to note that content views are not only limited to product collages. You can also use content views to create single promotional images, sales banners, or social media posts. The key is to create an eye-catching design that will attract attention and promote your products or brand.
When creating your content views, you have many options and controls to work with. For example, you can change the color, scale, and order of the photos, add backgrounds or other design elements, and even add utility tools like stickers or logos. The goal is to create a visually appealing and human-readable representation of your products or brand.
In order to promote your collages and content views, there are several ways to make them more visible and accessible. You can share them on social media platforms, include them in your email marketing campaigns, or use tools like Outfy to automatically share your collages across multiple platforms.
Overall, content views are a great way to showcase your products and attract potential customers. Whether you are creating a product collage, a promotional image, or a social media post, content views offer a versatile and visually appealing way to display your content.
Theme-specific content views
When creating product collages, you may want to display your products in a way that aligns with a specific theme or aesthetic. Theme-specific content views allow you to customize the look and feel of your collage to match your desired style or branding.
There are various ways to achieve theme-specific content views, depending on your needs and the tools you are using. Here are 3 common options:
-
Using a custom background: One way to create a theme-specific content view is by adding a custom background to your collage. This can be a solid color, a design, or even a sample image that relates to your theme. By importing a background image or using a CSS stylesheet, you can set the tone for your collage and make it more visually appealing for your audience.
-
Adding skins or layers: Another way to achieve theme-specific content views is by adding skins or layers to your product images. Skins are essentially stickers or decorative elements that can be placed on top of your product photos. They can be used to add branding elements, promotional messages, or to highlight specific features of your products. By rearranging and scaling the skins in a graphic design tool like Photoshop, you can create unique and eye-catching collages that align with your theme.
-
Using a theme-specific layout: In some cases, you may want to create a theme-specific content view by using a different layout or listing style. For example, if you are selling on Etsy, you can choose from a variety of listing templates or browse for custom themes created by other sellers. By selecting a layout that matches your theme and properly associating it with your product collage, you can enhance the visual appeal and promote your products effectively.
When going through these options, it’s important to note that you must pick the one that aligns best with your brand and the overall design goals of your collage. The theme-specific content view should be human-readable, easy to navigate, and user-friendly. Keep in mind that the content views you create will often be shared on social media or other promotional platforms, so making them visually appealing and engaging is key.
Below, you can find some examples of theme-specific content views:
- A product collage with a beach-themed background to promote summer sales
- A single product image with a festive sticker for a sticker party
- A collage of products displayed on a grid with different color backgrounds to showcase versatility
By following the above approaches and utilizing the right tools, you can create eye-catching and effective theme-specific content views for your product collages.
Skins views
When creating a product collage, one of the important aspects to consider is the “skins views” or the background of the collage. The background sets the tone for the entire collage and can greatly influence the overall aesthetic appeal of the product display.
There are various ways to create skins views for your product collage. One common method is to use Photoshop or other image editing tools to create backgrounds from scratch. Alternatively, you can also use pre-made background samples or purchase theme-specific backgrounds from third-party websites like Etsy.
Here are some tips on how to create skins views:
- Import images: Import the photos of the products you want to include in the collage.
- Remove the backgrounds: Remove the background of each photo using the selection tools in Photoshop or any other image editing software.
- Arrange the products: Rearrange the products and place them in the desired order on the background.
- Register the products: Associate each product with its corresponding listing or sales attribute.
- Add other elements: If desired, you can add additional elements like a promotional logo or theme-specific graphics.
- Scale and position: Scale and position the products and other elements to ensure they fit well within the collage.
- Stack and merge layers: Stack the product images and other elements in layers to create the final collage.
- Apply Skins views: Apply the desired background or skins views to the collage using the background options in Photoshop or CSS stylesheets.
Note that there are many ways to create skins views, and the examples given above are just a few ways to achieve the desired look for your product collage. It’s important to experiment with different options and tools to find the best approach that suits your specific needs.
Making a product collage with appealing skins views can help showcase your products in a visually engaging way, attracting potential customers and increasing sales. Whether you are using the collage for social media promotion, a shop listing, or other marketing purposes, the right skins views can make a significant difference in its effectiveness.
So, pick the right skins views for your product collage and let your creativity shine!
Content controls
When creating a product collage, there are many ways to add and control the content of your collage. In this section, we will explore some of the ways you can manipulate the product views and add more layers to your collage.
One way to control the content of your collage is by using sample photos or images of your products. You can import these photos into a design tool like Photoshop and use them as a single image or pick and rearrange them to create a collage. This gives you more control over how the products are displayed in your collage.
The removal or addition of promotional stickers or logos is another way to control the content of your collage. By removing or adding these attributes, you can make your collage more theme-specific or associate it with a particular sales theme.
In addition to photos and logos, you can also use other content controls to customize your collage. For example, you can use color schemes, background images, and different skins or themes to change the overall design of your collage. These content controls can be found in the documentation for the collage maker tools you are using.
Another way to control the content of your collage is by using utility controls, such as the ZCML documentation. These controls allow developers to specify what kind of content should be placed on the collage and where it should be placed. This can be particularly useful when you have a lot of content to display and want to ensure that it is all organized and displayed correctly.
When using content controls in your collage, it’s important to note that the more content you add, the more layers your collage will have. This can make it more difficult to follow and understand for your audience. Therefore, you must find a balance between adding enough content to make your collage interesting and informative, but not overwhelming or confusing for your viewers.
In summary, content controls are a great way to manipulate and customize your product collage. Whether it’s through the use of sample photos, removing or adding promotional attributes, or using theme-specific designs and backgrounds, these controls give you the flexibility to create a unique and engaging collage that will be sure to attract attention and promote your products.
Rearrange the stacking order of the layers
When creating a product collage, you may want to rearrange the stacking order of the layers to achieve the desired visual effect. This can be done in several ways, depending on the software or platform you are using to create your collage.
In Photoshop, for example, you can use the layer options to add photos and backgrounds to your collage. Then, you can select the layers and use the “Move” tool to drag and drop them into the desired order. The layers that are placed higher in the stack will be displayed on top of the layers below them.
If you are using Outfy to create your collages, you can use the “Rearrange Layers” controls to change the stacking order. Simply select the layer you want to promote or demote, and then click on the arrow buttons to move it up or down the stack. This way, you can control which elements are displayed in front of others.
In some theme-specific collage tools, such as the one provided by Etsy, you may have the option to rearrange the stacking order by importing your product photos and then associating them with theme-specific attributes. By doing this, you can control the order in which the products are displayed in your collage.
It’s important to note that when rearranging the stacking order of the layers, you must also consider the scale and design of your collage. Make sure that the layers work well together and don’t overlap or create a cluttered look. You can experiment with different arrangements and preview the collage to see how it will look.
By rearranging the stacking order of the layers in your product collage, you can create a more visually appealing design and increase the chances of making sales. So don’t be afraid to try out different ways of arranging your photos and backgrounds to find the best composition for your collage.
More like this
When it comes to creating product collages, there are many theme-specific tools and options to choose from. Whether you are a professional maker or someone who just wants to add some fun to their social media photos, there is a utility out there that can help you make the perfect product collage.
One popular tool for creating product collages is MyDocumentViewBrowserView. This tool allows you to pick and choose images from your own collection or from an online source and then arrange them in layers to create a cohesive and eye-catching collage. With MyDocumentViewBrowserView, you can easily add or remove images, rearrange their placement, and even stack them on top of each other for a more dynamic look.
In addition to MyDocumentViewBrowserView, there are many other tools and options available for creating product collages. For example, Outfy is a great option for promoting your products on social media. This tool allows you to import images directly from your online shop, add logos or stickers, and even customize the background to match your brand. With Outfy, you can create promotional collages that are not only visually appealing but also help boost your sales.
If you are more of a developer, you can create your own custom tool or interface for creating product collages. This gives you the flexibility to design a collage tool that fits your specific needs. For example, you can create a tool that allows for the removal of surplus images or the rearranging of the collage in a specific order.
No matter which tool or method you choose, there are a few key tips to keep in mind when creating product collages:
- Stick to a consistent theme or color scheme.
- Make sure your collage is human-readable and easy to understand.
- Use high-quality images to showcase your products in the best possible way.
- Don’t be afraid to get creative and try different layouts and designs.
- Share your collages on social media or your website to attract attention and generate interest in your products.
By following these guidelines and utilizing the various tools and options available, you can create eye-catching and effective product collages that will help showcase your products and increase sales.