

Wire wrapping is a simple yet beautiful technique for making jewelry with crystals. Whether you’re a beginner or an experienced jewelry maker, wire-wrapped crystal jewelry can be a great addition to your collection. In this step-by-step tutorial, we’ll show you how to wire wrap crystals using different techniques and tools.
The first thing you’ll need are the right tools and materials. You’ll need a mandrel, wire cutters, chain nose pliers, round nose pliers, and a vise or a table clamp. These tools can be found at your local jewelry supply store or online. In addition to the tools, you’ll also need wire in different gauges, beads, and crystals of your choice.
Before you start wire wrapping, it’s important to choose the right crystal for your jewelry. Some crystals are suggested for their healing properties, while others are more for decorative purposes. Tumbled and rough stones are great for beginners as they are easier to work with. Once you’ve chosen your crystal, it’s time to start wrapping!
Begin by making a loop at one end of your wire. This will be the starting point for wrapping the crystal. Insert the crystal into the loop and start wrapping the wire around it. Take your time and wrap the wire tightly but not too tightly. It’s better to go slow and make sure the wire stays in place.
As you’re wrapping, make sure to avoid any sharp edges or points that may scratch your skin. You can use a file or sandpaper to smooth out any rough ends. This will also give your wire-wrapped crystal a more finished look.
When wrapping beads or crystals, you may find that some wires tend to slip or move around. To avoid this, you can use a little bit of glue or a wire wrapping technique called a “wrap and tuck.” This will help secure the wire in place and prevent any movement.
Once you’ve finished wrapping your crystal, you can add additional beads or wire to create a unique design. You can also make wire-wrapped crystal rings or pendants by using a ring or pendant setting. The possibilities are endless, so let your creativity flow!
One last tip: when working with wire, it’s important to have a dedicated space for your wire wrapping projects. This can be a small corner or a dedicated studio. Having a clean and organized space will make your wire-wrapping process more enjoyable and efficient.
Now that you know the secret to creating wire-wrapped crystal jewelry, it’s time to gather your tools and materials and start your own DIY project. Soon enough, you’ll have a collection of beautiful wire-wrapped crystals that will add a touch of elegance to any outfit.
- Simple DIY Wire-Wrapped Crystal Point Tutorial Step-By-Step
- What You’ll Need to Start Wire Wrapping
- Tips on Tables and Chairs
- Wire Wrapping Storage Space
- Wire Jewelry Tools
- What Are the Best Techniques When Wrapping Wire Around Stones
- Choosing the Best Stone for Wrapping
- 1. Size and Shape
- 2. Energy and Healing Properties
- 3. Durability
- 4. Wire Gauge
- 5. Aesthetics
- Secret 5: Go slowly
- Sources
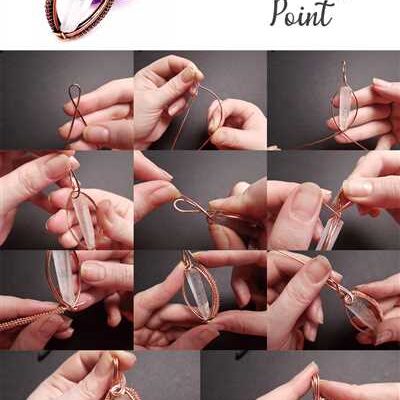
Simple DIY Wire-Wrapped Crystal Point Tutorial Step-By-Step
Wire-wrapped crystal points are a popular way to create unique and beautiful jewelry pieces while harnessing the energy and healing properties of crystals. In this step-by-step tutorial, we will guide you through the process of wire-wrapping a crystal point using simple techniques and tools that you may already have on hand.
What You’ll Need:
- Crystal point of your choice
- Wire (preferably in gauges 18-24)
- Round nose pliers
- Flush cutters
- Chain or beads for necklace or pendant
- Mandrel or any cylindrical object for shaping
- Jewelry storage container
Step 1: Choosing the crystal point
Start by selecting a crystal point that you would like to wire-wrap. You can choose from tumbled stones, rough stones, or even high-quality crystals for a more refined look. The key is to pick a crystal that speaks to you and resonates with your intentions or desires.
Step 2: Preparing your workspace
Ensure you have a clean and organized workspace. Clear any clutter from your table and gather all the necessary tools and materials. Having a dedicated space for jewelry-making will make the process easier and more efficient.
Step 3: Start wire-wrapping
Take one end of your wire and thread it through the hole at the top of the crystal point. Leave about 5-6 inches of wire sticking out. Hold the crystal and wire in place using your non-dominant hand.
Step 4: Begin wrapping the wire
Using your dominant hand, start wrapping the wire around the base of the crystal. Slowly work your way up towards the tip, making sure to keep the wraps tight and close together. This will ensure that the wire holds the crystal securely in place.
Step 5: Choosing the wrap style
You can experiment with different wire wrap styles, such as a simple spiral or a more intricate design. Let your creativity guide you as you shape the wire around the crystal.
Step 6: Shaping the wire
To create a pendant, use a round nose plier to create a loop at the top of the wire wrap. This will allow you to attach a chain or beads later on. Alternatively, you can create a wire-wrapped ring by wrapping the wire around a mandrel or any cylindrical object of your choice.
Step 7: Finishing touches
Trim off any excess wire using flush cutters, leaving a small tail. Use the round nose pliers to tuck the ends of the wire against the wrap, ensuring that they are hidden and don’t scratch or poke the skin.
Step 8: Adding the chain or beads
If you’re making a pendant, open a jump ring or use a jewelry connector to attach a chain to the loop you created. You can also add beads or charms for a more personalized touch.
Step 9: Storing your wire-wrapped crystal
Place your finished wire-wrapped crystal jewelry in a dedicated jewelry storage container to keep it safe and protected. This will also help prevent the wire from tangling with other pieces in your collection.
Now you have learned the best techniques for wire-wrapping crystal points and can create your own wire-wrapped jewelry pieces. Remember to take your time, follow the steps carefully, and enjoy the process. Each piece you create will be unique and carry its own special energy!
What You’ll Need to Start Wire Wrapping
If you’re interested in making your own wire-wrapped crystal jewelry, there are a few simple tools and materials you’ll need to get started. Here’s a suggested list of what you’ll need:
- Crystals: Choose rough or tumbled crystals that you want to wire wrap. These can be stones known for their healing or energy properties.
- Wire: You’ll need wire in different gauges, which refers to the thickness of the wire. For beginners, 22 or 24 gauge wire is a good starting point.
- Cutters: Use wire cutters to trim the wire to the desired length.
- Pliers: Round nose and chain nose pliers are essential for wire wrapping. Round nose pliers are used to create loops, while chain nose pliers are for holding and manipulating the wire.
- Wire wrapping mandrel: This tool is used to shape the wire into a perfect circle or any desired shape.
- Beads: You can use beads to enhance the design of your wire-wrapped crystals. Choose beads that complement the stone or add some extra flair.
- Storage container: Keep your wires, tools, and beads organized in a container to avoid any mix-ups or loss. A small container with separate compartments is ideal.
Once you have all these tools and materials ready, you’ll be all set to start wire wrapping your crystals. Don’t worry if you’re new to wire wrapping – there are plenty of tutorials and step-by-step videos available online to guide you through the process. Take your time, start with simple techniques, and slowly work your way up to more intricate designs.
One secret tip that many wire wrap artists suggest is to always work in a well-lit area with plenty of space. This will help you see the details clearly and avoid any mistakes. Create a dedicated workspace or studio with a table, chairs, and good lighting to make the process more enjoyable.
Remember, wire wrapping is a versatile jewelry-making technique that allows you to showcase the beauty of your crystals in a unique way. With a little practice and the right tools, you’ll be creating stunning wire-wrapped crystal jewelry in no time!
Tips on Tables and Chairs
If you’re setting up a studio space for wire wrapping crystals, you’ll need a sturdy table and a comfortable chair to work on. Here are some tips to help you choose the perfect ones:
Tables: Look for a table with enough space for your tools, gauges, and storage containers. A table with an open design or a rough surface will work best for wire-wrapping, as it will provide more grip for your wires and stones. You can also use a simple DIY table made from tumbled stones or choose a high table for easy access to your work.
Chairs: Opt for a chair that provides good back support and allows you to sit for long periods of time without discomfort. Studio chairs with adjustable heights and backrests are suggested, as they allow you to find the most comfortable position for your work. Choose a chair with armrests if you tend to work with heavy tools or chains.
Storage Containers: To keep your workspace organized, you’ll need storage containers for your beads, wires, and tools. Look for containers that are sturdy and have compartments to keep everything separate and easily accessible. A container with a lid will help you avoid losing small items like beads or wire ends. You can also use a vise or a mandrel as a storage solution for your wires.
Energy and Healing: When choosing a table and chair, consider the energy and healing properties of the materials. Some people believe that certain stones or wood can enhance creativity and concentration. Look for tables made from high-quality wood or choose a table with a crystal inlay. You can also incorporate crystals or stones into your chair’s design for a positive energy boost.
Take your time to find tables and chairs that are comfortable and suit your working style. Remember that the right setup can make a big difference in your wire-wrapping techniques and overall jewelry-making experience.
Wire Wrapping Storage Space
When it comes to wire wrapping crystals, having a dedicated storage space for your tools and materials is essential. A secret to successful wire wrapping is staying organized and having easy access to everything you need. Here are some tips for creating the perfect wire wrapping storage space:
1. Choose a dedicated workspace: Find a table or studio area where you can lay out your tools and materials. This will ensure that you have enough space to work and keep everything organized. Avoid working on chairs or other surfaces that tend to be less stable.
2. Get the right tools: The tools you’ll need for wire wrapping crystals are quite simple. You’ll need wire cutters, chain-nose pliers, round-nose pliers, and a mandrel. These tools will work for both tumbled and rough crystals. Make sure to choose tools of high quality that will last for a long time.
3. Organize your materials: Keep your wires, beads, and other materials neat and easily accessible. You can use small containers or dividers to store different gauges of wire, beads, and findings. This will make it easier to locate the materials you need for each project.
4. Store your crystals: Crystals should be stored in a way that protects their energy and avoids damage. A suggested method is to store them in open containers or on a table with a soft cloth or felt pad. This will prevent the crystals from getting scratched or chipped.
5. Have a designated wire wrapping area: Set up a specific area on your workspace for wire wrapping. This area should have a comfortable chair and good lighting. Having a dedicated area will make it easier for you to focus on your wire-wrapping projects.
By following these tips and setting up a wire wrapping storage space, you’ll be able to create beautiful wire-wrapped crystal jewelry with ease. Take your time to choose the best tools and materials, and start with simple wire wrapping techniques. There are plenty of DIY tutorials and step-by-step videos available online to guide you in your wire wrapping journey. Happy wire wrapping!
Wire Jewelry Tools
When it comes to wire wrapping crystals, having the right tools can make the process much easier and save you time and energy. Here are some essential wire jewelry tools you’ll need to get started:
- Wire cutters: These are used to trim the wire to the desired length and to cut off excess wire after wrapping. Choose wire cutters with a pointed nose for more precise cuts.
- Round-nose pliers: These specialized pliers have round, tapering ends that are perfect for creating loops and curves in your wire. They are great for making jump rings and ear wires.
- Chain-nose pliers: These pliers have short, pointed jaws that are used for gripping and bending wire. They’re excellent for opening and closing jump rings, holding beads or stones, and shaping wire.
- Nylon-jaw pliers: These pliers have nylon jaws that won’t scratch or mar the wire surface. They are great for straightening wire and for holding wire while wrapping.
- Wire mandrel: This tool is used to shape wire into loops and curves of different sizes. It can be a simple metal rod or a set of graduated round mandrels. The mandrel should be securely clamped in a vise or held in a container to prevent it from moving while you work.
- Wire gauges: These are used to measure the thickness of the wire. Different wire gauges are recommended for different wire wrapping techniques. The higher the gauge number, the thinner the wire.
These are just a few of the essential wire jewelry tools you’ll need for wire wrapping crystals. As you gain more experience, you may find that you need additional tools for specific projects or techniques. It’s also important to have a dedicated workspace with sufficient lighting and storage space for your tools and materials.
Remember, the key to successful wire wrapping is practice and patience. With time and effort, you’ll develop your own techniques and find what works best for you. Happy wire wrapping!
What Are the Best Techniques When Wrapping Wire Around Stones
When it comes to wire wrapping crystals, there are several techniques that you can use to ensure that you create beautiful and secure wire wraps. Whether you’re a DIY enthusiast or a jewelry maker looking to add unique pieces to your collection, these techniques will help you create stunning wire-wrapped stone jewelry that showcases the natural beauty of the crystals.
Here are some of the best techniques to use when wrapping wire around stones:
| Technique | Description |
|---|---|
| Start with a Mandrel | Using a mandrel or a cylindrical object as a base will help you create a consistent and even wire wrap. This will ensure that the wire wraps snugly around the stone and holds it securely in place. |
| Go Slowly | Take your time when wrapping the wire around the stone. Slow and steady movements will help you achieve the desired results and prevent any accidental damage to the crystal. |
| Avoid Rough Wires | Choose wires that are smooth and free of any rough edges. Rough wires can scratch the stone or make the wrapping process more difficult. |
| Use Gauges | Different stones require different wire gauges. Thin wires work great for delicate stones, while thicker gauges provide more stability for larger and heavier stones. |
| Choose the Right Tools | Invest in high-quality tools such as jewelry pliers, wire cutters, and chain-nose pliers. These tools will make the wire wrapping process easier and more efficient. |
| Work with Tumbled Stones | Tumbled stones tend to be smoother and rounder, making them easier to wrap with wire. They also have a more consistent shape, which simplifies the wrapping process. |
| Consider the Energy of the Crystal | When choosing crystals to wire wrap, consider their metaphysical properties and the energy that they bring. This can add an extra layer of meaning to the jewelry you create. |
| Use Step-by-Step Tutorials or Video Guides | If you’re new to wire wrapping, there are plenty of step-by-step tutorials and video guides available online. These resources can help you learn different wrapping techniques and improve your skills. |
| Find Your Perfect Wrapping Style | Experiment with different wrapping styles to find the one that suits your personal taste and the stone you are working with. There is no one-size-fits-all technique, so feel free to get creative! |
| Consider Storage and Organization | As you accumulate more wires, beads, and tools, having a well-organized workspace becomes essential. Consider using storage containers, tables, and chairs that will help you keep everything in order. |
By following these techniques, you’ll be able to create beautiful wire-wrapped crystal jewelry that showcases the natural beauty of the stones. Whether you’re making jewelry for yourself or as gifts for others, the process of wire wrapping can be a therapeutic and rewarding experience. So gather your tools, choose your stones, and start creating your own unique wire-wrapped masterpieces!
Choosing the Best Stone for Wrapping

When it comes to wire wrapping crystals, choosing the right stone is essential. Not all stones are suitable for wire wrapping, and some may be more challenging to work with than others. In this section, we will discuss some key factors to consider when selecting a stone for your wire wrapping project.
1. Size and Shape
The size and shape of the stone will determine how easy or difficult it is to wrap. Small, tumbled stones are ideal for beginners as they are easier to handle and work with. On the other hand, rough or irregularly shaped stones may pose more of a challenge. If you are a beginner or short on time, it’s best to start with smaller, more manageable stones.
2. Energy and Healing Properties
Crystals and gemstones are known for their energy and healing properties. Different stones have different vibrations and energies, so choose a stone that resonates with you. Research the properties of various stones to find one that aligns with your intentions or needs. This will not only make your wire-wrapped crystal aesthetically pleasing but also add personalized meaning.
3. Durability
Some stones are softer and more prone to scratches or damage. Be aware of the stone’s hardness and durability when selecting it for wire wrapping. Softer stones may require more gentle handling and careful wire wrapping to ensure they do not get damaged in the process.
4. Wire Gauge
The wire gauge you use will depend on the stone’s size and your desired wire-wrapping technique. Thicker gauges, like 20 or 18 gauge, provide more stability and support for larger stones, while thinner gauges, like 24 or 26 gauge, work well for delicate wrapping techniques or smaller stones. Consider the size and weight of your stone when choosing the appropriate wire gauge.
5. Aesthetics
Lastly, consider the overall look and feel you want to achieve with your wire-wrapped crystal. Some stones have unique colors, patterns, or inclusions that can enhance the aesthetic appeal of your piece. Choose a stone that you find visually appealing and that complements your personal style.
By considering these factors, you can select the best stone for wire wrapping. Remember, practice makes perfect, so don’t be afraid to experiment with different stones and techniques to find what works best for you. Happy wire wrapping!
Secret 5: Go slowly
When it comes to wire wrapping crystals, one secret that can make a huge difference in the outcome of your jewelry is to go slowly. It’s easy to get excited and rush through the process, but taking your time will yield better results.
Start by choosing the right tools for the job. You’ll need a mandrel, wire cutters, and chain-nose pliers, plus a vise or a sturdy table to work on. Make sure your workspace is clean and organized so that you have enough space to lay out your materials and work comfortably.
Tumbled crystals, which are smooth and rounded, are great for wire wrapping beginners. They are easier to work with compared to rough or pointed crystals, and they tend to hold their shape better when wrapped.
Before you start, it’s important to know what type of wire you’ll be using. Different gauges and materials have their own properties, so choose the one that best suits your project.
When wrapping the crystal, take it slowly and don’t rush the process. Work step-by-step, taking extra care with the wire. Make sure to leave enough wire to create an open loop, which will serve as the setting for your crystal.
Don’t be afraid to use your hands and manipulate the wires to get the desired shape. Be patient and take your time to avoid any mishaps.
It’s also a good idea to watch tutorial videos or read step-by-step guides for wire wrapping. This will give you a better understanding of the techniques involved and help you avoid common mistakes.
One important tip to keep in mind is to avoid using nose pliers when wrapping wires. These tools tend to leave marks on the wire and can ruin the overall look of your piece.
As you work, you’ll find that some crystals or stones may need a little extra support. In these cases, you can use additional wires or beads to reinforce the setting.
Once you finish wrapping the crystal, you can choose to create a bail or attach the wire-wrapped crystal directly to a chain. It’s all about personal preference and the overall design you’re aiming for.
Finally, when storing your wire-wrapped crystals or jewelry, keep them in a safe and secure container to prevent damage. A simple storage box or a jewelry organizer with individual compartments is a great option.
Remember, wire wrapping is a process that requires patience and practice. The more you work on it, the better your skills will become. So take your time, go slowly, and enjoy the journey of creating beautiful wire-wrapped crystal jewelry!
Sources
When it comes to wire-wrapping crystals, there are several recommended sources where you can find high-quality crystals for your projects. Here are five suggested sources:
1. Local gem and mineral shows: These events are a great way to find unique and one-of-a-kind crystals. Take your time to explore the show and look for tumbled stones or rough crystals that catch your eye.
2. Online crystal shops: There are plenty of online stores that specialize in selling crystals. You can find a wide variety of stones, from common ones to rare and unique ones.
3. DIY: If you have the time and the skills, you can try making your own crystals. There are many tutorials available on the internet that can guide you through the process step-by-step.
4. Local jewelry supply stores: Some stores carry crystal beads or tumbled stones that you can use for wire-wrapping. These stores often have a wide selection of beads and stones to choose from.
5. Energy healing centers and metaphysical stores: These types of stores tend to have a great selection of crystals for various purposes. They often provide information on the energy and healing properties of each stone, which can be helpful when choosing the right crystal for your wire-wrapping project.
Remember, when working with crystals, it’s important to handle them with care and respect. Take your time and practice your wire-wrapping techniques. Soon, you’ll be creating beautiful wire-wrapped crystal jewelry that perfectly showcases the natural beauty of the stones.


