

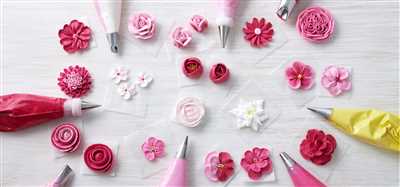
Welcome to our article on how to pipe flowers using buttercream frosting! If you’ve ever wanted to decorate your cakes with beautiful and realistic flowers, then you’re in the right place. In this article, we’ll show you the process of making stunning buttercream flowers, from choosing the right tools to filling the piping bag and piping the perfect petals.
Before we get started, let’s check if you have all the tools you’ll need. For this class, you’ll need a piping bag, piping tips (we recommend starting with small round or petal tips), parchment paper, and a flower nail. If you don’t have these tools yet, you can find them online or at a local baking supply store.
Now that you have all the necessary tools, let’s move on to the first step. Step 1 is to make sure your buttercream frosting is the right consistency. You want it to be soft enough to flow easily through the piping bag, but firm enough to hold its shape. If it’s too soft, you can add more powdered sugar. If it’s too stiff, you can add a little bit of milk or water to thin it out.
Once your buttercream is at the right consistency, it’s time to prepare your piping bag. Start by placing your chosen piping tip in the bag and cutting off the tip of the bag to fit the size of the tip. If you want to pipe roses, we recommend using a smaller Russian piping tip for a pretty and delicate look. Fill the piping bag with buttercream frosting, making sure not to overfill it. You can always add more frosting later if needed.
Now that your piping bag is ready, it’s time to start piping the flowers. We’ll start with the most basic flower, the rose. To pipe a rose, start by piping a small flat circle as the base of the rose. Then, pipe three narrow petals around the circle, slightly overlapping each other. Continue adding more petals, slightly larger than the previous ones, until you reach the desired size. Remember to pipe in a circular motion and use steady pressure.
As you pipe the petals, you can add leaves to make the flower look more realistic. Simply pipe a small leaf shape next to the flower, using a little pressure to create a pointed tip at the end. If you want more variety, you can try piping different types of flowers such as daisies, tulips, or sunflowers.
With patience and practice, you’ll soon master the art of piping buttercream flowers. Remember to start with simple designs and gradually challenge yourself with more complex ones. There are endless possibilities when it comes to decorating cakes with buttercream flowers, so let your creativity flow and enjoy the process!
- How to Make Buttercream FlowersOnline Class
- How To Pipe A Buttercream Rose
- How to Decorate with Russian Piping Tips
- What You Need
- 1 Fill Your Bag
- 2 Pipe a Flower
- 3 Pipe More Flowers
- 4 Add Leaves
- What tools do you need to make buttercream flowers
- How to Make Beautiful Buttercream Flowers for Cakes
- Video:
- How to Pipe Buttercream Roses 3 METHODS buttercream flowers
How to Make Buttercream FlowersOnline Class
If you want to learn how to pipe beautiful buttercream flowers, then the Buttercream FlowersOnline Class is for you. In this class, you’ll find all the steps and tips you need to create stunning floral decorations for your cakes.
First, you’ll need some tools and materials. Here’s a list of what you’ll need:
- Piping bag
- Narrow piping nozzle
- Parchment paper or flower nail
- Buttercream frosting
- Food coloring (optional)
Once you have all your materials ready, you can start the process of making buttercream flowers. Here’s how:
- Fill your piping bag with buttercream frosting. If you want to make different colored flowers, divide the frosting into separate bowls and add food coloring to each.
- Place a small amount of frosting on the parchment paper or flower nail to stick it in place on your work surface.
- Starting with roses, pipe three small petals in a triangular shape, with the pointed ends facing towards the center.
- Add three more petals around the first three, slightly overlapping them. Continue adding petals until you have a full rose with the desired number of layers.
- For leaves, pipe small tear-shaped blobs, starting narrow and widening out towards the tip. You can pipe leaves separately or directly onto the flowers.
- Check out the article above for more detailed instructions on how to pipe other types of buttercream flowers like Russian nozzles and more.
As you’re piping, be sure to apply consistent pressure to your piping bag to create even and smooth petals. If you’re finding it difficult to control the flow of buttercream, you can practice on a flat surface before moving on to the cake.
Remember, making buttercream flowers requires patience and practice. Don’t be discouraged if your first attempts don’t turn out perfectly. With time and practice, you’ll be able to create stunning floral decorations.
So, if you’re ready to learn how to make buttercream flowers, sign up for the Buttercream FlowersOnline Class today on Cakeflix. It’s the best way to master the art of piping beautiful flowers!
How To Pipe A Buttercream Rose
Decorating a cake with buttercream roses is a beautiful process that can elevate your cake to a whole new level. Whether you’re a beginner or an experienced cake decorator, learning how to pipe buttercream roses is a skill that you can use to create stunning floral designs.
Here at Cakeflix, we have a step-by-step guide to help you master the art of piping buttercream roses. So, let’s get started!
Step 1: Gather Your Tools
Before you begin piping, make sure you have all the necessary tools and supplies. You’ll need a piping bag, narrow tips for smaller petals, larger tips for bigger petals, and a leaf tip. It’s best to use a Russian piping tip for making roses, as it creates the most beautiful and realistic flowers. You’ll also need a small spatula or knife to fill your piping bag with buttercream frosting.
Step 2: Fill the Piping Bag
Half-fill your piping bag with buttercream frosting. If you want to create multi-colored roses, you can add different colored buttercream in separate sections of the bag. This will give your roses a gradient effect.
Step 3: Start Piping
Place a small piece of parchment paper on a flat surface. Hold your piping bag at a 90-degree angle above the parchment paper. Start piping by applying steady pressure and moving in a circular direction. Use a smaller tip for the inner petals and a larger tip for the outer petals.
Step 4: Pipe the Petals
To create the petals, pipe a small dot in the center and a few more dots around it. Then, using a sweeping motion, add more petals around the center, gradually making them smaller as you go towards the outer edge. Check out our cake decorating class on FlowersOnline for more detailed instructions on piping different types of petals.
Step 5: Add Leaves
Pipe leaves around the roses to make them look more realistic. Use a leaf tip and apply gentle pressure to create long, thin leaves. Place them strategically around the roses to enhance their beauty.
Step 6: Patience Is Key
Piping buttercream roses requires patience and practice. Don’t worry if your first few roses don’t turn out perfect. With time and practice, you’ll improve your piping skills and create beautiful roses.
So, what are you waiting for? Get your piping bags and buttercream ready, and start creating beautiful buttercream roses today. Remember to have fun and enjoy the process!
How to Decorate with Russian Piping Tips
If you want to make your cakes look even more beautiful, then you’ll love decorating with Russian piping tips. These special nozzles create stunning flower designs that will impress your guests. In this article, we’ll show you the steps and tips for piping pretty flowers on your cake using Russian piping tips.
Before you start, you’ll need a few tools. First, you’ll need a piping bag filled with buttercream frosting. You’ll also need Russian piping tips, which are larger and have a more narrow opening than regular piping tips. You can find these tips at cake supply stores or online.
To begin, carefully cut a piece of parchment paper and place it on a flat surface. This will make it easier to pipe the flowers and transfer them onto your cake. Next, choose the Russian piping tip you want to use for the flower. You can start with a smaller one, like a 1M or 2D tip, and work your way up to larger tips for bigger flowers.
Start by adding a little frosting to the center of the parchment paper. This will act as a base for your flowers. Then, apply gentle pressure to the piping bag and pipe a blob of frosting on top of the base. This will be the center of your flower.
Next, carefully pipe petals around the center blob. To do this, start at the base of the blob and pipe a petal shape, moving the piping bag in a half-circle motion. Repeat this process to add more petals, overlapping them slightly to create a full flower shape.
If you’re making roses, you can add leaves by piping small tear-drop shapes next to the flower. For other flower designs, you can add little leaves or swirls using a leaf tip or writing tip.
Once you’ve finished piping your flowers, carefully lift the parchment paper and transfer the flowers onto your cake. You can gently press them onto the cake to secure them in place.
If you’re making a multi-tiered cake, you can pipe flowers on each tier to create a cascading effect. Just remember to start at the top and work your way down.
To fill in any gaps or add more dimension to your cake, you can pipe some small leaves or tiny flowers between the larger flowers. This will give your cake a more intricate and artistic look.
Now that you know how to decorate with Russian piping tips, you can create stunning flower designs on your cakes. With a little practice and patience, you’ll be able to make the most beautiful and impressive cakes for any occasion.
For more tips and step-by-step directions, check out the cake decorating classes on CakeFlix. They have a wide range of tutorials that will help you become a pro at piping flowers and creating amazing cake designs.
What You Need
In order to decorate your cakes with beautiful piped flowers, you’ll need a few tools and supplies. Here’s a list of what you’ll need:
|
|
These tools will help you in the process of making beautiful piped flowers on your cakes. If you don’t have these tools, you can find them at your local cake decorating supply store or online. It’s best to have a variety of flower nozzles and tips so you can create different types of flowers. Now that you have what you need, let’s move on to the next steps.
1 Fill Your Bag
Before you can start piping beautiful flowers onto your cakes, you’ll need to fill your piping bag with buttercream frosting. Follow these steps to prepare your bag:
- Choose a piping bag with a small, narrow nozzle. The nozzle should be narrow enough to create delicate details on your flowers. If you don’t have a piping bag, you can find them at most food or cake decorating supply stores.
- If you’re using a disposable piping bag, you’ll need to cut off the tip. Start by cutting a small opening and then gradually make it bigger until you have the desired width for your flowers. If you’re using a reusable bag, attach the nozzle securely.
- Place the bag in a tall glass or cup and fold the top half of the bag over the glass. This will make it easier to fill the bag with frosting while keeping your workspace clean. If you’re working with a smaller bag, you can use a smaller glass or cup.
- Add your buttercream frosting to the bag. You can use any type of buttercream frosting you prefer, but Swiss meringue buttercream or Italian buttercream work best for piping flowers. Fill the bag about half full, as you’ll need enough room to twist the top and create pressure when piping.
- Twist the top of the bag firmly to secure the frosting inside. Make sure there are no air pockets or gaps in the bag. If you see any, press the frosting towards the tip of the bag and twist again.
Now that your bag is filled and ready to go, you can move on to the next steps of piping your beautiful flowers. Check out the rest of this article for tips on how to pipe different types of flowers and create stunning designs on your cakes.
2 Pipe a Flower
When it comes to piping flowers, the best tool you can use is a piping bag fitted with a small round nozzle. The size of the nozzle will depend on what type of flower you’re making, but a smaller one is usually best for most flowers.
Before you start piping, make sure you have prepared your buttercream frosting and filled your piping bag. If you’re unsure how to do this, you can find a step-by-step process in the previous section of this article.
To pipe a beautiful flower, you’ll need to apply the right amount of pressure to your piping bag. This can be a bit tricky at first, so be patient with yourself. Start by piping a small amount of frosting onto a piece of parchment or a flat surface, just to check the consistency and flow of your buttercream.
Next, place your piping bag at a 45-degree angle above your cake where you want to pipe the flower. Starting from the center, apply steady pressure to the bag and pipe the first petal in a circular motion, moving in an outward direction. Repeat this process to pipe the remaining petals, making sure to overlap each one slightly.
If you’re making a rose, the process will be slightly different. Here, start by piping a small cone shape as the center of the rose. Then, pipe the petals one by one around the center, making sure to angle the piping bag slightly upwards as you go. This will give your rose a more realistic look.
Remember to pipe the flowers in class for a more beautiful and delicate look. You can also add leaves to your flowers by piping small tear-drop shapes at the base of each flower.
Once you’ve piped your flowers, let them sit for a while to dry and set. This will help them hold their shape better when you transfer them onto your cake. If you find that your flowers are not holding their shape, you may need to adjust the consistency of your buttercream frosting.
Overall, piping flowers can be a fun and creative way to decorate your cakes. With a little practice and patience, you can create stunning flower designs that will impress your friends and family. So, grab your piping bag, some buttercream, and start piping beautiful flowers today!
3 Pipe More Flowers
If you’ve already learned how to pipe roses, then it’s time to move on to some other beautiful flower designs! In this article, we’ll show you how to pipe three more types of flowers using buttercream frosting. These flowers are perfect for decorating cakes and will add a pretty touch to any special occasion.
The first flower we’ll show you how to pipe is the Russian tip rose. With a large, narrow nozzle, you can create beautiful roses with just a few simple piping techniques. To start, place a small amount of buttercream on a piece of parchment or a cake board. Then, starting in the center, pipe a flat spiral of frosting, making sure to keep the pressure consistent as you go.
Next, we have the smaller version of the rose. Using a smaller nozzle, you’ll need to add more petals to create a fuller flower. Start by piping a small dot in the center and then pipe petals around it in a circular motion. Check the direction of your piping to make sure the petals are facing the right way.
Finally, we’ll show you how to pipe a simple yet elegant flower. Using a small round tip, you can create delicate little flowers with just a few well-placed dots of frosting. Start by piping a dot in the center, then add dots around it to form the petals. You can vary the size and shape of the petals for a more unique look.
So there you have it – three more flower designs to add to your piping repertoire! Whether you’re a beginner or an experienced decorator, these flowers are sure to impress. Just remember to have patience and practice, as piping takes time to master. With the right tools and a little creativity, you’ll be able to create stunning flower decorations for your cakes in no time. Happy piping!
4 Add Leaves
If you’ve followed the previous steps, you now have a pretty set of piped flowers on your cake. Great job! Now let’s add some leaves to make them even more beautiful. Here’s how:
1. Fill a piping bag with green buttercream frosting. Use a small round nozzle for this process.
2. Starting from the base of each flower, pipe a small leaf shape using a narrow, pointed tip. Make sure to apply gentle pressure and move your hand in a steady motion to create a realistic leaf shape.
3. Add more leaves above and around the flowers, spacing them out evenly. You can pipe larger leaves for bigger flowers and smaller leaves for smaller ones.
4. Carefully check that all the flowers and leaves have been piped, and then step back and admire your beautiful cake! You’ve successfully decorated your cake with piped flowers and leaves.
Remember, practice makes perfect. If you’re just starting out, don’t worry if your flowers and leaves aren’t perfect right away. With patience and practice, your piping skills will improve. Check out online tutorials and classes like those offered by Cakeflix and Flowersonline for more tips and direction.
Now go ahead and enjoy your gorgeous cake!
What tools do you need to make buttercream flowers
To show off your skills in cake decorating, you’ll need the right tools for making beautiful buttercream flowers. Here are the essential tools you’ll need:
- A piping bag: this is the most important tool for piping flowers. Choose a bag that is sturdy and easy to handle.
- Nozzles: invest in a set of Russian piping tips, which come in various shapes and sizes. These tips will give your flowers a realistic look.
- Parchment paper or flower nail: these tools are used to pipe flowers on. Place a small dot of frosting on the parchment or nail to secure the flower.
- Frosting: of course, you’ll need buttercream frosting for piping your flowers. You can find many recipes online, but make sure to check the consistency – it should be thick enough to hold its shape.
Now that you have all the necessary tools, let’s move on to the steps:
- Fill your piping bag with the frosting, but only fill it halfway to give yourself more control over the piping process.
- Starting with a flat piping tip, pipe a small mound in the center of your flower nail or parchment paper. This will be the base of your flower.
- Next, add three larger petals around the base, making sure to pipe in a clockwise direction. Apply gentle pressure to ensure the petals stick to the base.
- Now, pipe three smaller petals on top of the larger ones, offsetting them so that they fit between the larger petals.
- Add a few more layers of petals, gradually decreasing the size with each layer. This will give your flower a more realistic and dimensional look.
- Once your flower is complete, carefully transfer it to your cake using a spatula or your fingers. If your frosting is too soft, place the flower in the refrigerator for a few minutes to firm up.
- If you want to add leaves to your flower, change your piping tip to a leaf tip and pipe leaves around the base of the flower.
Decorating cakes with buttercream flowers takes practice and patience, but with the right tools and steps, you can create stunning floral designs. Check out cake decorating classes online or watch tutorials on platforms like CakeFlix or Food Class to learn more advanced techniques and tips. Happy piping!
How to Make Beautiful Buttercream Flowers for Cakes
Buttercream flowers are a beautiful way to decorate cakes and add a touch of elegance. Whether you’re a beginner or an experienced cake decorator, piping flowers with buttercream can be a fun and creative process. In this article, we’ll show you the steps to make stunning buttercream flowers for your cakes.
- Start by preparing your buttercream frosting. You’ll need a small piping bag and a set of small tips. If you don’t have these tools, you can find them at your local baking supply store or online.
- Fill your piping bag with buttercream frosting. If you want to make different colors of flowers, you can divide the buttercream into separate bowls and add food coloring to each bowl.
- Choose a small round tip for making roses. Start by piping a small dot in the center of the flower. Then, pipe petals around the dot, gradually increasing the pressure as you move outward. You’ll need to be patient and careful with each petal to make the rose look beautiful. Repeat this process to make as many roses as you desire.
- For other flower shapes, you can use a larger round tip or a narrow star tip. Pipe a small dot in the center of the flower and then pipe petals or leaves around the dot in a circular or spiral motion. You can experiment with different directions and shapes to create unique and beautiful flowers.
Remember to check the article for more detailed instructions and tips on piping buttercream flowers. The best part about piping flowers is the freedom to create your own designs and make each cake a work of art. So grab your piping bag, some buttercream frosting, and let your creativity flow!


