

Tie-dyeing is an ancient art form that allows you to create colorful and unique patterns on your shirts. Whether you’re a pro or a beginner, tie-dyeing is a fun and creative way to give your clothes a new life. In this article, we’ll show you the basics of how to tie-dye shirts and help you avoid any common mistakes.
First, you’ll need to gather your materials. You’ll need a plastic bucket or container to hold your dye, rubber bands to secure the fabric, and a gallon of water for the dye mixture. You’ll also need different colored dyes, which you can find at craft stores or online. If you’re unsure about which colors to choose, go with a variety of shades to create a colorful and vibrant design.
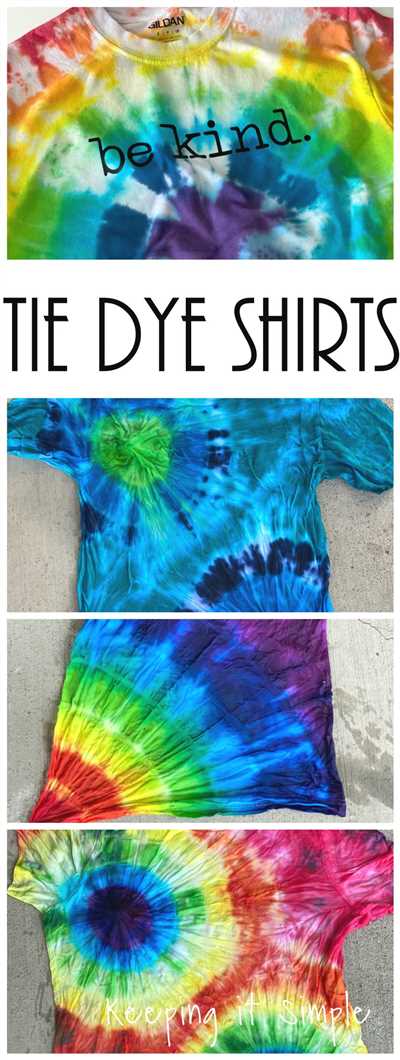
The next step is to prepare your shirts. Start by wetting the shirts to prevent the dye from running. Lay the shirt flat and decide where you want the design to be. You can either create multiple small designs or one large design on the entire shirt. Different folding and twisting techniques will yield different patterns, so experiment and have fun!
Once you’ve decided on the design, you can start applying the dye. Pour your chosen colors into separate plastic bottles, making sure to mix them according to the instructions on the dye package. Use the bottles to apply the dye to the different sections of the shirt, making sure to saturate the fabric. If you prefer a more vibrant design, you can apply more dye.
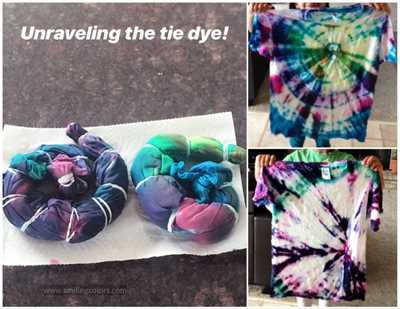
After applying the dye, it’s time to wrap and let the shirts sit. Wrap each shirt in plastic wrap or place them in individual plastic bags. Make sure the shirts stay wet and that the dye doesn’t leak onto other items. Let the shirts sit for at least 6-8 hours, or overnight if you can. This will allow the dye to fully penetrate the fabric and create vibrant colors.
Once the shirts have sat for the required time, rinse them thoroughly with cold water to remove any excess dye. You can then remove the rubber bands and unfold the shirts to reveal your unique tie-dye patterns. Let the shirts air dry, and voila! You’re now ready to start wearing your one-of-a-kind creations.
Remember, tie-dyeing can be messy, so it’s important to protect your work area and wear old clothes. Also, certain fabrics and materials may not work well with tie-dye, so choose your shirts wisely. By following these steps and experimenting with different techniques, you’ll soon become a tie-dyeing pro. So get creative, have fun, and enjoy the colorful world of tie-dye!
- How To Tie Dye T-Shirts
- Materials you’ll need:
- Step 1: Prepare your work area
- Step 2: Prep your shirts
- Step 3: Create your tie-dye design
- Step 4: Mix your dye
- Step 5: Apply the dye
- Step 6: Let it set
- Step 7: Rinse and dry
- Step 8: Enjoy your tie-dye shirts!
- How To Tie Dye
- Choosing the right shirt
- What You’ll Need
- Materials
- Video:
- How to create SPIRAL using "Fork"
How To Tie Dye T-Shirts
Tie dye shirts are a fun and colorful way to create unique designs on your clothing. Whether you’re wearing them for a special occasion or just for fun, tie-dye shirts can add a pop of color to any outfit. In this tutorial, we’ll show you how to create your own tie-dye shirts using the rubber band method.
Materials you’ll need:
- T-shirts
- Rubber bands
- Plastic bucket or container
- Gallon-sized plastic bottles
- Tie-dye dyes (choose your favorite colors)
- Plastic wrap
- Flat surface to work on
- Protective gloves
Step 1: Prepare your work area
Choose a flat surface to work on, like a table or the ground. Lay down some plastic wrap to protect the surface from any dye spills.
Step 2: Prep your shirts
Take your T-shirts and lay them flat on the work area. You can choose whether to dye the entire shirt or just a portion of it. If you’re only dyeing a portion, decide where you want the design to be. You can create different patterns by folding, twisting, or pleating the fabric.
Step 3: Create your tie-dye design
Start by pinching and twisting the fabric in the areas you want the dye to penetrate. Use rubber bands to secure the twisted sections. The tighter you twist and secure the fabric, the more white spaces will be visible in the final design.
Step 4: Mix your dye
Follow the instructions on the tie-dye dye bottles to mix the dyes. Use different colors to create a colorful design. Pour the dye into the plastic bottles for easy application.
Step 5: Apply the dye
Wearing protective gloves, start applying the dye to the fabric. Squeeze the dye out of the bottles and onto the different sections of the shirt. Make sure the dye saturates the fabric completely.
Step 6: Let it set
Once you’ve applied the dye, wrap each shirt in plastic wrap to keep the fabric moist. Let the shirts sit for the recommended amount of time, usually 6-8 hours. This will allow the dye to set and create vibrant colors.
Step 7: Rinse and dry
After the recommended time has passed, remove the plastic wrap and rinse each shirt under cold water until the water runs clear. Then, wash the shirts separately in the washing machine with cold water. Hang them to dry or tumble dry on low heat.
Step 8: Enjoy your tie-dye shirts!
Once dry, your tie-dye shirts are ready to be worn and shown off. Pair them with your favorite jeans or shorts for a funky and unique look. Whether you’re rocking them at a music festival or just around the house, your tie-dye shirts will definitely stand out!
How To Tie Dye
Whether you’re looking to create colorful shirts or add a unique touch to your clothing, tie-dye is a staple DIY project. Follow these steps to learn how to tie-dye like a pro!
- Choose the right materials: You’ll need a gallon-sized container, rubber bands, dye bottles, and t-shirts or other items to dye.
- Prepare your workspace: Lay a plastic flat on a table to protect it from any running dye.
- Prep your shirt: Start by soaking your shirt in water to help the dye absorb evenly.
- Tie your shirt: There are various techniques to tie your shirts, such as the spiral, bullseye, or crumple method. Choose the one you’re most comfortable with!
- Apply the dye: Use your chosen colors and pour them into separate dye bottles. Apply the dye to the tied sections of the shirt, making sure each section is fully saturated.
- Wrap it up: Wrap your dyed shirt in plastic wrap or seal it in a plastic bag. Let it sit for a few hours (or as directed by the dye instructions) to allow the colors to set.
- Rinse and wash: After the dye has set, rinse your shirt under cold water until the water runs clear. Remove the rubber bands and rinse again before washing it in cold water.
- Avoid color bleeding: When drying your tie-dye shirt for the first few times, it’s best to dry it separately to avoid any color bleeding onto other clothes.
- Enjoy your new creation: Once the shirt is dry, you can proudly wear your homemade tie-dye masterpiece!
Remember, tie-dye can be a messy project, so make sure to wear old clothes and protect your work area. With a little practice and creativity, you’ll be able to create unique and eye-catching designs on your clothing!
Choosing the right shirt
When it comes to tie-dye, the item you choose to work with can greatly impact the final result you’ll create. One of the basics you’ll need is a shirt, preferably made of cotton or another natural material that will absorb the dye well.
Before you start, determine what type of design you want to make. For more detailed designs, choose a shirt that is slightly larger than your usual size. This will give you more room to work with and create intricate patterns.
When it comes to the material of the shirt, avoid choosing one that is too thick or heavy, as it may not absorb the dye properly. A lightweight and breathable fabric, like cotton, is ideal for tie-dyeing.
Additionally, consider the color of the shirt you’re using. Darker colors can make it difficult for the dyes to show up, so it’s best to start with a white or light-colored shirt. This will allow the dyes to truly shine and create vibrant, colorful patterns.
Lastly, make sure you’re wearing clothes that you don’t mind getting dirty, as tie-dyeing can be a messy process. Protect your work area with a plastic tablecloth or garbage bags to prevent any accidental dye spills.
Now that you have the right shirt and materials, you’re ready to begin creating your own tie-dye masterpiece! Remember to have fun and experiment with different techniques to achieve the desired effect.
What You’ll Need
When it comes to tie-dye, there are a few staple items you’ll need to have on hand. These materials will help ensure a successful and colorful tie-dye experience. Here’s a list of what you’ll need:
- Flat surface for work area – whether it’s a table or the ground, make sure it’s a flat and stable surface.
- Plastic wrap or garbage bags – to cover your work area and avoid any dye from running onto surfaces you don’t want to stain.
- Rubber gloves – to protect your hands from the dye. Make sure you choose gloves that fit well and are comfortable.
- Tie-dye dyes – you’ll need various colors of tie-dye dyes to create your colorful designs. You can purchase pre-made dye kits or mix your own colors using dye bottles.
- Plastic squeeze bottles – these small plastic bottles are used to pour and apply the dye onto the fabric. Make sure the bottles have a fine tip for more precise application.
- A gallon-sized plastic bucket – this will be used to mix the dye. Make sure it’s clean and will not react with the dye.
- Rubber bands – these are an essential item for creating the tie-dye patterns. You’ll use them to bind the fabric and create the resist areas.
- White cotton shirts or other clothing items – make sure the item you’re tie-dyeing is made of natural fibers like cotton to achieve the best results.
- Finger protectors or gloves – if you don’t want to get dye on your fingers, consider using finger protectors or gloves to keep them clean.
Now that you know what you’ll need, you’re ready to dive into the colorful world of tie-dye. Happy creating!
Materials
When it comes to tie-dyeing shirts, you’ll need a few materials to get started. Here’s a list of the essentials:
| dyes | a variety of colorful dyes to create vibrant designs on your clothes |
| gallon-sized bottles | containers that will hold the dyes and make it easy to pour and work with |
| rubber gloves | wear these to avoid staining your hands |
| plastic wrap | cover your tie-dye project with plastic wrap to keep it flat and prevent the colors from bleeding |
| bucket | a staple item for tie-dyeing, used to mix the dyes and hold the shirts |
| t-shirts | these are the items you’ll be tie-dyeing, make sure you choose the right size and fabric |
These are the basic materials you’ll need, but depending on how elaborate you want your tie-dye designs to be, you might also want to have some other supplies on hand. For example:
- Finger paint
- Glitter
- Sequins
- Stencils
Feel free to get creative and experiment with different materials to make your tie-dye shirts truly unique!


