If you want to add a personal touch to your messages on iOS, making stickers is a great option. With the right apps and a step-by-step guide, you can easily create and use your own stickers on your iPhone.
There are several third-party apps available on the App Store that can help you in making stickers. Some popular options include PicsArt, Pixlr, and Fotor. These apps have built-in editing tools and a library of images that you can use as a background or subject for your stickers.
Here’s a guide on how to make stickers using PicsArt:
- First, download and launch the PicsArt app from the App Store.
- Select the “Edit” option from the menu at the bottom of the screen.
- Choose the image you want to turn into a sticker from your gallery or take a new picture.
- Open the editing tools and adjust the picture according to your preference.
- Then, find the “Cutout” option and use it to select the part of the image you want to turn into a sticker. You can adjust the selection using the built-in tools.
- Select the “Stickers” option from the menu and choose the sticker packs that you have downloaded or create your own from the chosen image.
- Once you have selected the stickers you want to use, just copy and paste them into your message or turn them into an icon for your home screen.
- Optionally, you can add more stickers to your library by downloading packs from the PicsArt store or by creating them yourself.
With these easy steps, you will be able to create and use your own stickers on your iPhone. Have fun expressing yourself with customized stickers!
- How to make a sticker from your photos on iPhone: A step-by-step guide
- Step 1: Download the apps
- Step 2: Open the app
- Step 3: Choose the photo you want to turn into a sticker
- Step 4: Make adjustments and add effects (optional)
- Step 5: Convert the picture into a sticker
- Step 6: Save and use your sticker
- Making Live Stickers from Your Photos
- 2 Use Photos
- 3 Fotor
- 5Pixlr
- 6PicsArt
- Convert images into stickers on iPhone
- Video:
- WHAT YOU NEED TO START A STICKER BUSINESS • How I Started My Sticker Shop On A Budget 2022
How to make a sticker from your photos on iPhone: A step-by-step guide
If you have an iPhone and want to create your own stickers from your photos, you’re in luck! There are several built-in and third-party apps that you can use to easily convert your images into stickers. In this guide, we will take you through the step-by-step process of making stickers on your iPhone using two popular apps: PicsArt and Pixlr.
Step 1: Download the apps
- Go to the App Store on your iPhone and search for “PicsArt” or “Pixlr”.
- Select the right app from the search results and tap on “Get” or the download icon to download and install the app.
Step 2: Open the app
- Once the app is installed, find its icon on your home screen and tap on it to launch the app.
- If prompted, allow the app to access your photo library.
Step 3: Choose the photo you want to turn into a sticker
- In PicsArt, tap on the “+” icon and select “Photos” to open your photo gallery. In Pixlr, tap on the gallery icon.
- Browse through your photo library and select the image that you want to use as a sticker.
- In PicsArt, tap on the chosen image and select the “Stickers” option in the menu that appears. In Pixlr, you can just start editing the image right away.
Step 4: Make adjustments and add effects (optional)
- In both apps, you will find various editing tools and options to adjust and enhance your picture. Use these tools to make your sticker look better.
- You can also add filters, text, or other overlays to your sticker.
Step 5: Convert the picture into a sticker
- In PicsArt, tap on the “Cutout” option, and then use your finger to manually trace the subject in the picture that you want to turn into a sticker. The background will be removed automatically. In Pixlr, use the selection and eraser tools to remove the background.
- Once you have made the necessary adjustments, tap on “Apply” or “Done” to convert the picture into a sticker.
Step 6: Save and use your sticker
- After converting the picture into a sticker, you can save it to your sticker packs or copy it to the Apple sticker library.
- In PicsArt, you can find the saved sticker in the “My Stickers” tab, while in Pixlr, you can find it in the “Stickers” menu.
- You can now use your sticker in messaging apps like iMessage or WhatsApp. Simply open the app, open a conversation, and tap on the sticker icon. You will find your stickers in the “Recently Added” or “Frequently Used” section.
With these step-by-step instructions, you now know how to make a sticker from your photos on iPhone. Get creative and have fun making your own personalized stickers to send to your friends and family!
Making Live Stickers from Your Photos
If you have an iPhone, you can create your own live stickers to add a fun and personal touch to your messages. There are several built-in apps that allow you to easily convert your photos into stickers. In this guide, we will show you how to make live stickers step-by-step.
Step 1: Open the Photos app on your iPhone and select the photo you want to turn into a sticker. This can be any picture from your gallery.
Step 2: Tap the “Share” icon (it looks like a square with an arrow pointing up) and find the option to “Copy” the image.
Step 3: Launch the app “PicsArt” from your home screen. If you don’t have it, you can download it from the App Store.
Step 4: When you open PicsArt, you will see a menu at the bottom of the screen. Tap on “Edit” to start editing your photo.
Step 5: From the editing menu, select the “Sticker” icon. You will find this option on the right-hand side.
Step 6: Now, you will see several sticker packs that you can use. Select the pack you want to use or find more stickers by tapping on the “More Stickers” option.
Step 7: When you have chosen a sticker pack, you can adjust its size and position on your photo. Just tap on the sticker and move it around or use the handles to resize it.
Step 8: If you want to make the sticker a live sticker, tap on the “Live” option. This will add a subtle animation to your sticker.
Step 9: Once you are happy with your sticker, tap on the checkmark icon to save it.
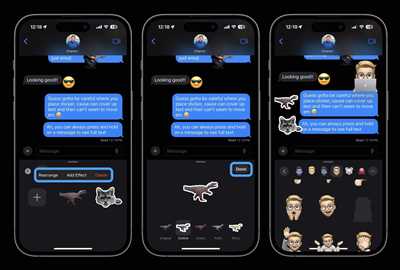
Step 10: Your sticker is now ready to use in your messages. Open the Messages app and select a conversation. Tap on the emoji icon and find your sticker in the recently used stickers section.
Step 11: To send your sticker, simply tap on it and it will be added to your message.
By following these steps, you can easily make your own live stickers from your photos on your iPhone. Have fun and get creative with your sticker designs!
2 Use Photos
If you want to make stickers using your own photos, you can do that too! There are several ways to convert images into stickers on your iPhone. In this guide, we will show you two ways of making stickers using the Photos app on your iPhone.
Option 1: Using the built-in Photos app
- Open the Photos app on your iPhone.
- Select the picture you want to turn into a sticker.
- Tap the share icon (the square with an arrow pointing up).
- Scroll through the options and find “Copy.”
- Launch a third-party sticker-making app (such as Pixlr or PicsArt) from your home screen.
- Paste the image you have copied into the app.
- Adjust the image, if needed, and save it as a sticker.
- The sticker will now be added to your collection and can be used in messaging apps.
Option 2: Using the Live Photos feature
- Select a Live Photo from your Photos library.
- Tap the share icon (the square with an arrow pointing up).
- Scroll through the options and find “Save as Sticker.”
- The Live Photo will be converted into a sticker and added to your collection.
- You can now send the sticker in messaging apps.
Note that the options mentioned above are only available when using iOS 17 or later. If you don’t have this version of iOS, you may only have the option to copy the image instead of saving it as a sticker. To access more sticker-making features, you can download third-party apps like Pixlr, PicsArt, or Fotor, which provide additional editing options and sticker packs.
3 Fotor
If you’re looking for a built-in option right on your iPhone to create stickers, Fotor is a great choice. With Fotor, you can easily turn your photos into stickers and use them in various messaging apps.
To start, you’ll need to download and launch the Fotor app from the App Store. Once you have it installed, open the app and select the “Edit” option from the menu at the bottom of the screen.
From the editing menu, find the “Sticker” icon, which looks like a square with a smiley face inside. Tap on that to open the sticker editing options.
There are several ways you can make stickers with Fotor. You can choose from the sticker packs that come with the app, or you can select your own images from your photo library or gallery. If you want to find more sticker packs, you can optionally download third-party sticker apps from the App Store.
To turn your images into stickers, select a picture from your library or gallery. Then, use the tools provided by Fotor to adjust the background and subject of the image. You can also add text or emoji to your stickers to make them even better.
Once you have chosen your image and made any adjustments, tap on the “Save” or “Copy” option to save the sticker to your photo library or copy it to your clipboard. The sticker will then be available for you to use in messaging apps like iMessage or WhatsApp.
Fotor is a great option for making stickers on your iPhone, and it’s a simple and straightforward process. With just a few steps, you can create your own personalized stickers and send them to your friends and family.
5Pixlr
If you want to make stickers on your iPhone, you have several options. One great option is to use the 5Pixlr app, which is available for download from the App Store.
Here is a step-by-step guide on how to use 5Pixlr to make stickers:
| Step 1: | Launch the 5Pixlr app on your iPhone. |
| Step 2: | Select the image you want to convert into a sticker from your photo library or take a new picture using the built-in camera option. |
| Step 3: | Adjust the image as needed using the various editing tools provided by 5Pixlr. You can crop, resize, and apply filters to make your sticker look better. |
| Step 4: | When you are happy with the image, go to the Tools menu and select the “Stickers” option. |
| Step 5: | Choose the right icon pack from the available options. You can also optionally add a background to your sticker. |
| Step 6: | Move the slider to adjust the opacity of your sticker and then click on the “Apply” button. |
| Step 7: | After making all the necessary adjustments, click on the “Save” button to save your sticker to the 5Pixlr Sticker Library. |
| Step 8: | To use your sticker in other apps, go to the 5Pixlr Sticker Library, tap on the sticker you want to send, and click on the “Copy” button. |
| Step 9: | Open the app where you want to use the sticker, like iMessage or WhatsApp, and paste the sticker into your message or chat. |
That’s it! With 5Pixlr, you can easily create and use your own stickers on your iPhone. Enjoy!
6PicsArt
If you want to know how to make stickers on your iPhone, there are several apps available that can help you with this. One such app is 6PicsArt, which offers a wide range of editing options and tools to turn your images into stickers. This guide will show you how to use the app to create your own stickers for use on your iPhone.
| Step 1 | Launch the 6PicsArt app on your iPhone. If you don’t have it, you can download it from the App Store. |
| Step 2 | Open the image you want to convert into a sticker. You can either choose an image from your gallery or take a new one using the built-in camera. |
| Step 3 | Once you have your chosen image, tap on the “Stickers” icon at the bottom of the screen. In the menu that appears, select the “Sticker Maker” option. |
| Step 4 | In the Sticker Maker, you can move and adjust the image to create the sticker that you want. You can also use the option to erase the background or add text if you prefer. |
| Step 5 | When you are satisfied with your sticker, tap on the “Save” button to save it to your stickers library. |
| Step 6 | To use your sticker, open the Messages app or any other app where you can send messages. Tap on the emoji icon and then select the “Stickers” option. From there, you can find your sticker packs and choose the sticker you want to send. |
With 6PicsArt, making stickers on your iPhone is easy and fun. Just follow these step-by-step instructions, and you’ll be creating your own custom stickers in no time!
Convert images into stickers on iPhone
If you want to add a personal touch to your messages, you can convert images into stickers right from your iPhone. There are built-in tools and third-party apps available that make it easy to create and share your own stickers. In this step-by-step guide, we will show you how to make stickers on iPhone using several different apps.
1. Using the built-in Apple tools
If you have an iPhone with iOS 13 or later, you can use the built-in editing tools to turn any image into a sticker.
- Open the image you want to convert into a sticker in the Photos app.
- Tap on the “Edit” icon and then tap on the three-dot menu icon.
- Select the “Markup” option from the menu.
- On the Markup toolbar, tap on the “+” icon and then tap on the magnifying glass icon.
- In the search bar, type “emoji” and select the desired emoji from the list.
- Adjust the size and position of the chosen emoji on your image.
- Tap on “Done” and then tap on “Done” again to save your edited image as a sticker.
- Your sticker is now ready to use in the Messages app.
2. Using third-party apps
If you want more options and better control over your sticker-making process, you can download third-party apps from the App Store. Here are three popular apps for making stickers on iPhone:
| App | Description |
|---|---|
| PicsArt | PicsArt is a powerful photo editing app that also allows you to create stickers from your images. You can use the app’s selection tools to cut out the subject from your picture and remove the background. PicsArt also offers a wide variety of editing options to customize your stickers. |
| Fotor | Fotor is another great photo editing app that includes a sticker-making feature. With Fotor, you can easily turn your images into stickers by selecting and copying the desired subject. The app also offers various adjustment tools to enhance your stickers. |
| Pixlr | Pixlr is a user-friendly photo editing app that offers an easy way to turn your images into stickers. After opening your image in Pixlr, you can use the selection tools to isolate the subject and remove the background. The app also provides a wide range of editing options to make your stickers look even better. |
Once you have installed one of these apps, follow the instructions provided by the app to create your stickers. The process will typically involve selecting and cutting out the subject from your image, adjusting the sticker settings, and saving the sticker to your photo library.
After creating your stickers, you can use them in the Messages app by opening a conversation, tapping on the App Store icon, and selecting the “Stickers” option. From there, you can browse your sticker packs and send them to your contacts.
By following these steps, you can easily convert your images into stickers on your iPhone. Whether you prefer using the built-in Apple tools or third-party apps, you have multiple ways to make personalized stickers for your messages.