

If you’re looking for a gluten-free alternative to wheat flour, coconut flour is a great option. Not only is it delicious, but it’s also incredibly versatile and easy to make at home. In this article, we’ll show you how to make coconut flour from scratch, using only a few simple ingredients.
To begin, you will need to gather the following ingredients: shredded coconut, a dehydrator or oven, a blender or food processor, and a fine-mesh strainer. If you don’t have a dehydrator, you can easily dry out the shredded coconut in the oven at a low temperature.
Once you have all your ingredients prepared, the first step is to dehydrate the shredded coconut. Spread the coconut in a single layer on a dehydrator tray or baking sheet and set it to a low temperature. If you’re using an oven, set it to the lowest temperature and allow the coconut to dehydrate for a few hours, stirring occasionally.
After the coconut is dehydrated, allow it to cool completely before transferring it to a blender or food processor. Pulse the coconut in short bursts until it reaches a fine, flour-like consistency. Be sure not to over-blend the coconut, as it can release its oils and become clumpy.
Next, you will need to strain the coconut flour to remove any remaining larger pieces. Use a fine-mesh strainer to sift the flour into a bowl, pressing it with the back of a spoon or your fingers to strain out any clumps. You can save any larger pieces you strained out and use them in recipes that call for shredded coconut.
Now that you have your homemade coconut flour, you can use it to add a delicious coconut flavor to a variety of dishes. It’s a great addition to pancakes, muffins, biscuits, and even sauces and curries. Just substitute a portion of the regular flour in your recipe with coconut flour for a gluten-free alternative that will stay moist and delicious.
Not only does coconut flour add flavor and texture to your baking, but it also has some fantastic health benefits. Unlike regular wheat flour, coconut flour is high in fiber and protein, making it a great dietary addition. It’s also naturally gluten-free and has a lower glycemic index, so it’s suitable for those with dietary restrictions or blood sugar concerns.
Now that you know how to make your own coconut flour at home, you can enjoy all the benefits it has to offer. Not only will you be providing your body with a valid source of nutrients, but you’ll also be supporting coconut-producing communities worldwide, thanks to the mission of organizations like GoNift.com. So, roll up your sleeves, grab your hammer and get ready to dive into the world of coconut flour!
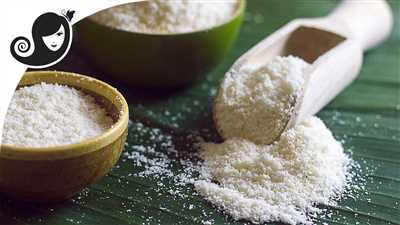
- How to Make Coconut Flour
- Removing the Coconut Meat
- Straining the Liquid
- Dehydrating the Coconut Pulp
- Grinding the Coconut into Flour
- Coconut Flour Recipe
- Coconut Pecan Muffins
- Coconut Flour Banana Pancakes
- Cheddar Garlic Biscuits
- Benefits of coconut flour
- Community QA
- Video:
- COCONUT FLOUR PANCAKES | fluffy, low-carb recipe
How to Make Coconut Flour
If you love coconut and are looking for a gluten-free alternative to traditional flours, then making your own coconut flour is a great idea! Not only is it easy to make, but it is also incredibly healthy and full of fiber. In this article, we will show you how to make coconut flour at home.
What You’ll Need:
- 1 to 2 coconuts
- Grater
- Cheesecloth or nut milk bag
- Baking sheet
- Oven
- Blender or food processor
Directions:
1. Preheat your oven to 200°F (93°C) and line a baking sheet with parchment paper or foil.
2. Begin by removing the outer husk of the coconut. You can do this by either using a hammer and nail to poke holes and drain the coconut water, then cracking it open, or by placing the coconut in the oven at 350°F (175°C) for about 10 minutes, which will cause the husk to loosen and easily be removed.
3. Once the husk is removed, use a grater to grate the coconut flesh. You can choose between a fine or coarse grate, depending on your preference.
4. After grating, combine the grated coconut with boiling water in a bowl, using a 1:1 ratio. This helps to soften the coconut and make it easier to blend.
5. Pour the mixture into a blender or food processor and blend until you have a smooth batter-like consistency.
6. Place a cheesecloth or nut milk bag over a bowl, and pour the coconut mixture onto it. Squeeze the cloth or bag to strain the liquid, making sure to catch all the coconut milk in the bowl below.
7. Once strained, the leftover coconut solids can be spread onto the prepared baking sheet. Make sure to spread it out evenly so that it dries properly.
8. Place the baking sheet in the preheated oven and let it cook for 2-3 hours or until the coconut solids are completely dried and crispy.
9. Once dried, remove the coconut solids from the oven and let them cool. They should be very dry and hard.
10. Break up the cooled coconut solids into smaller pieces and place them in a blender or food processor.
11. Blend the pieces until you have a fine flour-like consistency. Be careful not to overblend, as this can cause the coconut flour to become too dense.
12. Store your homemade coconut flour in an airtight container, in a cool and dry place. It can stay fresh for up to 6 months!
Now that you know how to make coconut flour, you can enjoy all the health benefits it has to offer. Use it in baking recipes instead of wheat flour, as a topping for smoothie bowls, or as a thickener for soups and sauces. The possibilities are endless!
advertisement
Helpful Tips:
- When using coconut flour in recipes, it is recommended to use 1/4 to 1/3 cup of coconut flour for every 1 cup of regular flour called for.
- Coconut flour tends to absorb more liquid than other flours, so you may need to increase the amount of liquid in your recipes.
- Coconut flour is a great addition to a gluten-free and paleo diet, as it is high in protein and fiber compared to other flours.
Conclusion:
Making your own coconut flour is not only a fun and rewarding kitchen activity, but it also allows you to control the quality of the flour you are using. By being able to source and grind the coconuts yourself, you can ensure that your flour is fresh and free from any additives or preservatives. Plus, you’ll be able to enjoy the incredible taste and nutritional value of coconut flour in all your favorite recipes!
Removing the Coconut Meat
Once you have cracked open the coconut, it’s time to remove the meat from the shell. This step is crucial in the process of making coconut flour. Here are the steps to remove the coconut meat:
- Using a small knife or spatula, carefully pry the flesh away from the inner shell.
- You may find it helpful to use a spoon to separate the meat from the shell.
- Once the meat is separated, shred it into small pieces using a grater or food processor.
- Alternatively, you can place the meat in a blender or food processor and pulse until it is shredded.
After the meat is shredded, there are a few different ways you can remove the liquid from the pulp. One way is to place the shredded coconut in a cheesecloth or clean kitchen towel and squeeze out the liquid over a bowl. Another method is to place the shredded coconut in a strainer and press down with a spoon or spatula to release the liquid.
Once the liquid has been removed, you can use the shredded coconut pulp for various purposes, such as making coconut flour. To make coconut flour, you will need to dry out the shredded coconut pulp.
One method is to spread the shredded coconut on a baking sheet lined with parchment paper or foil, and then bake it in a preheated oven at a low temperature (around 200°F or 93°C) for about 2 hours. Keep an eye on the shredded coconut to make sure it doesn’t burn.
Another method is to let the shredded coconut air dry for a longer period of time. Simply spread it out on a clean, dry surface and let it sit uncovered for a few days until it is completely dry.
Once the shredded coconut is dry, you can grind it into a fine powder using a food processor or blender. This process is known as milling and will result in a fine coconut flour that you can use in your baking recipes.
It’s important to note that homemade coconut flour may have a slightly different texture compared to store-bought coconut flour. The homemade version may be a bit coarser, but it still works well in baking. In fact, many people prefer the taste and texture of homemade coconut flour.
Remember, removing the coconut meat and making coconut flour can be a messy process, so be prepared for some clean-up afterwards. However, the effort is definitely worth it, as coconut flour is a highly prized ingredient with many benefits.
Straining the Liquid
After blending the coconut flesh and water, the next step in making coconut flour is to strain the liquid. This process involves separating the coconut milk from the pulp, leaving behind a creamy mixture that can be used to make a variety of delicious dishes.
To strain the liquid, you will need a fine mesh strainer or a cheesecloth. Place the strainer or cheesecloth over a large bowl or container to catch the liquid. Slowly pour the blended mixture into the strainer, allowing the liquid to separate from the pulp. Use your fingers or a spatula to press down on the pulp, extracting as much liquid as possible.
This liquid, known as coconut milk, is highly valued for its rich flavor and creamy texture. It can be used in many recipes, including curries, smoothies, and baked goods. Coconut milk is also a popular ingredient in diets such as vegan, gluten-free, and paleo.
The remaining pulp can be discarded or used in other recipes. Some people choose to dehydrate the pulp and grind it into a fine flour, while others use it as a natural exfoliant in skincare products.
Straining the liquid is an important step in the process of making coconut flour. By separating the milk from the pulp, you are able to extract the full nutritional value of the coconuts. Coconut milk is a good source of protein, iron, and fiber, making it a valuable addition to any dietary plan.
Once you have strained the liquid, you can proceed with the next steps of the coconut flour making process, such as drying and milling the pulp. By following these steps, you can create your own homemade coconut flour, providing a healthy and delicious alternative to traditional wheat flours.
Dehydrating the Coconut Pulp
To make coconut flour, it’s necessary to dehydrate the coconut pulp. This step ensures the moisture is removed, leaving behind a dry product that can be ground into flour. Here’s how to dehydrate your coconut pulp:
- Begin by breaking open a fresh coconut. Start by drilling a small hole into one of the eyes of the coconut.
- Drain the coconut water into a bowl. You can use this water for a recipe or enjoy it on its own for its many health benefits.
- With the coconut on its side, use a hammer or mallet to firmly tap around the equator of the coconut until it cracks open.
- Once the coconut is opened, use a spoon or your fingers to separate the white coconut meat from the inner shell.
- Cut the coconut meat into small pieces or shred it using a grater.
- Spread the coconut pulp evenly onto a baking sheet lined with foil or parchment paper.
- Place the baking sheet in a dehydrator or conventional oven set to a low temperature, around 120-150°F (50-65°C).
- Keep the oven door slightly ajar to allow air circulation.
- Dehydrate the coconut pulp for about 4-6 hours, or until it has dried completely and feels crispy to the touch.
- Once dried, remove the coconut pulp from the oven or dehydrator and let it cool to room temperature.
- Transfer the cooled coconut pulp to a food processor or blender and pulse until it turns into a fine powder.
- Sift the ground coconut flour through a strainer to remove any remaining larger chunks. You can also whisk the flour to break up any clumps.
- Your homemade coconut flour is now ready to be stored in an airtight container. It will stay fresh for several months.
Dehydrating the coconut pulp may require some time and patience, but the result is well worth it. Using homemade coconut flour allows you to enjoy the full benefits of this high-fiber, protein-rich flour that can be used in a variety of recipes. By dehydrating the pulp yourself, you have control over the process and can ensure a quality product. So, roll up your sleeves and get ready to embark on a delicious coconut flour adventure!
Grinding the Coconut into Flour
To make coconut flour, the first step is to grind the coconut meat into a fine powder. There are a few different methods you can use to do this:
- One common method is to use a food processor or blender to grind the shredded coconut. This process involves blending the coconut in short bursts until it becomes a coarse powder. If you want a finer texture, you can continue blending for a longer period of time.
- Another option, especially for smaller quantities, is to use a coffee grinder or spice grinder. These appliances can quickly grind the coconut into a fine powder, but you may need to do it in smaller batches to ensure even grinding.
- If you have a high-powered blender, you can try grinding the dried coconut flakes directly into flour. This method works best with a blender that has a tamper to push down the coconut flakes and keep them in contact with the blades.
No matter which method you choose, it’s important to grind the coconut until it reaches a flour-like consistency. The finer the grind, the smoother the resulting coconut flour will be.
It’s also worth noting that you can make coconut flour from fresh or dried coconut. Fresh coconut will have a higher moisture content and may take longer to dry out before grinding. Dried coconut, on the other hand, is already dehydrated and can be ground into flour immediately.
When grinding the coconut, be sure to keep a close eye on the progress. The high oil content of the coconut meat can cause it to clump together, so it’s helpful to stop grinding and break up any chunks with a spoon or spatula. This will ensure an even grind and prevent the coconut from turning into coconut butter or oil.
Once the coconut has been ground into flour, it’s ready to be used in a variety of recipes. Coconut flour is a gluten-free alternative to wheat flour and is highly valued in many healthy diet communities. It has a slightly sweet and nutty flavor, making it a great addition to muffins, pancakes, and other baked goods.
When using coconut flour in recipes, it’s important to note that it absorbs more liquid than wheat flour, so you may need to adjust the amount of liquid or add extra eggs to the batter. Additionally, coconut flour does not bind as well as wheat flour, so using it in combination with other flours or binding agents can help improve the texture of baked goods.
In conclusion, grinding coconut into flour is a simple process that can yield a versatile and valued ingredient. Whether you prefer to use fresh or dried coconut, the key is to grind it into a fine powder using a food processor, blender, or grinder. With the right grinding technique and the support of a good recipe, you can create gluten-free and healthy baked goods that will be a hit with coconut enthusiasts nationwide.
Coconut Flour Recipe
Are you wondering how to make coconut flour at home? It’s easier than you may think! In this article, we will show you a simple and delicious recipe to make your own coconut flour.
To start, you will need fresh coconut. The first step is to remove the outer shell. You can do this by using a hammer or a drill to make a small hole in one of the eyes of the coconut. Drain the liquid inside and then strike the coconut on a hard surface to break it open. Once the coconut is cracked, you can easily remove the flesh by using a knife or your fingers.
After removing the flesh, cut it into small chunks. You can then choose between two ways to make coconut flour: dehydrating or baking.
If you prefer the dehydrating method, spread the coconut chunks on a baking sheet lined with parchment paper. Place the sheet into an oven preheated to 150°C (300°F) and let the coconut dry for about 4-6 hours. After the drying process, the coconut should be crispy. Let it cool and then transfer it to a food processor or blender. Process the dried coconut until it turns into a fine powder. Your homemade coconut flour is now ready to use!
If you decide to bake the coconut, preheat your oven to 180°C (350°F). Spread the coconut chunks on a baking sheet lined with parchment paper and bake for about 10-15 minutes or until golden brown. After baking, let the coconut cool completely before placing it into a food processor or blender. Process the baked coconut until it becomes a smooth powder. Your homemade coconut flour is now ready!
It’s important to note that homemade coconut flour may not be as fine as the commercial one, but it still offers great taste and nutritional value. Coconut flour is gluten-free, high in fiber, and contains healthy oils. It is a great option for those following a gluten-free or low-carb diet.
Coconut flour can be used in various recipes such as pancakes, muffins, and bread. However, keep in mind that it has different baking properties than wheat flour, so you may need to adjust the measurements when substituting it in a recipe.
With this easy coconut flour recipe, you can now enjoy the benefits of this highly nutritious and versatile flour. By making your own coconut flour, you not only save money but also have the satisfaction of knowing the exact ingredients in your baked goods. So why not give it a try? Start dehydrating or baking your coconut today!
Coconut Pecan Muffins
Coconut pecan muffins are a delicious and nutritious treat that can be enjoyed fresh out of the oven or as a snack throughout the day. Made with coconut flour, these muffins are a great way to incorporate the benefits of coconuts into your diet.
Coconut flour is a valuable source of dietary fiber, protein, and healthy fats. It is a gluten-free alternative to traditional flours and has a lower glycemic index, making it a popular choice among those following a gluten-free or low-carb diet.
To make coconut flour, you will need fresh coconut flesh. Start by cracking open a fresh coconut and extracting the white flesh inside. This can be done by prying the coconut open with a small knife or hammer. Then, use a grater or a food processor to grate the coconut flesh into small pieces.
After grating the coconut, spread it out on a baking sheet and place it in a preheated oven set to a low temperature, around 200°F (93°C). Let the coconut dry out in the oven for several hours until it becomes crispy and brittle.
Once the coconut is dehydrated, you can grind it into a fine flour using a blender or a food processor. Be sure to strain the mixture through a fine mesh strainer to remove any larger pieces. The resulting flour will have a light and fluffy texture.
Coconut pecan muffins are easy to make. In a bowl, combine the coconut flour, pecans, baking powder, and a pinch of salt. In a separate bowl, whisk together eggs, melted coconut oil, and sweetener of your choice. Gradually add the dry ingredients to the wet mixture and mix until smooth.
Next, line a muffin pan with paper liners or grease it with coconut oil. Spoon the batter into the muffin cups, filling each about two-thirds full. Top each muffin with a sprinkle of shredded coconut and a few additional pecan pieces.
Bake the muffins in a preheated oven at 350°F (175°C) for about 20 minutes or until a toothpick inserted into the center comes out clean. Once done, remove the muffins from the oven and let them cool on a wire rack before serving.
Coconut pecan muffins can be enjoyed on their own or served with a side of butter or cream cheese. They make a great addition to breakfast or can be enjoyed as a snack during the day. The rich and nutty flavors of coconut and pecans make these muffins a truly delicious treat.
Now that you know how to make coconut flour and coconut pecan muffins, you can enjoy the benefits of coconuts in a new and tasty way. With their full flavor and nutritious contribution, these muffins are a sure hit for coconut lovers and anyone looking for a healthy and satisfying snack.
Coconut Flour Banana Pancakes
If you’re looking for a delicious and healthy alternative to regular pancakes, then you should try making coconut flour banana pancakes. These pancakes are not only tasty, but they are also gluten-free, making them a perfect option for those following a gluten-free diet.
Coconut flour is made by milling the meat of mature coconuts. It is a highly valued source of dietary fiber and protein compared to other flours. Coconut flour is also high in healthy fats, making it a good option for those on a high-fat diet.
To make these pancakes, you’ll need coconut flour, ripe bananas, eggs, baking powder, and a pinch of salt. First, preheat your pan or griddle over medium heat. In a mixing bowl, mash the ripe bananas until they are smooth. Add the eggs, coconut flour, baking powder, and salt to the bowl, and stir until everything is well combined.
Next, using a sharp knife, cut the nail off the coconut shell before piercing the soft part with a sharp object, like a nail. Drain the liquid into a bowl and reserve for later use. Once you have collected the coconut liquid, place the coconut meat in a food processor and blend until it reaches a smooth consistency. Use a fine-mesh strainer to strain the liquid from the pulp.
After straining the coconut meat, mix it with the banana mixture and stir until everything is well combined. The batter should be thick and smooth. Add more coconut liquid if needed to achieve the desired consistency. Using a 1/4 cup measure, pour the batter onto the preheated pan or griddle, and cook for about 2-3 minutes on each side, or until the pancakes are golden brown.
Once the pancakes are cooked, transfer them to a plate and enjoy them warm. You can serve them with fresh fruit, plain yogurt, or maple syrup for an extra touch of sweetness. These coconut flour banana pancakes offer a unique and delicious way to enjoy the benefits of coconut flour while satisfying your pancake cravings.
If you’re looking for more ways to use coconut flour, you can also try adding it to your baking recipes, such as muffins, biscuits, or bread. Coconut flour can also be used to make protein powder, which is highly valued in the fitness community.
In conclusion, coconut flour banana pancakes offer a healthy and delicious alternative to traditional pancakes. By using coconut flour, you can enjoy the nutritional benefits of coconut while still indulging in a delicious breakfast treat. Give these pancakes a try and see why they are prized by those who follow a gluten-free or high-fiber diet.
Cheddar Garlic Biscuits
If you’re in the mood for a tasty and healthy treat, look no further than these delicious Cheddar Garlic Biscuits. Made with coconut flour, this recipe offers a gluten-free alternative to traditional bread rolls. The combination of sharp cheddar and garlic gives these biscuits a flavorful kick that will have you coming back for more.
Ingredients:
- 140 grams of coconut flour
- 2 teaspoons of baking powder
- 1/2 teaspoon of salt
- 3/4 cup of shredded sharp cheddar cheese
- 2 cloves of garlic, minced
- 4 eggs
- 1/4 cup of melted butter
- 1/4 cup of heavy cream
Directions:
- Preheat your oven to 350°F (175°C) and grease a muffin tin.
- In a large bowl, combine the coconut flour, baking powder, salt, shredded cheddar cheese, and minced garlic.
- In a separate bowl, whisk together the eggs, melted butter, and heavy cream.
- Add the liquid mixture to the dry ingredients and mix until well combined.
- Spoon the batter into the greased muffin tin, filling each cup about three-quarters full.
- Bake for 20-25 minutes, or until the biscuits are golden brown on top.
- Remove from the oven and let cool for a few minutes before using a spatula to transfer the biscuits to a wire rack to cool completely.
These Cheddar Garlic Biscuits are perfect for those following a gluten-free or keto diet. The coconut flour adds a subtle coconut taste that pairs well with the sharp cheddar and garlic. Serve them as a side dish with soup or salad, or enjoy them on their own as a snack. These biscuits stay fresh for a few days, so you can enjoy them throughout the week. They can also be frozen for longer storage.
So next time you’re in the mood for a delicious and healthy treat, give these Cheddar Garlic Biscuits a try. You won’t be disappointed!
Benefits of coconut flour
- High in fiber: Coconut flour contains a large amount of dietary fiber, which is beneficial for digestive health and can help prevent constipation.
- Gluten-free: Coconut flour is naturally gluten-free, making it an excellent alternative for those with gluten sensitivity or celiac disease.
- Low glycemic index: Compared to other flours, coconut flour has a low glycemic index, which means it doesn’t cause a spike in blood sugar levels.
- Rich in protein: Coconut flour is relatively high in protein, making it a great option for those looking to increase their protein intake.
- Source of healthy fats: Coconut flour contains healthy fats, including medium-chain triglycerides (MCTs), which have been linked to several health benefits.
- Packed with nutrients: Coconut flour is a good source of various vitamins and minerals, including iron, potassium, and magnesium.
- Supports weight management: The high fiber and protein content of coconut flour can help keep you feeling fuller for longer, aiding in weight management.
- Versatile in cooking and baking: Coconut flour can be used in a wide variety of recipes, from bread and pancakes to cookies and cakes.
- Added texture and flavor: Coconut flour adds a unique flavor and texture to baked goods, giving them a slightly sweet and nutty taste.
- May benefit heart health: The healthy fats in coconut flour, such as MCTs, may help improve cholesterol levels and reduce the risk of heart disease.
Overall, coconut flour offers several benefits and can be a valuable addition to a healthy diet. It is important to note that while coconut flour is nutritious, it should be consumed in moderation, as it is relatively high in calories. Additionally, those with nut allergies should exercise caution when using coconut flour, as it is made from the flesh of the coconut, which is technically considered a fruit nut.
Community QA
Here are some common questions and answers from the coconut flour community:
- Q: Can you make pancakes with coconut flour?
A: Yes, you can make delicious pancakes using coconut flour. Just substitute coconut flour for regular flour in your favorite pancake recipe. Keep in mind that coconut flour is highly absorbent, so you may need to use more liquid in your batter. - Q: Is coconut flour high in fiber?
A: Yes, coconut flour is a great source of fiber. It contains about 5 grams of fiber per ounce, which is much higher than other flours. - Q: What can I do with the leftover pulp after making coconut milk?
A: The leftover pulp can be used in a variety of recipes. It can be added to smoothies, used in baked goods like muffins and biscuits, or even used as a coating for meat or vegetables. - Q: Does coconut flour taste like coconut?
A: Coconut flour does have a mild coconut taste, but it is not overpowering. The taste is more noticeable when the flour is toasted or used in small quantities. - Q: Is coconut flour gluten-free?
A: Yes, coconut flour is naturally gluten-free, making it a great option for those with dietary restrictions or gluten sensitivities. - Q: What are the benefits of using coconut flour?
A: Coconut flour is high in fiber, low in carbs, and contains healthy fats. It also helps in removing excess cholesterol from the body and is known to be helpful in maintaining a healthy weight. - Q: Can I use coconut flour in place of almond flour in recipes?
A: While coconut flour and almond flour are both gluten-free alternatives, they have different textures and behaviors when baking. Coconut flour absorbs more liquid, so you would need to adjust the recipe accordingly if substituting one for the other. - Q: Can coconut flour be used to make bread?
A: Coconut flour can be used to make bread, but it may require additional eggs or binders to help hold the bread together. It’s best to follow a recipe specifically designed for coconut flour bread. - Q: Can I use coconut flour to make savory dishes like garlic bread?
A: Yes, coconut flour can be used in savory dishes like garlic bread. There are many recipes available online that incorporate coconut flour into traditional savory dishes.
These answers provided by the coconut flour community can be helpful in addressing any questions or concerns you may have when using coconut flour in your recipes.


