
If you’re looking for an effective way to gather data and feedback from your customers or students, Google Forms is the tool for you. Whether you have a business or a classroom, using Google Forms can help you reach your objectives and make the most of the information you collect.
Google Forms offers a wide range of functions and options that will enable you to create and customize surveys and questionnaires according to your needs. It’s easy to get started – simply open Google Forms on your web browser and sign in with your Google account. If you don’t have an account, you can easily create one for free.
Once you’re in, you can choose from a variety of pre-designed templates or start from scratch and design your own form. You can edit the questions, add logic and validation to ensure the right responses, and even add collaborators to work on the form with you. Google Forms also allows you to embed a form on your website or share it through email or social media.
After you’ve completed the design of your form, you can customize the settings to control who can access and fill out the form. You can choose to make the form public or limit it to specific individuals or groups. You also have the option to collect responses anonymously or require respondents to sign in with their Google accounts.
Once your form is ready and you’ve shared it with your audience, you can start collecting responses. Google Forms automatically stores all the data in a Google Sheets spreadsheet, making it easy for you to analyze and interpret the results. You can also use Google Sheets to generate graphs and diagrams to visualize the data.
Google Forms is a powerful tool that can save you time and help you gather valuable insights. Whether you’re conducting market research, gathering feedback, or creating a quiz for your students, Google Forms has the features and options to meet your needs. Start using Google Forms today and see how it can revolutionize the way you collect and analyze data!
- Use Google Forms with Google Sheets
- Objectives
- Prerequisites
- Google Forms Overview
- Getting Started with Google Forms
- How to share a Google Form without edit rights
- Step 1 Go to the Google Form
- Step 2: Click the Send button to open up Google Form share settings
- Step 3: Choose how to share your Google Form
- Make your website more effective with Google Forms data
- Sources
Use Google Forms with Google Sheets
Google Forms and Google Sheets are both powerful tools that can be used together to gather and analyze data. By creating a form in Google Forms, you can collect responses from participants and automatically populate the responses into a Google Sheets spreadsheet. This integration can help you streamline your data collection process and make it more efficient.
Before you can start using Google Forms with Google Sheets, there are a few prerequisites you need to fulfill. First, you must have a Google account. If you don’t have one, you can easily create one for free. Second, make sure you have access to Google Sheets. You can access Google Sheets through your Google Drive or by visiting the Google Sheets website.
To get started, follow these steps:
- Open Google Forms by going to the Google Forms website or by accessing it through your Google Drive. This will open up the Google Forms editor where you can design your form.
- Create your form by adding questions, choosing response options, and customizing the settings. You can also add logic to your form to make it more dynamic and personalized.
- Once your form is complete, click on the “Send” button to share it with others. You have several options for sharing your form, such as sending it via email, embedding it on a webpage, or posting it on social media.
- As responses start coming in, they will automatically be populated into a Google Sheets spreadsheet. You can access this spreadsheet by going to your Google Drive and opening the corresponding Google Sheets file.
- Within Google Sheets, you can use various functions and features to analyze your data. You can create charts and graphs, filter and sort the data, and perform calculations to derive meaningful insights.
By using Google Forms with Google Sheets, you can reach your objectives more effectively. The integration between the two tools enables you to collect and analyze data in a streamlined and efficient manner. Whether you’re conducting a survey, gathering feedback from students, or running a business, this combination will save you time and make your data analysis more accurate.
So, if you haven’t already, give Google Forms with Google Sheets a try. It’s a powerful duo that can help you collect, organize, and analyze data without any hassle!
Objectives

When using Google Forms, it is important to first identify your objectives. This will help guide you in creating a form that effectively collects the information you need. Whether you are using Google Forms for personal, educational or business purposes, having clear objectives will ensure that you make the most of the available options and features.
Here are some objectives to consider when using Google Forms:
- Create a survey or questionnaire: Google Forms allows you to easily create online surveys and questionnaires. You can choose from a variety of question types, including multiple choice, short answer, and more.
- Collect data and analyze results: Google Forms automatically collects responses and stores them in a Google Sheets spreadsheet. This makes it easy to analyze the data and gain insights from the results.
- Share and collaborate: You can easily share your Google Form with others by sending them a link or embedding it on a webpage. You can also invite collaborators to work on the form with you, making it a collaborative effort.
- Reach a wide audience: Google Forms can be accessed online, so anyone with internet access can respond to your form. This makes it a convenient way to reach a large number of people and gather their input.
- Validate student learning: In an educational setting, Google Forms can be used to create quizzes or assessments. You can use the built-in logic functions to add validation and branching options based on students’ responses.
- Save time and resources: Using Google Forms eliminates the need for paper forms and manual data entry. Responses are automatically collected and stored, saving you time and resources.
To get started with Google Forms, you must have a Google account. Once you’re signed in, go to the Google Forms homepage and click the “+” button to create a new form. From there, you can choose from a variety of templates or start from scratch.
To design your form, you have the option to customize the theme, add images or videos, and organize questions into sections. You can also enable settings such as required questions, response limits, and automatic email notifications.
Once your form is complete, you can share it with others by sending them a link or embedding it on a webpage. You can also send the form via email, or post it on social media to reach a wider audience.
As responses are collected, you can view and analyze the data within Google Forms or export it to Google Sheets for further analysis. You can also set up notifications to receive email alerts whenever a new response is submitted.
Google Forms also allows for easy collaboration. You can invite others to edit the form or view response data by adding them as collaborators. This can be especially useful for classroom settings or business teams working on a project together.
In summary, Google Forms provides a user-friendly and efficient way to create online surveys, collect data, and analyze results. By identifying your objectives and utilizing the available features, you can create effective forms that meet your specific needs.
Prerequisites
Before using Google Forms, there are a few prerequisites that you need to meet:
- You must have a Google account. If you don’t have one, you can create it here.
- You need to be familiar with basic web browsing functions, such as clicking, right-clicking, and copying and pasting text.
- It is recommended that you have some basic knowledge of how to use Google Sheets, as the form responses will be stored there.
- If you plan to share your forms with others, you should understand how to set sharing permissions and manage collaborators.
- If you want to send the form to others via email or embed it on a website, you must have access to an email account or a website where you can post the form.
- For more advanced features, such as data validation, logic branching, and analyzing form results, it is beneficial to have some experience with Google Apps Script or coding in general.
By meeting these prerequisites, you will be ready to learn how to use Google Forms effectively and achieve your objectives.
Google Forms Overview
Google Forms is an online tool provided by Google that allows users to create surveys and collect data from respondents. Whether you have a personal website or a business, Google Forms can be a valuable tool for gathering information and feedback. Here, we will provide an overview of Google Forms and how to use it effectively.
Getting Started with Google Forms
To get started with Google Forms, you will need a Google account. If you don’t have one, you can easily create one for free. Once you have a Google account, go to the Google Forms website and click the “Blank” option to create a new form.
Designing Your Form
Google Forms allows you to design your form without any coding or programming knowledge. You can choose from various question types, such as multiple choice, dropdown, or short answer. You can also add logic to your form, such as branching based on respondent’s answer, to make it more interactive and tailored to your objectives.
Sharing and Collecting Responses
Once you have designed your form, you can share it with others to start collecting responses. Google Forms provides multiple options for sharing your form. You can send it via email, post it on social media, embed it in a webpage, or share it through Google Classroom. You can also customize the settings to choose who can respond to your form and whether respondents can see each other’s answers.
Analyzing and Using the Results
Google Forms automatically collects the responses for you and stores them in a Google Sheets spreadsheet. You can access the collected data whenever you need it and analyze the responses to gain insights. Google Sheets offers powerful data analysis functions that allow you to manipulate and visualize your data. You can also collaborate with others to work on the data together.
Conclusion
Google Forms is a powerful tool for creating and managing surveys online. Whether you need to gather feedback from your students or reach out to your customers, Google Forms provides an easy and effective way to collect data. With its user-friendly interface and customizable features, you can quickly create a professional-looking form and start collecting responses. So, if you haven’t already, give Google Forms a try and see how it can benefit you and your objectives!
How to share a Google Form without edit rights
Sharing a Google Form without giving others edit rights can be useful in various scenarios, such as sharing surveys, collecting data online, or distributing quizzes. In this tutorial, you will learn how to share a Google Form without granting edit access to the form itself.
Step 1: Open the Google Form that you want to share without edit rights. If you don’t have a form yet, you can create one by going to the Google Forms page and clicking on the “+ Blank” or choosing a template option.
Step 2: Customize the design and settings of your form according to your preferences. Choose the questions, model the options, and add any logic or validation functions that you need. Make sure the form is complete and ready for others to fill out.
Step 3: Click on the “Send” button located in the upper right corner of the form builder window.
Step 4: In the “Send via” options, choose the “Link” tab.
Step 5: Under the “Send via link” section, click on the “Copy” button to copy the link to your form.
Step 6: Share the copied link with your desired audience. You can paste it in an email, post it on a website or a social media platform, or embed it within a webpage.
This way, anyone who visits the link will be able to access and complete your form, but they won’t have the rights to edit the original form or see the form responses in real-time. This is particularly useful when you want others to answer your form without the risk of accidental changes to the questions or responses.
Keep in mind that if you choose to share your Google Form publicly, anyone who has access to the link can complete it. If you want to limit the form to a specific audience or group, you might consider using options like Google Classroom or sharing the form with specific collaborators.
By following these simple steps, you can share your Google Form without granting edit rights to ensure the data you collect remains accurate and secure. After sharing, you can analyze the responses, view the results in Google Sheets, and reach your objectives effectively.
Step 1 Go to the Google Form
To create a Google Form, you’ll need to start by going to the Google Forms website. If you don’t already have a Google account, you’ll need to create one in order to access Google Forms.
Once you’re logged in, click on the “Google Apps” button in the top right corner of the screen, then click on “Forms.” This will open up the Google Forms interface, where you can start creating your own forms.
If you’re using Google Forms for business or education purposes, you might have a slightly different interface. In this case, you can access Google Forms through your Google Drive. Open up Google Drive, click on the “+ New” button, and then click on “Google Forms” to get started.
Now that you’re on the Google Forms page, you’ll see a blank form template. This is where you’ll create your form. You’ll also see some options on the right-hand side of the page, including settings, validation, email notifications, and design. We’ll go through more of these options as we go along.
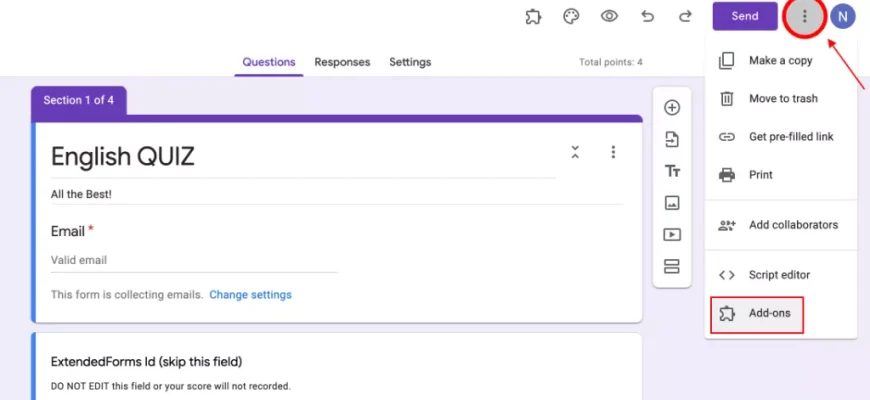
If you’re completely new to Google Forms and want to learn more about its features and functions, you can click on the “More” button in the top right corner of the page and select “Overview.” This will give you an overview of what Google Forms can do and how you can use it for your needs.
Now it’s time to start creating your form. Choose a title for your form, something that describes what the form is about. You can also add a description to provide more information to the respondents. Use the text fields provided to enter the title and description of your form.
Once you’ve entered the title and description, click on the “+ Add question” button to start adding questions to your form. You can choose from a variety of question types, such as multiple choice, short answer, or paragraph text. Think about the objectives of your form and the information you want to collect from the respondents when choosing the question types.
If you’re creating a form for a classroom or survey, you might also want to use the “+ Add section” button to organize your questions into different sections. This can make it easier for students or respondents to navigate through the form and complete it.
As you’re adding questions to your form, you can edit their options and settings by clicking on the three dots next to each question. This will open up a window where you can choose different options, such as making the question required or adding a data validation rule.
When you’re done creating your form, you can use the “Send” button in the top right corner of the page to share it with others. You can send the form via email, social media, or by embedding it on a webpage. You can also choose to collect responses in a Google Sheets spreadsheet for easier analysis later on.
That’s it! You’re now ready to start using Google Forms to create online surveys, collect data, and analyze the results. With its easy-to-use interface and versatile sharing options, Google Forms can be an effective tool for a wide range of businesses, classrooms, and personal projects.
Step 2: Click the Send button to open up Google Form share settings
Once you have created your Google Form with all the necessary questions and design elements, it’s time to share it with others. By sharing your form, you can collect responses online and analyze the data without any hassle.
To reach the sharing options, click on the “Send” button located in the top-right corner of the Google Forms window. This will open up the share settings window, where you can choose how you want to share your form.
Here are some of the options you might have:
- Send via email: You can directly send the form to individual recipients or a group of email addresses. This option is useful if you want to reach a specific audience.
- Get a link to the form: By choosing this option, Google Forms will generate a unique link for your form. You can copy and paste this link into a webpage, social media post, or any other online source for more reach.
- Embed within a website: If you have a website or a webpage, you can embed the form within it. This allows users to complete the form without leaving your site.
- Share with collaborators: If you’re working on a form with others, you can share it with specific collaborators. This option is particularly effective for business or classroom objectives, where multiple people might need access to the form.
Before sharing your form, make sure you have set the desired permissions and access rights. You can choose whether respondents can view and edit their responses, or if they can only view the results. Additionally, you can enable options like turning on/off email notifications, allowing collaborators to edit the form, and enabling response validation or survey logic.
Once you have selected the sharing options that fit your needs, click the “Send” button to complete the process. Now your form is ready to be distributed and collect responses from your chosen audience.
Step 3: Choose how to share your Google Form
Once you have completed the design and editing of your Google Form, it’s time to share it with your intended audience. Google Forms offers different sharing options to help you reach your objectives and gather responses effectively. Let’s explore some of these options:
– Share a link: This is the most common and easiest way to share your Google Form. You can simply copy the link provided and send it through email, post it on social media, or embed it on your website or webpage. This option allows anyone with the link to access and complete the form.
– Send via email: If you want to specifically reach out to a select group of people, you can send the form directly to their email addresses. This is a useful option if you’re conducting a survey within your classroom or business and need responses only from certain individuals.
– Embed on a website: If you have a website or webpage, you can embed your Google Form directly onto it. This lets visitors access and complete the form without leaving your site. To do this, simply click the “Send” button, choose the “Embed” tab, copy the embed code, and paste it into the HTML of your webpage.
– Share through Google Classroom: For teachers or students using Google Classroom, sharing your Google Form through this platform makes it easy and convenient. You can post the form directly in a Google Classroom assignment, making it accessible to your students and keeping track of their responses within Google Classroom.
– Collaborators rights: Another option is to share your form with collaborators. This gives them the ability to view and edit the form, allowing for easy collaboration and feedback. Note that collaborators must have a Google account to access and edit the form.
By using these sharing options, you can ensure that your Google Form reaches the right audience and gathers the data you need to analyze and learn from. Make sure to choose the sharing option that best fits your objectives and the function of your form.
Next, in Step 4, we will explore how to analyze the responses gathered through your Google Form.
Make your website more effective with Google Forms data
Google Forms is a powerful tool that can help you collect and analyze data from your website. By using Google Forms, you can gather information from your visitors and use that data to make your website more effective. In this guide, we will walk you through the steps of using Google Forms to reach your business objectives.
Step 1: Create a Google Form
To get started, open Google Forms and choose the option to create a new form. You can choose from a variety of templates or create a form from scratch. Once you have chosen the right form template, you can customize it to meet your needs. Add questions, choose validation options, and design the form right within the Google Forms interface.
Step 2: Share your form
Once your form is complete, you can share it with others by clicking on the “Send” button. You have several options for sharing your form, including sending it via email, embedding it on your website or webpage, or posting it on social media. Choose the option that best suits your needs and share your form with the right audience.
Step 3: Analyze the results
As responses come in, Google Forms will automatically collect and organize the data for you. You can view an overview of the responses within the Google Forms interface or export the data to Google Sheets for more in-depth analysis. Google Sheets offers powerful data analysis functions that can help you make sense of the data and draw conclusions.
Make the most out of Google Forms
Here are some tips and tricks to make your use of Google Forms even more effective:
1. Use logic and branching: Google Forms allows you to set up logic and branching in your survey or form. This means you can customize the questions based on the responses given, providing a more personalized experience for your respondents.
2. Collaborate with others: Google Forms makes it easy to collaborate with others on the same form. You can grant editing rights to collaborators, allowing them to make changes or add questions without having to copy and paste the form.
3. Integrate with other Google tools: Google Forms seamlessly integrates with other Google tools like Google Classroom, Google Sheets, and Google Slides. This allows you to use the data collected in Google Forms across different platforms and applications.
By using Google Forms, you can gather valuable data from your website visitors and make data-driven decisions that can help you improve your website. Whether you’re a business owner, a teacher, or a website owner looking to make your site more effective, Google Forms is a powerful tool that can help you achieve your goals.
Sources
When it comes to using Google Forms, there are several sources you can refer to in order to learn how to use it effectively. Here are some of the key sources for students and business objectives:
1. Google Forms Help Center: Google provides a comprehensive Help Center specifically designed to assist users in using and navigating Google Forms. You can find step-by-step guides, video tutorials, and FAQs on this site to help you get started.
2. Google Forms Community: The Google Forms Community is an online forum where users can ask questions, share tips and tricks, and connect with other users from around the world. This is a great place to find answers to specific questions or learn from the experiences of others using Google Forms.
3. Google Sheets: Google Forms is integrated with Google Sheets, which allows you to analyze and organize your form responses. With Google Sheets, you can create charts, apply functions, and perform data validation to make your analysis more effective.
4. Google Classroom: If you’re a student, Google Classroom may be a useful platform to use Google Forms. Google Classroom lets teachers easily create and share forms with their students, collect responses, and analyze the results within the platform.
5. Google Forms Add-Ons: Google Forms offers a variety of add-ons that can enhance the functionality and capabilities of your forms. From form validation to advanced question logic, these add-ons can help you design more powerful and customized forms.
6. Sharing and Embedding Options: Google Forms provides various options to share your form or embed it within a webpage. You can send your form through email, post it on social media, or generate a link to share with others. Additionally, you can embed your form directly on your website or within a Google Site for easy access.
These are just a few of the sources you can use to learn more about Google Forms and how to use it effectively. By utilizing these resources, you will be able to reach your objectives and make the most out of this powerful online survey tool.