

In today’s digital age, adding a signature to a document has never been easier. Gone are the days of printing, signing by hand, and scanning pages. Now, with the help of technology, you can create and insert your signature with just a few clicks. In this article, we will provide you with a comprehensive explanation on how to add signature pages using an iPad, Apple Mac, and online platforms like Signaturely.
Firstly, let’s talk about how you can add a signature page on your iPad. If you have an iPad, you can use the built-in camera to capture your signature. Simply open the document you want to sign, click on the signature icon, select Create a Signature, and then choose Camera. Place your signature on a white page and use the camera to capture it. Once done, your signature will be saved, and you can easily insert it into future documents.
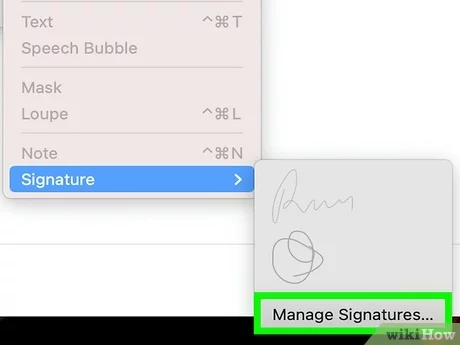
If you are using an Apple Mac, the process is just as simple. Open your document in the Preview app, click on Tools in the header, select Annotate, and then choose Signature. From here, you can either use your trackpad to sign your name or use a white piece of paper, sign it, and use the camera to capture your signature. Once you have your signature saved, you can easily insert it into any documents.
If you prefer to add signatures online, platforms like Signaturely make the process even easier. Simply upload your document, select the fields where you want to add signatures, and provide instructions for your signees. Signaturely also allows you to add an image of your signature or create a digital signature using their easy-to-use tools. Once you are done, you can save or send the document with the added signature pages.
Adding signature pages to your documents is a straightforward process that can save you time and effort. Whether you are an employee signing a contract or a business owner creating a handbook for your team, keeping the process digital not only saves paper but also ensures that your document remains intact with no limits on the number of signatures that can be added. So, next time you are asked to add your signature to an existing document, you know exactly what to do!
- How to Add a Signature Page to Your Employee Handbook
- How to Create a Digital Signature in Apple Pages
- 1 Step-by-step instructions for creating a digital signature in Apple Pages
- 2 Explanation of how to save the signature for future use
- Frequently Asked Questions About Adding a Signature in Pages
- How do you insert a signature to pages on a Mac
- How do I insert a signature to a Pages document on an iPad
- How can I create a digital signature
- How do I add an existing signature image to a PDF file on a Mac
- About Character Limits
- Sources
How to Add a Signature Page to Your Employee Handbook

Adding a signature page to your employee handbook is an important step to ensure that all employees have read and agreed to the policies and procedures outlined in the document. This page will serve as proof that each employee has acknowledged their understanding and acceptance of the information presented in the handbook.
To add a signature page to your employee handbook, follow these step-by-step instructions:
- Select the employee handbook file: Start by selecting the employee handbook document that you want to add the signature page to. Make sure you have the file saved on your device.
- Identify where to insert the signature page: Determine the appropriate location for the signature page within your employee handbook. Usually, it is placed at the end of the document but can be added anywhere you find it suitable.
- Create the signature page: Use a program like Signaturely or another digital signature service to create a blank page for signatures. This page will contain signature lines for employees to sign and their printed names. You can also include a brief explanation of the purpose of the signature page.
- Save the signature page as an image: Once you’re done creating the signature page, save it as an image file format (e.g., PNG). You can do this by using the “Save As” option in the program you’re using.
- Insert the signature page in the employee handbook: Open the employee handbook document and go to the page where you want to insert the signature page. Click on the “Insert” menu on your program and select the option to insert an image.
- Select the saved signature page image: On the pop-up window, browse your computer for the signature page image you saved. Select the image and click “Insert” to place it in the employee handbook document.
- Adjust the size and position of the signature page: If needed, resize the signature page image to fit the page layout. You can do this by clicking and dragging the corners of the image or using the resizing options in your program.
- Save the employee handbook with the signature page: Once you’ve inserted and adjusted the signature page, save the employee handbook document with the changes. Make sure to keep a backup copy as well.
- Inform employees to sign the handbook: Provide clear instructions to your employees on how to sign the employee handbook. You can do this by sending out an email or holding a meeting to explain the process.
- Ensure employees sign the handbook: To sign the employee handbook, employees can use a digital signature tool on their computer or mobile device. For example, if they use an iPad, they can sign using their finger or a stylus pen on the touchscreen. Alternatively, they can print out the signature page, sign it with a pen, and then scan the signed document or take a photo of it using a camera.
- Keep track of signed documents: As employees start signing the handbook, make sure to keep a record of the signed documents. You can create a separate file or folder to store all the signed signature pages for future reference.
By following these instructions, you can easily add a signature page to your employee handbook and ensure that all employees have officially acknowledged the information presented in the document.
Remember, adding a signature page is a best practice to maintain compliance and protect both employees and the company from any legal issues. It is important to consult with legal sources or seek professional advice if you have any questions regarding the process or the outcomes of adding signatures to your employee handbook.
How to Create a Digital Signature in Apple Pages
If you have a Mac and want to learn how to create a digital signature in Apple Pages, you’ve come to the right place. Here, we will provide step-by-step instructions on how to add a signature to your documents using Apple Pages.
- First, open the document that you want to add the signature to in Apple Pages. If you don’t have the document saved on your Mac, you can open it from other sources such as an iPad or an online file storage.
- Next, go to the page where you want to insert the signature. You can either create a new page or add the signature to an existing one.
- Click on the “Insert” icon on the toolbar, which looks like a white page with a plus sign. This will open a dropdown menu with various options.
- Select “Signature” from the dropdown menu. This will open a window where you can create a new signature or choose from existing ones.
- To create a new signature, click on the “Create Signature” button. You will be asked to draw your signature using your trackpad or the camera on your device.
- If you prefer to use an existing signature, click on the “Choose Signature” button. This will allow you to select a saved signature or an image file.
- Once you have created or selected your signature, click “Done” to insert it into the document. You can drag and resize the signature to position it correctly on the page.
- Repeat steps 3 to 7 if you need to add another signature to the document.
- Save the document to keep the signatures in place. You can now use the document with the digital signature for future outcomes.
Adding a digital signature in Apple Pages is the easiest way to sign documents electronically. It eliminates the need for printing, signing, and scanning the pages. With Apple Pages, you can simply create a digital signature and insert it directly into your documents.
Note that there may be limits on the number of signatures you can add or the size of the signature. You can refer to Apple’s support handbook or employee handbook for more information about the specific limits.
Using digital signatures not only saves time but also ensures the authenticity and integrity of your documents. It provides a secure way to sign important agreements, contracts, or any other documents that require your signature.
So, now that you know how to create a digital signature in Apple Pages, you can start signing your documents online. Follow the step-by-step instructions provided above and enjoy the convenience of a digital signature.
1 Step-by-step instructions for creating a digital signature in Apple Pages
Creating a digital signature in Apple Pages is a straightforward process that allows you to easily add your personal touch to documents. In this guide, we will walk you through the steps on how to create a digital signature using your Apple device.
Step 1: Open the Apple Pages application on your Mac or iPad.
Step 2: Select the document you want to add a signature to. If you don’t have an existing document, click on “Create a New Document” to start a new one.
Step 3: After opening the document, position your cursor where you want to insert the signature.
Step 4: Click on the “+” icon located in the toolbar at the top of the Pages window.
Step 5: From the drop-down menu, select “Signature.”
Step 6: A window will appear allowing you to choose the method of adding your signature. You can either sign using your trackpad, camera, or import a saved image. Select the method that suits you best.
Step 7: If you choose to sign using your trackpad, a white signature field will appear. Use your finger or stylus to draw your signature within the field. Press “Done” when you’re finished.
Step 8: If you choose to sign using your camera, a new window will open displaying a live view of your camera. Hold up a white piece of paper with your signature and align it within the white signature field. The camera will automatically capture your signature. Press “Done” to proceed.
Step 9: If you choose to import a saved image, click on the “Image” tab, then press “Choose Signature Image” to select the image file from your device. Adjust the size and position of the signature as needed.
Step 10: Once you’ve added your signature, you can edit it by clicking on the signature field and selecting “Edit Signature” from the options menu.
Step 11: Finally, save your document by pressing “File” in the top menu, then select “Save” or “Save As” to keep a copy of the document with your signature.
By following these step-by-step instructions, you can easily create a digital signature in Apple Pages. Adding your signature to documents is now even more convenient and will save you time and effort for future signees.
2 Explanation of how to save the signature for future use
After creating a signature on Signaturely, you may want to save it for future use. Here is a step-by-step explanation of how to do that:
- Open the document you want to add the signature to using Signaturely.
- Select the page or pages where you want to add the signature by clicking on them.
- In the upper-right corner, click on the “Insert Signature” icon (it looks like a pen).
- If you already have a saved signature, you can choose it from the list of existing signatures. Otherwise, click on the “Add New Signature” button.
- You will be asked to provide a name for the signature. Enter a descriptive name that will help you identify it easily in the future.
- Now, there are two options to add your signature:
- Using a signature already saved on your device: Click on the “Upload Signature” button, select the image file with your signature, and then click “Save”.
- Creating a new signature: Click on the “Draw Signature” button to draw your signature using your mouse or trackpad. You can also use the “Capture Signature” button to take a picture of your signature using your device’s camera.
- Once you have added your signature, click “Save” to save it for future use.
By saving your signature, you can easily insert it into any document without having to create it again. This can save you time and ensure consistency across multiple documents.
Please note that Signaturely has some limits on the number of signatures you can save depending on your subscription. For example, the free plan has a maximum limit of 3 signatures, while the Business plan allows unlimited signatures.
Now you know how to save your signature for future use on Signaturely! Follow these instructions and enjoy the convenience of adding your signature to documents with just a few clicks.
Frequently Asked Questions About Adding a Signature in Pages
1. What is the easiest way to add a signature to a Pages document?
The easiest way to add a signature to a Pages document is by using the built-in signature feature provided by Apple. You can create a digital signature by following the step-by-step instructions outlined in the Pages handbook.
2. Can I add more than one signature to a document?
Yes, you can add multiple signatures to a document. Pages allows you to create and save multiple signatures, making it convenient for situations where multiple signees or parties need to sign the same document.
3. How do I add a signature to an existing Pages document?
To add a signature to an existing Pages document, open the document and click on the “Sign” icon located in the toolbar. Then, select the signature you want to add from the list of saved signatures. The signature will be inserted into the document at the cursor position.
4. What are the limits on the size of a signature in Pages?
Pages does not have a fixed limit on the size of a signature. However, it is recommended to keep the size of the signature within reasonable limits to ensure optimal outcomes. Creating a signature using a clean white background and thin lines is often preferred for a professional appearance.
5. Can I add an image of my signature to a Pages document?
Yes, you can add an image of your signature to a Pages document. To do this, create a digital image of your signature using a camera or another device, save it as a file, and then use the “Insert > Choose…” option in Pages to select and insert the image into the document.
6. How do I add signature fields to a Pages document?
To add signature fields to a Pages document, you can use the built-in drawing tools to create lines or boxes where the signatures should be placed. Alternatively, you can use a dedicated online tool like Signaturely to provide predefined signature fields that can be easily inserted into the document.
7. What are the step-by-step instructions for adding a signature in Pages?
For step-by-step instructions on how to add a signature in Pages, please refer to the Pages handbook or the online guide provided by Apple. These resources will provide detailed explanations and illustrations to help you through the process.
8. Can I add a signature to a Pages document on my iPad or iPhone?
Yes, you can add a signature to a Pages document on your iPad or iPhone. Pages is compatible with iOS devices and provides the necessary tools and features for adding signatures using the touch interface.
9. What is the maximum number of characters allowed in a signature in Pages?
Pages does not impose a specific limit on the number of characters allowed in a signature. However, it is recommended to keep the signature concise and focused on the essential information to maintain a clean and professional appearance.
10. Why should I use a digital signature instead of signing a document by hand?
Using a digital signature offers several advantages over signing a document by hand. Digital signatures provide a higher level of security, can be easily replicated for multiple documents, and are more convenient for online or remote collaborations. Additionally, digital signatures leave a digital trail that can be useful for future references or audits.
How do you insert a signature to pages on a Mac
If you need to insert a signature to your Pages documents on a Mac, there are several methods you can use. One popular option is to use an online tool called Signaturely, which allows you to create a digital signature that can be added to your documents.
To insert a signature using Signaturely, follow these step-by-step instructions:
| Step 1: | Go to the Signaturely website and sign up for an account if you don’t already have one. |
| Step 2: | Upload the document you want to add a signature to by clicking on the “Upload” button. |
| Step 3: | Select the file and click on the “Add Fields” button. Choose the option to add a signature field to your document. |
| Step 4: | Position the signature field where you want the signature to appear on the document. |
| Step 5: | Click on the “Send” button to send the document to the signees. They can then sign the document using their mouse, trackpad, or any external device like a digital pen or stylus. |
| Step 6: | Once the signees have signed the document, you will receive a notification. You can then download the signed document as a PDF file. |
Another option is to use the built-in signature feature in Pages on your Mac. Here’s how:
| Step 1: | Open the document you want to add a signature to in Pages. |
| Step 2: | Click on the “Insert” option in the menu bar, then select “Signature” from the drop-down menu. |
| Step 3: | If you have an existing signature saved, select it from the list. If not, click on the “+” icon to create a new signature. |
| Step 4: | Follow the on-screen instructions to create a signature. You can use a white sheet of paper and a dark pen to draw your signature, or use a camera to capture your signature. |
| Step 5: | Once you have created or selected a signature, it will be inserted into the document. |
It’s important to keep in mind that there may be limits to the size and character of the signature you can insert using Pages. The maximum limit for a signature is typically around 2 inches in height and 100KB in file size.
If you have more questions about adding signatures to Pages documents on your Mac or any other Apple device, consult the Pages handbook or frequently asked questions provided by Apple for further explanation and guidance.
How do I insert a signature to a Pages document on an iPad
If you’re wondering how to add your signature to a Pages document on your iPad, you’ve come to the right place. This step-by-step guide will provide you with clear instructions on how to insert a signature using your iPad’s camera or an existing image.
1. Open the Pages app on your iPad and select the document you want to add a signature to.
2. Click on the icon that looks like a white sheet of paper with a pencil on it, located in the top-right corner of your screen. This will open the Markup toolbar.
3. From the Markup toolbar, select the icon that looks like a signature, labeled “Sign,” which will open the signature panel.
4. You have two options for adding your signature. The easiest way is to use your iPad’s camera. To do this, press the “+” icon and select the “Camera” option. You can then sign with your finger or a stylus on a white page and take a photo of your signature. Once you are done, click “Save” to add your signature to the document.
5. If you already have a digital signature saved on your device or have an existing image of your signature, you can select the “Image” option instead. You will be prompted to select the file from your iPad’s files. Once you select the file, your signature will be added to the document.
6. To position your signature on the document, simply tap and hold your signature with one finger and drag it to where you want it to be placed.
7. If you need to insert your signature on multiple pages, you can repeat the above steps for each page. Just make sure to place the signature in the desired location on each page.
8. After adding your signature, make sure to save the document by clicking on the document icon in the top-left corner and selecting “Save” or “Save a Copy” if you want to keep the original document intact.
That’s it! You have successfully inserted your signature to a Pages document on your iPad. Now you can share the document or keep it for future reference. If you have any questions about creating or adding signatures, Signaturely is a great online resource to learn more about what you can do with digital signatures.
Remember, there are some limits to adding signatures using the Pages app on an iPad. You can only add one signature per document and the signature field can’t exceed a maximum size. If you frequently need to add multiple signatures or have more complex signature requirements, you may want to consider using another app or a digital signature platform like Signaturely.
Sources:
- Apple: https://support.apple.com/en-us/HT209258
- Signaturely: https://signaturely.com/blog/how-to-add-a-signature-to-a-pages-doc-on-an-ipad
How can I create a digital signature

Creating a digital signature is a quick and easy process. By using online tools like Signaturely, you can add a digital signature to any document in just a few simple steps. Whether you’re on a Mac, iPad, or another device, this guide will provide step-by-step instructions on how to create a digital signature.
Here’s how you can create a digital signature:
- Select the document you want to sign. You can use an existing document or create a new one.
- Save the document in PDF format to ensure compatibility.
- Open the Signaturely website or app.
- Click on the “Add Signature” button.
- Using your mouse or a stylus, sign your name in the designated signature field.
- Depending on the platform, you may be asked to upload an image of your signature or draw it directly using your device’s touchscreen.
- Adjust the signature size and position to fit within the allocated space.
- Save the document with the inserted signature.
When creating a digital signature, there are a few things to keep in mind:
- Use a clear white background when creating your signature image.
- Ensure that your signature fits within the provided signature fields.
- Try to keep your signature simple and avoid overly complex or decorative characters.
- Make sure to press the “Save” button to apply the signature.
Adding a digital signature to your documents not only saves time, but it also ensures the authenticity of the content. Whether you need to sign employee handbooks, contracts, or any other important documents, using a digital signature will provide a secure and legally binding solution.
By following these instructions, you can easily create a digital signature for your documents and enjoy the convenience and efficiency it brings for your future signings.
Sources: Signaturely, Apple Support
How do I add an existing signature image to a PDF file on a Mac
If you have an existing signature image that you want to add to a PDF file on your Mac, you can easily do so by following these step-by-step instructions.
| Step 1: | Open the PDF file that you want to add the signature image to. |
| Step 2: | Click on the “File” menu and select “Insert from File” or “Insert Picture” (the exact option might vary based on the version of your PDF reader). |
| Step 3: | In the file selection window that opens up, browse and select the image file of your signature that you want to add to the PDF. |
| Step 4: | After selecting the image file, click on the “Insert” or “Open” button to insert the signature image into the PDF document. |
| Step 5: | Position and resize the signature image as needed using the tools provided in the PDF reader. |
| Step 6: | Save the modified PDF file with the added signature image. |
By following these instructions, you can easily add your existing signature image to a PDF file on your Mac. This can be useful for signing official documents or adding your personal touch to any digital document.
Please note that some PDF readers might have specific limitations or guidelines for adding images, so make sure to consult the user guide or documentation provided by the software developer for more information on using signature images.
About Character Limits
When using Signaturely to add signature pages to your documents, it’s important to keep in mind the character limits for certain fields. Character limits are the maximum number of letters, numbers, or symbols that you can use in a specific field, such as the header or the signature itself.
Why do character limits matter? Well, they ensure that your documents look professional and that all the necessary information can fit within the designated space. If you exceed the character limit, the text may get cut off or not display properly.
When you’re asked to input text, make sure to read the instructions carefully and pay attention to any character limits mentioned. If you have any questions about what to insert or the maximum character limit, consult the guide or contact Signaturely support for assistance.
If you’re adding an employee handbook or another document with a lot of text, you may want to consider creating multiple pages to accommodate the character limits. This can be done by selecting the “Add Page” icon in the document editor and then following the step-by-step instructions.
Frequently asked questions about character limits:
- What character limits apply to my signature page?
- How do I know if I’ve reached the maximum character limit?
- What are the outcomes if I exceed the character limit?
Signaturely provides more explanation on character limits in the Signaturely Blog.
When adding a signature to your document, Signaturely offers different options for creating your signature. You can type your signature using your keyboard or use a digital image of your signature. If you’re using a Mac or an iPad, you can even use your Apple Pencil or finger to sign directly on the screen.
After you’ve created or selected your signature, click on the “Sign” button to insert it into the designated signature fields. Signaturely will save your signature for future use, so you don’t have to re-create it every time you need to sign a document.
Keep in mind that Signaturely also has limits on the number of signees or recipients you can add to a document. If you have a large number of people who need to sign, consider dividing them into smaller groups or using the bulk upload feature to add them all at once.
One of the easiest ways to add a signature page to your document is by using Signaturely’s drag-and-drop feature. Simply drag and drop the signature fields onto your document where you want them to be placed. You can also use the pre-existing signature fields that Signaturely automatically detects in your document.
Remember, when it comes to adding signature pages to your documents, Signaturely makes it quick and easy for you to sign online. With step-by-step instructions, explanation of character limits, and various options for creating and inserting signatures, you can confidently go paperless and streamline your signing process.
Sources
Here are some sources that provide step-by-step instructions on how to add signature pages:
1. Signaturely Handbook: Adding Signature Pages – Signaturely provides a guide on how to add signature pages to your documents. The guide includes explanations and instructions on creating digital signature fields, inserting signature pages, and more. They also offer tips on how to keep your documents within the maximum file size limit and how to use signature pages on different devices such as Mac, iPad, and online.
2. – Apple Support offers instructions on adding signature pages using Pages on Mac and iPad. They explain the step-by-step process of inserting a signature page, adding signature lines, and saving the document. They also provide an explanation on how to sign the document using a digital signature or by hand, depending on your preference.
By following these sources, you can easily add signature pages to your existing documents.


