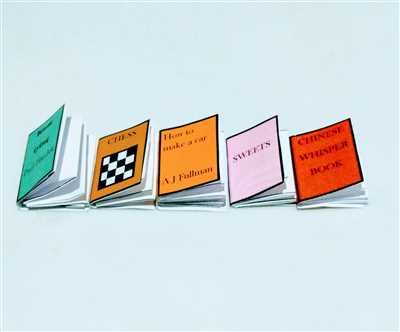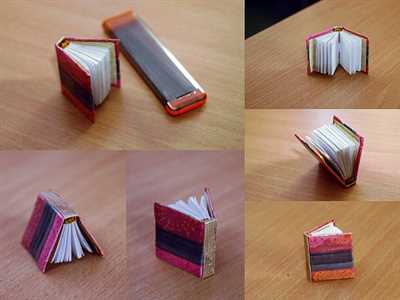
Have you ever used miniature books for a unique DIY project or as a charming gift for a loved one? These tiny books, no bigger than a keyring or a little notepad, can be a delightful way to express your creativity. You can create your own miniature books for a wide range of purposes, whether it’s for a dollhouse, an advent calendar, or as a personalized gift.
The process of making mini books is fairly simple, and with just a few tools and materials, you can create your own collection of tiny literary treasures. All you need is some paper, cardboard or board, glue, a needle and thread, and tools like scissors, a rotary cutter, or a craft knife. These items can usually be found in any craft or hobby store, or you may already have them in your craft drawer.
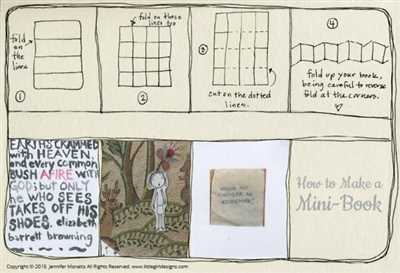
To create the mini books, start by cutting the paper into small rectangles, approximately the size of your desired book. Then, fold each sheet in half to form a little booklet. You can add more pages if you wish, just make sure they’re all the same size. Next, cut the cardboard or board to create covers for your mini books. Spray adhesive or Mod Podge can be used to attach the covers to the booklets.
Miniature Books
Miniature books are a fun and creative way to make small books that can be used as keyrings or ornaments. These tiny books are perfect for adding a decorative touch to your holiday decorations or as a small gift for a friend.
To create miniature books, you’ll need a few tools and materials. Start by cutting cardboard into small pieces for the front and back covers of the books. The size of the covers will depend on how big you want your books to be. You can use a rotary tool to cut the cardboard to the desired size.
Next, use a needle to punch holes along one side of the cardboard covers. Make sure the holes are evenly spaced and parallel to each other. Then, cut pieces of paper in the same size as the covers and score them down the middle. This will allow the pages to open more easily.
Now, it’s time to glue the covers and pages together. Apply a thin layer of glue, such as Mod Podge, to the back cover and stick the pages to it. Then, apply another layer of glue to the front cover and press it firmly against the pages. Make sure the edges are aligned and the pages are tight.
Once the glue is dry, you can add some decorative elements to the miniature books. Use a pencil to create patterns or write words on the covers. You can also add embellishments like beads or earrings to the spine of the book by threading them onto a piece of wire and gluing them in place.
If you wish, you can also make miniature books with a festive theme, such as Christmas or Advent calendars. To do this, create tiny pages with numbers or holiday images and glue them within the covers. You can then add a ribbon or string to hang the book as an ornament.
Remember, these miniature books are just for decorative purposes and may not be suitable for regular reading. The thickness of the paper and the size of the books may make it difficult to turn the pages and read the content within.
In conclusion, making miniature books is a fun DIY project that allows you to create unique and tiny books. Whether you want to make them as keyrings, ornaments, or gifts, they’re sure to be a hit with friends and family. So gather your tools, get creative, and start making your own miniature books!
DIY Christmas Advent Calendars

Christmas is a wonderful time of year, and one way to make it even more special is by creating your own DIY Christmas Advent Calendars. These calendars are a fun and creative way to count down the days until Christmas, and they also make great gifts for friends and family.
Here’s a step-by-step guide on how to make your own DIY Christmas Advent Calendars:
- Choose your size: Decide on the size of your advent calendar. You can make it as big or as small as you wish. If you’re a beginner, it’s best to start with a smaller size.
- Gather your materials: You’ll need bookbinders board or cardboard for the covers, paper for the pages, and a few tools like a rotary cutter, needle, and pencil. You can also add embellishments like beads, wire, or miniature holiday ornaments if you’d like.
- Measure and cut: Measure and cut your bookbinders board or cardboard to the desired size for the covers. Then, cut your paper into smaller pieces that will fit within the covers.
- Glue and bind: Using a glue like Mod Podge, start gluing the paper to the board or cardboard. You can also add bead or wire headbands to bind the pages together. Make sure to leave a space for the advent calendar numbers or symbols at the top or bottom.
- Add the advent calendar numbers: Next, you can either draw or use pre-made advent calendar numbers or symbols to mark each day. You can place them above each page or within the page itself.
- Decorate the covers: Now it’s time to decorate the front and back covers. You can use holiday-themed paper, satin ribbons, or even photos. Get creative and make it personal!
- Make it functional: To make the advent calendar functional, you can add small pockets on each page for treats or tiny gifts. You can also attach a keyring or wire loop at the top to hang it on the wall.
- Spray with protective coating: If you wish, you can spray your advent calendar with a protective coating to help preserve it for years to come.
- Count down to Christmas: Finally, hang your DIY Christmas Advent Calendar in a visible place and start counting down the days until Christmas. Each day, open a page or pocket and enjoy the holiday surprises inside!
Making your own DIY Christmas Advent Calendars is a fun and rewarding activity that the whole family can enjoy. It’s a great way to create cherished holiday memories and add a personal touch to your Christmas celebrations. So gather your materials, unleash your creativity, and get ready for a festive and exciting countdown to Christmas!
Sources: Darcy and/or other sources as shown above
Darcy
Creating mini books is a great way to showcase your creativity and make unique gifts for friends and family. In this section, we will explore the technique of making mini books using the Darcy method. Darcy is a bookbinding technique that allows you to create miniature books with beautiful covers.
The Darcy method involves using a combination of bookbinding tools and materials to create the book’s structure. For the covers, you can use various materials such as cardboard, satin, or even beading. The size of the book can vary depending on your preferences, but it is usually smaller than a full-size book.
To begin, gather all the materials you will need, including cardboard, paper, glue (such as Mod Podge), a rotary cutter, a needle and thread, and any decorations you wish to add.
First, cut the cardboard into the desired size for the book’s covers. Then, cut the paper into the same size, allowing for some extra space on the sides for the book’s thickness.
Next, fold the paper in half to create the book’s pages. Use a pencil to mark where the holes will be for the binding. You can create holes using a rotary cutter or a needle. Make sure the holes are evenly spaced and aligned on both sides of the folded paper.
Once the holes are ready, align the covers with the paper and thread the needle through the holes, binding them together. Make sure the thread is tight enough to keep the pages secure.
After the binding is complete, you can decorate the front and back covers of the book. This is where you can get creative and add personal touches such as beading, ribbons, or even miniature holiday calendars. Glue the decorations onto the covers using Mod Podge.
Once the covers are decorated and dry, your mini book is complete! You can create as many mini books as you like, each with its own unique design. These mini books make great gifts or can be used as keyrings or earrings.
The Darcy method allows you to create beautiful mini books that can be enjoyed by both children and adults. The process of making them can be a fun and relaxing activity for the whole family. So gather your tools and materials, and start creating your own mini books using the Darcy method!
DIY Tiny Books
If you enjoy making miniatures, DIY tiny books can be a fun and creative project to undertake. These miniature books are perfect for dollhouses, dioramas, or simply as decorative items. In this tutorial, we will show you how to create your own tiny books using simple materials and tools.
To make the covers of the books, you will need cardboard or heavy cardstock. Cut out small rectangles from the board, making sure they are slightly larger than the size you want for your books. You can use a rotary cutter or scissors for this step.
Next, you’ll need to create the book block, which is the part that holds the pages together. Take some paper and cut it into small rectangles, ensuring they are all the same size. You can use a ruler and a pencil to mark the dimensions before cutting.
Once you have your book covers and book blocks ready, you can start assembling the tiny books. Apply a thin layer of adhesive on one side of the book block and carefully attach it to the inside of one of the covers. Press firmly to ensure a tight bond. Repeat this step for the other side of the book block, making sure the covers align properly.
If you wish to decorate the covers of your tiny books, you can use decorative paper, fabric, or even satin ribbon. Cut a piece of your preferred material slightly larger than the size of the book cover. Apply a thin layer of glue or Mod Podge to the cover and carefully place the material on top, smoothing out any wrinkles or air pockets.
To give your tiny books a more authentic look, you can create a spine using beading wire. Measure and cut a piece of wire slightly longer than the thickness of the book. Insert the wire through the tiny holes on the book block and bend the ends to secure them in place.
Now that your DIY tiny books are complete, you can display them in various ways. You can stack them together to create a tiny bookshelf, attach them to a keyring as a charm, or even make miniature holiday advent calendars by gluing the books to a board and labeling them with numbers.
When it comes to miniature books, the possibilities are endless. You can experiment with different sizes, materials, and designs to create unique pieces. Get your whole family involved in the process and make it a fun activity for everyone.
Remember, while making these tiny books may seem challenging at first, practice makes perfect! So don’t be discouraged if your first few attempts are not perfect. With time and patience, you’ll become a master at creating these adorable DIY mini books.
Sources

If you’re interested in making mini books, there are many sources available to help you create your own. Here are some key resources:
- Miniature Bookbinders: There are many bookbinders who specialize in creating mini books. They often have tools, tutorials, and supplies available for purchase.
- DIY Websites and Blogs: There are a variety of DIY websites and blogs that can provide step-by-step instructions and inspiration for making mini books. Some popular sites include Darcy’s Bookbinding Journey and Instructables.
- Bookbinding Supplies: You’ll need a few basic supplies to make mini books, such as paper, glue, scissors, and a needle and thread for binding. There are many online retailers that sell these supplies, such as The Bookbinding Store and Talas.
- Holiday and Advent Calendars: Mini books can be a fun and unique addition to holiday and advent calendars. You can find pre-made mini books to use or create your own from scratch.
- Miniature Book Covers: If you’d like to make your mini books look more professional, you can purchase pre-made miniature book covers. These covers come in a variety of styles and materials, such as satin or leather.
- Keyring and Wire Binding: Instead of traditional binding methods, you can use keyring or wire binding to hold your mini books together. This allows for easy flipping through the pages and adds a unique touch.
- Paper Podge and Spray Adhesive: When gluing your mini book pages together, you can use paper podge or spray adhesive for a stronger and more durable hold.
- Mini Book Tools: There are specific tools designed for making mini books, such as miniature rulers, tiny scissors, and tiny hole punches. These tools can help you create precise and professional-looking mini books.
- Block and Earrings: If you’re making mini books as a gift or for a special occasion, you can use a block or a pair of earrings as a display stand. This adds an extra touch of creativity to your mini books.
With these sources and tools, you’ll be well-equipped to start making your own mini books. Whether you’re creating them as a hobby or for a special occasion, mini books are a fun and creative way to showcase your skills.


