Creating ink at home can be a fascinating and rewarding process. With just a few simple materials and some patience, you can make your own beautiful, natural inks that will add a touch of creativity to your artwork or writing. Today, we will explore the endless possibilities of making ink from various sources, such as honey, filters, glass jars, and more.
The first step in making ink is to gather the necessary materials. You will need some natural sources of color, such as blackberries, coffee, or even charcoal. Additionally, you will need a glass jar to mix the ingredients, filters to strain the ink, and honey to act as a binder.
Once you have all your materials, it’s time to start making the ink. Begin by crushing the natural sources of color in a mortar and pestle until they form a fine powder. Then, pour the powdered color into a glass jar and add a small amount of honey to create the ink’s texture and consistency.
Next, fill the glass jar with water and mix the ingredients together until they are well combined. If the ink appears too thick, you can add more water until it reaches your desired consistency. Conversely, if the ink is too thin, you can add more powdered color and honey to thicken it.
After mixing the ingredients, let the ink sit in an open jar for about 30 days. This will allow the ink to oxidize and deepen in color. Make sure to stir the ink occasionally during this period to prevent any mold or bacteria from growing.
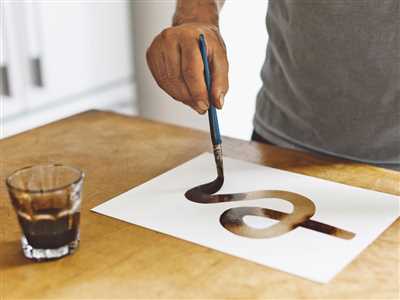
Finally, strain the ink through a filter to remove any particles or impurities. Your homemade ink is now ready to use! Simply pour it into an inkwell or a small container, and it’s ready to be dipped by a pen or a brush. You can use this ink for calligraphy, drawing, or any other artistic endeavors.
Remember, making ink at home allows you to experiment with different recipes and create unique colors. You can mix different natural sources to create shades of brown, green, or even instant inks that don’t require a waiting period. The more you practice, the better you will become at making your own homemade ink.
In conclusion, creating homemade ink is a wonderful and fulfilling process. By using natural sources, filters, honey, and other simple ingredients, you can produce your own beautiful inks right in the comfort of your own home. So why wait? Start making your own ink today and let your creativity flow!
30 Days of Natural Inks – Recipes
Welcome to our blog where we will share 30 days of natural ink recipes. Making your own homemade ink can be a fun and creative project to try at home. The possibilities for creating beautiful and unique ink colors are endless!
Today, we’re going to guide you through the process of making a rich black ink using just a few simple materials. Here’s what you’ll need:
- 1 cup of water
- 1 cup of honey
- 1 cup of brown filters
Start by pouring the water into a glass container and adding the honey. Stir the mixture until the honey is fully dissolved. Then, crumble the brown filters into small pieces and add them to the container.
Now, it’s time to let the mixture sit and infuse for 30 days. Find a cool and dark place to store the container, and be patient until the ink is ready. The waiting will be worth it!
After 30 days, open the container and strain the ink through a fine mesh strainer or cheesecloth to remove any solid particles. You will be left with a deep black ink that is perfect for use in watercolor paintings, calligraphy, or any other artistic project you can imagine.
So why wait? Start making your own natural inks today and discover the joy of creating unique colors from simple ingredients. Stay tuned for more ink recipes in the coming days!
Materials
When it comes to making ink at home, there are endless recipes and materials you can use. Today, we will guide you through the process of making homemade ink, just like the beautiful watercolor paints you would find in an art store.
Here is a list of materials you will need:
| – | Black ink recipe |
| – | Glass jar with a lid |
| – | Watercolor filters |
| – | Ink filters |
| – | 30 grams of natural honey |
| – | 30 grams of water |
| – | 30 grams of instant coffee |
To make the ink, start by opening the glass jar and pouring in the honey, water, and instant coffee. Stir the mixture well until it reaches a brown color. If you prefer a darker ink, you can add more coffee. Once the desired color is achieved, close the lid of the jar and let the ink sit for a few days to thicken.
After a few days, you may notice some sediment at the bottom of the jar. To ensure a smooth ink consistency, use the watercolor filters and ink filters to strain out any particles. Once filtered, your homemade ink is ready to use!
Brown Ink Recipe
Making your own ink can be a beautiful and rewarding process. With just a few simple materials, you can create endless colors and explore the world of homemade inks. Today, we will focus on a brown ink recipe that you can easily make at home.
Here is what you will need:
- Watercolor ink sources (black, brown, etc.)
- A glass jar or container
- Honey
- Filters
- Water
Follow these steps to make your own brown ink:
- Start by pouring a small amount of water into the glass jar.
- Add the desired amount of brown watercolor ink source. You can adjust the amount depending on how dark you want your ink to be.
- Add a small amount of honey to the mixture. The honey will act as a binder and help the ink stick to the paper.
- Mix the ingredients together until well blended.
- If you prefer a smoother ink, you can strain the mixture through a filter to remove any particles.
- Let the ink cool and settle for at least 30 minutes, or until it reaches room temperature.
Your brown ink is now ready to use! Pour it into a small container or bottle, and it will be ready for your artistic needs. Remember, making your own ink is a creative process, so feel free to experiment with different ratios and ingredients to achieve the desired shade of brown.
Now that you have mastered the art of making brown ink, you can explore other ink recipes on our blog. The possibilities are endless, and you never know what new and beautiful colors you may discover!
Homemade Instant Black Ink

If you are a fan of watercolor painting or calligraphy, having a reliable source of black ink is essential. Instead of relying on store-bought options, why not try making your own black ink at home? Not only is it a fun and creative project, but it also allows you to have complete control over the materials you use and the final result.
There are endless recipes and guides available online for making homemade black ink, but today we will share with you a simple and instant recipe that will give you beautiful results.
What you need:
- 30 grams of honey
- 30 grams of water
- 30 grams of black ink
- 2 coffee filters
- A glass jar with a lid
Instructions:
1. Start by combining the honey and water in a small container. Mix it well until the honey is completely dissolved.
2. Open the black ink bottle and pour it into the container with the honey-water mixture. Stir it gently until the ink is fully incorporated. The honey will help give the ink a nice texture and make it flow smoothly.
3. Take one of the coffee filters and place it over the opening of the glass jar. Secure it with the lid, making sure it is tightly closed. This will act as a filter to remove any impurities or particles from the ink.
4. Now, pour the ink mixture into the glass jar through the coffee filter. The filter will catch any solid particles or impurities, leaving you with clean and smooth black ink.
5. Once you have poured all the ink, carefully remove the coffee filter and discard it. You can now use your homemade instant black ink for your art projects!
Remember to store the ink in a cool and dark place, away from direct sunlight. This will help preserve its quality and prevent it from drying out.
This simple and natural recipe for homemade instant black ink is a great alternative to store-bought options. Not only is it cost-effective, but it also allows you to experiment and create different shades of black by adjusting the honey-water ratio.
So why not give it a try? Open your art blog and share your experience with making homemade ink. Your followers would surely appreciate the opportunity to learn something new!
Sources
When it comes to making black ink at home, there are a few common sources you can look into. One of the most popular materials for homemade ink is glass. Glass containers are great for mixing and storing ink because they are non-reactive and won’t affect the quality of the ink.
There are also various materials you can use to create different recipes for black ink. Some people like to use instant coffee or honey as a base for their ink. Others prefer to use natural materials like walnut shells or charcoal. The possibilities are endless, and you can find many cool recipes online or in a homemade ink blog.
If you are looking for a simple recipe, one popular method is to mix 30 grams of powdered gum arabic with 30 grams of lamp black pigment. Then, slowly add water and stir until the mixture reaches the consistency of a thin watercolor. You may need to add more or less water, so it’s always a good idea to experiment until you get the desired result.
Filters are often used when making homemade ink to remove any impurities or lumps. Some ink makers like to use a coffee filter or a fine mesh cloth to strain the ink before using it. This step ensures that your ink is smooth and free of any debris that could clog your pen or brush.
Keep in mind that making your own ink can be a messy process, so it’s a good idea to have an open workspace and some old newspapers or a drop cloth to catch any spills. Also, be sure to wear protective clothing like an apron or old clothes that you don’t mind getting stained.
With these sources and tips, you can start making your own beautiful homemade ink in no time. It’s a fun and creative project that can be enjoyed by artists and crafters of all levels. So why not give it a try today?