

Are you looking for a simple and fun way to add a personal touch to your belongings or brand your business? Making your own stickers with a Cricut machine is the perfect solution! With just a few easy steps, you can create custom stickers that are perfect for decorating your laptop, water bottle, notebooks, and more.
First, you’ll need to familiarize yourself with the Cricut Design Space software. This powerful tool allows you to create and edit designs that can be cut out by your Cricut machine. After selecting the “New Project” button, you’ll notice a blank canvas where you can start designing your sticker.
To create a sticker, you’ll need to find or create a design that you would like to turn into a sticker. Cricut provides a wide range of images, fonts, and shapes that you can use for your projects, but if you have a specific design in mind, you can easily upload your own images or use the ones provided by Cricut.
Once you have your design ready, you can start layering different colors and elements to make your sticker stand out. The Cricut Design Space allows you to add multiple layers to your design, so you can easily create stickers with a layered look.
Next, you’ll need to select the materials you want to use for your sticker. Cricut offers a variety of materials that are compatible with your machine, including vinyl, printable paper, and even fabric. Depending on the type of material you choose, you may need to adjust the settings of your machine to ensure a precise cut.
After loading your chosen material onto the cutting mat, you can now send your design to the machine for cutting. Simply click the “Make It” button in the Cricut Design Space, and you’ll be guided through the cutting process. You may need to adjust the size and position of your design to fit the material properly.
Once your design is cut, you can easily remove it from the cutting mat by gently bending the mat away from the sticker. If you’re working with vinyl, you’ll notice that the design has a backing. Simply peel away the backing to reveal the adhesive side of the sticker.
Now that your sticker is ready, you can apply it to your desired surface. Make sure the surface is clean and free of any dust or oils that could prevent the sticker from sticking properly. Simply peel the sticker off the backing and apply it to the surface. Use a small tool, like a credit card or a scraper, to remove any air bubbles and ensure a smooth application.
Voila! Your custom Cricut sticker is complete. Now you can proudly show off your own unique designs or use them as marketing materials for your business. Making stickers with a Cricut machine is a fun and creative way to personalize your belongings and bring your ideas to life.
20 Cricut Sticker Ideas that are Hot in 2023
Looking for some trendy and unique sticker ideas to create with your Cricut machine? Look no further! Below are 20 cool and creative sticker ideas that are going to be popular in 2023. Get your printable tape and transfer materials ready, because you’ll want to try all of these designs!
- Window decals: Create stunning window decals that can be easily applied to any window surface.
- Fabric stickers: Use fabric material to make stickers that can be easily ironed onto your favorite clothing items.
- Contour stickers: Explore the contour feature on your Cricut machine to create unique and intricate sticker designs.
- Smart layers: Combine multiple layers of stickers to create a dynamic and eye-catching design.
- Print and cut stickers: Print your favorite designs using your Cricut machine, and then cut them into perfectly shaped stickers.
- Marketing stickers: Create custom stickers for your brand or business to use in your marketing efforts.
- Fun fonts: Play around with different fonts and typography styles to make your stickers stand out.
- Colorful decals: Experiment with vibrant and bold colors to make your stickers pop.
- Layered designs: Use the layering technique to create 3D-like stickers with depth and dimension.
- Black and white stickers: Embrace the minimalist trend and create sleek and stylish black and white stickers.
- Flatten projects: Flatten your sticker projects to remove any leftover creases or air bubbles for a smooth finish.
- Arrow stickers: Use arrow shapes in your designs to indicate directions or add a sense of movement.
- Corner stickers: Create stickers that can be placed on the corners of your laptop or notebook for a decorative touch.
- Name decals: Personalize your belongings by creating custom name decals.
- Printable backing: Design printable backing for your stickers to give them a more professional look.
- Layered shapes: Experiment with different shapes and layer them to create unique sticker designs.
- Translucent stickers: Use translucent materials to create stickers that allow light to pass through, giving them a magical appearance.
- Review stickers: Make review stickers that you can easily stick on products you want to rave about.
- Textured stickers: Add texture to your stickers by using materials like glitter or faux leather.
- Peel-off stickers: Create stickers with a peel-off backing for easy application.
- Custom shapes: Don’t limit yourself to standard shapes. Use your Cricut to cut out any desired shape for your stickers.
With these 20 Cricut sticker ideas, you’ll have plenty of inspiration for your next creative project. From window decals to fabric stickers, the possibilities are endless. Get crafting and have fun designing your own unique stickers!
Make decals with Cricut
If you want to create custom decals or stickers, the Cricut machine is a great tool to use. With its precision cutting capabilities, you can easily make decals in various shapes and sizes. Here’s a step-by-step guide on how to make decals with Cricut:
- Design your decal using Cricut Design Space or any other design software. You can choose from a wide variety of pre-made designs or create your own from scratch.
- Once you have your design ready, select the vinyl color you want to use for your decal. Cricut offers a range of vinyl colors to choose from, so you can find the perfect one for your project.
- Next, load your selected vinyl into the Cricut machine. Make sure to place the vinyl with the backing paper facing down and the vinyl layer facing up. This will ensure that your design is cut on the correct side.
- Open the Cricut Design Space software and select the “Print then Cut” option. This will allow you to print your design onto the vinyl and then have the Cricut machine cut it out.
- After selecting the “Print then Cut” option, follow the on-screen instructions to send the design to your printer. Make sure to select the appropriate settings for vinyl printing to ensure the best quality.
- Once your design is printed, place the printed vinyl onto a cutting mat and load it into the Cricut machine. Align the arrow on the cutting mat with the corresponding arrow on the machine.
- Turn the Smart Set Dial to the recommended setting indicated by Cricut for the type of vinyl you are using. This will ensure that the machine cuts through the vinyl but not the backing paper.
- Press the “Go” button on the Cricut machine and watch as it cuts out your design with precision. When the cutting is complete, unload the cutting mat from the machine.
- Remove the excess vinyl from around your design, leaving only the decal or sticker you created. Use a weeding tool or your fingers to carefully peel away the unwanted vinyl.
- If your decal has multiple layers, carefully layer them on top of each other using transfer tape. This will help you position the different vinyl pieces accurately.
- If you’re making a decal to apply to a surface like a car or a laptop, clean the surface thoroughly before applying the decal. This will ensure that it sticks well and lasts longer.
- Peel the backing paper off the decal, starting from one corner. Be careful not to damage the decal while peeling off the backing.
- Once the backing is removed, carefully place the decal on the desired surface. Use your fingers or a scraper tool to smooth out any bubbles or wrinkles.
- Finally, give your decal a gentle press to ensure it adheres properly. Let it sit for a while to allow the adhesive to fully bond with the surface.
Now you know how to make decals with your Cricut machine. With these simple steps, you can create custom decals for a variety of projects. Whether you’re making stickers for personal use or to sell, the Cricut machine offers a versatile and efficient way to bring your designs to life.
Step 1
To make stickers with your Cricut machine, you will need a few materials. First, you need a Cricut machine. There are different models available, like the Cricut Maker or the Cricut Explore Air 2. Next, you will need some vinyl. Vinyl is a type of material that can be cut into different shapes and designs. You can find vinyl in many colors and finishes, like matte or glossy.
There are also printable vinyl options available, which allow you to print your designs directly onto the vinyl using an inkjet printer. This can be helpful if you want to create custom stickers with specific images or text. Just keep in mind that the printable vinyl might have different instructions for application compared to regular vinyl.
Once you have your materials ready, you can start creating your stickers using the Cricut Design Space software. This software allows you to design and customize your stickers with different colors, fonts, and images. You can also import your own designs or choose from a library of pre-made designs.
To begin, open Cricut Design Space and click on the “+ New Project” button. This will open a blank canvas where you can start designing. If you already have a design in mind, you can click on the “Upload” button to import your own image or select from the available options.
When designing your stickers, keep in mind that the Cricut machine can only cut up to a certain size. The maximum cutting size may vary depending on the model you have. Make sure to leave enough space between different sections of your design to avoid any overlapping or cutting issues.
Once you have your design ready, you can choose the material settings. For stickers, you will typically select the “Vinyl” setting or the specific type of vinyl you are using. Make sure to follow the instructions provided by the material manufacturer for the best results.
After selecting the material settings, you can preview your design and make any necessary adjustments. The preview will show you what your stickers will look like once they are cut. You can rearrange elements, resize them, or make any other changes to perfect your design.
When you are satisfied with your design, you can load the vinyl into the Cricut machine. Follow the machine’s instructions to feed the vinyl correctly. Make sure to flatten any rolled edges or corners to ensure a smooth and accurate cut.
Once the vinyl is loaded, you can press the “Go” or “Start” button on your Cricut machine to begin the cutting process. The machine will then follow the contour of your design and cut out each section.
After the machine has finished cutting, you can carefully remove the excess vinyl from the cutting mat. Use a weeding tool or your fingers to peel away the unwanted vinyl, leaving only your desired stickers behind.
Congratulations! You have successfully created your own stickers using your Cricut machine. From here, you can apply the stickers to various surfaces like notebooks, laptops, water bottles, and more. Get creative and have fun with your sticker-making projects!
Step 2
After you have selected your desired design or text for your sticker, you could either flatten it or leave it as is. Flattening the design or text will make it easier to work with and cut. To flatten a design or text, click the “Flatten” button on the layers panel on the right side of the screen. This will combine all the layers into a single layer, indicated by a little arrow on the left side of the layer. If you want to keep the design or text as separate layers, there is no need to flatten it.
Next, you will need to find the desired fonts or images for your sticker. The Cricut machine allows you to find fonts and images from cartridges that are already loaded into Design Space, or you can find more fonts and images from other sources online. To find fonts and images from cartridges, click the “Font” or “Images” button on the left panel, and then select the cartridge you want to use. To find fonts and images from other sources, you can click on the “Insert Images” button and then search for the desired design.
Once you have selected your design or text and have it flattened (if desired), you can now proceed to the next step. In the next step, you will need to apply the design or text onto the sticker material. If you are using printable vinyl, you will need to print your design onto the vinyl using a standard printer. Make sure to set your printer settings to the highest quality and select the appropriate paper type to get the best results.
If you are using regular vinyl, you can skip the printing step and go straight to cutting. Place the vinyl onto the cutting mat with the adhesive side facing up. Press it down firmly to ensure that it sticks to the mat securely. Load the mat into the Cricut machine by aligning the corner of the mat with the corner of the machine as indicated by the arrow. Turn the machine on and select the appropriate material setting. For example, if you are using black vinyl, you might select “Vinyl” as the material setting. If you are unsure which material setting to use, you can refer to the Cricut website or the user manual for guidance.
After you have loaded the mat and selected the material setting, you can now proceed to cut your design or text. Press the “Go” button on the Cricut machine and watch as it cuts out the design. The machine will follow the contour of your design or text and cut out the shape precisely. Once the machine has finished cutting, unload the mat from the machine and remove the excess vinyl from around your design. Be careful not to damage the delicate cuts.
Now that your design or text is cut out, you can apply it onto your desired surface. If you are making decals, you can apply them to a window, car, or any other smooth surface. Start by carefully peeling the backing away from the vinyl, making sure to keep the vinyl design or text intact. Position the design or text onto the desired surface and press it down firmly. Use a squeegee or the edge of a credit card to smooth out any air bubbles or wrinkles. Slowly peel away the transfer tape, leaving the vinyl design or text on the surface.
Congratulations! You have successfully completed the second step of making Cricut stickers. Now you can move on to the next step and continue creating amazing projects with your Cricut machine.
Step 3
After you have selected the design and printed it out on printable vinyl or paper, it’s time to cut out the stickers. This is where your Cricut machine comes in handy.
First, turn on your Cricut machine and open the Cricut Design Space software. Click on the ‘+ New’ button and select the ‘Upload’ option. This will allow you to upload and use your own images for cutting.
Next, select ‘Upload Image’ and browse for the file you want to use. Once selected, click on the ‘Continue’ button.
In the next screen, you will see the selected image and a preview of how it will look when cut. Look for any black marks or corners that might indicate where the machine will cut. Use the ‘Contour’ feature if you want to remove any unwanted sections or layers.
Once you’re satisfied with the image, click on the ‘Continue’ button.
On the next screen, you will see a preview of how the image will be cut. Pay attention to the cutting marks and make sure they are placed where you need them to be. You can move them around by clicking and dragging.
After making any necessary adjustments, click on the ‘Continue’ button.
Now it’s time to select your material. If you’re using printable vinyl, choose the ‘Printable Vinyl’ option. If you’re using paper, select the ‘Cardstock’ option.
Place your material onto the cutting mat, ensuring it’s properly aligned. Then, load the mat into the machine by following the instructions indicated on the screen.
Once everything is ready, click on the ‘Go’ button. The machine will start cutting the stickers based on the selected design and settings.
After the machine has finished cutting, unload the mat and carefully remove the stickers. You may need to use a weeding tool to remove any small pieces and detail.
Now, your stickers are ready to use or apply to your desired surface. If you’re using vinyl stickers, apply transfer tape to the top of the design, peel off the backing, and carefully apply the sticker to the surface.
And there you have it! Step 3 is all about cutting out the stickers using your Cricut machine. It’s a simple process that allows you to easily create custom stickers for all your labeling, decorating, and marketing needs.
Step 4
Once you have selected the design you want to make into a sticker, click on the “Flatten” button in the right panel. This will create a new layer called “Flatten” on top of your design.
Next, go to the top panel and click on the “Print” button. A window will pop up with the options for printing your sticker. Make sure your Cricut machine is connected and turned on.
Under the “Print” tab, you will find the option to select your Cricut machine. Click on it and choose the model you are using.
After selecting your machine, click on the “Print” button in the upper right corner of the window. This will send the design to your Cricut machine for cutting.
While the machine is cutting, open your Cricut Design Space and click on the “New Project” button. This will create a new blank canvas for your sticker.
Click on the “Upload” button in the left panel. A window will pop up with the options for uploading your sticker design.
Click on the “Upload Image” button and select the sticker design you just cut from the list. The image will appear on your canvas.
Click on the image to select it, and then click on the “Make It” button in the upper right corner of the screen. This will take you to the cutting mat preview screen.
Review the preview to make sure everything looks perfect. You can use the arrow buttons to navigate between the different sections of your sticker design.
If everything looks good, click on the “Continue” button in the lower right corner of the screen.
The next screen will show you a preview of how your sticker will look when it’s cut. You can use the arrows to scroll through the different pages, as well as zoom in and out to get a closer look.
Click on the “Continue” button in the lower right corner of the screen when you’re ready to proceed.
On the next screen, you will see a preview of your sticker with a dotted line around it. This is the cut line that the machine will follow.
If you want to make any changes to the cut settings or the size of your sticker, you can do so using the options on this screen.
When you’re happy with the settings, click on the “Continue” button in the lower right corner of the screen.
The final screen will show you a preview of your sticker design on the cutting mat. It will also indicate which color vinyl you need to load into the machine.
Load the vinyl into your machine according to the instructions in the Cricut User Manual. Make sure the machine is set to the correct material and color.
Once the vinyl is loaded, click on the “Go” button in the lower right corner of the screen. The machine will start cutting out your sticker.
After the machine has finished cutting, remove the sticker from the cutting mat and carefully peel away the excess vinyl around your design.
You can use a transfer tape to apply the sticker to your desired surface.
And that’s it! You’ve successfully made your own custom Cricut sticker. Repeat the steps above to create more stickers using different designs and colors. Let your creativity flow and have fun making unique decals for yourself and others.
Step 5
Once you have your design cut out on the vinyl, it’s time to transfer it onto the sticker backing. Take off the transfer tape and place it sticky side down on top of the vinyl. Use a credit card or an applicator tool to smooth out any air bubbles or wrinkles.
If your design has multiple layers, you’ll want to follow the same process for each layer. Start with the bottom layer and work your way up.
If you made any customizations using the contour tool, now is the time to remove any unwanted sections. Simply click on the contour button, select the sections you want to remove, and click “hide contour”.
Now, take the sticker backing with the vinyl and carefully peel off the paper backing, making sure that the vinyl sticks to the transfer tape. If you notice any parts of the vinyl not sticking, use your finger or the applicator tool to press it down.
Next, find the surface where you want to apply your sticker. Clean it thoroughly to ensure proper adhesion. Peel off the transfer tape from the vinyl, making sure the vinyl sticks to the surface. Use an applicator tool or your finger to press down and smooth out any bubbles or wrinkles.
And voila! Your sticker is now applied and ready to be shown off on your favorite items. If you want to make more stickers, just repeat the process outlined above. Using different colors and designs allows you to create an unlimited number of unique stickers for all your crafting projects.
Step 6
Once you have reviewed your design and made all the desired adjustments, it’s time to print and cut your stickers using the Cricut machine. Here is how you can do it:
- Turn on your Cricut machine and open the Cricut Design Space software.
- Click on the “+ New Project” button to create a new project.
- Click on the “Upload” button on the left panel to upload the printable sticker design you created in the previous steps.
- Click on the “Upload Image” button and select the file you want to use for your sticker. You will then see a preview of the sticker on the right side of the window.
- If you notice any unwanted marks or areas on your sticker, you can use the “Contour” button to remove them. Simply click on the areas you want to remove and they will be circled in black. Then click on the “Hide Contour” button to remove those areas from your design.
- After you have finished editing your design, click on the “Make It” button on the bottom right corner.
- In the next window, you will see how the stickers will be arranged on the cutting mat. If you want to make any changes, you can drag and resize the stickers to fit your needs.
- Click on the “Continue” button on the bottom right corner.
- On the next screen, you can select the material you are using for your stickers. If you are using printable vinyl, choose the appropriate option.
- Prepare your cutting mat by placing the printable vinyl on the sticky side. Make sure it is aligned properly.
- Load the cutting mat into the Cricut machine and press the flashing “Go” button to start the cutting process.
- Follow the prompts on the screen to complete the cutting process.
- Once the machine has finished cutting, unload the mat and carefully remove the stickers from the cutting mat.
- You can now apply your stickers to the desired surface.
By following these steps, you will be able to create your own custom stickers using a Cricut machine. Remember to have fun and experiment with different designs and colors!
Step 7

Now that you have selected the images and fonts you want to use for your stickers, it’s time to move on to the next step.
Once your design is ready, click on the “Make It” button in the top right corner of the Cricut Design Space.
You will be taken to the Prepare screen, where you can see how your stickers will be arranged on the cutting mat. This is where you can make any final adjustments if needed.
Take note of the colors indicated on the layers panel. Each color represents a different layer that will be cut out separately. For example, if you have a sticker with three colors, there will be three separate layers to cut.
If you are using printable vinyl, you will also notice a layer called “print then cut”. This is where the machine will print your design and then cut around it. Make sure you have the printable vinyl loaded into your machine.
Next, you need to flatten your design. This is done by selecting all the layers and clicking on the “flatten” button at the bottom of the layers panel. Flattening your design will turn all the layers into one single layer.
After flattening, you may need to rearrange your design to fit within the print and cut borders. Simply drag and resize your design as needed.
When your design looks good, click on the “make it” button in the bottom right corner.
You will be prompted to select your Cricut machine. Choose the appropriate machine from the list.
On the next screen, select the material you will be cutting your stickers on. For example, if you are using vinyl, choose the “vinyl” option. If you are using printable vinyl, choose the “printable vinyl” option.
Follow the prompts to load your mat into the machine and proceed with cutting.
Once the machine has finished cutting, unload the mat and carefully remove the stickers from the cutting mat. Use a weeding tool to remove any excess vinyl from around the stickers.
If you are using printable vinyl, you will need to apply a transfer tape to the top of the stickers before peeling them off the backing.
And there you have it – your stickers are now made and ready to stick onto whatever your heart desires!
Keep in mind that these steps are just a general guideline, and there might be slight variations depending on the specific Cricut machine model and software version you are using. It’s always a good idea to review the user manual or check online resources for more detailed instructions.
Step 8

After you have finished cutting all of your stickers using the Cricut machine, it’s time to move on to the next step.
Take the “backing” paper that was included with your Cricut vinyl and carefully peel away the backing from the cutting mat. You will notice that the sticker decals are stuck to the backing paper.
Next, open the Cricut Design Space software program on your computer. Here, you will find a panel on the left-hand side of the window. In this panel, click on the “Layers” tab.
Within the Layers tab, you will see the same image of the sticker that you selected and cut. Above the sticker image, you will find a small arrow icon that looks like the letter “V” turned on its side. Click on this arrow to open up more options for your sticker design.
One of the options that you will see when you click on the arrow is called “Contour”. This allows you to flatten and simplify your sticker design by removing unwanted sections or lines.
To contour your sticker design, click on the “Contour” option and a new window will appear. In this window, you will see a black outline of your sticker design with small circles on it.
To remove a section of your sticker design, simply click on the circled area that you want to remove. The selected section will turn grey, indicating that it will be removed from the final sticker.
After you have contoured your sticker design to your desired shape, click on the “X” in the top-left corner of the window to close it.
Now, you can see that your sticker design has been simplified and is ready to be transferred onto your desired surface.
To apply the sticker to your desired surface, use transfer tape. Cut a piece of transfer tape that is slightly larger than your sticker design and place it over the sticker, sticky side down.
Press down on the transfer tape with your fingers, making sure that the tape adheres to the sticker. Then, peel the transfer tape off of the backing paper, taking the sticker with it.
Finally, carefully place the sticker onto your desired surface. Use a squeegee or a credit card to smooth out any air bubbles or wrinkles in the sticker. Press down firmly on the sticker to ensure that it sticks well to the surface.
And there you have it! You have successfully created your own custom Cricut stickers using the Cricut machine. Now you can use your creativity to make more stickers for your projects and ideas!
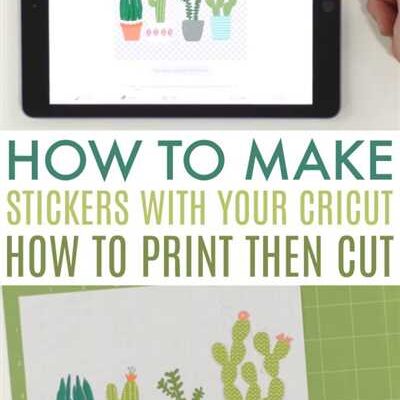
How to Make Print Then Cut Stickers – The Design
When it comes to making stickers with your Cricut machine, the design process is an essential step. This is where you can unleash your creativity and come up with unique ideas for your stickers. Whether you want to make decals for your car, personalize your laptop, or create cute stickers for your planner, the design is everything.
The first thing you need to do is open the Cricut Design Space software. If you haven’t downloaded it yet, you can easily find it on the Cricut website. Once you have it installed, open it up and you will be greeted with a blank canvas.
To start designing your stickers, you can use images and fonts provided by Cricut, or you can upload your own designs. For example, if you want to make stickers with cute animals, you can search for animal images in the Design Space library. Once you find the desired image, simply click on it and it will be added to your canvas.
The next step is to resize and arrange the images on your canvas. You can resize them by clicking on the image and dragging the corner circles. Just make sure that the images fit the size you want for your stickers. You can also move them around and arrange them in different sections of your canvas.
If you want to add text to your stickers, you can use the text tool on the design panel. Simply click on the text tool, choose your desired font, and type the text you want to include in your stickers. You can also resize and arrange the text just like the images.
Once you are happy with the design of your stickers, you can proceed to the next step, which is printing and cutting. Click on the “Make It” button in the top right corner of the Design Space window. This will open the Print Then Cut panel.
In the Print Then Cut panel, you will notice a preview of how your stickers will look once printed and cut. You can select the material you are using, such as vinyl or printable fabric, from the drop-down menu. You can also choose the number of copies you want to make.
Before you start the printing process, make sure you have a color printer connected to your computer. The stickers will be printed on a printable material, so it’s essential to have a high-quality printer for the best results.
Once you have everything set up, click on the “Print” button. The Cricut machine will then print your stickers with the selected design and colors. After the printing is done, place the printed sheet on the cutting mat and load it into the Cricut machine.
The Cricut machine will then go through the cutting process, following the marks on the printed sheet to cut out your stickers. Once the cutting is complete, you can unload the mat from the machine and admire your perfect stickers.
Now that you know how to design and make print then cut stickers with your Cricut machine, you can get creative and start making all sorts of stickers for your projects. Whether you want to make custom stickers for marketing purposes, personalize your belongings, or simply add some fun to your life, the possibilities are endless with your Cricut machine.


