

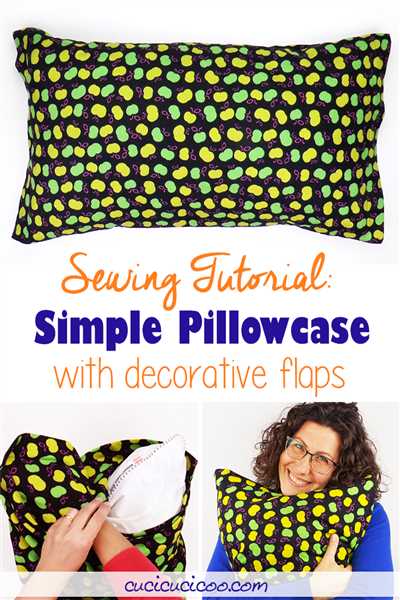
Are you looking for a quick and easy sewing project to spruce up your bedroom decor? Making your own pillowcases is a great choice! Not only is it fun and creative, but it also allows you to choose the perfect fabric that matches your style and preferences. In this tutorial, we will guide you step by step on how to make a standard pillowcase that will add a touch of charm to your bedding. So let’s get started!
Step 1: Choosing the Right Fabric
The first thing you’ll need to do is choose the fabric for your pillowcase. When selecting the fabric, keep in mind the size of your pillow and the overall look you want to achieve. You can use cotton, flannel, or any other fabric of your choice. Make sure to measure your pillow before purchasing the fabric, so you know how much yardage you’ll need.
Pro tip: Consider pre-washing the fabric to avoid shrinkage later.
Step 2: Cutting the Fabric
Once you have the fabric, it’s time to cut it to the right dimensions. For a standard pillowcase, you’ll need a piece of fabric that measures approximately 42 inches by 32 inches. Use a ruler, rotary cutter, and cutting mat to ensure straight edges. Pay attention to the pattern if you have one and make sure it’s facing the right way.
Pro tip: To mark the cut lines on the fabric, you can use disappearing-ink fabric markers or simply make small marks with a regular pen or pencil that will disappear after washing.
Step 3: Sewing the Pillowcase
With the right sides of the fabric facing each other, fold the fabric in half widthwise, so the long edges are together. Pin along the side and bottom edges to keep them aligned. Use a sewing machine or a needle and thread to sew these edges together, making sure to leave a 1/2 inch seam allowance.
Pro tip: Backstitch at the beginning and end of the seam to secure it.
Step 4: Creating the Hem
To create a neat hem for the opening of the pillowcase, press the raw edge 1 inch to the wrong side of the fabric, using an iron. Then press it again by another 2 inches. Pin the hem in place and sew along the folded edge, approximately 1/8 inch from the edge. This will give your pillowcase a polished look.
Pro tip: If you want to add a zippered opening, refer to a separate tutorial on installing zippers.
Step 5: Finishing Touches
Once you’ve completed sewing the hem, trim any loose threads and give your pillowcase a final press with an iron. You’re almost done! To insert your pillow, simply open the flap of the hem, slide your pillow inside, and close the flap. Pull the pillowcase over your pillow, making sure to align the corners and edges properly.
Pro tip: If your pillowcase ends up a bit longer than your pillow, you can trim the excess fabric. Just make sure to leave enough room for a seam allowance.
That’s it! You now know how to make a pillowcase from scratch. Whether you’re making it for yourself or as a gift, this simple sewing project is a great way to add a personal touch to your bedroom decor. So gather your supplies, follow this guide, and enjoy a good night’s sleep with your new handmade pillowcase!
Pillowcase Sewing Pattern – Easy Tutorial
If you’re looking to make your own pillowcase, this easy tutorial will guide you through the process. Whether you want to make a pillowcase for your own bedroom or as a gift for someone else, this pattern makes it simple and straightforward.
First, you’ll need to gather your supplies. You’ll need fabric, thread, a rotary cutter (or fabric scissors), and a disappearing-ink fabric marker. The amount of fabric you’ll need depends on the size of your pillowcase. For a standard size pillowcase, one yard of fabric will usually be enough.
Start by washing and drying your fabric to pre-shrink it. Then, lay the fabric flat on your work surface and use the rotary cutter or scissors to cut out a piece of fabric that measures approximately 21 by 40 inches. These dimensions are for a standard size pillowcase, but you can adjust them for a queen or king size pillowcase if needed.
Once your fabric is cut, fold it in half lengthwise, with right sides facing each other. Pin the edges together to hold them in place. Start sewing along the long open edge, using a 0.5-inch seam allowance. Sew all the way to the end, making sure to backstitch at the beginning and end to secure the seam.
Next, turn the pillowcase right side out and press the seam with an iron to make it crisp and flat. You can also press the other edges of the pillowcase to give it a professional finish.
Now, it’s time to create the opening for your pillow. Starting from one of the corners of the pillowcase, measure about 8 inches down and make a mark with your disappearing-ink fabric marker. This will be the width of the opening. Repeat this on the other corner of the pillowcase.
Next, sew along the marks you made, making sure to backstitch at the beginning and end. This will create the opening for your pillow insert.
Finally, choose a thread color that matches your fabric and replace the thread on your sewing machine. Sew around the edges of the opening with a 0.25-inch seam allowance, making sure to backstitch at the beginning and end. This will give the opening extra reinforcement.
Your pillowcase is now complete! It’s ready to be used on your bed or given as a gift. The simple design and easy-to-follow tutorial make this a great project for beginners. Enjoy making your own custom pillowcases!
What size is a standard pillowcase
When making a pillowcase, it’s important to know the right size to ensure a perfect fit for your pillow. A standard pillowcase is typically 20 inches by 30 inches in size. This is a common size that will fit most standard pillows found in bedrooms.
To make a standard pillowcase, you’ll need enough fabric to cover the pillow, along with a few additional inches for folding seams and creating an opening for inserting the pillow. A yard of fabric is usually enough for one pillowcase.
Before starting your pillowcase project, make sure to measure your pillow to ensure that you have the correct dimensions. A simple guide to follow is to add 4 inches to the width and 7 inches to the length of your pillow. This will account for the seam allowances and give you a nicely fitting pillowcase.
Once you have your fabric cut to size, you’ll want to mark the edges where the seams will be sewn. Using disappearing ink or tape will help you make accurate markings that will vanish when washed or ironed. This is especially important if you’re using a patterned fabric, as you’ll want to make sure the design lines up correctly.
Next, fold over and press the edge of the fabric that will be the opening of the pillowcase. This will create a clean, finished edge once the pillow is inserted. You may choose to use a zipper or sew the edge together with a simple straight stitch.
Now it’s time to sew the sides of the pillowcase. Use a basic straight stitch or serger to sew along the edges, making sure to backstitch at the beginning and end to secure the seam. Pay attention to the corners to ensure they are properly sewn and reinforced for durability.
After sewing, trim any excess fabric from the edges using a rotary cutter or scissors. This will help reduce bulk and make your pillowcase look neater.
Once your pillowcase is sewn and trimmed, give it a good press with an iron to smooth out any wrinkles. You can also wash and dry the pillowcase to remove any sizing and shrinkage before use.
And that’s it! You now have a lovely standard pillowcase that you can use or gift to someone. Making your own pillowcases is a great way to add a personal touch to your bedroom decor, and it’s an easy project that anyone can do.
Remember, if you’re looking for a different size pillowcase, you’ll simply need to adjust the dimensions and follow the same steps. Whether it’s a queen-size or a zippered pillowcase, the process remains the same – measure, cut, sew, and enjoy!
Supplies
Before you begin making a pillowcase, gather together the following supplies:
- Fabric of your choice – Make sure to choose a fabric that is machine washable and dryer safe, as pillowcases will need to be cleaned regularly. You’ll need approximately one yard of fabric for a standard size pillowcase.
- Thread – Choose a thread color that matches or complements your fabric choice.
- Sewing machine – A sewing machine will make the process much easier and quicker, but you can also sew by hand if you prefer.
- Scissors or rotary cutter – Use scissors or a rotary cutter to cut the fabric to the appropriate size.
- Straight pins – These will be used to hold the fabric pieces together before sewing.
- Tape measure – Use a tape measure to ensure accurate sizing and dimensions.
- Disappearing-ink pen or fabric marker – This will be used to mark your fabric for sewing lines.
- Iron and ironing board – Pressing your fabric and seams will help to create a professional-looking finished product.
- Needle – You may need a needle for hand sewing any finishing touches.
By having all of these supplies on hand, you’ll be ready to follow this simple tutorial and make your own pillowcases. Whether you’re making them for yourself or as a gift, a handmade pillowcase makes a great addition to any bedroom decor. Plus, it’s an easy way to replace worn-out pillowcases or add a pop of color to your bedding.
Choosing the Right Fabric
When it comes to making a pillowcase, choosing the right fabric is crucial. The fabric you choose will affect the overall look and feel of the pillowcase, as well as its durability. Here are a few factors to consider when selecting the perfect fabric for your pillowcase:
Material:
The first thing you need to consider is the material of the fabric. Cotton is a popular choice for pillowcases due to its soft and breathable nature. It is also easy to care for and comfortable to sleep on. Other options include linen, silk, and satin, each with their own unique characteristics.
Thread Count:
Another important aspect is the thread count. The thread count refers to the number of threads per square inch of fabric. Generally, a higher thread count indicates a smoother and more durable fabric. Look for a thread count of at least 200 for a quality pillowcase.
Sizing:
You’ll want to consider the sizing of the pillowcase. Standard pillowcases typically measure around 20 x 30 inches, while queen pillowcases measure around 20 x 36 inches. Measure your pillow insert to determine the dimensions you’ll need for your pillowcase.
Shrinkage:
Pay attention to the fabric’s shrinkage potential. Some fabrics have a tendency to shrink more than others. To account for shrinkage, it’s recommended to pre-wash and dry your fabric before starting the sewing process.
Pattern and Design:
Finally, consider the pattern and design of the fabric. You want to choose a fabric that matches the overall aesthetic of your bedroom. Whether you opt for a solid color, a floral pattern, or a bold print, make sure it’s something you’ll love seeing on your pillow every day.
By following these tips and paying attention to fabric choice, you can make a pillowcase that not only looks great but also feels comfortable to sleep on. Now that you know what to look for when choosing the right fabric, you’re ready to move on to the next step in this simple pillowcase making tutorial!
Wash Dry and Cut the Fabric
Before you start making your pillowcase, it’s important to wash and dry the fabric to prevent any shrinkage later on. Choose a fabric that is suitable for pillowcases like cotton or cotton-blend. Make sure to wash the fabric according to the manufacturer’s instructions.
Once the fabric is dried, you can proceed to cut it to the right size. Measure your pillow to determine the dimensions you’ll need. For a standard pillowcase, the size is typically 20 by 30 inches, while a queen-sized pillowcase is usually 20 by 36 inches.
Using a rotary cutter, ruler, and cutting mat, lay the fabric flat on a large surface. Measure and mark the dimensions of the pillowcase using disappearing-ink or fabric marker. Carefully cut the fabric following the lines you’ve marked.
When cutting the fabric, make sure to add about half an inch to each side for seam allowance. This extra fabric will be used to sew the edges together later on.
If you want to make a zippered pillowcase, now is the time to insert the zipper. Follow a tutorial or use a pattern to guide you through the process of adding a zipper to your pillowcase. This step is optional, but it makes for a great gift or a practical choice if you want to easily replace the pillowcase.
After cutting and adding the zipper (if desired), press the edges of the fabric using an iron to give them a crisp and clean look. Pay attention to the corners to ensure they are well-pressed.
Now your fabric is ready for sewing, and you can move on to the next step in making your pillowcase.
What You’ll Need
In order to make a pillowcase, you’ll need the following supplies:
- Fabric of your choice – a queen size pillowcase typically requires around 1 yard of fabric
- Thread – choose a color that matches your fabric
- Sewing machine – a standard sewing machine makes the task easier, but you can also sew by hand if you prefer
- Scissors or rotary cutter – for cutting the fabric
- Disappearing-ink fabric marker or pins – to mark the fabric
- Iron and ironing board – for pressing the fabric
- Measuring tape – to measure the dimensions of your pillow
Make sure to pay attention to the sizing and shrinkage information on the fabric you choose. Some fabrics may shrink after washing, so it’s important to account for that when measuring and cutting.
These supplies are enough to complete a simple pillowcase. If you’re looking for a more advanced project, you can also try making zippered pillowcases or adding decorative elements like trim or embroidery.
Now that you have all the necessary supplies, you’re ready to start making your pillowcase!
Zippered Pillow Cover
If you’re looking for a simple and easy way to make a zippered pillow cover, this tutorial is the perfect guide for you. With just a few supplies and some basic sewing skills, you’ll have a beautiful new pillowcase that you can use to update the look of your bedroom or give as a gift.
To get started, you’ll need to gather your supplies. You’ll need a yard of fabric in the pattern of your choice, a zipper that is longer than the dimensions of your pillow, thread, a sewing machine, scissors or a rotary cutter, and some disappearing-ink marking tools.
First, measure your pillow to determine the size of your cover. Standard pillow sizes are typically 20×26 inches for a standard pillow, 20×30 inches for a queen pillow, and 20×36 inches for a king pillow. Add an inch to each measurement to allow for seam allowance and fabric shrinkage.
Next, cut your fabric to the appropriate size using your scissors or rotary cutter, making sure to create two identical pieces. You’ll also want to cut two pieces of fabric for the facing, which will be slightly wider than the opening of your pillow.
Using your disappearing-ink marker, press the zipper onto the right side of one of the fabric pieces. Mark the beginning and end points of the zipper, as well as the center point, approximately half an inch below the beginning mark.
Starting at one of the marks you made, sew along the zipper using a zipper foot on your sewing machine. Be sure to sew a few stitches in reverse at the beginning and end to secure the zipper in place.
Once the zipper is sewn in, press the fabric away from the zipper and repeat the process on the other fabric piece. When you’re done, both fabric pieces should have zippers sewn into them.
With right sides facing, pin the two fabric pieces together along all of the edges, leaving the zipper partially open. Sew along the edges using a 1/2 inch seam allowance, making sure to pivot at the corners.
Trim the corners and turn the cover right side out through the zipper opening. Use a pencil or blunt object to push out the corners and press the cover with an iron to remove any creases.
Finally, insert your pillow into the cover and zip it closed. Give your pillow a good fluffing to make sure it fills out the cover completely.
And there you have it – your very own zippered pillow cover! The zipper allows for easy removal and washing, so you can keep your pillow fresh and clean. Whether you’re looking to update your bedroom decor or give a thoughtful gift, this is a simple and practical project that anyone can do.


