

If you’re wondering how to do tie dye, you’re in for a fun and creative adventure! Tie dyeing is a popular technique that allows you to create unique and vibrant designs on fabric. Whether you want to make homemade tie dye shirts or jazz up your old bed sheets, tie dyeing is a fantastic way to add a pop of color to your wardrobe and home decor.
To achieve the best results, it’s important to follow a few key steps. First, gather your materials. You will need fabric dye in various colors, rubber bands or elastics, plastic or paper to protect your work surface, and water. You’ll also need a damp iron or steamer to set the dye and prevent it from running or staining.
Next, decide on your tie dye patterns and designs. There are countless possibilities, from simple stripes and swirls to more intricate designs like pleated or tightly tied knots. The outcome will depend on how you fold, twist, and tie your fabric before dyeing. For more control over the final look, try using different types of fabric or experimenting with different dyeing techniques.
When you’re ready to start dyeing, make sure to carefully follow the instructions on the dye package. Some dyes may require prepping a dyebath, while others can be applied directly to the fabric. Regardless of the method, it’s important to saturate your fabric with dye and ensure that the colors penetrate all the way through, especially if you want vibrant and long-lasting results.
After dyeing, let your fabric sit for a specific period of time, usually between 4 to 24 hours, to allow the dye to set. Then rinse the fabric under cold water to remove any excess dye. You can also wash it using a gentle detergent to help remove any dye residue. Once your fabric is clean, let it air dry or tumble dry on low heat.
Remember, tie dyeing is all about having fun and being creative, so don’t be afraid to experiment with different colors, patterns, and techniques. With a little practice and some patience, you’ll soon become a tie dye expert and create stunning pieces that will undoubtedly impress everyone around you!
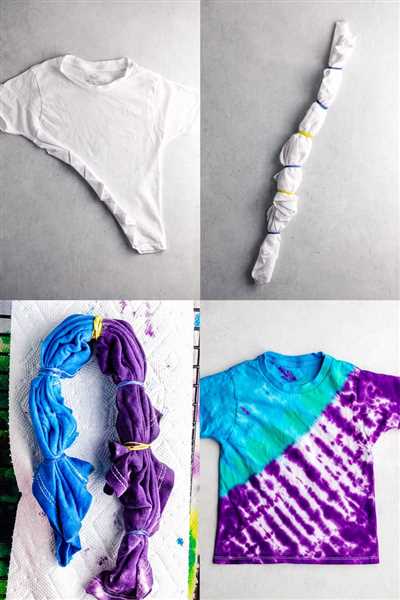
How To Tie Dye
Are you wondering how to create amazing tie-dye designs? Follow these steps to achieve the best results:
- First, gather all the supplies you’ll need, including rubber bands, dye, plain white fabric, plastic or paper to protect your work area, and gloves.
- Dampen the fabric with water to make it easier to work with.
- Decide on the design you want. There are various tying techniques you can use, such as pleating, folding, or twisting the fabric to create different patterns.
- Carefully tie the fabric using rubber bands to create sections for the dye.
- Prepare the dye according to the instructions on the packaging or make a homemade dye using vegetables or other natural materials.
- Add the dye to separate containers, one for each color.
- Dip each tied section of the fabric into the dyebath, making sure to completely immerse it to ensure even coloring.
- Allow the fabric to soak in the dye for the recommended time, usually around 20-30 minutes.
- Once the fabric has finished dyeing, carefully remove the rubber bands.
- Rinse the fabric thoroughly with cold water to remove any excess dye.
- Wash the fabric separately in cold water with mild detergent to remove any remaining dye and to set the colors.
- After washing, hang the fabric to dry or iron it while slightly damp to help set the colors.
- Remember to wash the fabric separately for the first few times to avoid staining other items.
By following these steps and experimenting with different tying techniques and colors, you can create unique tie-dye designs and enjoy the vibrant outcomes of your creative process!
Tie Dyeing
Tie dyeing is a fun and creative way to add a unique touch to your clothing and other fabrics. By carefully tying, pleating, and using rubber bands or elastics to create different patterns, you can make one-of-a-kind designs that are sure to be a success.
First, you’ll need to wash the fabric you plan to dye to remove any dirt or stains that could interfere with the dyeing process. Then, dampen the fabric and lay it flat on a plastic surface.
Next, choose the dye colors you want to use. There are many dye options available, but it’s best to use fabric dyes specifically made for tie-dyeing. You can also make homemade dyes using vegetables or other natural materials, but be aware that these dyes may not produce as vibrant or long-lasting colors.
To create your tie-dye design, start by folding or pleating the fabric in various ways. The way you fold or pleat the fabric will determine the outcome of your design, so feel free to get creative! Then, use rubber bands or elastics to tightly secure the fabric in place. The areas that are tied or banded will resist the dye, creating interesting patterns and color variations.
Once you have your fabric prepared, fill a dyebath with water and add the dye according to the package instructions. Make sure the water is hot enough to dissolve the dye completely. Then, carefully place the tied fabric into the dyebath, ensuring that it is fully submerged.
Allow the fabric to sit in the dyebath for the recommended amount of time, typically around 20-30 minutes. Stir the fabric occasionally to ensure even dye penetration. If you want more vibrant colors, you can leave the fabric in the dyebath for a longer period of time.
After the desired amount of time has passed, carefully remove the fabric from the dyebath and rinse it under cold water until the water runs clear. Remove the rubber bands or elastics and unfold the fabric to reveal your tie-dyed masterpiece.
Finally, you’ll need to let the fabric dry completely before using or wearing it. Once dry, you can iron the fabric to help set the dye and prevent any staining. If you’re concerned about the dye bleeding or transferring to other fabrics, you can also rinse the fabric in a vinegar and water solution before letting it dry.
Now that you know the basics of tie dyeing, you can experiment with different folding techniques, colors, and patterns to create your own unique designs. Have fun and let your creativity run wild!
How to make homemade dye
If you want to try tie dyeing at home, making your own homemade dye is a great way to get unique and vibrant colors. Here’s a step-by-step guide on how to make your own dye using household ingredients.
Step 1: Gather your materials
Before you start, gather all the materials you’ll need. This includes a white cotton fabric, rubber bands, elastics, plastic bottles or containers, and the ingredients to make your dye. You can use various vegetables to create different colors, such as beets (red), spinach (green), or turmeric (yellow). Make sure the fabric is clean and damp before starting.
Step 2: Prepare the dye
The first thing you need to do is prepare your homemade dye. Chop up the vegetables and place them in a pot with water. The ratio of ingredients to water will depend on the desired color intensity and the weight of your fabric. You’ll need to experiment to find the best proportions that work for you. Bring the mixture to a boil and let it simmer for about an hour.
Step 3: Strain the dye
Once the dye has simmered, strain the mixture using a cheesecloth or a fine mesh strainer to remove any solid pieces. Transfer the strained liquid back into the pot and let it cool down to room temperature.
Step 4: Begin tying and dyeing
Now comes the fun part. Take your damp fabric and start pleating, folding, or twisting it into your desired pattern. Use rubber bands or elastics to tightly secure the fabric, creating different sections for the dye to penetrate. The tighter the bands, the clearer the design will be.
Step 5: Dip the fabric in the dyebath
Once everything is set up, immerse your fabric in the cooled dyebath. Make sure the fabric is completely submerged and let it soak for at least 30 minutes. You can also leave it overnight for more vibrant colors, but make sure to check on it regularly to avoid over-dyeing.
Step 6: Rinse and dry
After the desired time has passed, carefully remove the fabric from the dyebath and rinse it under cold water until the water runs clear. Avoid using hot water, as it can set the colors. Once rinsed, hang the fabric to dry or throw it in the dryer, depending on the care instructions for your fabric.
Step 7: Enjoy the outcomes
Once your fabric is dry, you’ll have your very own homemade tie-dyed creations. Unwrap the fabric to reveal the beautiful colors and patterns you’ve created. Be amazed at your success and show off your unique designs to everyone else!
Remember to always follow safety precautions when dyeing, such as wearing gloves and working in a well-ventilated area. Also, keep in mind that using homemade dyes may result in staining on surfaces, so it’s best to protect your work area with plastic or paper.
Now that you know how to make homemade dye, you can let your creativity run wild and create even more stunning tie-dye designs. Have fun experimenting with different colors, patterns, and techniques to create one-of-a-kind pieces that will make you wonder why you didn’t try tie-dyeing sooner!
Get tying
To start tie-dyeing, you’ll need a few materials: damp clothes, rubber bands or elastics, plastic or paper weights, clear plastic or paper wrap, and some homemade or store-bought dyes. Once you have everything ready, it’s time to get tying!
Step 1: Decide on the design and pattern you want to create. You can choose from a wide range of patterns and outcomes, so make sure to carefully plan your design.
Step 2: If you’re using a ready-made dye, follow the instructions on the packaging to mix the dye bath. If you’re making your own dye, mix the desired colors according to the instructions, then add water to create the dyebath.
Step 3: Lay your damp clothes flat on a table and start pleating, folding, or twisting the fabric in different ways. The way you fold or twist your clothes will determine the design and pattern you’ll have on your dyed clothes.
Step 4: Once you have your clothes tightly folded and pleated in your desired design, secure them with rubber bands or elastics. Make sure to tie them tightly to prevent the dye from running into unwanted areas.
Step 5: If you want to create a specific design, you can tie small objects, such as rubber bands or vegetables, to your clothes before tying them. This will create interesting shapes and patterns on your dyed clothes.
Step 6: Now it’s time to dye your clothes! Submerge them into the dyebath, making sure they’re completely covered. Let them soak for the recommended time, as mentioned in the dye instructions.
Step 7: After the recommended time, rinse your clothes under running water until the water runs clear. This will remove any excess dye and prevent staining.
Step 8: Carefully remove the rubber bands or elastics from your clothes. Be patient and take your time to avoid smudging the design.
Step 9: Once you’ve removed the bands, rinse your clothes again to ensure all the dye is removed. You can use cold or warm water for this step.
Step 10: Finally, wash your dyed clothes separately for the first few times to prevent the colors from running or bleeding onto other clothes. Iron them if necessary, and you’re ready to show off your homemade tie-dye designs!
Step 4
If you want to create a tie-dye effect, you’ll need to tie the fabric with elastics in specific patterns. The patterns you create will determine the outcomes of the design. For example, tightly pleated fabric will result in more defined patterns, while looser pleats will create softer, more blurred designs.
Before adding your fabric to the dyebath, be sure to wet it with water. This will help the dye penetrate the fabric more evenly. Once the fabric is damp, carefully place it in the dyebath, making sure that the entire fabric is submerged in the dye. If you’re using different colours, you can dip each section of the fabric in a separate dyebath or carefully pour the different dyes onto different sections of the fabric.
Leave the fabric in the dyebath for the recommended amount of time, usually around 30 minutes to an hour, depending on the dye and the desired intensity of colour. If you want a lighter colour, you can remove the fabric sooner, and if you want a darker colour, you can leave it in the bath longer.
When the desired colour is achieved, carefully remove the fabric from the dyebath and rinse it thoroughly with cold water to remove any excess dye. It’s important to rinse the fabric until the water runs clear, as any remaining dye can continue staining the fabric and ruin your design. Avoid wringing or twisting the fabric too much to prevent the colours from bleeding or blending together.
After rinsing, you have the option to wash the fabric in the washing machine, following the manufacturer’s instructions. This will help to completely remove any remaining dye and set the colours. Alternatively, you can hand wash the fabric with a mild detergent. Once washed, hang the fabric to dry or tumble dry it on a low setting.
Once dry, you can iron the fabric to remove any wrinkles and make the design look even more vibrant. Be sure to use a low heat setting and iron the fabric on the reverse side to avoid damaging the dyed areas.
With these steps, you’ll be well on your way to achieving tie-dyeing success and creating beautiful, vibrant designs. And remember, the more you practice, the better your outcomes will be!


