When working with text in various design projects, you may come across the need to make the text transparent. This can be useful in situations where you want the text to blend seamlessly with the background, or when you want to create a visually appealing effect.
There are several options available to achieve this effect, depending on the software you are using. In this article, we will discuss one method that can help you achieve the desired transparency for your text.
If you’re using Photoshop, one option is to use the layer styles options to create a semi-transparent text. To do this, select the text layer and open the Layer Styles window. In the Blending Options section, you’ll find the “Opacity” slider that allows you to adjust the transparency of the text. Sliding the slider to the left will decrease the opacity, making the text more transparent.
Another method involves using masks to make the text transparent. First, create a shape or select an existing shape that you want to use as a mask. Then, select both the text layer and the shape layer, and go to the “Layer” menu. From there, choose “Create Clipping Mask” or “Create Clipping Path”. This will make the text appear only within the boundaries of the shape, creating a transparent effect.
If you’re using GIMP, the free alternative to Photoshop, you can achieve the same effect by using the Layer Mask feature. Simply select the text layer and click on the “Add Layer Mask” button located at the bottom of the Layers toolbox. In the pop-up window, choose the “Black (Full Transparency)” option, and click “Add”. This will create a layer mask that makes the text transparent.
Keep in mind that the method you choose will depend on the software you’re using and your personal preference. The important thing is to experiment with different options and find the one that works best for your project. With a little practice, you’ll be able to create stunning transparent text that adds a unique touch to your designs.
- How to make Semi-Transparent Text
- ). For this example, we’ll use a paragraph:
This is some sample text.
Now, let’s apply the semi-transparent effect to our text. Here’s how: Select the text element in your HTML by using its ID or class. In this case, we’ll use the ID “myText”. In your CSS file, add the following code: #myText { color: rgba(0, 0, 0, 0.5); } Let’s break down the code: The #myText selector targets the element with the ID “myText”. Change this selector to match your chosen element and ID. The rgba(0, 0, 0, 0.5) value sets the color of the text. In this example, we’re using black (rgb(0, 0, 0)) with an alpha value of 0.5, making it semi-transparent. You can adjust the alpha value as needed. Once you’ve made these changes, save your CSS file and refresh your HTML page. You should now see your text with a semi-transparent effect applied to it. Keep in mind that the semi-transparent effect will also be applied to any child elements within the selected element. If you want to exclude certain elements, you can use CSS inheritance or specify their own color values. That’s it! You’ve successfully made your text semi-transparent using HTML and CSS. This effect can be a great addition to your web design, allowing you to create interesting and eye-catching presentations. Method 3 Beveled Text The third method for making text transparent is by creating beveled text. This technique adds a three-dimensional effect to your text, giving it depth and dimension. Here’s how you can achieve this effect: Launch a graphic editing program like Photoshop or GIMP, which have a wide range of tools and options to help you achieve the desired effect. Create a new document or open an existing one where you want to add the beveled text. Select the text tool from the toolbox, which is usually represented by a capital letter ‘T’ icon. Type in the text that you want to make transparent in your presentation or design. Finally, use the bevel filter/window in your graphic editing program to apply the beveled effect to the text. This filter creates a three-dimensional shape by adding highlights and shadows to the text, giving it a realistic and professional look. Make any other changes or adjustments to the text, such as color, font, size, contrast, value, etc., to further enhance the appearance of the beveled text. You’ll also be able to adjust the transparency of the text by selecting a semi-transparent color or by using masks. Once you’re satisfied with the changes, save the file and continue working on your design or presentation. By using the beveled text method, you can add depth and interest to your text and make it stand out from the background imagery or layers. This technique is particularly useful for creating titles, headings, or any other text element that needs to grab the viewer’s attention. Reply to this thread if you have any questions or need further assistance. Leave a Reply Cancel Reply If you’re trying to make text transparent in HTML, there are several options you can use to achieve the desired effect. One method is to use CSS and the opacity property to control the transparency of the text. Another option is to use an image editing program like Photoshop or GIMP to create a transparent image file and then use it as a background for the text. If you want to make text semi-transparent using CSS, you can set the opacity property to a value between 0 and 1. A value of 1 makes the text fully opaque, while a value of 0 makes it completely transparent. You can adjust the value to get the desired level of transparency. For example, opacity: 0.5; will make the text semi-transparent, with the background partially visible through it. Another approach is to use image editing software like Photoshop or GIMP to create transparent text. In Photoshop, you can use the “Text” tool to type out the desired text and then apply a layer style like “Bevel and Emboss” or “Drop Shadow” to give it a more interesting look. To make the text transparent, you can either lower the opacity of the text layer itself or use the “Layer Mask” tool to create a mask that reveals the background layer beneath the text. In PowerPoint presentations, you can also make text transparent by using the “Format Shape” window. Select the text box or shape that contains the text, then go to the “Format” tab and click on “Shape Fill”. From the drop-down menu, select the “Picture” option and choose an image file with transparency. This will make the text appear semi-transparent, with the selected image visible through it. When working with HTML, you may also want to consider using the filter property to apply visual effects to text. For example, the filter: blur(3px); property will blur the text, while the filter: brightness(150%); property will increase its brightness. There are many other filter options available, such as contrast(), grayscale(), or sepia(), that allow you to make various changes to the appearance of the text. In summary, there are several methods and options available to make text transparent in HTML. Whether you choose to use CSS opacity, image editing software, or PowerPoint features, you have the power to create eye-catching and visually appealing text with transparency effects. How to Make Text Transparent in PowerPoint When creating a PowerPoint presentation, you may want to make your text transparent to create a more dynamic visual effect. By making the text semi-transparent, you can overlay it on top of images or shapes, allowing the underlying content to be seen while still having the text visible. This can be particularly useful when working with imagery, trying to create contrast, or highlighting specific elements. Here are the steps to make text transparent in PowerPoint: Select the text element on the slide. In the toolbar, click on the “Format” tab. Under the “Text Options” section, click on the small arrow icon next to “Text Fill”. A drop-down menu will appear with various options. Select the “Solid Fill” option. Beneath the “Solid Fill” option, you’ll see a slider labeled “Transparency”. Slide the value to the left to make the text more transparent. You can preview the changes in real-time as you move the slider. You can also experiment with other options in the drop-down menu, such as “Gradient Fill”, “Picture or texture fill”, or “Pattern fill”, to achieve different effects. Once you’re satisfied with the transparency level, you can further customize the text appearance by adjusting other settings in the “Text Options” section, such as font size, font style, or text effects. Remember to save your changes before exiting the PowerPoint presentation. Keep in mind that making the text transparent can affect the readability, so it’s important to find the right balance between transparency and legibility. It’s recommended to preview the changes and test the presentation on different screens to ensure the text is still easily readable. Lastly, if you’re looking for more advanced options to make text transparent, you can explore graphic editing software like Adobe Photoshop or GIMP. These programs provide more precise control over transparency levels and offer additional tools and filters to enhance the visual effects. Video: Create Transparent Text | CapCut PC Tutorial - Method 3 Beveled Text
- Leave a Reply Cancel Reply
- How to Make Text Transparent in PowerPoint
- Video:
- Create Transparent Text | CapCut PC Tutorial
How to make Semi-Transparent Text
If you want to add a touch of style to your text, making it semi-transparent can be a great option. This effect allows the underlying shapes or imagery to show through, creating an interesting contrast and adding depth to your design. In this tutorial, we’ll show you how to achieve this effect in HTML using CSS.
There are several ways to make text semi-transparent, but one of the most common methods is by using the CSS rgba() color value. This value allows you to specify the red, green, blue, and alpha (transparency) values of a color. By lowering the alpha value, you can make the text semi-transparent.
Before we start, make sure you have a text element on your HTML page. You can use any element, such as a paragraph (
) or a heading (
). For this example, we’ll use a paragraph: This is some sample text.
This is some sample text.
Now, let’s apply the semi-transparent effect to our text. Here’s how:
- Select the text element in your HTML by using its ID or class. In this case, we’ll use the ID “myText”.
- In your CSS file, add the following code:
#myText {
color: rgba(0, 0, 0, 0.5);
}
Let’s break down the code:
- The #myText selector targets the element with the ID “myText”. Change this selector to match your chosen element and ID.
- The rgba(0, 0, 0, 0.5) value sets the color of the text. In this example, we’re using black (rgb(0, 0, 0)) with an alpha value of 0.5, making it semi-transparent. You can adjust the alpha value as needed.
Once you’ve made these changes, save your CSS file and refresh your HTML page. You should now see your text with a semi-transparent effect applied to it.
Keep in mind that the semi-transparent effect will also be applied to any child elements within the selected element. If you want to exclude certain elements, you can use CSS inheritance or specify their own color values.
That’s it! You’ve successfully made your text semi-transparent using HTML and CSS. This effect can be a great addition to your web design, allowing you to create interesting and eye-catching presentations.
Method 3 Beveled Text
The third method for making text transparent is by creating beveled text. This technique adds a three-dimensional effect to your text, giving it depth and dimension. Here’s how you can achieve this effect:
- Launch a graphic editing program like Photoshop or GIMP, which have a wide range of tools and options to help you achieve the desired effect.
- Create a new document or open an existing one where you want to add the beveled text.
- Select the text tool from the toolbox, which is usually represented by a capital letter ‘T’ icon.
- Type in the text that you want to make transparent in your presentation or design.
- Finally, use the bevel filter/window in your graphic editing program to apply the beveled effect to the text. This filter creates a three-dimensional shape by adding highlights and shadows to the text, giving it a realistic and professional look.
- Make any other changes or adjustments to the text, such as color, font, size, contrast, value, etc., to further enhance the appearance of the beveled text. You’ll also be able to adjust the transparency of the text by selecting a semi-transparent color or by using masks.
- Once you’re satisfied with the changes, save the file and continue working on your design or presentation.
By using the beveled text method, you can add depth and interest to your text and make it stand out from the background imagery or layers. This technique is particularly useful for creating titles, headings, or any other text element that needs to grab the viewer’s attention.
Reply to this thread if you have any questions or need further assistance.
Leave a Reply Cancel Reply
If you’re trying to make text transparent in HTML, there are several options you can use to achieve the desired effect. One method is to use CSS and the opacity property to control the transparency of the text. Another option is to use an image editing program like Photoshop or GIMP to create a transparent image file and then use it as a background for the text.
If you want to make text semi-transparent using CSS, you can set the opacity property to a value between 0 and 1. A value of 1 makes the text fully opaque, while a value of 0 makes it completely transparent. You can adjust the value to get the desired level of transparency. For example, opacity: 0.5; will make the text semi-transparent, with the background partially visible through it.
Another approach is to use image editing software like Photoshop or GIMP to create transparent text. In Photoshop, you can use the “Text” tool to type out the desired text and then apply a layer style like “Bevel and Emboss” or “Drop Shadow” to give it a more interesting look. To make the text transparent, you can either lower the opacity of the text layer itself or use the “Layer Mask” tool to create a mask that reveals the background layer beneath the text.
In PowerPoint presentations, you can also make text transparent by using the “Format Shape” window. Select the text box or shape that contains the text, then go to the “Format” tab and click on “Shape Fill”. From the drop-down menu, select the “Picture” option and choose an image file with transparency. This will make the text appear semi-transparent, with the selected image visible through it.
When working with HTML, you may also want to consider using the filter property to apply visual effects to text. For example, the filter: blur(3px); property will blur the text, while the filter: brightness(150%); property will increase its brightness. There are many other filter options available, such as contrast(), grayscale(), or sepia(), that allow you to make various changes to the appearance of the text.
In summary, there are several methods and options available to make text transparent in HTML. Whether you choose to use CSS opacity, image editing software, or PowerPoint features, you have the power to create eye-catching and visually appealing text with transparency effects.
How to Make Text Transparent in PowerPoint
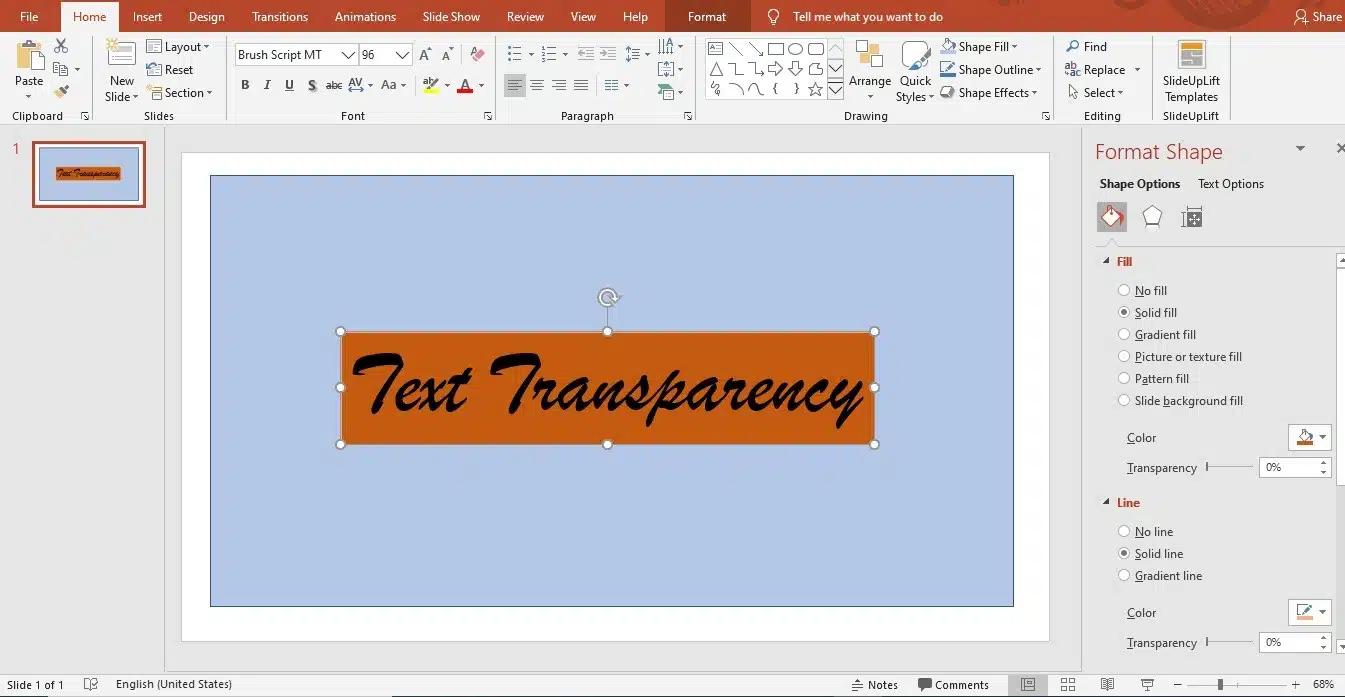
When creating a PowerPoint presentation, you may want to make your text transparent to create a more dynamic visual effect. By making the text semi-transparent, you can overlay it on top of images or shapes, allowing the underlying content to be seen while still having the text visible. This can be particularly useful when working with imagery, trying to create contrast, or highlighting specific elements.
Here are the steps to make text transparent in PowerPoint:
- Select the text element on the slide.
- In the toolbar, click on the “Format” tab.
- Under the “Text Options” section, click on the small arrow icon next to “Text Fill”.
- A drop-down menu will appear with various options. Select the “Solid Fill” option.
- Beneath the “Solid Fill” option, you’ll see a slider labeled “Transparency”. Slide the value to the left to make the text more transparent. You can preview the changes in real-time as you move the slider.
- You can also experiment with other options in the drop-down menu, such as “Gradient Fill”, “Picture or texture fill”, or “Pattern fill”, to achieve different effects.
- Once you’re satisfied with the transparency level, you can further customize the text appearance by adjusting other settings in the “Text Options” section, such as font size, font style, or text effects.
- Remember to save your changes before exiting the PowerPoint presentation.
Keep in mind that making the text transparent can affect the readability, so it’s important to find the right balance between transparency and legibility. It’s recommended to preview the changes and test the presentation on different screens to ensure the text is still easily readable.
Lastly, if you’re looking for more advanced options to make text transparent, you can explore graphic editing software like Adobe Photoshop or GIMP. These programs provide more precise control over transparency levels and offer additional tools and filters to enhance the visual effects.