If you have ownership over a Jira project or need to create and manage filters for your team, Jira provides a quick and interactive way to do so. Jira filters are a powerful tool that can be used to show only the issues that you are interested in. For example, you can create a filter to show only the issues assigned to you, or to show all the issues that are currently unresolved.
To start using filters, simply navigate to the “Filters” section in your Jira dashboard. There, you can find a list of all the filters that you have access to. If you are new to Jira or want to learn more about how to create filters, you can use the provided examples as a starting point. These examples can be opened and edited to fit your needs, making it very simple to create your own filters.
One of the best things about Jira filters is that you can share them with other users. For example, if you have created a filter that shows all the issues for a specific project, you can share it with your team members so that they can view the same issues and stay updated. This can be done by clicking on the “Share” button and entering the usernames or email addresses of the users you want to share the filter with.
Jira filters can also be used in conjunction with other features, such as dashboards and sprints. For example, you can build a Jira dashboard that displays a set of filters, allowing you to quickly navigate between different views of your project. This is particularly useful if you work with multiple projects or want to have a quick overview of all the issues that are assigned to you.
In addition to creating and managing filters, Jira allows you to configure subscriptions for your filters. Subscriptions are a way to automatically send notifications to yourself or other users when new issues match the filter criteria. This can be especially helpful if you want to stay updated on certain types of issues or if you want to assign issues to other team members without manually checking the filter all the time.
In summary, Jira filters are a powerful and flexible tool that can help you manage and view your project’s issues in the way that suits you best. By configuring and using filters effectively, you can navigate and stay updated on your project with ease. So, start exploring the possibilities and make the most out of Jira’s filter capabilities!
How to Create a Filter in Jira
If you want to create a filter in Jira, you’re in the right place. Filters in Jira allow you to quickly and simply find the issues that are most important to you, without having to navigate through all the noise. This can be very useful for project managers and team members who want to stay organized and focused on their tasks.
To create a filter in Jira, follow these steps:
- First, make sure you have the proper access rights. Only Jira users with the right permissions can create filters.
- In Jira, navigate to the “Filters” section in the top menu and click on “Create Filter”.
- Give your filter a name that reflects its purpose or the type of issues it will show. For example, you can name it “Open Sprint Issues” if you want to see all the issues in your current sprint.
- In the next section, you can add more details to your filter by configuring its parameters. You can specify the project, assignee, issue type, and more. This allows you to filter the issues based on your specific needs.
- Once you have configured the filter’s parameters, you can optionally set up subscriptions. This will allow you to receive regular updates on the filter’s results via email.
- Lastly, click on “Save” to create the filter. You can then find it in the “Filters” section, and it will be available for you to use whenever you need it.
Filters in Jira are interactive and can be edited or deleted as needed. They can be used in dashboards and shared with other users, making them a powerful tool for collaboration and project management. By creating filters in Jira, you can have a clear view of your issues and easily stay on top of your tasks.
Configuring filters in Jira
Filters in Jira allow users to quickly find the issues they are interested in. By configuring filters, users can create custom views of the issues that best fit their needs. This can be done without the need to open each individual issue and manually navigate through them.
In Jira, filters can be created and managed in the Filters section of the dashboard. To create a new filter, simply click on the “Create” button and give it a name. This name will help users easily identify and access the filter later on.
Once a filter is created, users can configure different parameters to fine-tune the results. For example, they can set an interval to view only the issues created or modified within a specific time frame. Users can also filter by assignee, project, sprint, and many other criteria to narrow down the list of issues.
The filters in Jira are very powerful and can be used in a variety of ways. For example, a filter can be shared with other users, allowing them to view and manage the same set of issues. Filters can also be used to build interactive dashboards, providing a rich and dynamic view of the project’s progress.
To ensure that only the right users have access to the filters, Jira provides ownership and subscription functionalities. Users can assign ownership of a filter to specific users or groups, allowing them to have full control over who can view and edit the filter. Subscriptions can also be set up to automatically email the filter results to selected users on a regular basis.
Configuring filters in Jira is a simple and quick process. By leveraging the power of filters, users can stay organized, find the information they need, and manage their projects more efficiently. Whether it is for a simple to-do list or a complex project management system, Jira filters are a valuable tool to have.
| Filter | Description |
|---|---|
| Filter Name | The name given to the filter to easily identify it |
| Interval | The time frame of the issues to be displayed in the filter |
| Assignee | Filters the issues by the assignee |
| Project | Filters the issues by the project |
| Sprint | Filters the issues by the sprint |
| Other criteria | Additional criteria that can be used to filter the issues |
Learn more about configuring filters in Jira and how they can be used to manage issues and provide valuable insights to the viewers. With the right filters, Jira can become a powerful tool for any project and team.
How to manage Viewers and Editors
When creating Jira filters, it’s important to manage the viewers and editors to ensure the right people have access to the relevant information. In this section, we will learn how to configure the access for viewers and editors.
By default, Jira allows users to view and edit filters that they have created. However, you can change the ownership of a filter and give access to other users as well.
To manage the viewers and editors of a filter, simply open the filter and click on the “Edit” button. In the “Viewers and Editors” section, you can add or remove users by typing their names or email addresses in the provided field. You can also assign different levels of access – viewers can only see the filter results, while editors can make changes to the filter settings.
For example, if you have a project with multiple teams, you can assign the respective team members as viewers or editors for the filters related to their work. This way, each team can have access to the information they need without interfering with the filters used by other teams.
In addition to managing the viewers and editors manually, Jira also provides a quick way to allow access to those who need it. By configuring a dashboard, you can show the filter results to specific users or groups. This can be particularly useful if you want to create a rich and interactive dashboard that displays the most relevant information for each user or team.
Another option is to set up subscriptions for the filter results. With subscriptions, Jira automatically sends the filter results to the specified users or groups at a regular interval. This ensures that the viewers or editors stay updated with the latest information without having to navigate to the filter every time.
In conclusion, managing viewers and editors in Jira is very simple and can be done right from the filter settings. By assigning the appropriate access levels, you can ensure that the right people have access to the right information. Whether it’s through dashboards or subscriptions, Jira provides a flexible and user-friendly way to manage viewers and editors for your filters.
How to manage subscriptions
In Jira, managing subscriptions to filters and dashboards is a simple and efficient way to stay up to date with the issues that matter most to you. This feature allows you to receive regular updates on any changes that occur in the issues that are relevant to you, without having to manually check them yourself. Subscriptions can be used by both viewers and editors, making it a versatile tool for all users.
To manage your subscriptions, start by navigating to the “Filters & Subscriptions” section in Jira. Here, you will find a list of all the filters and dashboards that you have access to. If you want to create a new filter or dashboard, simply click on the “Create” button and provide a name for it.
Once you have created a filter or dashboard, scroll down to the “Subscriptions” section. Here, you can configure the settings for your subscriptions. You can specify the interval at which you want to receive updates, as well as the format in which they are delivered (e.g., email notifications, RSS feed).
To add a subscription to a filter or dashboard, simply click on the “Add Subscription” button. You will then be prompted to select the recipients of the subscription. You can choose to send updates to specific users or groups, or even to yourself.
When configuring a subscription, you can also choose to include specific issue types, projects, or assignees. This allows you to customize your subscription to only receive updates on the issues that are of highest importance to you.
By managing your subscriptions, you can ensure that you are always in the loop and have quick access to the most relevant information. Whether you are a viewer or an editor, this feature is a valuable tool for staying informed and maintaining ownership over your projects.
Learn More
When working with Jira, it is important to understand how to create and manage filters. Filters allow users to find and view specific issues based on certain criteria. They can be used to build dashboards, show only the issues that are relevant to a sprint, and much more.
To create a filter in Jira, simply navigate to the “Issues” section and click on the “Filter” button. From there, you can name your filter and configure the criteria that should be used to display the desired issues. For example, you can filter issues by project, assignee, sprint, and so on.
Filters can also be used to create interactive dashboards. Dashboards allow Jira users to stay up-to-date with the highest-priority issues and provide a rich and interactive view of the project. With dashboards, users can navigate through different filters, change the interval for which the data is displayed, and even edit the filters to show only the information that is most important to them. Dashboards can be shared with other Jira users, giving them access to the same rich and interactive view.
Jira filters can be used to quickly find and manage issues without having to open each individual issue. They allow users to easily find the information they are looking for and take ownership of the issues they are responsible for. For example, filters can be used to find all the open issues assigned to a particular user or to find all the issues created within a certain time frame.
By configuring filters and dashboards in Jira, users can create a customized view of their projects that best suits their needs. Filters and dashboards are powerful tools that allow users to easily navigate through the vast amount of information in Jira and focus on the issues that are most important to them.
To learn more about configuring filters and dashboards in Jira, refer to the documentation provided by Atlassian. The documentation provides a step-by-step guide on how to create and manage filters, as well as how to create and configure dashboards. It also includes examples and best practices to help users make the most out of these features.
Build a very simple interactive Jira Dashboard
To build a very simple interactive Jira Dashboard, you can start by creating a project in Jira. Once your project is created, you can use the rich set of filters provided by Jira to create dashboards that show specific information.
First, let’s learn how to create a filter. Filters allow you to define a set of criteria to find and navigate through your issues. You can create filters based on various parameters such as project, assignee, status, and more. Once you have created a filter, you can save it with a name and access it anytime.
To create a dashboard, simply go to the “Dashboards” section in Jira and click on “Create Dashboard”. You can give it a name and choose the ownership as either yourself or other users. By default, only the owner and users with the highest level of access will be able to see and edit the dashboard.
Once you have created the dashboard, you can start adding gadgets to it. Gadgets are small sections that display specific information. For example, you can add a gadget to show the number of open issues, the progress of a sprint, or any other relevant information.
To make the dashboard interactive, you can add gadgets that allow users to change the filters or parameters. For example, you can add a gadget that allows users to select a specific sprint or assignee and see the corresponding data. This can be done without the need for a controller or any additional configuration.
For example, you can add a gadget that shows a list of issues filtered by a specific assignee. Users can then simply click on the assignee’s name to see all the issues assigned to them. Similarly, you can add a gadget that shows the number of issues opened in the last week and allow users to change the interval as well.
To manage the subscriptions for your dashboard, you can simply go to the dashboard settings and add or edit the subscriptions. Subscriptions allow you to receive regular updates on the dashboard via email. You can configure the frequency and recipients to stay up to date with the latest information.
In summary, building a very simple interactive Jira Dashboard is quick and easy. You can create filters to define the criteria for your dashboard, add gadgets to display specific information, and make it interactive by allowing users to change the filters or parameters. With Jira’s rich set of features, you can build a dashboard that provides valuable insights and helps you stay on top of your projects.
Example Quick Filters
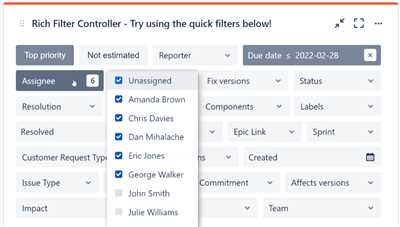
Quick filters in Jira provide users with a simple and interactive way to navigate and manage their issues and filters. These filters can be used to build dashboards and stay on top of the highest priority tasks without having to open individual issues. Quick filters are a great way to configure Jira to best fit the needs of its users.
Here is an example of how quick filters can be used to create a rich and interactive dashboard:
1. Click on the “Filters” dropdown menu in the Jira navigation bar, and then click “Manage Filters”.
2. In the “Filter Results” section, click “Edit” next to the quick filter you want to configure.
3. In the “Configure Filter” page, you can change the name of the filter, assignee, project, sprint, and other filter criteria as needed.
4. After configuring the filter, click “Save” to apply the changes.
5. Now, go back to the Jira dashboard and you will see the newly created quick filter displayed in the top navigation bar.
6. By clicking on the quick filter, you can instantly view the filtered issues without navigating through different sections of Jira.
7. Quick filters also allow viewers to subscribe to them, which means they will receive notifications whenever new issues that meet the filter criteria are created.
Quick filters provide users with a very simple and efficient way to manage their Jira issues and stay on top of their work. They can be used by team members as well as project managers and other Jira administrators to track progress, assign ownership, and show the status of different projects and sprints. By using quick filters, Jira users can have an interactive and personalized dashboard that suits their needs and allows them to focus on the tasks that are most important to them.