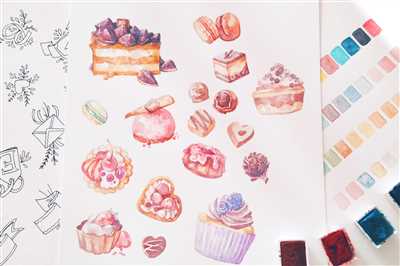
Watercolor stickers are a fun and creative way to add a splash of color to your artwork. Whether you want to decorate your journal, cards, or any other surface, these stickers can be a perfect addition. In this tutorial, we will guide you through the process of creating your own watercolor stickers using just a few simple steps.
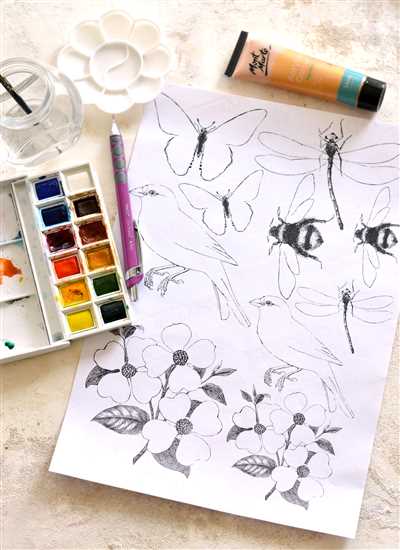
First, gather all the materials you will need. You’ll need watercolor paper, watercolor paints, a round brush, a pencil, a transparent stamping pad, and a set of waterproof ink. You will also need a cutting machine, such as a Cricut, to cut out your stickers with precision.
Step 1: Start by sketching out the shapes or designs you want to turn into stickers. You can experiment with different flowers, letters, or any other elements that you find interesting. Once you have a rough sketch, go over it with a waterproof ink pen to create the final design.
Step 2: Now it’s time to add some color! Choose a palette of watercolors that you love and start painting the background of your stickers. Be sure to use watercolor paper, as it can handle the water and prevent any bleeding. You can use a wet-on-wet technique for a more blended look or dry brush for more defined details.
Step 3: Once your background is dry, start adding details to your stickers. You can use the same watercolors or switch to a different color palette. Experiment with different blending techniques and layering to create depth and dimension in your designs. Don’t be afraid to play around and see what works best for you.
Step 4: When you’re done with the painting part, let your stickers dry completely. This is important to prevent any smudging or blending of colors when you apply them to different surfaces. You can use a hairdryer to speed up the drying process, but be careful not to overheat the stickers.
Step 5: Now it’s time to cut out your stickers using a cutting machine. If you don’t have a cutting machine, you can use scissors or a craft knife, but it may take more time and precision. Adjust the settings on your machine to ensure a clean and precise cut.
Once your stickers are cut, you’re ready to use them to decorate your planner, cards, or any other surface you have in mind. Simply peel off the backing and place them wherever you want. The transparent background will allow the colors to show through, making your stickers more vibrant and eye-catching.
That’s it! Now you know how to make your own watercolor stickers. It’s an easy and enjoyable process that allows you to unleash your creativity. Whether you’re just starting with watercolors or are already an experienced artist, these stickers can add a personal touch to your artwork. Watch the video below for a step-by-step tutorial and let your imagination run wild!
- How to Make Stickers with Cricut + 4 Ways to Waterproof Them
- Materials List
- No Machine Stickers Video Tutorial
- Step 1 – Get Your Supplies Ready
- Step 2 – Set Up Your Palette
- Step 2a – Add Your Colors
- Step 3 – Let’s Get Painting
- Step 4 – Paint Your Labels
- Step 5 – Get Decorating without Stamping Ink
- Step 5a – Get Decorating without Stamps
- Step 6 – Use Your Stickers
- 🎉 Final Step Show Off Your Work
- Working with Layer Masks
- Adjust Layer Mask with Brush Tool in Black and White
- Art Studio Confessions Making Stickers
- HOW TO MAKE WATERCOLOR STICKERS WITH A SILHOUETTE
- Video:
- Paintings into stickers! Using 2 materials you probably already have
How to Make Stickers with Cricut + 4 Ways to Waterproof Them
Stickers are a fun and versatile way to decorate just about anything, from cards and planners to water bottles and laptops. If you’re looking to make your own custom stickers, using a Cricut machine can make the process much easier and more efficient.
Step 1: Gather Your Supplies
Before you start making your stickers, make sure you have all the necessary supplies. Here’s a list of what you’ll need:
- A Cricut machine
- Watercolor paper
- Watercolors
- A pencil
- A Cricut-compatible printer
- Clear sticker paper
- A heat tool or laminator
- A waterproof sealant (optional)
Step 2: Create Your Sticker Design
To start, you’ll need to create your sticker design. You can either hand-draw your design on the watercolor paper using a pencil, or use design software such as Adobe Illustrator or Procreate. Keep in mind that the design should be in black and white, as the Cricut machine will only read black lines.
Step 3: Prep Your Design for Cutting
Once your design is ready, scan or take a photo of it and import it into the Cricut Design Space or Silhouette Studio software. Make sure to clean up the image and adjust the size if needed. You can also add any additional text or elements at this stage.
Step 4: Print and Cut Your Design
After finalizing your design, it’s time to print and cut it using your Cricut machine. Follow the instructions provided by the machine and make sure to use the appropriate settings for the sticker paper you’re using.
Step 5: Apply a Waterproof Sealant (Optional)
If you want your stickers to be more durable and waterproof, consider applying a waterproof sealant. This will prevent the watercolors from smearing or running when exposed to moisture. There are various sealants available, such as spray sealants or adhesive laminating sheets. Apply the sealant according to the manufacturer’s instructions.
Step 6: Waterproofing Techniques
If you don’t want to use a sealant, there are other ways to waterproof your stickers. Here are four techniques you can try:
- Resin Coating: Apply a thin layer of resin over the sticker to create a protective barrier against water.
- Packing Tape: Cover the sticker with a layer of clear packing tape, smoothing out any bubbles or wrinkles.
- Nail Polish: Brush a coat or two of clear nail polish over the sticker, allowing each coat to dry before applying the next.
- Polyurethane Spray: Spray a light coat of polyurethane spray over the sticker, holding the can a few inches away for even coverage.
These techniques will help ensure that your stickers stay in great condition, even when exposed to water or moisture.
Step 7: Show Off Your Stickers
Now that your stickers are waterproofed, you can start using them to decorate all sorts of items! From personalizing your water bottle to adding some flair to your planner, the possibilities are endless. You can also give your stickers as gifts or sell them online.
Step 8: Watch and Learn
If you’re new to making stickers with a Cricut machine, it can be helpful to watch video tutorials or take online classes to learn different techniques and tricks. There are plenty of resources available that can help you master the art of sticker making.
Conclusion
Making stickers with a Cricut machine opens up a world of possibilities for DIY projects and creative endeavors. With a few basic supplies and some creativity, you can create beautiful and personalized stickers that are both fun to make and durable. So, grab your Cricut machine and start designing!
Materials List
To make watercolor stickers, you’ll need the following materials:
- A sheet of watercolor paper
- A set of watercolor paints
- A watercolor brush
- A container of water for rinsing your brush
- A piece of white vinyl or sticker paper
- Waterproof ink pens or markers
- Scissors or a cutting machine, like a Cricut
- Optional: stamps or stencils for additional designs
To start, you’ll want to find a good workspace where you can work comfortably without worrying about making a mess. Make sure your surface is protected with a plastic tablecloth or work mat.
Once you have your materials ready, here’s a step-by-step guide to making watercolor stickers:
- Sketch out the designs you want to turn into stickers. You can draw flowers, patterns, or anything else you like!
- If using stamps or stencils, place them over your watercolor paper and start painting over them with the watercolors. This will create a background for your stickers.
- Let the watercolors dry completely.
- Using waterproof ink pens or markers, add additional details to your stickers. This could be outlining the shapes or adding finer details.
- If you have a cutting machine, set up your design on the software and cut out the stickers. If not, you can use scissors to carefully cut around each design.
- Finally, peel off the backing of the white vinyl or sticker paper and stick your watercolor stickers wherever you like!
That’s it! Now you have your own handmade watercolor stickers. They’re perfect for decorating notebooks, journals, and more. If you have any questions, you can watch video tutorials or check out online resources for more tips and ideas.
Note: If you want your stickers to be more durable and long-lasting, you may consider using a waterproof spray or sealant over them. This will make them more resistant to water damage.
No Machine Stickers Video Tutorial
If you’re looking for an easy way to make watercolor stickers without a machine, this video tutorial is just what you need! In this tutorial, we will show you how to make beautiful watercolor stickers using only a few materials that you likely already have on hand.
To start, you will need a set of watercolors, a waterproof black pen or marker, a brush, and some white vinyl or transparent labels. You can find these materials at your local art supply store or online.
Step 1: Sketch your designs on a piece of paper using a pencil. You can use this step to experiment with different designs and find out what works best for you. Once you’re satisfied with your sketches, leave them to dry.
Step 2: Use your waterproof black pen or marker to trace over your pencil sketches. This will create the final designs for your stickers. Make sure to take your time and be precise.
Step 3: Get your watercolors ready by adding a little water to each color and mixing them to get the desired shades. Keep in mind that watercolor paints are transparent, so the colors will appear lighter once they dry.
Step 4: Using your brush, start painting the backgrounds of your stickers. This will create a nice base for your designs and make them stand out. You can use a rounded brush for blending or a smaller brush for more detailed work.
Step 5: Once the backgrounds are dry, you can start painting the objects in your designs. Feel free to use different colors and experiment with blending to create depth and dimension. Remember to let each color dry before adding the next one.
Step 6: When everything is dry, you can add some final details using a white gel pen or mask. This will give your stickers a nice finishing touch and make them look more professional.
Step 7: Cut out your stickers using a pair of scissors or a cutting tool. You can make them any shape or size you like, but rounded corners tend to look better and are less likely to peel off.
Step 8: Place your stickers on cards, drawings, or any other projects you’re working on. They will instantly add a handmade touch and make your creations stand out.
Congratulations! You’ve just made your own watercolor stickers without a machine. Now you have a set of unique and personalized stickers that you can use for anything you like.
If you have any questions or want to learn more about watercolor sticker making, check out the video tutorial below. It will guide you through the whole process and provide you with more tips and tricks to make your stickers look even better!
Step 1 – Get Your Supplies Ready
To start making watercolor stickers, you will need to gather all the necessary supplies. Here’s a checklist of what you will need:
1. Watercolor paints (in different colors of your choice)
2. Watercolor paper (preferably a thicker weight, like 140 lb)
3. Watercolor brushes (rounded tip brushes work well for detailed work)
4. Watercolor masking fluid
5. Watercolor palette or mixing tray
6. Water container
7. Paper towels or a rag for blotting excess water and paint
8. Scissors or a cutting tool to trim your stickers
9. Clear adhesive sheets or sticker paper
10. A printer (to print your designs)
Make sure you have all these items on hand before you start working on your watercolor stickers. It’s a good idea to test your supplies beforehand to get familiar with how they work and what results you can achieve. Plus, having everything ready will save you time and make the process smoother.
Step 2 – Set Up Your Palette
Before you start painting your watercolor stickers, you need to set up your palette with the necessary materials and colors. This step is crucial to ensure that your stickers turn out beautifully and vibrant.
Here is a list of materials you will need:
- Watercolor paints – choose a set that includes a variety of colors.
- Watercolor paper – the surface on which you will paint your stickers. Make sure it is thick and suitable for watercolor work.
- Waterproof pen or pencil – for sketching out your designs on the paper.
- Masking fluid – a tool used to cover certain areas of your painting to protect them from paint.
- Blending tool – to create smooth color transitions and gradients.
- Water containers – to clean and dampen your brushes.
- Palette – a surface where you can mix and blend your watercolors.
- Paint brushes – various sizes for different details and techniques.
Once you have gathered all your materials, the next step is to choose the colors for your stickers. Watercolor paints come in a wide range of shades, so it’s up to you to decide which ones you want to use for your designs. You can find plenty of inspiration online or through tutorials, where artists show their preferred color palettes for specific themes.
Keep in mind that watercolors dry lighter than they appear when wet, so it’s a good idea to test the colors on a separate sheet of paper before applying them to your stickers. This way, you can adjust the shades as needed.
When setting up your palette, you can use an empty watercolor set or even a simple plastic or ceramic plate. Arrange the colors in a way that makes it easy for you to access and mix them. Just make sure to label each color so you can easily identify them during the painting process.
Now that your palette is ready and your colors are set, you are one step closer to creating beautiful watercolor stickers. In the next step, we will explore how to start painting your designs onto the watercolor paper.
Step 2a – Add Your Colors
Now that you have your printed watercolor designs and all your tools ready, it’s time to start adding colors to your stickers. Here’s how to do it:
1. Place your watercolor paper on a flat surface, making sure it is clean and free from any debris.
2. Start by sketching out the designs on your paper using a light pencil. This will serve as a guide when you start painting.
3. Grab your watercolor palette and choose the colors you want to use for your stickers. Feel free to mix and match to create unique shades.
4. Get your brushes ready. It’s best to have a variety of brush sizes to make it easier to work on different details and areas of your designs.
5. Dip your brush into your chosen color and start painting over the sketched areas. If you want lighter shades, dilute the paint with a little bit of water.
6. Work in layers, allowing each layer to dry before adding more colors. This will help you achieve depth and dimension in your stickers.
7. If you’re using watercolor markers, such as Tombow or Cricut, you can directly apply the colors to your paper without the need for brushes.
8. To create a background, you can either paint behind the main design or use a mask to cover the design while you paint the background.
9. If you want to add some textures or patterns, you can use stamps or find objects with interesting textures to stamp onto your paper.
10. If you make a mistake, don’t worry! You can use a damp brush or a little bit of water to lift the paint off the surface and make adjustments.
11. As you work, keep an eye on the overall look of your stickers and adjust the colors and details as needed to make everything look cohesive and balanced.
12. Once you’re satisfied with the colors and designs, let everything dry completely. You can use a hairdryer to speed up the drying process if you’re in a hurry.
That’s it for Step 2a! Now you have a set of beautifully watercolor painted stickers ready to go.
Step 3 – Let’s Get Painting
Now that you have your materials and designs ready, it’s time to start painting! Here’s what you’ll need:
- Watercolors: These will be your main tool for decorating the stickers. Make sure you have a wide range of colors to choose from.
- Watercolor paper: This is the best surface to work on when using watercolors. It will allow the colors to blend and keep the paint from seeping through.
- Brushes: You’ll need a variety of brush sizes to adjust to different objects and designs.
- Palette or any flat surface: This is where you’ll place your watercolors for easy access and mixing.
- Water: You’ll need a container with clean water to dip your brush in and clean it as you work.
Once you have everything set up, it’s time to start painting! Here’s how:
- Start by sketching your designs lightly with a pencil on the watercolor paper. This will act as a guide for your painting.
- Once you’re happy with your sketches, start painting the first layer of your designs. Use light and transparent colors to add depth and dimension to your stickers.
- Let the first layer dry completely before adding another layer on top. This will prevent the colors from blending and getting muddy.
- Keep adding layers until you’re satisfied with the colors and the overall look of your stickers. You can test different color combinations and blending techniques to find what works best for your designs.
- If you’re working with flowers or any other objects that have rounded shapes, pay extra attention to the shading and highlighting to make them look more realistic.
- Once you’re done painting, let the stickers dry completely before moving on to the next step.
Remember that watercolors can be a bit unpredictable, so don’t worry if your stickers don’t turn out perfect. They’re meant to have a handmade and artistic feel to them. Also, keep in mind that watercolors are not permanent, so make sure to handle them with care and avoid wetting the stickers too much.
Now that you know how to paint your stickers, you’re ready to move on to the next step: Step 4 – Stamping and Printing. In this tutorial, we’ll show you how to use a Cricut machine to stamp and print your watercolor designs on transparent sticker sheets. It’s a easy and fun way to make your own watercolor stickers!
If you have any questions about the painting process or any other part of this tutorial, feel free to ask. We’re here to help!
Step 4 – Paint Your Labels
Now it’s time to add color to your silhouette labels! Grab a set of watercolors, plus a brush, palette, and water. You can choose whatever colors you like, but we recommend starting with a few basic shades.
Start by sketching out your labels on a piece of white paper. Use a pencil or a pen to create the outline of your design. This will serve as a guide as you paint.
Once your sketch is done, mix up your watercolor paints on your palette. You can experiment with different color combinations and blending techniques to achieve the perfect shades for your labels.
Now, pick up your brush and start filling in the labels with the watercolors. Take your time and work in layers to build up the colors. You can use masks or masking tape to create crisp edges and prevent the colors from bleeding into each other.
If you want to add more details to your labels, you can use a smaller brush or even a Tombow brush pen. These tools are perfect for adding fine lines and intricate designs.
As you paint, feel free to adjust and refine your colors as needed. Watercolors are forgiving, so you can easily make changes or correct any mistakes.
Once you’re satisfied with your painted labels, let them dry completely. This may take a little while, so have patience!
If you want to add a decorative background to your labels, you can use stamps or stencils to create interesting patterns or textures. Just make sure to let the paint dry before moving on to the next step.
When everything is dry, carefully cut out your labels, following the outline you sketched earlier. Use a sharp pair of scissors or a craft knife for this step.
Now, your watercolor labels are ready to be used! You can stick them onto your planner, cards, or any other projects you have in mind. The transparent nature of watercolors will allow the background to show through, giving your stickers a unique and artistic look.
If you want to make your labels more durable and long-lasting, you can also laminate them or print them onto vinyl materials using a cutting machine like a Silhouette or Cricut. This will ensure that your stickers stay in great condition for a longer time.
That’s it! You’ve completed all the steps in this watercolor sticker tutorial. Now you have beautiful, hand-painted labels to use in your projects. Feel free to experiment with different colors, techniques, and designs to make each label unique!
Confessions of a DIY Addict – Watercolor Stickers Tutorial: https://www.youtube.com/watch?v=XSY3vWZK5A
Step 5 – Get Decorating without Stamping Ink
Now that you have your watercolor stickers ready, it’s time to get creative and start decorating! The best part about these stickers is that you can use them in so many different ways. Whether you’re painting cards, planner pages, or any other object, the possibilities are endless.
Here are a few ways you can use your watercolor stickers:
1. Using Masks: For more intricate designs, you can use masking pieces to protect certain areas while you work on others. This technique allows you to layer different colors and create unique effects.
2. Blending Colors: Since the watercolor stickers are waterproof, you can easily blend colors together. Simply apply one color, let it dry, and then add another color on top. Use a rounded tool such as a Tombow blending mule to blend the colors together smoothly.
3. Decorating with Backgrounds: If you’re looking to create a more detailed scene, try adding a background first. Use your watercolor palette to create a beautiful background and let it dry completely before adding the stickers on top.
4. Adding Details: Use your watercolor stickers to add small details to your paintings or drawings. They’re perfect for adding flowers, leaves, or any other element that will make your artwork stand out.
5. Final Touches: Once you’re done decorating, don’t forget to seal your watercolor stickers. You can use a transparent adhesive or a layer of waterproof paint to keep them in place.
With these tips in mind, you’re ready to let your creativity run wild and decorate to your heart’s content. The possibilities are endless, and your art studio will be filled with beautiful creations in no time.
That wraps up our tutorial on how to make watercolor stickers. If you have any questions, feel free to ask in the comments below. Happy painting!
Step 5a – Get Decorating without Stamps
If you don’t have any stamps or if you want to switch things up, there are still plenty of ways to decorate your watercolor stickers. Let’s explore some of the options:
1. Hand-drawn Designs: If you’re feeling artistic, grab a brush and start drawing your own designs! You can paint flowers, objects, letters, or anything else that comes to mind. It’s a fun and creative way to add a personal touch to your stickers.
2. Printed Designs: If you’re not confident in your drawing skills, no worries! You can find plenty of printable designs online or even use clipart. Simply print them out, cut them to size, and glue them onto your sticker paper.
3. Masking: Masking is a technique where you cover parts of your sticker with tape or other materials to protect them from paint. This allows you to create layers and add depth to your designs.
4. Watercolor Background: Start off by creating a colorful watercolor background on your sticker paper. Once it’s dry, you can either leave it as is or use a finer brush to add details on top of the background.
5. Transparent Stickers: If you’re working with transparent sticker paper, you can experiment with creating see-through stickers. This is a great way to incorporate negative space into your designs.
6. Use Watercolor Pencils: If you’re not confident in your watercolor skills, you can use watercolor pencils instead. Simply draw your design with the pencils, then use a damp brush to blend the colors and create a watercolor effect.
Remember, there are no rules when it comes to decorating your watercolor stickers. Get creative and have fun exploring different techniques!
Step 6 – Use Your Stickers
Now that you have your watercolor stickers ready, it’s time to put them to use! Here are some ideas and tips on how to use them:
- Get your tools ready: Before you start using your stickers, make sure you have all the necessary supplies. You’ll need the watercolor stickers you made, a brush, watercolors, a watercolor paper or any other surface you prefer, and some masking tape or a mask to keep the background clean.
- Choose your surface: Decide where you want to place your sticker. It can be on a watercolor paper, in your sketchbook, or on any other object you like. Make sure the surface is clean and dry.
- Peel off the sticker: Carefully peel off the watercolor sticker from its backing. If you find it difficult to lift the sticker, use a pencil or any other tool to help you lift the edge.
- Place the sticker: Once you have the sticker in your hand, decide where you want to place it on the surface. Gently press it down, starting from one edge and moving towards the other, to ensure it sticks well.
- Blend it in: If you want your sticker to look more integrated with the background, you can use a brush and some watercolors to blend the edges. This will give it a more seamless and natural feel.
- Repeat for more: Repeat steps 3-5 for every sticker you want to use. You can create a whole art piece or add the stickers to different projects.
- Enjoy your creations: Once you’re done applying your watercolor stickers, step back and admire your work! You can use them as decorative elements in your artwork, journal, or craft projects. They can also be great additions to greeting cards, gift tags, or even as labels for your art supplies.
Now that you know how to make and use watercolor stickers, you’re ready to add an extra touch to your creations. Have fun experimenting with different colors, shapes, and techniques!
🎉 Final Step Show Off Your Work
Now that you have completed all the steps in making your watercolor stickers, it’s time to show off your beautiful creations! Take a moment to admire your work and feel proud of what you have accomplished.
You can display your stickers in various ways. Here are a few ideas:
1. Decorate your planner or journal: Stick your watercolor stickers onto the pages of your planner or journal to add a pop of color and personality.
2. Use them for crafting projects: Get creative and incorporate your watercolor stickers into other crafting projects. They make great additions to handmade cards, scrapbooks, and more!
3. Share them with others: Give some of your watercolor stickers to friends or family members as a thoughtful and unique gift. They will surely appreciate the time and effort you put into making them.
4. Create personalized labels: Use your watercolor stickers to label jars, boxes, or other objects. This will not only help you stay organized but also add a touch of beauty to your surroundings.
5. Display them as art: Frame your favorite watercolor stickers and hang them on your wall. They can serve as a wonderful reminder of your creativity and the joy you experienced while making them.
Remember, these are just a few suggestions. Feel free to explore different ways to showcase your watercolor stickers. Let your imagination run wild!
Now that you know how to make watercolor stickers, the possibilities are endless. Get your materials and tools ready, and start making your own beautiful pieces of art. Have fun and enjoy the process!
Working with Layer Masks
If you want to create beautiful watercolor stickers, you’ll need to know how to work with layer masks. Layer masks allow you to set transparent areas on your watercolor designs, so the background can show through while keeping the important details in place. Here’s a step-by-step guide on how to use layer masks to make your watercolor stickers:
Step 1: Prepare your watercolor designs on a piece of paper or any surface suitable for watercolor painting. Make sure everything is dry and ready to be scanned or photographed.
Step 2: Scan or photograph your watercolor designs, and open them in your preferred image editing software. If you’re using a manual process, you can skip this step.
Step 3: Place your watercolor designs on separate layers in your image editing software. You can use the selection tools to create a silhouette around the design, or you can manually select the areas you want to keep. If you’re using a manual process, you can trace the outlines of your designs on a separate piece of paper.
Step 4: Add a layer mask to each watercolor design layer. This will allow you to hide or reveal parts of the design as needed. By default, the layer mask is filled with white, which means the entire design is visible. You can use the Brush tool to paint with black on the layer mask, hiding the areas you don’t want to show. Make sure to use a soft, rounded brush for better blending.
Step 5a: If you’re working with black ink or any other waterproof medium, you can skip this step. However, if you’re using watercolor, make sure to let the watercolor dry completely before moving on to the next step.
Step 5b: Adjust the layer masks as needed. You can use the Brush tool with white or black to add or remove parts of the design, respectively. This will give you more control over the final look of your watercolor stickers.
Step 6: Test print your watercolor stickers on a regular piece of paper to make sure everything looks good. If you’re using a cutting machine like Cricut, make sure to watch out for any small details that may get cut off or become hard to see once the stickers are placed on a surface.
With these layer masks in place, you can create beautiful watercolor stickers that show off the vibrant colors of your designs while leaving the background transparent. These stickers are perfect for adding a personal touch to cards, labels, and more. So, let’s get started and make some amazing watercolor stickers! 🎉
Adjust Layer Mask with Brush Tool in Black and White
When creating watercolor stickers, it is important to adjust the layer mask with the brush tool in black and white. This technique allows you to work around the flowers or any other design element you want to highlight or remove from the final sticker.
Here’s how to do it:
- Open your digital artwork or drawing in a software like Photoshop or Procreate.
- Create a new layer above your background layer and label it “Mask”.
- Use the brush tool with black color to paint over the areas you want to hide or remove from the sticker design.
- Switch to the white color and use the brush tool to show the areas you want to keep or highlight in the sticker design.
- Make sure to use a soft round brush for blending and smooth transitions between the hidden and visible parts of your design.
- Test your adjustments by printing a test sheet on a waterproof vinyl or sticker paper. This will give you a better idea of how your stickers will look in physical form.
By adjusting the layer mask with the brush tool in black and white, you have more control over the final look of your watercolor stickers. Whether you’re using a Cricut or Silhouette machine to cut out your stickers or you’re making them by hand, this technique will help you create beautiful and professional-looking stickers for your art, cards, or any other creative projects.
Art Studio Confessions Making Stickers
Welcome to the Art Studio Confessions! In this tutorial, we will show you how to make your own watercolor stickers. These stickers can be used to decorate your notebooks, laptops, or any other items you’d like to personalize.
Before we get started, let’s gather all the necessary materials and tools. You will need the following supplies:
- Watercolor paints
- Paintbrushes
- Watercolor paper
- Pencil
- Masking tape
- Tombow or similar blending tool
- Scissors
- Inkjet printer or Cricut
- Vinyl or sticker paper
Once you have all the materials ready, let’s start making our watercolor stickers!
- Step 1: Sketch your design
Use a pencil to sketch your desired sticker designs on the watercolor paper. Feel free to get creative and experiment with different shapes and objects.
Step 2: Paint your designs
Using watercolor paints and brushes, add colors to your sketches. Watercolors offer a wide range of vibrant and transparent colors, so take your time to mix and blend shades for a better result.
Step 3: Add details
Once your watercolor paintings have dried, use a fine-tip brush or a Tombow blending tool to add details and define the outlines of your designs.
Step 4: Print your stickers
Scan or photograph your watercolor artwork and print them on a vinyl or sticker paper using an inkjet printer or a Cricut machine.
Step 5: Cut out your stickers
Once the prints have dried, carefully cut out your stickers using scissors. If you have a Cricut, you can use it to cut precise shapes.
Step 6: Decorate and enjoy!
Now you have your handmade watercolor stickers ready to be used! Stick them on your favorite items, and let your creativity shine.
These watercolor stickers are perfect for adding a colorful and artistic touch to your belongings. They’re also a great way to personalize gifts or create unique party favors. Enjoy making your own watercolor stickers and have fun exploring different ways to design and decorate with them!
HOW TO MAKE WATERCOLOR STICKERS WITH A SILHOUETTE
If you’re looking for a fun and creative way to make watercolor stickers, using a Silhouette machine can make the process much easier. In this tutorial, we’ll show you how to create beautiful watercolor stickers using the Silhouette and some basic supplies.
Supplies:
- Silhouette machine
- Watercolor paper
- Watercolor paints
- Brushes
- Masking fluid
- Watercolor palette
- White vinyl
- Scissors
- Tombow Dual Brush pens
Step 1: Sketch and Print
Start by sketching your desired sticker designs on a piece of watercolor paper. Once you’re happy with your sketches, use a printer to print them out.
Step 2: Apply Masking Fluid
Using a brush or a masking fluid pen, carefully apply masking fluid to the areas you want to preserve in the final design. This will create a barrier that prevents the watercolors from seeping into those areas.
Step 3: Paint with Watercolors
Now it’s time to bring your stickers to life with watercolors! Start by wetting your brush and then pick up a color from your palette. Apply the watercolors to the areas that are not covered with masking fluid. Feel free to blend and layer colors to achieve the desired effect.
Step 4: Let It Dry and Remove Masking
Once you’re done painting, let the watercolor stickers dry completely. This may take a few hours, so be patient! Once the stickers are dry, carefully remove the masking fluid by gently rubbing it off with your finger or an eraser.
Step 5: Cut Out the Stickers
Using scissors or a cutting tool, carefully cut out your watercolor stickers. Make sure to leave a border around each sticker to prevent them from peeling off easily.
Step 6: Stick and Enjoy!
Now that your watercolor stickers are ready, it’s time to stick them onto your desired surfaces. Whether it’s journals, cards, or other DIY projects, these stickers will add a pop of color and personality. Just peel off the backing and apply the stickers wherever you want!
Final Tips:
- If you don’t have a Silhouette machine, you can still make watercolor stickers by hand. Just draw and cut out your designs without the use of the machine.
- Experiment with different watercolor techniques, such as wet-on-wet or wet-on-dry, to create various effects.
- Feel free to add other elements, such as stamps or labels, to enhance your watercolor sticker designs.
- If you’re new to watercolors, check out online tutorials or watch videos for more tips and inspiration.
That’s it! You now know how to make beautiful watercolor stickers with a Silhouette machine. Have fun creating and adding a touch of art to your everyday life!