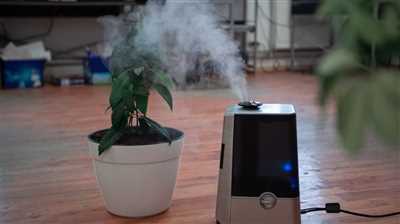
If you live in a dry environment or are experiencing dry skin, you may want to consider making your own homemade humidifier. Humidifiers are small devices that help to create a more humid environment in your home or workspace. They release a soothing mist into the air, which can be essential for your health, especially in the summer months.
One of the benefits of making your own humidifier is that it can be very inexpensive compared to store-bought options. With just a few simple materials and some basic steps, you can build your own homemade humidifier. Not only will this help to humidify the area, but it will also boost the humidity levels in the room and reduce symptoms like cough and dry skin.
Here’s how you can make your own DIY humidifier. First, you will need a small fan, a bottle or bucket for water, and some materials to create the mist. You can choose from a variety of ideas, such as using a sponge or cloth to hold the water and create the mist. Just make sure the materials you choose are safe and won’t cause any harm.
Next, fill the bottle or bucket with water. You want to fill it enough so that it will last for a decent amount of time, but not so much that it will overflow. Then, place the fan near the water source and turn it on. As the fan blows across the water, it will create a mist that is released into the air. This mist will help to humidify the space and provide the healthy environment your body needs.
Creating your own homemade humidifier can be a fun and rewarding project. Not only will it help to improve the air quality in your home, but it will also provide a soothing and comfortable environment. So, whether you are looking to boost your health or just enjoy the benefits of a humid room, try making your own humidifier today!
- 21 DIY Humidifier Ideas For Mist Making
- Why Build Your Own Humidifier?
- Materials and Steps
- Benefits of DIY Humidifiers
- Conclusion
- Boost Your Health with These Homemade Humidifiers for Cough
- Making Your Own Homemade Humidifier
- The Benefits of Homemade Humidifiers for Cough
- How to Humidify a Room With a Fan
- Why Humidify a Room?
- What You’ll Need
- Steps to Make a Homemade Humidifier
- Benefits of Homemade Humidifiers
- Essential Facts About Making a Humidifier With a Water Bottle
- Materials You’ll Need
- Simple Steps to Create Your DIY Humidifier
- Benefits of Using a Homemade Humidifier
- Simple Steps to Build your Own Humidifier at Home
- Materials you will need:
- Step 1: Choose the right fan
- Step 2: Get a mist maker
- Step 3: Prepare the container
- Step 4: Set up the humidifier
- Step 5: Add essential oils (optional)
- Step 6: Enjoy the benefits
- Video:
- How to make a humidifier using water bottle at home – diy mist maker
21 DIY Humidifier Ideas For Mist Making
Humidifiers play a crucial role in maintaining a healthy living environment. They help create a soothing mist in the room, which can alleviate cough symptoms, boost skin health, and provide numerous other benefits. While store-bought humidifiers are readily available, creating your own DIY humidifier can be a simple and inexpensive project that caters to your specific needs.
Why Build Your Own Humidifier?
Homemade humidifiers allow you to enjoy the benefits of mist-making without the need to buy expensive equipment. Additionally, DIY humidifiers can be tailored to fit small areas or specific rooms in your home, ensuring the perfect humidity levels for you and your family.
Materials and Steps
Creating a homemade humidifier is a fairly straightforward task. The essential materials you will need include a container or bottle to hold water, a fan or humidifier maker, and a source of moisture like a bucket or water reservoir. Depending on the type of humidifier you choose to build, you may also need additional materials such as essential oils.
To start, make sure the area you want to humidify is well-ventilated, as excessive humidity can be uncomfortable. Once you have gathered all the necessary materials, follow these steps to build your homemade humidifier:
- Choose a container or bottle that can hold a sufficient amount of water for your space.
- Drill or poke small holes in the lid of the container for mist dispersal.
- Attach a small fan or humidifier maker to the lid of the container.
- If using a bucket or water reservoir, place it below the fan or maker to hold the water.
- Securely attach the lid with the fan or maker to the container, ensuring a tight seal.
- Add water to the container or bucket, leaving enough space for mist production.
- If desired, add a few drops of essential oils to the water for a soothing aroma.
- Place the homemade humidifier in the desired space and turn on the fan or maker.
- Monitor the humidity levels in the room and adjust accordingly.
Benefits of DIY Humidifiers
DIY humidifiers not only provide the necessary moisture to your environment but also offer several additional benefits. Homemade humidifiers are generally quieter than store-bought ones, which can be important for ensuring a peaceful atmosphere. They also allow for customization, allowing you to choose specific materials and scents that cater to your preferences.
Furthermore, DIY humidifiers are often more cost-effective compared to their store-bought counterparts. By utilizing your own materials and creating a homemade humidifier, you can save money while still enjoying the benefits of a humidified space.
Conclusion
Creating your own DIY humidifier can be a fun and rewarding project. With just a few simple steps and some inexpensive materials, you can build a homemade humidifier that suits your needs and helps improve the health and comfort of your living environment. Whether it’s in the summer or during the dry winter months, having a DIY humidifier at home is a great way to ensure a well-humidified space for you and your loved ones.
So why wait? Start making your DIY humidifier today and enjoy the soothing mist and other health benefits it provides!
Boost Your Health with These Homemade Humidifiers for Cough

If you’re looking to create a more comfortable and healthy environment in your home, especially during the summer months, a homemade humidifier can be just what you need. It’s a simple DIY project that can have a big impact on your health. In this article, we’ll discuss how to make your own humidifier and the benefits it can provide for your respiratory system.
Making Your Own Homemade Humidifier
Creating a homemade humidifier is very easy and only requires a few materials. One of the key components you’ll need is a fan, which will help to distribute the mist created by the humidifier. You can choose to use a small fan or a larger one, depending on the size of the room you want to humidify.
Next, you’ll need a container to store the water. A simple bucket or water bottle will work just fine. Make sure the container is clean and free of any contaminants before using it as a humidifier.
Now, it’s time to build your DIY humidifier. Fill your container with water and place it in front of the fan. You can also add a few drops of essential oils to create a soothing and pleasant aroma in the room.
As the fan blows air, it will pass over the water, creating a mist that humidifies the air in the immediate area. This mist will help to alleviate cough symptoms by keeping your respiratory system moist, reducing irritation and inflammation.
The Benefits of Homemade Humidifiers for Cough
Using homemade humidifiers has several benefits for your respiratory health. Firstly, they are inexpensive to create, making them accessible to everyone. Store-bought humidifiers can be quite expensive, so making your own can save you money.
Secondly, homemade humidifiers allow you to control the humidity levels in your home. Excessive humidity can lead to mold and mildew growth, so having control over the levels is important for your overall health.
Additionally, using a homemade humidifier can also benefit your skin. Dry air can cause skin to become dry and itchy, but with the added moisture from a humidifier, your skin will feel more hydrated and healthy.
To enjoy the full benefits of a homemade humidifier, make sure to properly maintain it. Clean the container regularly and change the water to prevent any bacteria or mold growth. With these simple steps, you can create a healthy and soothing environment in your home to boost your overall health.
How to Humidify a Room With a Fan
During the hot summer months, it’s common to have a very dry environment which can lead to various uncomfortable symptoms like dry skin, cough, and congestion. While there are store-bought humidifiers available, they can be expensive and take up space in your home. But don’t worry, you can create your own homemade humidifier using a fan and a few simple materials.
Why Humidify a Room?
Humidifying a room is essential for creating a healthy environment. It helps to boost moisture levels, soothe your skin, and enjoy a more comfortable space. Whether you have a small room or a larger area, these DIY ideas will help you ensure that your room has the right level of humidity.
What You’ll Need
To make your own homemade humidifier, you’ll need the following materials:
- A fan
- A bottle or bucket
- Water
Steps to Make a Homemade Humidifier
Follow these simple steps to build your own humidifier:
- Choose a fan that you have at home. It doesn’t have to be fancy or loud, as long as it can create airflow.
- Fill a bottle or bucket with water. Make sure it’s clean and free from any contaminants.
- Place the fan in front of the bottle or bucket, and turn it on.
- The fan will create airflow over the water, creating mist and increasing the humidity in the room.
Benefits of Homemade Humidifiers
Making your own humidifier has several benefits:
- Cost-effective: Homemade humidifiers are inexpensive compared to store-bought ones.
- Customizable: You can choose the size and shape of the container according to your needs.
- Soothing and healthy: The added moisture in the air can soothe your skin and alleviate symptoms like cough and congestion.
So next time you need to humidify a room, don’t rush to the store. Follow these simple steps and enjoy the benefits of your DIY humidifier!
Essential Facts About Making a Humidifier With a Water Bottle
Creating a homemade humidifier is a simple and inexpensive DIY project that can bring many benefits to your home. Whether you need to boost the humidity in a small space or humidify a whole room, making your own humidifier with a water bottle can be a great solution.
Here are some essential facts about making a DIY humidifier with a water bottle:
Materials You’ll Need
To build your own humidifier, you’ll need a few basic materials:
- A clean water bottle
- A small fan
- Suitable duct tape
- A bucket or container
Simple Steps to Create Your DIY Humidifier
Follow these steps to make your own homemade humidifier:
- Start by choosing a suitable water bottle for your humidifier. Make sure it has a wide opening to allow easy access for filling.
- Attach the small fan to the top of the water bottle using duct tape. The fan will help to disperse the mist created by the humidifier.
- Fill the bottle with water and place it inside a bucket or container to catch any drips.
- Turn on the fan and enjoy the soothing mist generated by your DIY humidifier.
Benefits of Using a Homemade Humidifier
By using a homemade humidifier, you can enjoy several benefits:
- Creating a healthier environment: Humidifiers can help to alleviate symptoms such as cough and dry skin by adding moisture to the air.
- Saving money: DIY humidifiers are much more cost-effective than store-bought ones.
- Noisy-free operation: Unlike some store-bought humidifiers, homemade ones are often very quiet.
- Customizable mist level: You can adjust the airflow of your DIY humidifier to meet your specific needs.
- Fewer maintenance needs: Homemade humidifiers typically require less maintenance compared to complex, high-end models.
With these essential facts in mind, you can confidently start your own DIY humidifier project and enjoy the benefits of a healthy and soothing environment in your home, especially during the dry summer months.
Simple Steps to Build your Own Humidifier at Home
Humidifiers are devices that help to add moisture to the air, creating a more comfortable environment in your home. Whether you live in a dry climate, want to soothe dry skin, or need relief from cough and cold symptoms, a humidifier can be a healthy addition to your space. While there are many store-bought options available, making your own DIY humidifier can be a fun and inexpensive project. In this article, we will guide you through the simple steps to build your own humidifier at home.
Materials you will need:
- A small fan
- A mist maker
- A bucket or large bottle
- Water
- Essential oils (optional)
Step 1: Choose the right fan
Start by choosing a small fan that is suitable for the size of the room you want to humidify. Make sure it is not too loud and has adjustable speed settings.
Step 2: Get a mist maker
A mist maker is a device that creates a fine mist by vibrating water at a high frequency. You can find them online or at a local store. Make sure to choose one that suits your needs and budget.
Step 3: Prepare the container
If you are using a bucket, drill a hole in the lid that is large enough for the mist maker to fit through. If you are using a large bottle, cut a hole near the bottom. This will be where the mist will come out.
Step 4: Set up the humidifier
Fill the container with water, leaving enough space for the mist to rise. Place the mist maker in the hole of the lid or bottle, making sure it is secure. Turn on the fan and position it near the mist maker. The fan will help to disperse the mist throughout the room.
Step 5: Add essential oils (optional)
If you want to enjoy the soothing and health-boosting benefits of essential oils, you can add a few drops to the water in the container. This will not only humidify the air but also fill it with a pleasant aroma.
Step 6: Enjoy the benefits
Once everything is set up, turn on the humidifier and enjoy the improved humidity levels in your room. Be sure to monitor the humidity levels and adjust the settings accordingly.
Now that you know how to make your own homemade humidifier, you can enjoy the many benefits it has to offer. From creating a more comfortable space to improving your health, DIY humidifiers are a great addition to any home. So gather your materials, follow these simple steps, and start enjoying a healthier and more soothing environment.