

Making online surveys and collecting information from respondents has never been easier with Google Forms. Whether you’re looking to create a registration form, a survey, or even a feedback form, Google Forms is the best tool for the job. In this guide, we will walk you through the process of creating a Google Form in just 6 simple steps.
Step 1: Access Google Forms
To create a Google Form, first, you need to have a Google account and access to Google Drive. From your Google Drive dashboard, click on the “New” button and select “More” to find the Google Forms option. Click on it to start creating your form.
Step 2: Choose a Template or Start from Scratch
Google Forms provides multiple templates that you can choose from based on the type of form you’re looking to create. If none of the templates are appropriate for your needs, you can also start with a blank form and customize it according to your preferences.
Step 3: Configure Form Settings
Before adding questions to your form, you can configure various settings such as the form title, description, background color, and theme. This will help customize the form to match your desired look and feel.
Step 4: Add Questions and Options
Now it’s time to add questions to your form. Google Forms provides different question types such as multiple choice, short answer, and dropdown. You can also add options to each question and further customize them if needed.
Step 5: Preview and Customize the Form
Once you’ve added all the necessary questions, you can preview the form to see how it will look to users. If everything looks good, you can further customize the form by adding a header image, changing the font style, and even configuring advanced settings.
Step 6: Share and Collect Responses
The final step is to enable the option to collect responses. You can choose to collect responses in a Google Sheets spreadsheet or even send them through email. Google Forms provides different ways to share your form, whether it’s through a direct link or through social media.
That’s it! You have successfully created a Google Form. Now you can analyze the results and get valuable feedback based on the responses you receive. Google Forms makes the process of creating and sharing forms simple and efficient, saving you time and effort.
- How to Create a Survey in Google Forms and Add it to Email
- Create a Form
- Guide on How to Use Google Forms for Registration
- Step 1: Creating a Google Form
- Step 2: Spreading the Word
- Step 3: Collecting Responses and Analyzing the Results
- 1 Create the Form
- 2 Add Online Registration Questions
- 3 Configure Settings
- 4 Customize Forms
- 5 Preview Send Forms
- 6 Collect Analyze Form Responses in Spreadsheet
- Final Thoughts
- Sources
How to Create a Survey in Google Forms and Add it to Email

Google Forms is a powerful online tool that allows you to create surveys and collect information from respondents. Whether you need feedback or want to conduct a registration process, Google Forms is the best option for you. In this guide, we will walk you through the steps to create a survey using Google Forms and how to add it to an email.
Step 1: Create a Form
The first step is to create a new form. Simply log in to your Google account and go to Google Drive. Click on the “+ New” button and then select “Google Forms” from the dropdown menu. This will open a new blank form for you to work with.
Step 2: Customize the Form
Next, you can customize the form based on your preferences and the theme of the survey. You can choose from a variety of templates to give your form a professional and appropriate look. You can also add a header image to make it more visually appealing.
Step 3: Add Questions
Once you have customized the form, you can start adding questions. Google Forms offers various question types such as multiple-choice, dropdown, and text entry. You can add as many questions as you want and even enable required responses for certain questions.
Step 4: Configure Settings
After adding questions, you can further configure the settings of the form. You can choose whether to collect email addresses, limit responses to one per person, or even allow respondents to submit the form only once. You can also customize the color and theme of the form to match your preferences.
Step 5: Preview and Finalize
Once you are done creating the form, you can preview it to see how it will look to the respondents. Make sure everything is working well before moving to the final step.
Step 6: Share and Collect Responses
Now you are ready to share the form and collect responses. Google Forms provides you with options to share the form through email, social media, or by embedding it on a website. Choose the appropriate option based on your requirements.
Adding the Form to Email
To add the form to an email, first, open the form and click on the “Send” button. In the popup window, select the “Email” tab. Here, you can customize the email subject and write a message to accompany the form. Once you are done, click on the “Send” button, and the form will be added to the email.
Analyze Results
As respondents fill out the form, their responses will be automatically recorded in a Google Sheets spreadsheet. You can access the results by going to the “Responses” tab in the form, and from there, you can further analyze the data and work with the information collected.
Google Forms is a versatile tool that can be used for various purposes. Whether you need to gather feedback, conduct a survey, or collect registration information, Google Forms provides a simple and effective way to do it. With its customizable options and easy sharing process, you can quickly create and distribute surveys to get valuable insights from your audience.
Create a Form
To create a Google Form, follow these steps:
- Sign in to your Google account and open Google Forms from the Google Drive menu.
- Click on the “Blank” option to start creating a new form.
- Use the toolbar at the top of the page to customize the form’s theme, such as changing the color or adding an image.
- Add questions to the form by clicking on the “+” icon. You can choose from different question types such as multiple choice, checkboxes, or short answer.
- Configure additional settings such as making certain questions required or enabling options for respondents to upload files.
- Preview the form to see how it will appear to the users.
- Click on the “Send” button to share the form with others. You can share it via email, social media, or by generating a link to the form.
- Collect responses from the form by either viewing them in the form itself or by accessing the responses directly in a Google Sheets spreadsheet.
- Analyze the responses using the built-in tools provided by Google Forms. This allows you to view summary charts and graphs based on the collected information.
- Further customize the form by editing or adding new questions based on the feedback received.
- Once you’re happy with the final form, you can close the form and it will still be available for users to fill out.
By following this step-by-step guide, you can easily create a Google Form to collect online responses for surveys, registrations, feedback, and more. Google Forms provides an easy-to-use and intuitive tool for making forms that can be customized to fit your specific needs.
Guide on How to Use Google Forms for Registration
Google Forms is a powerful online tool offered by Google for creating forms and surveys. It is a great tool for registration processes as well. In this guide, we will explain how to use Google Forms for registration and show you the step-by-step process. Let’s get started!
Step 1: Creating a Google Form
- Go to https://docs.google.com/forms and click on the “Blank” option to start creating a new form.
- Configure the settings according to the registration information you are looking to gather. You can customize the form’s header, choose from different question types, and even enable options such as limiting responses to one per user or requiring sign-in.
- Personalize the theme of your form by selecting a color and appropriate image.
- Thoughts on making your form even more visually appealing? There are templates available that you can choose from.
- Click on the “Send” button to finalize the form creation.
Step 2: Spreading the Word
- Once the form is created, you can either send it directly to individuals by email or share the form link on social media platforms.
- If you are looking to drive registration through specific sources, you can even customize the form URL and create different links for each source.
Step 3: Collecting Responses and Analyzing the Results
- As people respond to your form, Google Forms automatically collects the data in a Google Sheet.
- Go to the “Responses” tab in your form and click on the Google Sheets icon to see all the responses in the form of a spreadsheet.
- Use the various options provided by Google Sheets to analyze the responses and extract the necessary information.
That’s it! You now know how to use Google Forms for registration. Make sure to follow these steps to create a registration form, spread the word, and analyze the responses effectively. Google Forms is a versatile tool that can be used for various purposes, and registration is just one of them. Start using it today and simplify your registration process!
1 Create the Form
To create a form in Google Forms, follow these steps:
- Go to Google Forms by either naviating to the Google Forms website or through Google Drive.
- Click on the “+ Blank” or “Template Gallery” icon to start creating a new form.
- Choose an appropriate form template or start with a blank form.
- Edit the form settings and configure options such as the form title, theme, and background color.
- Add questions to the form by clicking on the “Add” button. You can add various types of questions such as multiple choice, checkbox, short answer, and more.
- Customize the form further by adding headers, images, and descriptions to make it more visually appealing and informative.
- Configure additional settings such as enabling or disabling the option to collect email addresses, limiting the number of responses, or allowing respondents to edit their responses.
- Preview the form to see how it looks to the user, and make any necessary edits.
- Save the form and you’re ready to send it out, share it online, or embed it on a website.
- Once respondents start filling out the form, you can analyze the results in Google Sheets based on the responses received.
By following these steps, you can create a Google Form and use it for various purposes such as surveys, registration forms, feedback forms, and more. Google Forms is a powerful tool that allows you to collect and analyze information in an easy and efficient way.
2 Add Online Registration Questions
Once you have chosen the theme and color scheme for your Google Form, it’s time to add the online registration questions. These questions will help you gather the necessary information from respondents who want to register for your event or access certain resources.
To add online registration questions, follow these steps:
- Open the Google Form you are creating or editing.
- Click on the “Add” button, which is represented by a plus icon, located on the side or at the top of the form.
- From the options that appear, click on “Multiple choice”, “Checkbox”, or any other question type that best suits your needs.
- Customize the question text according to what information you are looking to gather.
- If necessary, add options for respondents to choose from or provide space for them to enter their own response.
- Enable the “Required” option if you want to make a particular question mandatory for respondents to answer.
- Click on the “Done” button to finalize the question. You can continue adding more questions by repeating steps 2 to 6.
As you add the online registration questions, make sure that the questions are clear and easy to understand. Thoughtfully consider the information you are asking for, as well as any additional details that may be appropriate.
Once your form is complete, you can further customize it by adding a header image, changing the color scheme, and configuring additional settings such as the theme and response destination (Google Sheets, email addresses, etc.). You can also preview your form to see how it will look for respondents.
Now that you have added the online registration questions, the next step is to share the form with potential respondents. There are multiple ways to do this, such as sending the form through email, sharing it on social media, or embedding it on a website. Choose the method that best suits your needs.
When respondents fill out the form and submit their responses, you can access the results in the Google Form itself or in a Google Sheets spreadsheet. This will help you analyze the data and gather the necessary information for further processing or feedback.
That’s it! You have successfully added online registration questions to your Google Form. Follow these steps and create an effective form that will help you gather the information you need for your registration process.
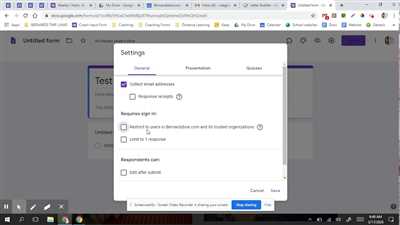
3 Configure Settings
Once you have created your form and are happy with its content, it’s time to configure the settings to suit your needs. Here are some options to consider:
- Results: Choose whether to show respondents a “Thank you” message, a link to edit their responses, or nothing at all. This can be helpful when you want to guide users to the next steps after submitting the form.
- Send form data to: Decide where the responses will be collected. You can choose to send them to a Google Sheets spreadsheet, your email address, or another online tool of your choice.
- Enable registration: If you’re looking to collect user information before they can access the form, enable this option to require respondents to sign in with their Google account or provide their name and email address.
- Customize theme: Make your form visually appealing by choosing a color scheme or selecting from pre-made templates. You can also add a header image to further personalize the form.
- Collect email addresses: If you want to keep track of who responds to your form, enable this option to require respondents to provide their email addresses. This can be helpful when you want to send follow-up emails or analyze responses based on different groups.
- Share and collaborate: Once you’re done making adjustments, click on the “Send” button to get a link to share your form. You can distribute it through email, social media, or any other appropriate channels. You can even embed the form on your website or blog.
By configuring these settings, you can ensure that your Google Form works best for you and your respondents. It’s important to take the time to think through the process and layout of your form to create an engaging and user-friendly experience.
4 Customize Forms
Once you’ve created a Google Form, you can customize it to suit your needs and make it more visually appealing. Here are some options for customizing your forms:
1. Customize the Header
Click on the “Header” tab in the form editor to add a custom image or text as the header of your form. You can also choose from pre-designed themes or customize the color scheme.
2. Add Questions and Customize the Form
In the form editor, you can add various types of questions such as multiple-choice, checkbox, dropdown, and more. You can also customize the layout and appearance of the form by adding sections, changing the font and background color, and even inserting images or videos.
3. Customize the Form Theme
Under the “Themes” tab, you can choose from a variety of pre-designed themes or use your own custom theme by uploading an image or selecting colors based on your preference.
4. Configure Form Settings
Click on the “Settings” tab to configure options such as requiring respondents to sign in, limiting responses to one per person, collecting email addresses, and enabling responses to be edited after submission. You can also enable the “Quiz” mode to automatically grade the responses based on your defined answers.
5. Analyze Responses
Once you start receiving responses, you can click on the “Responses” tab to view and analyze the collected data. Google Forms provides various tools to analyze the data, such as charts, graphs, and summary statistics.
6. Share and Collect Responses
Finally, you can share your form by clicking on the “Send” button. You have multiple options to share your form, such as through email, social media, or by embedding it on a website. You can also generate a QR code or send the form link directly. As responses come in, they will be automatically recorded in a Google Sheets spreadsheet for further processing.
By customizing your Google Forms, you can create a user-friendly and visually appealing registration form, survey, feedback form, or any other type of form that suits your needs. Take advantage of the customization options provided by Google Forms to make the form-making process even easier!
5 Preview Send Forms

Once you have created your Google Form and customized it using templates, colors, and images, it is time to preview and send it to your intended audience. Here is a step-by-step guide to help you through the process:
- Preview the Form: Before sending it out, it is essential to preview the form to ensure that everything looks and works as expected. Click on the “Preview” button to see how the form will appear to respondents.
- Customize the Theme: If you are not satisfied with the current theme, there are five even more templates that you can choose from. Click on the “Theme” icon to browse through the available options and select the one that best addresses your needs.
- Configure the Settings: Next, go to the “Settings” tab to further customize the form. You can enable options such as collecting email addresses, allowing multiple responses from the same user, and configuring a custom confirmation message.
- Analyze and Collect Responses: Once you are done with the settings, you are ready to send out the form. Click on the “Send” button to choose how you want to share the form. You have the option to send it via email, share a link, or embed it on a website.
- View Responses in Google Sheets: As respondents start filling out the form, their responses will be automatically collected in a Google Sheets spreadsheet. You can access this sheet by clicking on the “Responses” tab, and further analyze and work with the data collected.
That’s it! You have successfully created, customized, and sent out a Google Form to collect feedback, conduct surveys, or gather information. The responses will be conveniently stored and organized in a Google Sheets spreadsheet for further analysis.
Remember, Google Forms is a powerful tool that not only allows you to create online forms but also offers various ways to customize and share them. Whether you are making a registration form, collecting user feedback, or conducting a survey, Google Forms has got you covered.
6 Collect Analyze Form Responses in Spreadsheet
Once you have created and customized your Google Form, the next step is to collect and analyze the responses from your users. Google Forms provides a convenient tool to help you with this process by automatically collecting the responses in a spreadsheet.
To enable this feature, click on the “Responses” tab at the top of the form editor. There, you will find options to collect and analyze your form responses.
If you want to collect responses only, you can choose the “Collect email addresses” option. This will prompt users to sign in with their Google account before filling out the form. Their email addresses will be recorded along with their responses.
If you want to analyze the results, you can choose the “Create a new spreadsheet” option. This will generate a new Google Sheets spreadsheet where all the responses will be recorded. The spreadsheet will automatically update as new responses come in.
Once the spreadsheet is set up, you can further customize it by adding headers, formatting the cells, and applying appropriate colors and themes. This will make the data easier to read and analyze.
To analyze the responses, you can use the various tools provided by Google Sheets. You can create charts and graphs to visualize the data, use filters and sort functions to organize the responses, and apply formulas to calculate statistics and perform further analysis.
Additionally, you can share the spreadsheet with others to collaborate on the analysis, and you can export the data to other formats such as PDF or CSV.
By using Google Forms and Google Sheets together, you have a powerful toolset to collect, analyze, and work with form responses in a seamless and efficient way. These steps can help you gather valuable feedback, conduct online surveys, and gather information from users.
In conclusion, by following these steps, you can easily collect and analyze form responses in a spreadsheet using Google Forms and Google Sheets. It’s a best practice that saves time and streamlines the process of gathering information from respondents. If you’re looking for a tool to create, edit, and analyze surveys, Google Forms and Sheets is the way to go!
Final Thoughts
Creating a Google Form is a simple and effective way to collect information, customize questions, and gather feedback. With features like multiple question types and templates, you can easily tailor your form to meet your specific needs.
When making a form, it’s important to keep in mind the steps of the process. First, you need to create the form and configure the settings. Then, you can add questions based on the information you are looking to collect. Google Forms offers a variety of options to choose from, such as multiple choice, checkboxes, and text response.
After you have finished creating your form, you can preview and customize the theme to make it look more appealing. You can edit the header image, configure the color options, and even enable a progress bar. Once your form is ready, you can share it with others through a direct link, email, or by embedding it on a website.
When respondents fill out the form, the responses will be collected and stored in a Google Sheets spreadsheet. This makes it easy to analyze the results and further process the data. You can even collaborate with others on the sheet to work on the analysis together.
Google Forms also provides helpful features to help you gather more responses. For example, you can enable response validation, set a limit on the number of responses, or create a registration form that requires users to sign in with their Google accounts. You can also make use of social media sharing options to reach a wider audience.
In conclusion, Google Forms is one of the best online survey tools available. With its user-friendly interface, customizable features, and seamless integration with Google Drive and Google Sheets, it’s a great choice for anyone looking to create a survey or collect feedback. So, why wait? Start using Google Forms today!
Sources
When creating a Google Form, there are various sources and options you can use to customize and enhance the form. Here are some sources and tools that can help you during the process:
- Google Forms: This is the main tool you’ll be using to create and customize your form. You can access it by going to your Google Drive and clicking on “New” → “More” → “Google Forms”.
- Google Forms Help Center: If you need further guidance or have questions about using Google Forms, the Help Center can be a valuable resource. It provides step-by-step guides on various topics related to creating and using forms.
- Google Drive: Google Forms is integrated with Google Drive, so you can access and manage your forms directly from your Drive. You can also enable the option to automatically save form responses to a Google Sheets spreadsheet.
- Google Sheets: If you want to analyze and work with the form responses in a spreadsheet format, you can link your form to a Google Sheets spreadsheet. This way, all the responses will be automatically recorded on the spreadsheet for further analysis.
- Google Templates: If you’re looking for pre-made templates for your form, Google Forms provides a variety of template options. You can browse through and choose the best template that suits your needs.
- Google Docs: If you want to add more information or a guide to your form, you can create a Google Docs document and embed it in your form. This can be useful if you have a long form with detailed instructions or if you want to provide additional resources to the respondents.
- Social Media: If you want to share your form with a wider audience, you can use social media platforms such as Facebook, Twitter, or LinkedIn to spread the word. Simply share the form link in your posts and encourage people to participate.
- Email: Another way to share your form is through email. You can send the form link directly to individuals or use email marketing tools to reach a larger audience.
These sources and options can help you customize and make the most out of your Google Form. Consider using them based on your specific needs and the goals of your form.


