

If you want to put your signature on electronic files without the need for paper, Preview on your Mac can help you do just that. With Preview, you can create and manage electronic signatures for various documents, saving you time and ensuring a more efficient workflow. Whether you need to sign a PDF, a mail, or any other file, Preview has you covered.
Here’s how to add your signature using Preview:
- First, open the document or image you want to sign in Preview.
- Next, click on the “Sign” button located in the toolbar. You can find this button in the top-right corner of the Preview window.
- A pop-up menu will appear, and you can select the option to create a new signature or use a previously created one. If you choose to create a new signature, you can use your trackpad or a connected camera to capture your signature.
- Once you have captured your signature, click “Done” to save it.
- You can then drag and drop your signature onto the document or image where you want it to appear.
- Finally, use the handles to resize and position your signature, and click “Accept” to add it.
The advantages of using Preview to add signatures:
- No need for paper – You can sign documents electronically, eliminating the need for printing and scanning.
- Time-saving – With Preview, you can add signatures with just a few clicks, saving you time compared to traditional signing methods.
- Efficient management – Preview allows you to save and manage your signatures, making it easy to add them to new documents whenever needed.
- Trackpad or camera support – You can create signatures using your trackpad, or capture them with a connected camera for a more personalized touch.
- Date stamping – Preview can also add a date stamp to your signature, providing additional verification and accountability.
So, the next time you need to sign a document, whether it’s a PDF, a mail, or any other file, take advantage of Preview’s convenient signature feature. You can create, manage, and add your signatures directly and electronically without the hassle of paper.
- How to Sign a PDF in Preview Mac
- Advantages of Electronic PDF Signature
- Steps to Electronically Sign a PDF Using Trackpad
- How-to Use Preview to put signatures on PDF’s, Pages Documents, and Mail messages
- Using Preview to Sign PDF’s
- Using Preview to Sign Pages Documents
- Using Preview to Sign Mail Messages
- How To Create A Signature And Sign And Date PDF Documents Using Preview On Your Mac
- Create a Signature
- Sign and Date PDF Documents
- Sources
- Videos:
- How to Add Signature in iPhone Notes
How to Sign a PDF in Preview Mac
If you’re using a Mac, you can easily add your electronic signature to PDF documents in Preview. This eliminates the need for printing, signing, and scanning paper documents. Here are the steps to sign a PDF in Preview on your Mac:
| Step 1: | Open the PDF document you want to sign in Preview. |
| Step 2: | Click on the “Show Markup Toolbar” button in the top-right corner of the Preview window. It looks like a pen tip. |
| Step 3: | Click on the “Signature” icon in the Markup Toolbar. It looks like a signature in front of a camera. |
| Step 4: | A pop-up menu will appear. Here, you can choose to create a signature using your Mac’s trackpad, using the built-in camera, or using an image of your signature. Select the option that suits you best. |
| Step 5: | If you choose to create a signature using the trackpad, you can sign by dragging your finger on the trackpad or clicking the “Clear” button to start over. |
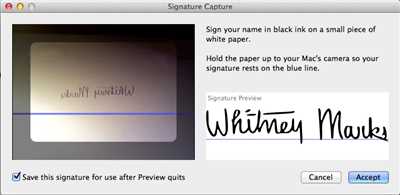
| Step 6: | If you choose to create a signature using the camera, a window will open, and you can put a piece of paper with your signature in front of the camera. Click the “Accept” button when the signature is captured. |
| Step 7: | If you choose to create a signature using an image, click the “Create Signature from FaceTime HD Camera” button and select an image file of your signature. |
| Step 8: | Your signature will now appear in Preview. You can drag the signature to the desired location on the PDF, resize it if needed, and even rotate it by clicking and dragging the green dot above the signature. |
| Step 9: | Once your signature is positioned correctly, you can save the PDF by clicking on “File” in the menu bar, then selecting “Save.” |
| Step 10: | You can now use the signed PDF as needed. You can send it electronically via email or other messages, or you can print it if necessary. |
Preview on a Mac makes it easy to sign PDFs without the need for paper. This feature is especially useful for various documents like contracts, agreements, forms, and more. So, now that you know how to sign a PDF in Preview, go ahead and give it a try!
Advantages of Electronic PDF Signature
Electronic PDF signatures offer several advantages compared to traditional paper signatures. Here are some of the key benefits:
- Time-saving: With electronic signatures, you can quickly sign documents without the need for printing, scanning, or mailing them. This can save you a significant amount of time, especially when dealing with multiple pages or documents.
- Convenience: Using an electronic signature, you can sign PDFs directly on your computer or mobile device. You don’t need to have a physical pen or paper on hand.
- Security: Electronic signatures provide a secure way to sign documents. They offer validation features, such as date and time stamps, that help verify the authenticity of signatures.
- Flexibility: Electronic signatures can be created using various methods, including typing your name, selecting a pre-made signature image, or using a trackpad or camera to capture your signature.
- Efficiency: By using electronic signatures, you can easily manage and organize your signed PDF documents. You can search, sort, and categorize them for easy retrieval.
- Cost-saving: With electronic signatures, you can avoid printing, postage, and other costs associated with paper-based signatures. This can lead to significant savings in the long run.
To sign a PDF electronically in Preview, follow these steps:
- Open the PDF file in Preview.
- Click on the “Markup” icon in the toolbar, then select the “Sign” option.
- A pop-up will appear with options to create a signature. You can type your name, draw your signature using a trackpad, or use a pre-made image.
- Select the desired method and follow the on-screen instructions to create your signature.
- Once your signature is created, you can drag and position it on the document by clicking and dragging.
- Click “Done” to accept the signature and save the changes.
By following these steps, you can easily add an electronic signature to your PDF documents in Preview.
Steps to Electronically Sign a PDF Using Trackpad
If you need to sign a PDF document without printing it out and signing it with a pen, Preview on Mac allows you to do so using your trackpad. Here are the steps you can follow:
- Open the PDF in Preview by double-clicking on the file.
- In Preview, click on the “Markup Toolbar” icon, which looks like a toolbox.
- From the toolbar, click on the “Signature” icon, which looks like a handwritten signature.
- A pop-up menu will appear with various options. Select “Trackpad” from the list.
- Next, the signature creation window will appear. Use your trackpad to create your signature by clicking and dragging on the trackpad.
- Once you are satisfied with your signature, click on the “Done” button.
- Your signature is now saved and ready to use. To sign a document, simply click on the “Signature” icon again, select your signature from the pop-up menu, and click on the area of the PDF where you want to place your signature.
- You can also resize and reposition your signature by clicking and dragging on it.
- After signing, you can check the date and time of the signature by double-clicking on it.
- This method allows you to sign every page of a PDF document by repeating the previous steps for each page.
- Once you’re done signing, make sure to save your PDF with the signatures. You can do this by clicking on “File” in the menu bar, then selecting “Save” or “Save As”.
- You can now send your signed PDF via email or manage your files as needed.
Using the trackpad to electronically sign a PDF in Preview has several advantages. It eliminates the need for paper and physical signatures, making the process more efficient and environmentally friendly. It also allows you to create and manage multiple signatures, which can be useful if you need to sign documents on behalf of different entities. Additionally, Preview automatically saves your signed PDFs, so you don’t have to worry about losing them.
How-to Use Preview to put signatures on PDF’s, Pages Documents, and Mail messages
If you need to sign an electronic document or paper without the hassle of printing it out, signing it by hand, and scanning it back into your computer, you’re in luck. Mac’s Preview allows you to easily create and add your electronic signature to PDF’s, Pages documents, and even Mail messages.
Here’s how you can do it:
Using Preview to Sign PDF’s
- Open the PDF document you want to sign in Preview.
- Click on the “Markup Toolbar” button located on the top toolbar.
- Select the “Signature” option from the pop-up menu.
- If you have previously created a signature, you can select it from the list. Otherwise, click on the “Create Signature” button.
- If you have a trackpad, you can sign your name directly on it using your finger. If not, you can use the “Camera” option to capture your signature using the built-in camera.
- Once you have created or captured your signature, you can resize it and drag it to the desired location on the document.
- Click “Done” when you’re happy with the placement of your signature.
- You can now save the signed PDF or send it directly via email.
Using Preview to Sign Pages Documents
- Open the Pages document you want to sign in Preview.
- Follow steps 2 to 8 mentioned in the previous section for signing PDF’s.
- Save the signed Pages document.
Using Preview to Sign Mail Messages
- Compose a new Mail message as you normally would.
- In the body of the email, click on the “Markup” button.
- Select the “Signature” option from the pop-up menu.
- Follow steps 4 to 8 mentioned in the first section for signing PDF’s.
- Once you’re done, the signed document will appear directly in the Mail message body.
By using Preview, you can easily accept and manage electronic signatures in various files without the need for paper and ink. This not only saves you time but also keeps track of all your signed documents in one place.
So, next time you need to sign a document electronically or add your signature to an email message, give Preview a try and enjoy the advantages it offers!
How To Create A Signature And Sign And Date PDF Documents Using Preview On Your Mac
If you often find yourself needing to sign PDF documents, you’ll be glad to know that you can easily create a digital signature and sign and date PDFs directly on your Mac using the Preview app. This eliminates the need to print out the documents, sign them with a pen, and then scan them back in. In this how-to guide, we’ll show you the steps to create and use electronic signatures in Preview.
Before we get started, it’s important to note that the electronic signatures created and used in Preview are legally accepted in many countries around the world. However, it’s always a good idea to check the specific legal requirements in your jurisdiction.
Create a Signature
To create a signature in Preview, follow these steps:
- Open Preview on your Mac and open any PDF document.
- Click on the “Markup Toolbar” button, which looks like a small toolbox.
- In the toolbar that appears, click on the “Signature” icon, which looks like a handwritten “S”.
- A pop-up menu will appear with a few options. If you have a built-in camera on your Mac, you can choose to “Create Signature” using the camera. Alternatively, you can choose to “Create Signature” without the camera, which allows you to use an image file of your signature that you’ve previously saved.
- If you choose to create a signature using the camera, position your signature paper on a flat surface in front of the Mac’s camera, and click on the “Click Here to Begin” button. Sign your name as neatly as possible, then click on the “Done” button.
- If you choose to create a signature using an image file, click on the “Choose” button and navigate to the location where your signature image is saved. Select the image file and click on the “Open” button.
- Your signature will now appear in the pop-up menu. If you want to use multiple signatures, you can create and save them in the same way.
- Click on your signature in the pop-up menu to select it.
- Your signature will now appear in the Preview window. You can resize and reposition it as needed by dragging on the signature.
Sign and Date PDF Documents
Once you have created a signature in Preview, you can easily sign and date PDF documents. Here’s how:
- Open the PDF document you want to sign in Preview.
- Click on the “Markup Toolbar” button.
- In the toolbar that appears, click on the “Signature” icon.
- A pop-up menu will appear with your saved signatures. Click on the signature you want to use.
- Your selected signature will now appear in the Preview window. Position it where you want it to appear in the document.
- If you want to add a date to your signature, you can do so by clicking on the “Text” icon in the Markup Toolbar, then clicking on the document where you want the date to appear. Type the date using the keyboard.
- Save the signed PDF document by clicking on “File” in the menu bar, then selecting “Save”.
That’s it! You have successfully created a signature and signed and dated a PDF document using Preview on your Mac. Now you can enjoy the advantages of electronically signing your PDFs without the need for paper or a physical signature.
Sources
If you’re wondering how to add a signature to your documents, there are various sources you can use. Here are some of the options:
| 1. Mac Preview: If you’re using a Mac, you can directly use Preview to create and manage signatures. Preview allows you to use your trackpad or camera to capture your signature on a piece of paper, then put it on PDFs and other documents. This way, you can sign them electronically without the need for printing and scanning. |
| 2. Mail: If you use the Mail app on your Mac, you can create a signature in Mail’s preferences. When you compose a new email, you can click on the Signature drop-down menu in the composing window to select the signature you want to use. |
| 3. Preview on iOS: If you’re using an iOS device, you can also use the Preview app to sign PDFs and other documents. The steps are similar to those on the Mac. You can use your finger or an Apple Pencil to sign your name directly on the screen. |
| 4. Third-party apps: There are also third-party apps available that specialize in electronic signatures. These apps often have more advanced features, such as the ability to track when a document has been signed or to accept signatures from multiple people. |
By using these sources, you can easily add signatures to your documents without the need for paper and ink. Take advantage of the electronic signature options available to save time and make the signing process more efficient!


