

Launching a website might seem like a daunting concept, especially if you’re not familiar with installing and setting up a WordPress site. But with the right tools and a little guidance, you can have your blog or online business up and running in no time. In this post, we’ll give you step-by-step tips on how to launch your WordPress site, from choosing a hosting provider to publishing your first post.
Step 1: Find a Reliable Hosting Provider
The first part of launching your WordPress site is to choose a reliable hosting provider. A hosting provider is like a home for your website, giving it a place to live and be accessible to the internet. Make sure to do your research and find a hosting provider that offers a good balance between price, performance, and reliability.
Step 2: Install WordPress
Once you have chosen a hosting provider, it’s time to install WordPress. Many hosting providers offer an autoinstaller, which can help you with the installation process. If your hosting provider doesn’t have an autoinstaller, don’t worry – WordPress installation is relatively easy and there are plenty of tutorials available online to guide you through the process.
Step 3: Configure Your Site
After installing WordPress, you’ll need to configure your website. This includes choosing a theme, adding your logo and other branding elements, and setting up your site’s structure. WordPress provides an easy-to-use admin panel where you can customize these settings and make your website look and feel just the way you want it.
Step 4: Publish Your First Post
Now that your site is set up and ready to go, it’s time to publish your first post. Write a compelling and informative article that will engage your potential audience. Remember to keep your content SEO-friendly and make use of relevant media such as images and videos to enhance your posts.
Step 5: Keep Learning and Growing
Launching your WordPress site is just the beginning. To run a successful website, you’ll need to continuously learn and improve. Take advantage of the vast resources available on WordPress.org and other tech blogs, as well as helpful tutorials and tips from experienced users. With each new step you take, you’ll develop a better understanding of WordPress and be able to take your site to new heights.
By following these steps, you’ll be well on your way to launching a great self-hosted WordPress site. Remember, the ultimate goal is to develop a website that reflects your brand and engages your audience. So take your time, make sure to choose the right hosting provider, and above all, have fun!
How to launch a WordPress Website in 10 steps
If you’re new to WordPress or want to start a blog or website, then this step-by-step guide is for you. In just a few simple steps, you can have your own WordPress site up and running without any technical knowledge or coding skills. So, let’s get started!
- Create an account with a web hosting provider: The first step is to choose a hosting provider to host your WordPress site. We recommend selecting a hosting provider that offers easy WordPress installation, such as Bluehost or SiteGround.
- Register a domain name: Next, you’ll need to choose and register a domain name for your website. This is your site’s web address (e.g., www.yourwebsite.com). Choose a domain name that is easy to remember and reflects your site’s topic or purpose.
- Install WordPress: Once you have your hosting account and domain name, you need to install WordPress. Most hosting providers offer a one-click WordPress installation method, making it quick and easy.
- Log into your WordPress admin dashboard: After installing WordPress, you can log into your WordPress admin dashboard. This is where you’ll manage your site, add content, and customize the appearance.
- Choose a WordPress theme: Now it’s time to choose a theme for your website. A theme determines how your site looks and functions. WordPress offers a wide range of free and premium themes to choose from. Select a theme that aligns with your site’s goals and target audience.
- Add content to your site: With your theme installed, you can start adding content to your site. This includes creating pages, writing blog posts, and adding media such as images and videos.
- Customize your site: WordPress allows you to customize your site’s appearance and functionality. You can add widgets, change colors, fonts, and more. Take the time to personalize your site and make it unique.
- Add essential plugins: Plugins are like apps for your WordPress site. They add extra features and functionality. Some essential plugins include security plugins, SEO plugins, and caching plugins. Install and configure the plugins that you need.
- Optimize your site for search engines: To ensure your site ranks well in search engine results, optimize it for SEO. Use relevant keywords, write meta descriptions, and optimize your images. This will help drive more organic traffic to your site.
With these 10 steps, you can launch your own WordPress website and start sharing your ideas, knowledge, or business online. Remember to keep learning and exploring the various features and functionalities that WordPress has to offer. Good luck!
Step 1 Develop Your Site’s Concept
Before you launch your WordPress site, it’s important to develop a clear concept for your website. This is the ultimate goal that you want to achieve with your site and will help guide you in deciding on the themes, plugins, and content you’ll need.
First, think about what your website will be about. Will it be a personal blog, an online store, a news site, or something else entirely? This concept will determine the overall direction of your site and what content you should focus on.
Next, consider who your target audience is and what they might be looking for. This will help you choose a theme and design that appeals to them. For example, if you’re targeting tech-savvy users, you might want to find a theme that has a more modern and technical feel.
Once you have a clear concept in mind, it’s time to start building your site. The first step is to register a domain name and choose a hosting provider. We recommend using a self-hosted WordPress site, as it gives you more control and flexibility.
After you’ve set up your hosting account and domain, you’ll need to install WordPress. Many hosting providers offer a one-click installation method, which is quick and easy. Alternatively, you can manually install WordPress by downloading the files from WordPress.org and following the installation tutorials.
Once WordPress is installed, you can log in to your admin account and start customizing your site. This is where you’ll choose a theme, add plugins, and start adding content. It’s a good idea to keep the default WordPress theme while you’re still developing your concept, as it’s relatively clean and simple.
As you develop your concept further and start adding content, make sure to give your site a unique and personal touch. Adding high-quality media, such as images and videos, can also help make your site more engaging and appealing to users.
Lastly, don’t forget to make your site search engine-friendly. This means optimizing your site’s structure, adding meta tags, and using SEO-friendly URLs. There are many helpful plugins and tutorials available that can guide you in this process.
In summary, developing your site’s concept is the first step in launching a successful WordPress site. Take the time to think about your site’s purpose, target audience, and overall idea. This will guide you in choosing the right theme, plugins, and content for your site. With a well-developed concept, you’ll be on your way to creating a great website that will attract and engage users.
What’s Next
Now that you have successfully installed WordPress on your self-hosted website, what’s next?
The ultimate goal is to launch your site and make it available online for users to see. You may have already created a basic site during the installation process, but there is still much more you can do to develop and customize your website.
First, you’ll want to choose a theme for your site. WordPress offers a great selection of free and premium themes that can give your site the look and feel you desire. There are even tutorials available to help you choose the best theme for your site’s goals.
Next, you might want to start adding content to your site. Whether it’s blog posts, media, or other pages, this is the time to publish your content and give your site some life.
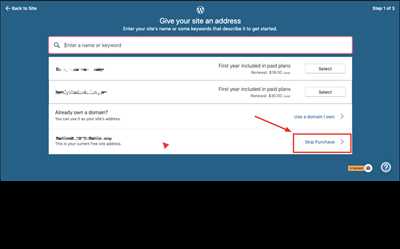
Once you’ve added content, it’s important to keep in mind that your site’s domain may still be the default one that WordPress auto-installer gave you. To change this, you’ll need to manually add your own domain. This can be done through your hosting account or by using a domain registrar.
Another helpful step is to set up a user-friendly login for your site. By default, WordPress creates an admin account for you, but it’s recommended to create a username and password that are unique to you. This will help prevent potential security issues.
Now that your site is up and running, it’s time to explore what else WordPress has to offer. There are countless plugins available that can enhance your site’s functionality and make it even more user-friendly.
Remember, developing a website takes time, so don’t rush the process. Take advantage of the resources available to you, such as WordPress.org’s tutorials and support forums. These can help you troubleshoot any snags you might run into along the way.
Once you feel confident with your site, give it a final review before officially launching it. Click through the pages, test the functionality, and make sure everything is working as you intended.
So, what’s next? Well, that’s up to you and your website’s goals. Whether you want to start a blog, showcase your portfolio, or even develop an online store, WordPress is a versatile platform that can help you achieve your vision.
So don’t wait, start exploring all the possibilities and launch your WordPress site today!
Method 3: How to install WordPress manually
If you don’t want to rely on a hosting provider or want more control over the installation process, you can install WordPress manually. This method requires a bit more technical knowledge, but it allows you to customize your site to the fullest potential.
Here are the steps to manually install WordPress:
- First, make sure you have a domain name and hosting account. If you don’t have one, you can find a great hosting provider and register a domain name from websites like WordPress.org.
- Next, download the latest version of WordPress from the official WordPress website. You can find the download link on the homepage of WordPress.org.
- After downloading WordPress, unzip the files and copy them to the desired location on your web hosting server. This location will typically be the “public_html” or “www” folder, depending on your hosting provider.
- Now, create a MySQL database for your WordPress site. Most hosting providers have a control panel where you can easily create a new database. Make sure to note down the database name, username, and password as you will need them in the next step.
- Next, open a web browser and navigate to the domain name where you uploaded the WordPress files. You should see the WordPress installation page.
- Choose your preferred language and click on the “Continue” button.
- On the next screen, you will see a message asking you to create a “wp-config.php” file. Click on the “Let’s go!” button.
- In the next step, you will be asked to enter your database details. Enter the database name, username, password, and the database host (which is usually “localhost”).
- Click on the “Submit” button, and WordPress will run a quick installation process.
- Once the installation is complete, you will see a success message. Click on the “Run the installation” button to proceed to the next step.
- Now, you need to enter your site’s title, choose a username and password for your admin account, and add your email address. Be sure to choose a strong password to secure your site.
- Click on the “Install WordPress” button, and you’re done! You can now log in to your WordPress admin dashboard using the username and password you just created.
Congratulations! You have now manually installed WordPress on your self-hosted site. This method allows you to have full control over your WordPress installation and customize your site’s design and functionality to your liking.
Keep in mind that this method requires some technical knowledge and may take a bit more time compared to other methods. However, it is a great way to learn how WordPress works and gives you more flexibility in the long run.
If you run into any issues during the installation process, there are many helpful tutorials and guides available online to assist you. Additionally, the WordPress community is always there to help, so don’t hesitate to reach out if you need any assistance.
Installing Your Self-hosted WordPress Blog
If you’ve decided to create a self-hosted WordPress blog, the first step is to install WordPress on your domain. This guide will walk you through the process and make it as easy as possible for you to get your blog up and running.
First, make sure you have a domain name and hosting account. If you don’t already have one, there are many hosting providers available that offer WordPress installation services. Once you have a domain and hosting account, you’re ready to begin.
There are two main methods for installing WordPress: manually or using an autoinstaller. For simplicity and convenience, we recommend using an autoinstaller, especially if you’re new to WordPress or don’t have much technical knowledge.
If your hosting provider offers an autoinstaller like Softaculous or Fantastico, you can install WordPress with just a few clicks. Simply log in to your hosting account and find the autoinstaller in the control panel. Look for the WordPress icon, click on it, and follow the prompts to install WordPress.
If your hosting provider doesn’t offer an autoinstaller, you’ll need to install WordPress manually. This method requires you to download the WordPress installation files from wordpress.org, create a database, and upload the files to your hosting account. It’s a bit more involved, but many tutorials and guides are available online to help you through the process.
Once you have WordPress installed, you can log in to your site’s admin dashboard using the username and password you created during the installation. From here, you’ll see a clean interface with various options, including adding posts, installing themes, and adding media to your site.
The next step is to choose a theme for your blog. WordPress offers a default theme, but there are thousands of themes available that can give your blog a unique and professional look. To find a theme, go to the “Appearance” section in your admin dashboard and click on “Themes”. From here, you can browse through the available themes and install one that you like.
With your theme chosen, you’re now ready to start adding content to your blog. You can create new posts by clicking on “Posts” in the admin dashboard and then “Add New”. Simply enter a title and the content of your post, then click the “Publish” button to make it live on your site.
What’s great about WordPress is that it’s easy to update and modify your blog as you develop your website. If you ever want to change your theme or add new functionality, you can do so with just a few clicks.
The above steps should give you a good starting point for launching your self-hosted WordPress blog. Of course, there might be some snags along the way, but with the help of online tutorials and the WordPress community, you’ll be able to overcome any challenges that come your way. Good luck!
| – | ||
| 3 | Ultimate | Guide |
If You Run Into A Snag
-
Double-check your hosting provider.
-
Ensure you have entered the correct information.
-
Troubleshoot the theme.
-
Consider a self-hosted option.
-
Look for tutorials and guides.
-
Reach out to the WordPress community.
Since you are installing WordPress.org, make sure you have chosen a reliable hosting provider. If your site’s speed is slow or if any other issues arise, it might be worth considering switching to a different host.
During the installation process, make sure you enter all the necessary details correctly, such as your site’s title, your username, and your password. A small typo could cause a big problem, so double-check everything.
If you’re having trouble with the theme you’ve chosen, it might be worth trying a different one. WordPress.org offers a large selection of themes, so you’re bound to find one that suits your website’s concept and idea.
If you’re having trouble with your blog and it’s hosted on WordPress.com, you might want to consider switching to a self-hosted option. This will give you more control over your site and allow you to customize it even further.
If you’re still unsure about how to launch your WordPress site, there are plenty of online tutorials and guides available. These will walk you through the steps and help you learn how to customize your site to your liking.
Don’t hesitate to ask for help! The WordPress community is known for being welcoming and supportive. You can post in forums or even reach out to other WordPress users directly for assistance.
Remember, launching a WordPress site doesn’t have to be a technical challenge. With the right guidance and a little patience, you can have your website up and running in no time.


