

When using Outlook to manage your email messages, it is important to have a professional signature that you can easily include in your outgoing emails. The settings in Outlook allow you to create and save signatures that can be automatically added to your messages. However, it is not always clear how to save a signature in Outlook if you are not familiar with the steps.
To save a signature in Outlook, you first need to create the signature that you want to use. This can be done by selecting the “Signatures” option under the “Settings” menu in Outlook. Once you have created your signature, you must copy it to a fixed location so that you can easily return to it when you want to use it.
Outlook provides several options for saving signatures, including saving the signature in the cloud. This allows you to access your signature from any device that has access to the internet. If you choose to save your signature in the cloud, you will need to enter your login information for the cloud service that you are using.
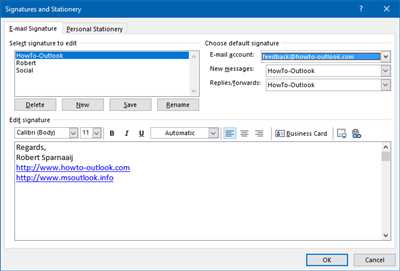
Another option for saving your signature is to save it on your local computer. This can be done by selecting the “File” tab in Outlook and then selecting the “Options” tab. From there, go to the “Mail” section and click on the “Signatures” button. In the Signatures and Stationery window that appears, click on the “New” button to create a new signature and then enter the text for your signature in the text box provided.
Once you have created and saved your signature, you can easily add it to any outgoing email by selecting the “Insert” tab in Outlook and then clicking on the “Signature” button. From there, select the signature that you want to use from the list of available signatures. Your signature will then be automatically added to the bottom of your email.
Fixed Email Signature Not Saving in Outlook 365
If you’re experiencing issues with creating or saving your email signature in Outlook 365, you’re not alone. Many users have encountered the problem where their signature doesn’t save despite following the correct steps. Luckily, there are some solutions that might help you resolve this issue.
First, make sure that you’re not using the online version of Outlook, as signatures created in the cloud are not available for use in the desktop version. To check this, open Outlook and enter your login details. If the interface looks different and you see the word “Online” in the top left corner, you’re using the online version. In this case, you’ll need to switch to the desktop version by installing the application on your computer.
Next, ensure that the signature you’ve created is applied to the correct email account. Sometimes, users mistakenly create a signature for one email account but apply it to another, resulting in the signature not showing up in outgoing messages. To check and fix this, go to the “File” tab in Outlook and select “Options.” Then, navigate to the “Mail” category and click on “Signatures.” Make sure you’ve selected the correct email account under both the “E-mail account” and “New messages” sections.
Another step you can take is to clear the existing signature files. Sometimes, Outlook may encounter conflicts with old signature files, preventing the creation or saving of new signatures. To do this, go to the “Mail” category in Outlook’s options and click on “Signatures.” On the “Signatures and Stationery” page, select the signature that’s causing the issue and click on “Delete.” Once the signature is deleted, try creating and saving a new one to see if it resolves the problem.
If none of the above solutions work, you can try using a different email client or contacting Microsoft support for further assistance. Issues like these can be frustrating, but with some troubleshooting and persistence, you should be able to resolve the problem and have your email signature working smoothly in no time.
How it works
In Outlook 365, you have the option to create and use signatures for your outgoing email messages. These signatures can be saved and used across devices, making it convenient for you to have a consistent email signature. Here’s how it works:
- Open Outlook and go to the Outlook settings page by selecting the gear icon (Settings) in the top right corner of the Outlook window.
- Select View all Outlook settings at the bottom of the settings pane. This will open a new page with all the available Outlook settings.
- Under Mail, select Compose and reply to access the signature settings.
- In the Email signature section, you can create or edit your signature. Use the text editor provided to format your signature with different fonts, colors, and styles. You can also insert images or links if needed.
- Once you’ve created your signature, make sure to save it by clicking the Save button. This will ensure that your signature is available for use in your outgoing email messages.
- When you compose a new email, you can select your signature from the drop-down menu at the top of the email body. This allows you to quickly and easily add your signature to your messages.
- If you’re using Outlook on multiple devices, your signatures will be synced across all devices. This means that any changes you make to your signatures will be reflected on all devices, ensuring consistency.
- Another useful feature is the ability to share signatures with others. In the signature settings, you can enter the email addresses of the people you want to share your signature with. They will receive an email with instructions on how to add your signature to their Outlook.
- In addition, if you have multiple signatures created, you can set a default signature for new messages as well as for replies and forwards.
- If you’re using Outlook on the web or Outlook for Mac, the process of creating and saving signatures is similar to the steps outlined here. The only difference might be the exact location of the settings, but the functionality remains the same.
By saving your signature in Outlook, you can ensure that it’s readily available whenever you need to send emails. Whether you’re using Outlook on a computer or a mobile device, your signature will be there, ready to be added to your emails. It’s a simple and clear process that works seamlessly under the Microsoft 365 cloud.
Sources:
– Microsoft Support: Creating and using email signatures in Outlook on the web
– Microsoft 365: Outlook Help & Learning
Create an Email Signature in Outlook Online

An email signature is a great way to add professionalism to your online messages. In Outlook Online, you have access to a variety of tools and features that allow you to easily create and manage your email signature. However, it’s important to note that the process for creating a signature in Outlook Online is slightly different from Outlook 365 or the desktop version of Outlook.
Here is a step-by-step guide on how to create an email signature in Outlook Online:
- First, sign in to your Outlook Online account.
- Once signed in, click on the gear icon in the top right corner of the page to access the settings menu.
- In the settings menu, select “View all Outlook settings” at the bottom of the list.
- On the left-hand side of the settings page, you will see a list of options. Click on “Compose and reply”.
- Under the “Email signature” section, you can enter and customize your email signature. You can use formatting options such as bold, italics, and underline to make your signature stand out.
- If you have already created an email signature using Outlook 365 or the desktop version of Outlook, you can simply copy and paste it into the text box provided.
- Once you have created or copied your signature, click on the “Save” button at the top of the page to apply your changes.
It’s important to note that any changes made to your email signature in Outlook Online will not be reflected in other sources that you might be using to access your email, such as the Outlook app or other devices. If you want to have the same signature across all platforms, you must manually update each one.
To summarize, creating an email signature in Outlook Online involves accessing the settings, selecting “Compose and reply”, entering or copying your signature, and saving your changes. Remember to return to this page to make any necessary updates or adjustments to your signature.
Using Signature Files in Outlook
When sending outgoing email messages in Outlook, it is important to have a professional and consistent signature. Outlook provides a convenient way to save and use signature files so that you don’t have to manually enter your signature every time you compose a new message.
To save a signature file in Outlook, follow these steps:
- Open Outlook and go to the “File” tab.
- Select “Options” and then click on “Mail.”
- Under the “Compose messages” section, click on “Signatures.”
- In the “Signatures and Stationery” window, select the email account for which you want to create or add a signature.
- Click on “New” to create a new signature or select an existing one from the list.
- Enter your desired signature in the text box.
- If you have an HTML signature file created, you can copy and paste it into the text box. Alternatively, you can use the built-in formatting tools to create your signature.
- Click on “OK” to save your signature.
- Repeat these steps for any additional email accounts you have.
Once you have your signature files saved, you can easily switch between them when composing emails. Just follow these steps:
- When creating a new email message, click on the “Signature” button in the Message tab.
- Select the desired signature from the dropdown list.
- Your selected signature will be automatically inserted into your email.
It is worth noting that if you are using Outlook 365 or Outlook Online, your signature files will be saved in the cloud and will be available across all devices.
In conclusion, using signature files is an essential step in maintaining a professional email signature in Outlook. By following the above steps, you can easily create and save multiple signatures and switch between them when composing messages. This ensures that your outgoing emails have a consistent and professional appearance.
Sources:
– Microsoft Support: Create and add a signature to messages
– Microsoft Support: Change default email signature in Outlook
Sources
When using Outlook 365, there are several sources you can refer to in order to save your signature. Here are the steps to do it:
1. In Outlook, go to the “File” tab.
2. Under “Options”, select “Mail”.
3. In the “Compose messages” section, click on “Signatures”.
4. In the “Signatures and Stationery” window, click on “New” to create a new signature.
5. Enter a name for your signature and click “OK”.
6. In the “Edit signature” section, create your signature using the available tools.
7. Once your signature is created, click “OK”.
8. Now, your signature is available for use in your outgoing emails.
9. To return to the main Outlook page, click “OK”.
10. When using Outlook on the web, the process for saving your signature is slightly different:
11. Go to the settings page in Outlook online.
12. Click on “Mail” in the left pane.
13. Under the “Layout” section, click on “Email signature”.
14. Create a new signature using the available tools.
15. Once your signature is created, click “OK” to save it.
16. When selecting “Edit signature” in the settings page, you can copy the HTML code for your signature.
17. Now, you can use this HTML code to share your signature with others or save it for future use.
By following these steps, you can easily save and share your Outlook signature for use in your emails.


