

Creating a Facebook page for your business is a crucial step in marketing and promoting your brand. With over 2.8 billion monthly active users, Facebook provides a perfect platform to reach out to a large audience. However, it is important to remember that creating a Facebook page is not just about hitting the “Create Page” button. There are a series of steps that you need to take to ensure that your page is complete, professional, and ready to attract and engage your target audience.
- Step 1: Start with the Basics
- Step 2: Choose a Picture
- Step 3: Add More Details
- Step 4: Include Administrators
- Step 5: Learn and Improve
- Conclusion
- How to Create the Perfect Facebook Business Page to Promote Your Small Business 2023 Edition
- Step 1: Create a New Facebook Business Page
- Step 2: Enter Your Business Details
- Step 3: Add a Profile Picture and Cover Photo
- Step 4: Complete Your Page Details
- Step 5: Add Administrators
- Step 6: Improve Your Page with Imagery
- Step 7: Learn and Analyze with Facebook Analytics
- Step 8: Promote Your Page
- Step 9: Take Advantage of Optional Page Sections
- Step 10: Remember to Update and Engage
- Administrators
- How to create the perfect Facebook business Page
- Step 1 Create a new Page from the “Pages” section
- Step 2: Enter your Page name and category
- Step 3: Add your Page bio
- Step 4: Include your business details
- Step 5: Put together your profile imagery
- Conclusion
- Want to Learn More
- Video:
- How to Create a Page on Facebook – Full Guide
Step 1: Start with the Basics
The first step you need to take is to enter the basic details of your business. When you create a new page, Facebook will prompt you to provide certain information, including the name of your business, category, and bio. Make sure to provide accurate and relevant information in these sections, as it will help people understand what your business is all about.
Step 2: Choose a Picture
Next, you need to choose a profile picture and cover photo for your Facebook page. The profile picture is the smaller image that will appear next to your posts and comments. The cover photo is the larger image that will show at the top of your page. Both these images are crucial for creating a visually appealing and professional-looking page. Make sure to choose images that are relevant to your business and represent your brand in the best way possible.
Step 3: Add More Details
Once you’ve done the initial setup, it’s time to add more details to your Facebook page. This includes providing additional information such as your business hours, contact details, and website URL. You can also add a Call-to-Action button to your page, allowing people to take a specific action, such as booking a service or making a purchase, directly from your page.
Step 4: Include Administrators
If you have a small team of people who will be managing your Facebook page, you can include them as administrators. This will allow them to help you manage the page, including responding to messages and comments, posting updates, and analyzing page insights. By working together, you can ensure that your page is always up to date and responsive to your audience’s needs.
Step 5: Learn and Improve
Creating a Facebook page is just the beginning. To make the most of your page, you need to continuously learn and improve your strategies. Facebook provides valuable analytics and insights that can help you understand your audience’s preferences, track the performance of your posts, and identify areas where you can make improvements. By regularly analyzing these analytics, you can refine your content and engagement strategy, ensuring that your page is always delivering the best results for your business.
Conclusion
Creating a Facebook page for your business is a step that cannot be overlooked in today’s digital age. By following the steps outlined above, you can create a professional and engaging Facebook page that will attract and engage your target audience. Remember to regularly update your page with fresh content, respond to messages and comments promptly, and keep an eye on the analytics to ensure that your page is always meeting your business’s marketing needs. With the right strategy and attention to detail, your Facebook page can become a valuable asset for your business’s online presence.
How to Create the Perfect Facebook Business Page to Promote Your Small Business 2023 Edition
Welcome to the 2023 Edition of our guide on creating the perfect Facebook business page to promote your small business. In this step-by-step guide, we’ll show you how to create a page that will help you reach your target audience, improve your online presence, and drive more traffic to your website. Let’s get started!
Step 1: Create a New Facebook Business Page
To create a new Facebook business page, click on the “Pages” button on the left sidebar of your Facebook profile. Next, click on the “Create Page” button.
Step 2: Enter Your Business Details
On the next page, you’ll need to enter details about your business, including the name, category, and bio. Make sure to choose the most appropriate category for your business and provide a compelling bio that will attract potential customers.
Step 3: Add a Profile Picture and Cover Photo
Next, you’ll need to add a profile picture and cover photo to make your business page visually appealing. Choose images that best represent your brand and ensure they meet the recommended pixel size for optimal display.
Step 4: Complete Your Page Details
In this section, you can add more information about your business, including your website URL, contact details, and business hours. Make sure to provide accurate and up-to-date information to help your customers find and connect with you.
Step 5: Add Administrators
If you have other team members who will be managing the page with you, you can add them as administrators. This will allow them to contribute and make updates to your page.
Step 6: Improve Your Page with Imagery
To make your page more visually appealing, consider adding images and videos that showcase your products or services. You can also create custom tabs to highlight specific aspects of your business, such as promotions or testimonials.
Step 7: Learn and Analyze with Facebook Analytics
Once your page is set up, take advantage of Facebook Analytics to gain insights into your audience, their interests, and engagement with your content. This will help you optimize your marketing strategies and reach the right people.
Step 8: Promote Your Page
Now that your page is complete, it’s time to promote it! Use Facebook ads, invite your existing contacts to like your page, and share your page on other social media profiles. The more visibility your page gets, the more potential customers you’ll be able to reach.
Step 9: Take Advantage of Optional Page Sections
Facebook offers additional page sections that you can optionally include to enhance your page’s functionality. Consider adding sections like “Shop” to sell products directly from your page, or “Services” to showcase the services your business offers.
Step 10: Remember to Update and Engage
Creating the perfect Facebook business page is an ongoing process. Remember to regularly update your page with fresh content, engage with your audience by responding to their comments and messages, and stay active to maintain a strong online presence.
By following these steps, you’ve learned how to create the perfect Facebook business page to promote your small business. Now, put them into practice and watch your business thrive on social media!
| 1 | 2 | 3 | 4 | 5 |
| – | Best | Complete | Create | Edition |
| How | Most | Need | Once | Pages |
| Promote | Section | Show | Small | Step |
| Take | To | With | You’ve | 22 |
Administrators
Administrators play a crucial role in managing a Facebook page. As an administrator, you have the power to control and customize various aspects of your page, including the content, settings, and access rights.
One of the most important tasks that administrators should focus on is adding pixels to their pages. Pixels are small snippets of code that help you track and analyze the actions people take on your website. By adding pixels to your page, you’ll be able to gather valuable data and optimize your marketing strategy.
To add administrators to your page, follow these steps:
- Go to your page and click on the “Settings” button.
- Scroll down to the “Page Roles” section.
- Under the “Assign a New Page Role” section, enter the name or email address of the person you want to add as an administrator.
- Select the role that best fits their needs – admin, editor, moderator, advertiser, or analyst.
- Click the “Add” button.
It’s important to remember that only existing administrators can add new administrators to the page. So make sure you have at least one administrator added before attempting to add more.
In addition to managing administrators, you can also use the “Page Roles” section to switch roles or remove administrators from your page. This can be helpful if certain individuals no longer need access or if you want to promote someone to a higher role.
Administrators have the power to take action on behalf of the page, so it’s essential to choose trusted individuals for these roles. They should have a good understanding of your business and marketing strategy.
To provide administrators with the best possible tools for managing the page, Facebook offers various optional features. These include analytics, video tabs, and a call-to-action button. Consider what features would be most beneficial for your page and enable them accordingly.
Another important aspect of page management is the cover picture and profile picture. These visual elements play a significant role in attracting people and conveying important information about your business. Choose high-quality imagery that represents your brand or business effectively.
Finally, once you’ve created your page and added administrators, it’s time to complete all the necessary details. This includes providing your business information, such as the name, address, and contact details. The more information you provide, the easier it will be for people to find and learn about your business.
In conclusion, administrators are a vital part of managing a Facebook page. From adding pixels to managing roles and enabling optional features, administrators have the power to improve your page’s reach and engagement. Take the time to create a perfect team of administrators, and together, you’ll be able to achieve your marketing goals and promote your business successfully on Facebook.
How to create the perfect Facebook business Page
If you have a small business or want to promote your brand, creating a Facebook business Page is the first and most crucial step. With over 2.8 billion monthly active users, Facebook provides an excellent platform to reach and engage with your target audience. Follow these steps to create the perfect Facebook business Page:
| Step 1: Start with the basics |
| – Go to Facebook.com and click on the “Create” button. |
| – Select “Page” from the dropdown menu. |
| – Enter your business name and choose a category that best describes your business. |
| – Click on the “Get Started” button. |
| Step 2: Add important details |
| – Complete the “About” section with a brief description of your business and what you offer. |
| – Include relevant contact information, such as your business address, phone number, and website. |
| – Add a profile picture and cover photo that represent your brand. |
| Step 3: Improve with imagery |
| – Use high-quality visuals and graphics to enhance your Page’s appearance. |
| – Consider adding videos or virtual tours to make your Page more engaging. |
| Step 4: Engage with your audience |
| – Post regularly and provide valuable content to keep your audience interested. |
| – Respond to comments and messages in a timely manner. |
| – Use Facebook analytics to learn more about your audience and tailor your content accordingly. |
| Step 5: Promote your Page |
| – Use Facebook advertising to reach a wider audience and drive traffic to your Page. |
| – Utilize Facebook pixels to track conversions and optimize your ad campaigns. |
Once you’ve done these steps, your Facebook business Page will be ready to impress and attract more people to your brand. Remember to switch to the “Business Manager” edition if you have multiple administrators managing the Page. Now you know how to create a perfect Facebook business Page and can start using it to grow your business!
Learn more about Facebook pages and get some suggestions on how to make them even better in the Facebook Page Guide for 2023!
In conclusion, creating a Facebook business Page is an essential step in your marketing strategy. Follow the steps above and take advantage of the features and tools Facebook provides to improve your Page and engage with your target audience. By providing the necessary details, enhancing your Page with imagery, and using analytics to learn more about your audience, you can create the perfect Facebook business Page for your small business or brand.
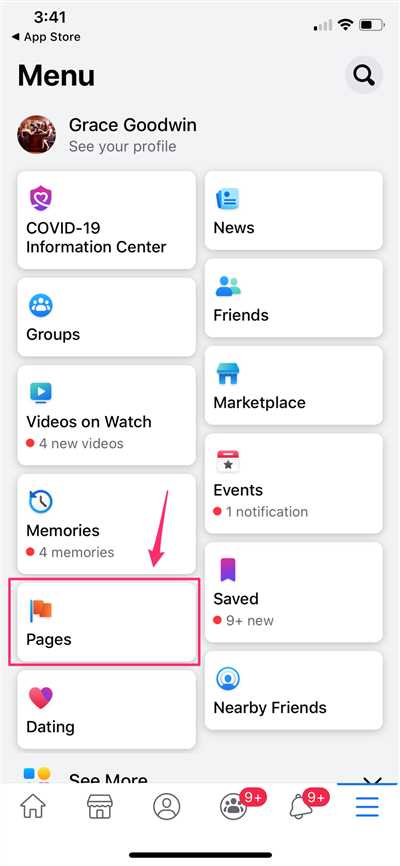
Step 1 Create a new Page from the “Pages” section
To start using Facebook for your business, the first step is to create a new Page. This is where you will showcase your business, provide important information, and engage with your audience. Here’s a step-by-step guide on how to create a new Page:
- Click on the “Pages” section: Start by clicking on the “Pages” button on the left-hand side of your Facebook homepage.
- Click on “Create New Page”: Once you’re on the “Pages” section, you’ll see a blue “Create New Page” button. Click on it to proceed.
- Choose a Page category: Facebook will provide you with a list of different categories to choose from. Select the category that best fits your business needs. If you’re not sure which category to choose, you can always switch it later.
- Enter your Page name: Next, enter the name of your Page. Make sure to choose a name that clearly represents your business or brand.
- Add a profile picture and cover photo: Images are crucial for your Page’s visual imagery. Add a profile picture that will show up next to your Page’s name in search results, and a cover photo that will appear at the top of your Page. These visual elements will help attract people’s attention and make your Page more appealing.
- Complete your Page details: Provide information about your business in the bio section. This is where you can add a brief description of your business, including what you do, the products or services you offer, and any other relevant details. You can also include a link to your website.
- Add additional details: Facebook will then provide you with some optional details to add, such as your business’s address, phone number, and website. It’s recommended to add these details to make it easier for people to find and contact your business.
- Choose Page administrators: Decide who will be managing your Page. You can add multiple administrators if needed. Each administrator can have different roles and permissions to help you manage your Page effectively.
- Learn about Page settings: Take some time to familiarize yourself with the different settings available for your Page. This includes settings related to privacy, notifications, and more. Understanding these settings will help you customize your Page according to your needs and preferences.
- Click “Done” to create your Page: Once you’ve completed all the steps above, click on the “Done” button. Congratulations! Your new Facebook Page is now ready.
Creating a new Facebook Page is just the first step in your social media marketing strategy. In the next steps, you’ll need to consider adding more details, improving your page’s aesthetics, and developing a content strategy to promote your business, engage with your audience, and gather valuable insights through Facebook analytics and pixels. Stay tuned for the next parts of this guide to learn more!
Step 2: Enter your Page name and category
Once you’ve decided to create a Facebook Page for your business or organization, the first thing you need to do is enter your Page name and category. This information is crucial as it will help people find and identify your page among the thousands of other pages on Facebook.
To enter your Page name and category, follow these steps:
1. Start by clicking on the “Create” button and then select “Page” from the dropdown menu.
2. In the new window that appears, you’ll see a form where you can enter your Page name and category. Take your time to choose a name that represents your business and is easy to remember.
3. When it comes to choosing the category for your page, consider what best describes your business. Facebook provides a wide range of categories to choose from, including options for businesses, organizations, and even public figures.
4. It’s important to note that once you’ve entered your Page name and category, you won’t be able to change it later. So make sure you double-check the information before clicking the “Next” button.
5. In addition to your Page name and category, you can also add a profile picture and cover photo to your page. These images are important as they will be the first thing people see when they visit your page. Remember to choose images that are professional and visually appealing.
By completing these steps, you’ll have successfully entered your Page name and category. However, there is still more to do to make your Facebook Page perfect.
In the next step, we’ll learn how to improve your Facebook Page by adding more information, including a bio, contact details, and other crucial details.
Step 3: Add your Page bio
Once you’ve completed the previous steps, it’s time to add a bio to your Facebook Page. This section is crucial as it provides important information about your business or brand to visitors. Here’s how you can do it:
- Click the “Edit Page Info” button which you can find right under your cover picture.
- Switch to the “About” tab.
- In the “Bio” section, click on the “Add Bio” button.
- A text box will appear where you can write your Page bio.
- Consider adding your business name, what you do, and the category your business falls under. You can also include any special promotions or offers you have.
- Remember that the bio is limited to 255 characters, so make sure to provide a concise yet compelling description of your business.
- Once you’re done, click the “Save Changes” button.
Adding a bio to your Facebook Page will not only help improve your Page’s visibility and credibility, but it will also give people a better understanding of what your business is all about. It’s an important step to complete in order to make your Page more appealing to potential customers.
Later on, you can also manage and improve your bio by using Facebook Page analytics. This will give you insights into how people are interacting with your Page and help you fine-tune your strategy.
Next, we’ll move on to step 4, where we’ll guide you on how to add a profile picture to your Facebook Page.
Step 4: Include your business details
Now that you have created your Facebook page, it’s crucial to include your business details to make your page complete. This step will help people find you and learn more about your business.
Here’s how to add your business information:
- Click on the “About” tab located below your cover photo.
- Next, click on the “Page Info” option on the left-hand side menu.
- On the Page Info section, you’ll see different categories. Select the most appropriate category for your business.
- Enter your business name and provide a short bio that will show up on your page.
- Switch to the “Edit” button next to each section to add more details. Consider adding your business email, phone number, website, and location.
- Once you have entered all the necessary information, click on “Save Changes”.
Adding your business details will help people understand what your business is about and how to get in touch with you. It will also provide valuable information for those who are looking to promote or manage their businesses on Facebook.
Remember, the more complete your page is, the more likely people will trust your business and take the desired action. Also, make sure to update your page with new information as needed.
Creating a Facebook page is just the first step. In the next edition of the guide, you’ll learn how to improve your page and switch to the new 2023 Facebook layout.
Step 5: Put together your profile imagery
Your Facebook page’s profile picture and cover photo are crucial components that can help promote your page and make a strong impression on visitors. In this step, you’ll learn how to add the perfect profile and cover imagery to your page.
1. Once you’ve completed the previous steps and have created your page, click on the “pages” tab on the left-hand side of your Facebook home screen. From there, select the page you want to manage.
2. On your page, click on the “Edit Page” button located at the top-right corner. This will allow you to switch to “Edit Profile” mode, where you can make changes to your page’s details.
3. In the “Edit Profile” section, you’ll see a “Profile Picture” and “Cover Photo” section. You can click on either of these sections to add or change your profile picture and cover photo.
4. When choosing a profile picture, consider using a picture that represents your business or brand. It should be clear, high-quality, and easily recognizable even in a small size. The recommended size for profile pictures is 180 x 180 pixels for desktop and 180 x 180 pixels for mobile.
5. For the cover photo, you have more space to work with. You can use this section to showcase your products, services, or team. The recommended size for cover photos is 820 x 312 pixels.
6. Once you’ve chosen the best imagery for your page, click on the “Save Changes” button to apply the changes.
7. In the “Edit Profile” section, you can also add a bio, provide contact information, and select a category for your page. These details will help people learn more about your business and improve your page’s visibility on Facebook.
8. If you want to switch to the new layout, which includes the updated profile and cover photo display, you’ll have the option to do so. Keep in mind that the new layout is not available for all pages yet.
9. In conclusion, your profile imagery is an important aspect of your Facebook page. It’s essential to put together the best pictures that represent your business or brand effectively. By following the steps and suggestions provided above, you’ll be able to create and manage a Facebook page with outstanding profile imagery.
Conclusion
In this guide, we have shown you the steps to create a perfect Facebook page for your business. From choosing the right category and name to adding a profile picture and cover photo, we have covered all the essential details you need to know.
Remember, the size and imagery of your profile picture and cover photo are crucial in creating a visually appealing page. Make sure to consider your business needs and strategy when choosing the best pictures.
Once your page is set up, you can manage it with the help of administrators. You can switch between your personal profile and your page, depending on what action you want to take. You can also use the “pages” section to create more pages or manage existing ones.
To improve your page’s reach and engagement, consider promoting it with Facebook ads, using pixels to track analytics, and providing valuable content that aligns with the interests of your target audience.
In addition, we suggest you complete your page’s details and include any optional information that may help people learn more about your business.
With the right marketing strategy and a well-managed Facebook page, small businesses can significantly improve their online presence and reach more potential customers.
So, what are you waiting for? Follow the steps outlined above to create your own Facebook page and start promoting your business effectively. Take advantage of the features and tools Facebook has to offer, and together, we can make 2023 a successful year for your business.
Want to Learn More
If you want to learn more about how to prepare your Facebook page, here are some crucial steps that will help you create and manage a successful page for your small business.
Step 1: Set Up Your Page
Start by clicking on the drop-down arrow on the top right of your Facebook profile and select “Create Page”. Enter the name of your business and choose a category that best describes it. Add a profile picture and a cover photo. Remember, the profile picture should be 170×170 pixels and the cover photo should be 820×312 pixels in size.
Step 2: Complete Your Page Details
Next, click on the “About” section and enter all the necessary information about your business, including your address, phone number, website, and any other optional details you want to include. This will make it easier for people to find and contact you. You can also add administrators to help you manage your page.
Step 3: Switch to “Pages”
Once you’ve completed the previous steps, switch from your personal profile to your new page by clicking on the drop-down arrow, selecting your page name, and clicking “Switch to [Page Name]”.
Step 4: Learn from Facebook Analytics
Facebook provides valuable analytics for your page, including information on who is engaging with your content and how your posts are performing. Take advantage of this data to improve your marketing strategy.
Step 5: Promote Your Page
To get more people to like and follow your page, promote it by sharing it with your existing contacts, including them in your email signature, and adding a Facebook Like button to your website. You can also run Facebook ads to reach a wider audience.
By following these steps, you’ll have a complete and well-managed Facebook page that will help you promote your business and improve your online presence. Don’t forget to stay updated with the latest features and changes on Facebook, as they can have a significant impact on your page’s performance.
For more information and suggestions, consider reviewing Facebook’s official guide on creating and managing pages. They provide in-depth details on each step, as well as helpful tips and best practices to make your page perfect for your business.
Remember, the most crucial action you can take is to start! Don’t wait until later. Start building your Facebook page today and see the positive impact it can have on your small business.


