Creating a toy can be a fun and educational activity for children of all ages. Whether you are a parent looking for a way to engage your child during their playtime or you are a crafty individual looking for a new project, making your own toy can be an amazing DIY experience. Not only does it give you the chance to exercise your creativity, but it also allows you to customize the toy to suit your child’s preferences and needs.
One of the best things about creating a toy is that it doesn’t have to be expensive or complicated. With a few simple materials and some basic crafting skills, you can easily create a toy that will provide hours of entertainment for your child. Plus, making toys at home gives you the opportunity to teach your child about sustainability and the importance of reusing materials.
To get started, choose a toy that is appropriate for your child’s age and interests. For younger children, simple crafts like paper masks or greeting cards can be a great option. Older children might enjoy more complex projects, such as building a wooden model or creating a stuffed animal. Thomas DeCarlo, a professor of toy design at a prestigious university, suggests that parents should always involve their children in the toy-making process to boost their creativity and drive.
Once you have chosen a toy to create, gather all the necessary materials. This may include items like scissors, glue, cardboard, fabric, and paint. You can either use materials that you already have at home or purchase them from a craft store. If you are looking for a more sustainable option, consider using recycled or upcycled materials for your toy. Not only is this better for the environment, but it also adds a unique touch to your homemade creation.
Now it’s time to start the production process. Follow step-by-step instructions or watch online tutorials to ensure that you are using the correct techniques. Erin Vibha, a DIY enthusiast from Hyderabad, shares valuable tips on creating homemade toys. She suggests involving your child in the cutting, decorating, or painting process. This not only teaches them new skills but also gives them a sense of ownership and pride in their creation.
Finally, once your toy is complete, don’t forget to give it a final touch with some packaging. You can create a simple box or bag to store the toy or add a personalized tag to make it even more special. Packaging plays an important role in the sales of toys, and with the right presentation, your homemade toy will look just as professional as store-bought ones.
In conclusion, creating your own toy can be a rewarding experience for both children and adults. It’s an opportunity to be creative, educate, and play all while having fun. With easy-to-follow steps and tips from experts like Thomas DeCarlo and Erin Vibha, you can embark on the journey of making amazing toys that will bring joy to children everywhere.
15 Amazing And Easy DIY Homemade Toys For Children To Play
Parents are always looking for ways to keep their children engaged and entertained. While there are many products on the market that target children’s play, it’s not always necessary to spend a lot of money. DIY homemade toys can be a fun and educational way to keep children entertained while also boosting their creativity and imagination.
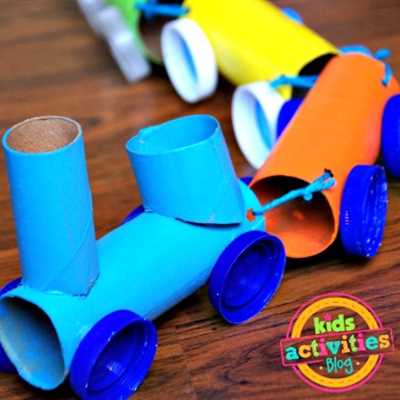
In this article, we will outline 15 amazing and easy DIY homemade toys that you can create for your children to play with. These toys are made from simple materials that you can find at home, such as cardboard, paper, and household items. Not only will making these toys be a fun activity for you and your children, but it will also help save money and reduce waste.
-
Cardboard Mask: Cut out a mask shape from cardboard and let your child decorate it with paints, markers, or other craft supplies. This toy encourages imaginative play and can be used for dressing up or creating characters for storytelling.
-
Paper Airplanes: Fold and decorate paper airplanes using different folding techniques. This toy is not only fun to make, but it also helps children understand basic principles of aerodynamics.
-
DIY Greeting Card Puzzle: Take an old greeting card and cut it into small puzzle pieces. Your child can then put the puzzle back together, improving their problem-solving skills and hand-eye coordination.
-
Homemade Play Dough: Make your own play dough using flour, water, salt, and food coloring. This tactile toy is great for sensory play and can provide hours of entertainment.
-
Paper Bag Puppets: Decorate paper bags with eyes, nose, and mouth cutouts to create puppets. Your child can then use their imagination to bring the puppets to life.
-
Homemade Sensory Bottles: Fill empty plastic bottles with water, glitter, beads, and other small objects. Seal the bottles tightly and let your child explore the different textures and colors.
-
Cardboard Marble Run: Cut out various shapes from cardboard and create a structure for marbles to roll down. This DIY toy encourages problem-solving and spatial reasoning skills.
-
Homemade Bean Bags: Sew small fabric squares together and fill them with dried beans or rice. These bean bags can be used for tossing games or stacking activities.
-
Paper Plate Tambourine: Decorate two paper plates and staple them together with dried beans or beads inside. This homemade musical instrument is a fun way to introduce rhythm and music to children.
-
Cardboard Castle: Cut out a castle shape from cardboard and let your child decorate it with paints or markers. This DIY toy provides an imaginative play space for your child and can be used to act out stories or play with action figures.
These are just a few examples of the amazing and easy DIY homemade toys that you can create for your children to play with. Remember to involve your child in the process and let them add their own creative touch. Making toys at home not only provides entertainment, but also promotes hands-on learning and resourcefulness.
So why not open up your craft supplies and start creating these fun and educational toys with your children today?
4 Tips to Create Toy Packaging That Boosts Sales
When it comes to creating a toy, the packaging can play a crucial role in driving sales and catching the attention of your target audience. While children are the ones who will ultimately play with the toy, it’s important to remember that parents are the ones who make the purchasing decisions. Therefore, creating toy packaging that appeals to both children and their parents is essential for boosting sales. Here are four tips to help you create toy packaging that will have a positive impact on your sales:
1. Make it Educational: Parents are always looking for toys that offer educational value. Consider including information on the packaging that outlines the educational benefits of the toy. This will give parents the reassurance that their children will be learning and developing while having fun.
2. Include DIY Crafts: DIY crafts have become increasingly popular in recent years. Parents appreciate toys that not only provide entertainment but also allow children to engage in creative and hands-on activities. Including a bonus DIY craft or project inside the packaging will make the toy even more appealing to parents.
3. Emphasize Safety: Safety is a top concern for parents when it comes to toys. Make sure to clearly state on the packaging that your toy meets all safety regulations and standards. Include any certifications or testing documentation to give parents peace of mind that the toy is safe for their children to play with.
4. Create an Eye-Catching Design: Finally, the packaging itself should be visually appealing and stand out on store shelves. Use bright and vibrant colors that will attract the attention of children, while still maintaining a professional and trustworthy appearance to appeal to parents. Consider using a clear window on the packaging so parents can see the toy before purchasing.
Overall, by implementing these tips, you can create toy packaging that not only catches the eyes of both children and parents but also showcases the amazing qualities of your toy. Remember, the packaging is the first impression that the consumer will have, so make it count!
Step 3: Cut the Outline
Once you have your cardboard template ready, it’s time to cut out the outline of your toy. This step is crucial as it will define the shape and form of the final product. Here are a few tips to follow while cutting:
- Use a sharp pair of scissors or a craft knife to cut along the outline. Make sure to have adult supervision if children are involved in the process.
- Take your time and make precise cuts. It’s better to go slow and have clean edges rather than rushing and ending up with jagged lines.
- If you have intricate details or curves in your design, you may need to use a smaller pair of scissors or a craft knife with a pointed tip.
- Always cut on a flat surface to ensure stability and accuracy in your cuts.
Remember, safety should always be a priority. Make sure to wear a mask and work in a well-ventilated area, especially if you are cutting through thick materials.
By following these steps, you will be able to create an amazing homemade toy that holds great educational and play value for children. Cutting the outline is an essential part of the production process, and with a little practice, you’ll be able to craft toys that kids will love!
Production
Once you have outlined the steps for creating your homemade toy and gathered all the necessary materials, it is time to move on to the production stage.
1. Crafting the Toy
Get your children involved in the production process. Not only does this boost their creativity and DIY skills, but it also allows them to take pride in the final product. Let them cut, glue, paint, and decorate the toy according to their imagination.
2. Quality Control
While making toys at home can be an amazing experience, it is always important to ensure the safety and quality of the toys. Check for any sharp edges or small parts that could pose a choking hazard. Use child-friendly materials and ensure that the toy is sturdy and durable.
3. Packaging and Sales
When your homemade toy is ready, it’s time to package and present it. Parents and children can work together to design an attractive packaging that showcases the toy. This can include a catchy name, vibrant colors, and a clear description of the toy’s features. You can also create a greeting card or a small note to personalize the packaging.
4. Boosting Education and Sales
In today’s digital age, it is important to target the right audience and market your toy effectively. Utilize social media platforms, online marketplaces, and local craft fairs to reach potential customers. Consider partnering with educational organizations or toy stores that align with your toy’s values and purpose. This can give a significant boost to your toy’s sales and educational impact.
By following these easy tips, you can create homemade toys that not only provide entertainment but also contribute to your children’s growth and education.
Remember, creating toys at home should always be a fun and enjoyable experience, fostering creativity and imagination in your children.