

Adding digital signatures to PDF documents is becoming increasingly popular in the operating world. With the rise of online business transactions, it is crucial to generate and sign important documents electronically. In this article, we will explore how to create and sign PDFs using Laravel, one of the most versatile and widely supported PHP frameworks.
The process of adding digital signatures to PDF documents involves a few key steps. First, you need to locate a reliable tool that supports the creation and signing of PDFs. There are several options available, including Adobe Acrobat, TCPDFClass, and PDFGear. These tools offer various features and benefits, so it’s important to choose the one that best fits your needs.
Once you have chosen a tool, you can start the process of digitally signing your PDFs. This typically involves opening the PDF document that you want to sign, selecting the “Edit” option, and then choosing the “Add Digital Signature” option. You will then be prompted to select the certificate you want to use for the signature. If you don’t have a certificate yet, you can create one by following the instructions provided by the tool.
After selecting the certificate, you will need to resize and position the signature on the PDF document. This step allows you to customize the appearance of the signature and ensure it fits the document properly. Once you are satisfied with the placement and size of the signature, you can click “Close” to finalize the signing process.
Adding digital signatures to your PDF documents offers several benefits. Firstly, it provides an extra layer of security and authenticity to your documents, ensuring that they cannot be tampered with or forged. Secondly, it allows for offline validation of the signatures, meaning that the document can be verified even without an internet connection. Thirdly, digitally signed documents are legally recognized in many jurisdictions, making them valid and enforceable in court.
In conclusion, adding digital signatures to PDFs using Laravel is a crucial step in the modern digital world. With the right tools and knowledge, you can easily create, fill, and sign PDF documents with confidence and security. So, why wait? Start implementing digital signatures into your business workflows today!
- How to Create Digital Signature in Adobe Acrobat
- Digitally Sign a PDF Free with PDFgear
- Step 1: Open a PDF with PDFgear
- Step 2 Locate the “Edit” Tool in PDFgear
- Step 3: Create a Digital Signature on PDFgear
- Step 4 Resize Digital Signature on PDFgear
- How Google Docs’ Versatility Benefits You
- How to Add Digital Signature in PDF using Laravel
- This is a signed PDF
- What kinds of digital signatures are supported by FineReader PDF 15
- Video:
- How to Add Digital Certificate in Acrobat
How to Create Digital Signature in Adobe Acrobat
Adobe Acrobat is a powerful tool that allows you to open and create PDF documents. One of its key features is the ability to add digital signatures to your PDFs. Adding a digital signature to a document provides several benefits, including validation of the document’s authenticity and security against tampering. In this guide, we will go through the steps on how to create a digital signature in Adobe Acrobat.
Step 1: Open a PDF document in Adobe Acrobat that you want to digitally sign.
Step 2: Click on the “Sign” tab located on the right-hand side of the toolbar. If you don’t see the “Sign” tab, go to “Tools” and click on “Preferences”. From there, locate the “Signatures” category and make sure the “Show Signatures” option is checked.
Step 3: Choose the option “I Need to Sign” and click on the “Place Signature” button. If you haven’t created a digital signature before, you will need to do this first. Adobe Acrobat provides several options for creating a digital signature, including using a digital ID from a certificate, using a scanned image of your signature, or using the “Draw” feature to create a signature directly on the screen.
Step 4: After creating your digital signature, you can resize and position it as needed. Once you are satisfied with the placement, click the “Apply” button.
Step 5: If you want to add additional information to your digital signature, such as the reason for signing or contact information, click on the “Add Text” button and enter the desired information.
Step 6: To save the signed document, click on the floppy disk icon in the top toolbar or go to “File” and select “Save”.
That’s it! You have successfully created a digital signature in Adobe Acrobat. Your signature is now embedded in the document and can be validated by others.
It is worth noting that Adobe Acrobat is not the only tool available for creating digital signatures. There are other free and paid options, such as PDFGear, FineReader, and Laravel TCPDFClass, that offer similar features. Additionally, some operating systems and software, such as Windows and Google Docs, also provide built-in support for digitally signing PDFs without the need for Adobe Acrobat.
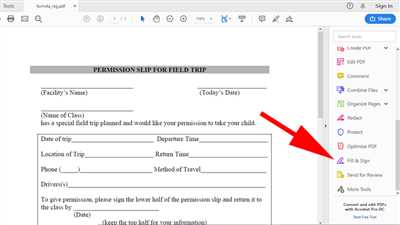
Digitally Sign a PDF Free with PDFgear
PDFgear is a versatile tool that allows you to digitally sign PDFs without the need for Adobe Acrobat or any other offline tools. With PDFgear, you can easily add a digital signature to your PDF documents in just a few simple steps.
Here is how you can digitally sign a PDF using PDFgear:
- Click on the “Open” button to locate and open the PDF file that you want to sign.
- In the PDF viewer, you can fill in any supported fields or signatures that need to be filled in or added.
- Generate the signature by clicking on the “Sign” button. This will create a digital signature for the document.
- Download the signed PDF to your computer for further use or validation.
PDFgear supports three kinds of signatures: digital certificates, signatures without certificates, and signatures using TCPDFClass. This provides you with the flexibility to choose the type of signature that best fits your needs.
By digitally signing PDFs with PDFgear, you can enjoy the benefits of digital signatures, such as proof of authenticity, data integrity, and non-repudiation. Digitally signing your PDFs ensures that the documents cannot be tampered with and provides a valid and legally binding signature.
PDFgear is a free tool that is compatible with Windows operating systems. It is an excellent alternative to Adobe Acrobat and other paid software for digitally signing PDF documents. With PDFgear, you can sign PDFs easily and efficiently, saving you time and money.
So, if you are looking for a reliable and user-friendly tool to digitally sign your PDF documents, try PDFgear. It’s free, easy to use, and provides all the features you need to create and validate digitally signed PDFs.
Step 1: Open a PDF with PDFgear
When it comes to working with PDF documents, PDFgear is a versatile and powerful tool. With PDFgear, you can create, fill, generate, and sign PDFs easily and for free. It supports a wide range of operations, making it an excellent choice for all your PDF needs.
To start using PDFgear, you’ll first need to locate and open the PDF document that you want to work with. Whether it’s a document you’ve created yourself or one you’ve received from someone else, PDFgear can handle it all.
Here are the steps to open a PDF with PDFgear:
- Download and install the PDFgear library, such as tcpdfclass, to your operating system. Make sure you have the required dependencies and that you follow the installation instructions provided.
- Open the PDFgear tool on your computer or launch it from an online platform. If you’re using PDFgear offline, you’ll need to install it on your machine. If it’s an online tool, you can simply access it through your web browser.
- Once the tool is open, click on the “Open” button or a similar option to browse and select the PDF document you want to work with. PDFgear supports all kinds of PDF files, whether they are digitally signed, have certificates, or contain other types of signatures.
- After selecting the PDF file, PDFgear will open it within the tool’s interface. You can now view and edit the document as needed. PDFgear provides a wide range of features, including the ability to add, edit, and resize text, images, and other elements.
- If you need to digitally sign the PDF document, PDFgear offers this functionality as well. You can create a digital signature or import one from a trusted source. PDFgear supports various validation methods and ensures the integrity of the signed document.
- Once you’re done making changes or adding signatures, you can save the modified PDF document. PDFgear allows you to save the document in different formats, including PDF, so you can easily share it with others or store it for future use.
- Close the PDFgear tool or the online platform you were using. Your changes to the PDF document are now saved, and you can continue working with other PDFs or close the tool, depending on your needs.
PDFgear is a reliable and user-friendly tool that simplifies the process of working with PDF documents. Whether you need to create, edit, fill, or sign PDFs, PDFgear offers the functionality you need. By following these simple steps, you can open a PDF document with PDFgear and start leveraging its benefits right away.
Step 2 Locate the “Edit” Tool in PDFgear
To add digital documents, you need a tool that offers versatility and the ability to create, edit, sign, and validate PDFs. PDFgear is a free tool that provides all these features and more.
Here’s how you can locate the “Edit” tool in PDFgear:
- Open PDFgear on your operating system. PDFgear is available for both Windows and Mac.
- Click on the “Edit” option in the main menu. This will open the editing interface.
- On the left-hand side of the interface, you will find a set of tools for editing PDFs. Look for the “Edit” tool and click on it.
- Once you have clicked on the “Edit” tool, you can start making changes to your PDF. You can add text, images, or even resize elements within the document.
- PDFgear also supports creating and adding digital signatures to your PDFs. You can generate certificates and sign your documents digitally without the need for offline tools like Adobe Acrobat.
- To create a digital signature, click on the “Sign” tool in PDFgear. This will open a window where you can select a signature and apply it to the document. PDFgear supports different formats of signatures, including PDF and image files.
- PDFgear provides the benefit of close integration with other tools and platforms. For example, it can be used with Google Docs by installing the TCPDFClass in Laravel. This allows you to edit and generate PDFs directly from Google Docs without the need to download them.
- PDFgear also offers the ability to fill and sign forms. If you have PDF forms that need to be filled out and signed, you can do it easily using this tool.
By following these steps, you can locate and utilize the “Edit” tool in PDFgear to add digital signatures, edit PDFs, and enjoy the benefits of this versatile tool.
Step 3: Create a Digital Signature on PDFgear
Adding a digital signature to your PDF documents can provide a secure and legally recognized way to authenticate the sender and ensure the integrity of the content. In this step, we will guide you through the process of creating a digital signature using PDFgear.
To begin, you will need to have PDFgear installed on your computer. If you don’t have it yet, you can download it for free from the official PDFgear website.
Once you have PDFgear installed, follow these steps to create a digital signature:
- Open the PDF document that you want to digitally sign using PDFgear. You can do this by clicking on “File” and then selecting “Open” from the dropdown menu.
- Locate the “Digital Signature” tool in the toolbar. In some versions of PDFgear, this tool may be labeled as “Sign” or “Add Signature”.
- Click on the “Digital Signature” tool to open the signature options.
- PDFgear supports three different kinds of digital signatures:
| Signature Type | Description |
| Visible Signature | A visible representation of your signature will be added to the PDF document. |
| Invisible Signature | The signature will be added to the PDF document, but it will not be visible. |
| Certified Signature | The signature will be added along with a validation certificate to ensure the document’s integrity. |
Choose the type of signature that you need and click on it.
- A dialog box will open, allowing you to resize and position the signature field on the PDF document. Adjust the size and position according to your preferences.
- Click “Sign” to proceed.
- If you are using Windows operating system, PDFgear will use a TCPDFClass to generate the digital signature. On other operating systems, Adobe Acrobat will be used.
- PDFgear will then generate the digital signature and add it to the PDF document. The signed document is now ready to be shared or further edited if needed.
- Close the PDF document and repeat the process for any other documents you want to digitally sign.
By creating a digital signature on PDFgear, you can enjoy the benefits of a secure and legally recognized authentication process for your PDF documents. Whether you need a visible or invisible signature, or a certified signature with validation certificates, PDFgear provides the versatility and tools you need to add digital signatures to your documents.+
Step 4 Resize Digital Signature on PDFgear
To resize your digital signature on PDFgear, follow the steps below:
1. Open the PDF document that needs to be signed.
2. Locate the area where you want to add your digital signature. This can be done by scrolling through the document or using the search function.
3. Click on the “Edit” button in the toolbar. This will open the editing options for your PDF.
4. In the editing options, you will find the “Sign” tool. Click on it to create a signature field in the PDF.
5. If you already have a digital signature created, select it from the available options. If not, you can generate a new digital signature using tools like Adobe Acrobat or TCPDFclass.
6. Once you have selected your signature, click on the area where you want to place it in the document.
7. To resize the signature, click and drag the corners of the signature field. This will allow you to adjust the size of your signature as needed.
8. After resizing the signature, you can further customize it by adjusting the position and appearance using the available editing options.
9. Once you are satisfied with the size and appearance of your digital signature, click on the “Save” or “Apply” button to finalize the changes.
10. You can now close the editing mode and save the signed PDF document.
By following these steps, you can easily resize your digital signature on PDFgear. This tool offers versatility in creating and adding digital signatures to PDFs, providing you with the benefits of using digital certificates and validation. Whether you are using Windows or any other operating system, PDFgear is a free offline tool that can help you sign your PDF documents without any hassle.
How Google Docs’ Versatility Benefits You
Google Docs is a powerful tool that offers a wide range of features for creating and editing documents. One of the key benefits of Google Docs is its versatility, which allows you to add digital signatures to your PDFs without the need for expensive software like Adobe Acrobat.
Adding a digital signature to a PDF document is a simple process in Google Docs. Here are the steps you need to follow:
- Open the PDF document in Google Docs by clicking on “File” and then “Open”.
- Locate the document you want to add a digital signature to and click on it to open it.
- Click on “Extensions” in the top menu and search for “Signature” in the search bar.
- Choose a signature tool that is supported by Google Docs. Some popular options include Adobe Acrobat, FineReader, PDFgear, and TCPDFClass.
- Click on the signature tool you have chosen and follow the on-screen instructions to create a digital signature. You may need to resize the signature and validate it using certificates.
- Once you have created and validated your digital signature, click on “Save” or “Generate” to add the signature to your PDF document.
- Close the signature tool and your signed PDF document is ready to download or share.
With Google Docs’ versatility, you can also fill out forms, create and edit various kinds of documents, and collaborate with others in real-time. Additionally, Google Docs is a free tool that can be used on multiple operating systems, including Windows, making it accessible to a wide range of users.
In summary, the benefits of using Google Docs’ versatility for adding digital signatures to your PDF documents are numerous. You can create and sign documents without the need for expensive software, download signed PDFs, and easily manage and organize your signed documents. Whether you are a business professional or a student, Google Docs’ versatility will save you time and streamline your document signing process.
How to Add Digital Signature in PDF using Laravel
In today’s digital era, adding a digital signature to your PDF documents has become a common practice. A digital signature is a way to validate the authenticity and integrity of a document, ensuring that it has not been tampered with since it was signed. In this article, we will guide you step by step on how to add a digital signature to a PDF using Laravel.
Before we start, it’s important to understand what kinds of certificates are needed for digital signatures. There are two main types of certificates: self-signed certificates and certificates obtained from trusted certificate authorities (CAs). Self-signed certificates can be generated using tools like OpenSSL, while CA certificates are issued by well-known CAs like Google.
Here are the steps to add a digital signature to a PDF using Laravel:
Step 1: Install the necessary packages
To add digital signatures to PDFs in Laravel, we will be using the TCPDFClass package, which is a PHP class for generating PDF documents. You can install this package using Composer:
composer require tecnickcom/tcpdf
Step 2: Create a signature field
To add a digital signature to a PDF, you need to create a signature field where the signature will be placed. You can do this by using the TCPDFClass library:
$pdf->addSignatureField($x, $y, $width, $height);
Step 3: Generate the PDF
Next, you need to generate the PDF document with the signature field using the TCPDFClass library:
$pdf->Output('file.pdf', 'D');
With these three steps, you can create a PDF with a digital signature using Laravel and the TCPDFClass library. The resulting PDF can then be signed using a supported tool such as Adobe Acrobat or online PDF editors like PDFGear or FineReader.
Benefits of adding a digital signature to your PDF documents include:
- Enhanced security: Digital signatures provide a way to authenticate the document and ensure its integrity.
- Offline availability: Once a document is signed, it can be accessed and validated offline without the need for an internet connection.
- Legal compliance: In many countries, digitally signed documents are legally binding and can serve as evidence in court.
- Versatility: Digital signatures can be used across different operating systems and devices, ensuring compatibility.
In conclusion, adding a digital signature to a PDF using Laravel is a straightforward process that requires a few steps. By following the steps outlined in this article, you can easily create PDF documents with digital signatures for various purposes.
This is a signed PDF
If you want to add a digital signature to your PDF documents, there are several tools you can use. One popular option is Adobe Acrobat, which is available for both Windows and Mac operating systems. With Adobe Acrobat, you can easily create, edit, and sign PDFs.
To digitally sign a PDF document, you will need a digital certificate. This certificate acts as a unique identifier for the person signing the document. You can obtain a digital certificate from a trusted certificate authority or generate your own using tools like TCPDFClass, PDFGear, or Laravel.
Once you have your digital certificate, you can sign the PDF document with just a few clicks. Open the PDF in Adobe Acrobat and click on the “Sign” tool. Select the kind of signature you want to add – there are three options: signature, initial, or full name. Resize and position the signature to fill the designated space on the document.
After you have positioned the signature, click “Close” to finalize the signature. Adobe Acrobat will validate the signature and add it to the PDF. The signed PDF can now be viewed and verified by anyone with a PDF reader that supports digital signatures.
The benefits of adding a digital signature to a PDF are numerous. It adds authenticity and integrity to the document, ensuring that it has not been tampered with. Additionally, digitally signed PDFs can be validated offline, meaning that the signature can be verified even without an internet connection.
In conclusion, adding a digital signature to a PDF is a simple and secure process. By using tools like Adobe Acrobat, you can easily create, edit, and sign PDF documents. With the added benefit of offline validation, digitally signed PDFs provide versatility and peace of mind.
What kinds of digital signatures are supported by FineReader PDF 15
FineReader PDF 15 is a powerful tool that allows you to add different types of digital signatures to your PDF documents. With FineReader PDF 15, you can generate digitally signed PDFs for various purposes, such as signing contracts, filling out forms, or validating the authenticity of documents.
There are three main types of digital signatures supported by FineReader PDF 15:
- Standard digital signatures: FineReader PDF 15 supports standard digital signatures that comply with industry standards and can be validated by any PDF viewer or operating system. These signatures use a digital certificate to sign the document and ensure its integrity and authenticity.
- Timestamp signatures: FineReader PDF 15 also supports timestamp signatures, which add an additional layer of security by including a timestamp from a trusted third-party server. This ensures that the signature remains valid even if the certificate used to sign the document expires.
- Approval signatures: In addition to standard and timestamp signatures, FineReader PDF 15 allows you to add approval signatures to your PDFs. Approval signatures are used to show that a specific person has reviewed and approved a document, but they do not validate the document’s content or integrity.
By offering support for these different types of digital signatures, FineReader PDF 15 provides users with the versatility and flexibility they need to sign and validate their PDF documents effectively. Whether you need to sign a contract, fill out forms, or verify the authenticity of a document, FineReader PDF 15 has the tools necessary to help you accomplish these tasks.


