Gmail provides a simple and effective way to customize your email messages and add a personal touch by including a signature. A signature is a section of text that appears at the bottom of every email you send. It can include your name, contact information, and even a link to your website or social media profiles.
So, how do you create a signature in Gmail? Follow these easy steps:
- Click on the gear icon in the top right corner of your Gmail window.
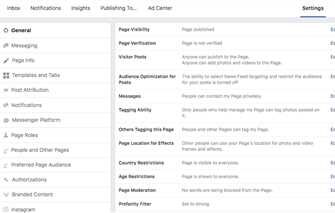
- In the dropdown menu, select “Settings” to open the settings page.
- Scroll down until you see the “Signature” section. Here, you can enter and format your signature text. You can add additional formatting, such as fonts and colors, to make your signature more visually appealing and recognizable.
- If you want to include images or a logo in your signature, click on the “Insert Image” button and follow the on-screen instructions to upload and insert the desired image.
- Once you have created your signature, scroll down to the bottom of the page and click on the “Save Changes” button to save your new signature.
That’s it! Your signature will now appear automatically at the bottom of all your outgoing emails. It’s a simple yet important step to add a professional touch to your emails and reduces the need to manually type out your contact information every time you send a message.
Remember, you can create multiple signatures in Gmail, which is especially useful if you have different identities or want to use different signatures for different purposes. Managing your signatures is easy – just go back to the settings page and repeat the steps above to create additional signatures or edit existing ones.
Why would you want to create multiple signatures? Well, it provides flexibility and allows you to tailor your signature to different recipients or types of emails. For example, you may want to include a longer signature with more contact information for business emails, while keeping a shorter and more casual signature for personal emails.
Having a well-designed and consistent email signature not only adds authenticity to your emails but also helps people remember your brand and reach out to you easily. So take a few minutes to create an appealing and professional signature for your Gmail account – it’s worth it!
- Create an email signature – Gmail Training
- Option 1: Using Gmail Settings
- Option 2: Inserting a Signature in the Compose Window
- Option 3: Using HTML Code
- Why is a Gmail Signature Important
- 1 Makes You Easily Recognizable
- 2 Doubles Up as a Visiting Card
- 3 Provides Authenticity
- How to add an email signature in Gmail
- Add your logo to your email signature
- FAQ
- Video:
- Create an Email Signature with Canva with multiple Clickable Links & Social Media Icons
Create an email signature – Gmail Training
When managing your Gmail emails, it is important to have a professional and recognizable email signature. An email signature is a simple way to add your personal or company branding to your emails, making them more authentic and reducing the need for long explanations or multiple email exchanges.
Gmail provides three ways to create a signature. In this training, we will go over all three options and discuss how to insert images or additional links if necessary.
Option 1: Using Gmail Settings
To create a signature using Gmail settings, follow these steps:
- Click on the gear icon in the top right corner of your Gmail page.
- Select “Settings” from the drop-down menu.
- Scroll down to the “Signatures” section.
- Click on the “Create new” button.
- In the signature window, type in the desired text for your signature.
- If needed, use the formatting options to change fonts, colors, or add a logo.
- Click “Save changes” to save your new signature.
Option 2: Inserting a Signature in the Compose Window
If you want to add a signature to a specific email message without changing your default signature, follow these steps:
- Create a new email message by clicking on the “Compose” button.
- In the compose window, click on the “More options” button (three vertical dots).
- Scroll down and select “Insert signature” from the options list.
- If necessary, make any changes to the signature using the formatting options provided.
- Click “Insert” to add the signature to your email message.
Option 3: Using HTML Code
If you have an HTML code for your signature, you can use it in Gmail by following these steps:
- Create a new email message by clicking on the “Compose” button.
- In the compose window, click on the “More options” button (three vertical dots).
- Select “Plain text mode” from the options list.
- Paste your HTML code into the open window.
- Switch back to “Rich text mode” by clicking on the “More options” button again.
- Your HTML signature should now appear in the compose window.
- Continue writing your email message and send it with the signature intact.
Remember, when creating an email signature, think about what information is important to include. Consider including your name, job title, contact information, and any relevant links or additional information. A well-designed signature adds professionalism and authenticity to your emails, helping you make a strong brand impression.
If you need help, visit the Gmail FAQs section on the Gmail Help Center or consider attending Gmail training courses where experts can guide you through the process step-by-step.
Why is a Gmail Signature Important
A Gmail signature is an essential component of professional email communication. It provides a simple and efficient way to add a personalized touch to your emails, while also increasing authenticity and credibility.
Having a well-designed Gmail signature helps people quickly identify who you are and what you represent. It doubles as a virtual business card, where you can easily include your contact information, such as phone number, email address, and website link.
Moreover, a Gmail signature contributes to brand identity and recognition. By adding your company’s logo and using consistent fonts and colors, you can create a signature that reflects your brand’s visual identity and represents your professional image.
Gmail signatures are easy to create and manage. Here are three simple steps to add a Gmail signature:
- In Gmail, click on the gear icon in the top right corner to access the Settings page.
- Scroll down to the “Signature” section, then click on the “Create new” button.
- In the signature editor window, insert your desired signature text, format it as needed, and include any additional elements like images or links.
By following these steps, your Gmail signature will appear at the bottom of every email you send, reducing the need to manually add signature details each time.
Gmail signatures also help in managing multiple email accounts. You can create different signatures for various email addresses, making it easier to differentiate and maintain a professional identity across different communication channels.
In addition to their visual appeal, Gmail signatures serve practical purposes. They can include links to your social media profiles, which allows recipients to easily connect with you beyond email. Moreover, adding a signature can help comply with legal requirements, such as including a physical business address for commercial emails.
To sum it up, a Gmail signature is an important tool that helps establish and maintain a professional identity in email communication. It makes your emails easily recognizable, reduces the effort needed to add contact information, and provides a platform to showcase your brand. So don’t think twice – create your Gmail signature today and start reaping the benefits!
1 Makes You Easily Recognizable
A signature is an important part of your brand identity in Gmail. It is necessary to create a signature if you want to be easily recognizable and reduce the chances of your emails being ignored or marked as spam. A signature is a simple way to add a personal touch to your emails and make them stand out.
Gmail provides multiple ways to create and manage signatures. Here is how you can do it:
- Click the gear icon in the top-right corner of the Gmail window and select “Settings” from the dropdown menu.
- In the Settings page, scroll down to the “Signature” section.
- Click on the “Create new” button to create a new signature.
- In the signature editor, you can insert your logo, add images, include colors and fonts, and write the text you want to appear in your signature.
- If you have multiple signatures, you can select the one you want to use by hovering your mouse over the signature area and clicking on the desired signature.
That’s it! Now your signature is created and will appear at the end of every email you send. Your signature will also show up when you reply to emails or compose new ones.
Why is a signature important? It shows professionalism, helps people recognize who the message is coming from, and provides necessary contact information.
Managing signatures in Gmail is a simple and effective way to add your personal touch and make your emails more recognizable.
2 Doubles Up as a Visiting Card
If you frequently send emails for business or professional purposes, it’s important to have a signature that represents your identity and brand. Gmail provides an option to create multiple signatures and easily manage them. This signature not only adds a professional touch to your emails but also serves as a visiting card for your recipients.
Why should you create a signature in Gmail? There are several reasons why a signature is important:
1. Authenticity: Having a signature in your emails adds authenticity and credibility to your messages. It assures recipients that the email is indeed coming from you or your organization.
2. Brand identity: Your signature serves as a brand identity. It helps people recognize your emails and associate them with your business or personal brand.
3. Contact information: Your signature can include important contact information like your name, title, email address, phone number, website, or social media links. This makes it easier for recipients to contact you if needed.
Now, let’s see how you can create and manage signatures in Gmail:
Step 1: Go to your Gmail settings. You can do this by clicking on the gear icon at the top right corner of the Gmail window and selecting “Settings” from the drop-down list.
Step 2: Scroll down to the “Signature” section. Here, you will see an option to insert your signature. You can use the provided text box to enter the necessary information for your signature.
Step 3: Formatting your signature: You can use the formatting options to customize your signature. This includes choosing fonts, colors, and adding images or links. Be sure to keep the signature simple and recognizable, avoiding long paragraphs or excessive design elements.
To add multiple signatures, click on the “Create new” button located below the text box. This allows you to create additional signatures for different purposes or occasions.
When composing a new email, you can easily select the desired signature from the drop-down list that appears below the compose window. This allows you to choose the appropriate signature based on the context or recipient.
Gmail’s signature feature provides a simple and effective way to include your visiting card in your emails. It not only helps reduce the needed effort of typing your contact information each time but also adds a professional touch to your messages. Your signature is another step towards creating a recognizable and memorable brand identity.
So next time you think about how to create a signature in Gmail, remember that it doubles up as a visiting card that represents you or your organization!
3 Provides Authenticity
In addition to the customizable emails you can create in Gmail, signature is another way to add authenticity to your messages. This is a simple step you can take to make your emails appear more professional and easily recognizable by recipients. When you include a signature, it not only provides people with a list of important contact information, but it also doubles as a way to show that the email is coming from you and not someone else.
Gmail offers three options for managing your signature. By visiting the settings page, you can easily insert a signature that will be automatically added to every email you send. You also have the option to create multiple signatures, allowing you to choose which one to include in each individual message. This is especially helpful if you have different email addresses or roles that you use for different purposes.
In the signature settings, you have the choice to include text, links, and even images in your signature. You can also format the text using different fonts and colors to match your personal or brand style. If you have a company logo or additional branding elements, you can easily insert them into your signature using HTML code. This makes your emails look more professional and helps to drive brand recognition.
What’s more, Gmail’s signature feature reduces the need for people to think about how they should sign their emails. Rather than manually typing in their name and contact information at the end of each message, they can simply click the signature button and it will be automatically inserted.
How to add an email signature in Gmail
Adding a professional email signature to your Gmail account is essential for creating a strong and recognizable brand identity. It not only helps to provide authenticity to your emails but also doubles up as a virtual business card that showcases important information about you or your company. Follow these simple steps to create and add an email signature in Gmail:
Step 1: Open Gmail in your web browser and click on the gear icon located in the top right corner. This will open a drop-down menu.
Step 2: Scroll down and click on the “Settings” option. This will open the Gmail settings page.
Step 3: In the settings page, scroll down until you find the “Signature” section. There, you can create a new signature or edit an existing one.
Step 4: Click on the radio button that says “No signature” or select the specific email address for which you want to create a signature in the drop-down menu.
Step 5: In the text box provided, enter the desired text for your signature. You can include your name, job title, contact information, website link, or any other relevant details.
Step 6: If you want to add additional formatting to your signature, such as bold or italic text, click on the icons provided in the formatting toolbar.
Step 7: If you want to include images or a logo in your signature, click on the “Insert Image” button located in the formatting toolbar. You can either upload an image from your computer or insert an image from Google Drive.
Step 8: If you want to add links to your signature, highlight the text or image you want to turn into a link, click on the “Link” button in the formatting toolbar, and enter the URL.
Step 9: To change the font style and size of your signature, click on the “Change font” button in the formatting toolbar and select from the three available fonts.
Step 10: Once you have created your signature, scroll down and click on the “Save Changes” button at the bottom of the page.
Now, whenever you compose a new email or reply to a message, your signature will automatically appear at the bottom. Adding a signature in Gmail is a great way to save time and make your emails look more professional and consistent.
If you need further help or have any additional questions, Gmail provides a comprehensive FAQ page with step-by-step instructions and video tutorials. By visiting the Gmail Help Center, you can find training resources, courses, and even get in touch with Gmail support.
Add your logo to your email signature
If you want to make your email signature more personalized and professional, adding your logo is a great way to do it. Having your logo in your email signature makes it easily recognizable and adds authenticity to your brand. It also helps you stand out from the crowd and makes your emails more memorable.
Gmail provides several ways to add your logo to your email signature. Here, we will walk you through three simple steps on how to create and add your logo to your Gmail signature.
Step 1: Create and upload your logo image
Firstly, you need to create a logo for your email signature. Think about the necessary size and format. It’s recommended to keep the logo size small to reduce the loading time of your emails. Once you have your logo image ready, you can upload it to your Google Drive or any other cloud storage.
Step 2: Copy the logo image URL
After you have uploaded your logo image to the cloud storage, copy the image link or URL. You will need this link to insert your logo into your Gmail signature.
Step 3: Insert your logo into your Gmail signature
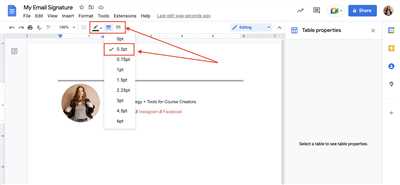
Open your Gmail account and click on the gear icon in the top right corner to access the Settings. Scroll down and click on the “See all settings” link. In the Settings window, scroll down to the Signature section. Here, you can create or edit your email signature. If you have not created a signature yet, this is where you can do it.
In the signature editor, click on the Image icon (the mountain and sun symbol) above the text box. Then, paste the logo image URL you copied earlier into the Image URL field. You can also adjust the size of the logo if needed. Click on the “Select” button to insert your logo into your signature.
Additional steps to consider:
- You can add multiple signatures and choose different logos for different purposes or recipients.
- Make sure to use high-quality, clear logo images for the best appearance.
- Fonts, colors, and formatting options are available to make your signature more visually appealing and in line with your brand identity.
By following these steps, you can easily add your logo to your email signature in Gmail. It not only doubles as a digital business card, but also helps people recognize your brand and gives your emails a more professional touch. So why not make your emails more memorable and recognizable by adding your logo to your email signature today!
FAQ
Q: How do I create a signature in Gmail?
A: To create a signature in Gmail, follow these steps:
- Click on the gear button in Gmail and select “Settings” from the dropdown menu.
- Scroll down to the “Signature” section, where you will find an option to add a signature.
- Click on the “+ Create new” button to create a new signature.
- Type in the text you would like to include in your signature, such as your name, job title, contact information, or a personalized message.
- Use the formatting options to customize your signature. You can change the font, font size, font color, add images, or insert hyperlinks.
- Click “Save Changes” to save your signature. Your signature will now appear at the bottom of your emails.
Q: Can I create multiple signatures in Gmail?
A: Yes, Gmail allows you to create multiple signatures. Simply follow the steps mentioned above to create a new signature for each different context or purpose.
Q: How can I make my signature more visually appealing?
A: To make your signature more visually appealing, you can:
- Use colors that match your personal or brand identity.
- Add images, such as your company logo or a personal photo.
- Use different fonts and font sizes for emphasis.
- Insert hyperlinks to link to your website or social media profiles.
- Add a hover effect to your signature to make it more interactive.
Q: Why is having a signature in Gmail important?
A: Having a signature in Gmail provides several benefits:
- It makes your emails look more professional and recognizable.
- It helps people easily identify you and your brand.
- It provides a sense of authenticity and adds a personal touch to your messages.
- It reduces the need to type your contact information in every email.
- It doubles as a way to promote your business, services, or upcoming events.
Q: Are there any character limits for a signature in Gmail?
A: Gmail allows you to have a maximum of 10,000 characters in your signature. However, it’s important to keep your signature concise and to the point. A long signature may distract from the main content of your emails.
Q: Where can I find additional help with managing my Gmail signatures?
A: If you need additional help with managing your Gmail signatures, you can visit Gmail’s FAQ page or contact Gmail support for assistance. They offer step-by-step guides, video tutorials, and other resources to help you set up and customize your signatures.