

Are you a business owner or a professional looking to create a Facebook page for your brand or yourself? Setting up a Facebook page is a great way to connect with your audience and showcase your products or services. In this article, we will walk you through the essential steps to get your page up and running.
Step 1: Create a Facebook Page
First things first, you need to have a Facebook account to create a page. If you don’t have one, go to Facebook’s homepage and sign up for an account. Once you have an account, click on the arrow in the top right corner of the screen and select “Create Page” from the dropdown menu.
Step 2: Choose a Page Category
Facebook gives you various options on what type of page you want to create, such as a business or brand, community or public figure, or entertainment. Select the category that best suits your needs and click on the “Get Started” button.
Step 3: Set Up Your Page Details
Now it’s time to fill in the details for your page. Give your page a name, choose a category that describes your business or profession, and provide some basic information. You can also add a profile picture and cover photo to make your page look more professional.
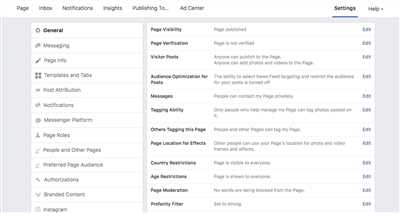
Step 4: Customize Your Page Settings
Within the settings menu, you can adjust various options to fit your needs. For example, you can change the privacy settings to determine who can see your page and its content. You should also give access to other team members or admins who will help you manage the page.
Step 5: Connect Your Instagram Account
If you already have an Instagram account for your business or personal brand, you can connect it to your Facebook page. This allows you to easily share your Instagram posts on your page, giving your audience a seamless experience across both platforms.
Step 6: Check Your Page Insights
Once everything is set up, you should start checking your page insights regularly. Insights provide valuable data on the performance of your page, such as the number of likes, reach, and engagement. This information can help you adjust your content strategy and improve your page’s performance.
Setting up a Facebook page is an important step to establish a strong online presence for your business or personal brand. By following these step-by-step instructions, you can create a professional-looking page that will attract and engage users. Don’t wait any longer – start setting up your page today!
How to Adjust Your Facebook Privacy Settings
When it comes to your Facebook account, privacy settings are one of the first things you should check and adjust. Whether you’re a business owner or just a social media user, it’s important to ensure that your personal information and images are only seen by the people you choose.
To start adjusting your privacy settings, click on the downward arrow in the top-right corner of the Facebook page. From there, select “Settings & Privacy” and then “Settings” from the drop-down menu.
Once you’re in the Settings area, you can move into the “Privacy” tab on the left-hand side. Here, you’ll find a suite of options that allow you to change who can see your posts, who can send you friend requests, who can look you up using your email address or phone number, and much more. Take some time to go through these settings and choose the options that best suit your needs.
Another important setting to check is the “Profile and Tagging” tab. This is where you can adjust who can see your profile information, such as your bio, education, and work details. You can also decide who can tag you in posts and how tags are approved. By checking and adjusting these settings, you can ensure that only the most relevant and professional information is visible to other users.
For business pages, it’s crucial to give your team members the right access levels to ensure smooth management of the page. To do this, go to the page you want to manage and click on the “Settings” button at the top. Next, choose “Page Roles” from the left-hand menu. From there, you can add users and assign them roles like Admin, Editor, or Moderator, depending on their level of responsibility within the team.
If you’re already connected with your Instagram account, you also need to adjust its privacy settings. To do this, go to your Instagram profile on the desktop and click on the three horizontal lines in the top-right corner. From there, click on “Settings” and then “Privacy”. Within this menu, you can choose whether your images are public or private, and adjust other details such as who can send you direct messages.
Remember to click the “Save Changes” button at the bottom of each page to ensure that your settings are applied. Checking your privacy settings regularly is a simple way to maintain control over your online presence and protect your personal information from being accessed by unauthorized users.
Checking your admin settings Facebook Pages and Instagram
When it comes to managing your Facebook Pages and Instagram accounts, it’s important to regularly check your admin settings to ensure that everything is set up correctly. Here’s a step-by-step guide on how to do it.
First, go to your Facebook Page or Instagram profile and click on the arrow in the top right corner of the screen. From the dropdown menu, click on “Settings”.
In the left-hand menu, you’ll see a list of options. Click on “Page Info” or “Profile” to adjust the details, cover images, and privacy settings for your page or profile.
Next, click on “Admins” or “Team” to give other people access to your Facebook Page or Instagram account. You can choose to add them as a person or as part of a business suite. Ensure that the right permissions are set up for each person or team.
In the “Insights” or “Analytics” section, you can check the analytics and data for your Facebook Page or Instagram account. This will give you valuable insights into your audience and engagement.
Under the “Facebook Settings” or “Instagram Settings” tab, you can connect your pages and profiles to other social media accounts, such as Twitter or LinkedIn. This will allow you to cross-post content and reach a wider audience.
In the “Dashboard” or “Buffer” section, you can manage and schedule posts for your Facebook Pages and Instagram accounts. This will help you stay organized and ensure a consistent posting schedule.
Finally, don’t forget to check the “Privacy” or “Security” settings to ensure that your page or profile is set up in a professional and secure manner. Adjust the settings to your liking and make sure that only the necessary information is visible to users.
By regularly checking your admin settings for your Facebook Pages and Instagram accounts, you can ensure that everything is running smoothly and that you’re making the most out of these platforms for your business or personal use.
Checking settings in the Professional Dashboard

When it comes to setting up your Facebook page, it’s important to ensure that everything is adjusted to your liking. This includes checking the settings in the Professional Dashboard. Here’s how:
- First, click on the menu button (the three lines) at the top right corner of your Facebook page.
- Next, click on the “Settings” option.
- Within the settings menu, you’ll see a list of options on the left-hand side. Here, click on “Professional Dashboards”.
- Once you’re in the Professional Dashboard, you should see a toggle button labeled “Connect to Buffer”. If you already have a Buffer account, you can toggle this on to give the Buffer suite access to your Facebook page.
- Under the “Connect to Buffer” option, you’ll find a section for “Admin Accounts”. This is where you can choose which team members or individuals have access to your Facebook page.
- Make sure to check the “Insights” option if you want to have access to detailed analytics and data about your page.
- If you want to connect your Instagram account to your Facebook page, you can do so under the “Instagram Accounts” section. Simply click on the “Connect Instagram Account” button and follow the prompts.
- Within the Professional Dashboard, you can also check the “Privacy” settings for your page. This includes adjusting who can see your page, who can post on your page, and who can send you messages.
- Check the “Your Page” settings to ensure that your page is set up as a business page rather than a personal profile.
- If you want to change the profile picture or cover image for your page, go to the “Profile” and “Cover” sections respectively. You can upload images from your computer or choose from the ones already available on your Facebook page.
By following these steps and checking the settings in the Professional Dashboard, you can ensure that your Facebook page is fully optimized and ready to connect with your audience.
Checking settings in Meta Business Suite
When it comes to setting up your Facebook Page, it’s important to check all the settings to ensure everything is adjusted to your needs. In this section, we’ll cover how to check the settings in Meta Business Suite.
To start, click on the Meta Business Suite icon on the top left corner of your dashboard. From there, click on the “Settings” option in the left-hand menu. This will take you to the Settings page, where you can adjust various details for your account.
Under the “Page Settings” section, you should see a list of options for your Facebook Page. Here, you can check and change settings such as the Page name, username, privacy, and more.
Next, click on the “Profile Picture” option to check and adjust your Facebook Page’s profile picture. Here, you can choose an image from your desktop or connect with your Instagram account to use a picture from there.
Move to the “Cover Picture” option to check and adjust your Facebook Page’s cover picture. You can choose an image from your desktop or select from the integrated collection of professional cover pictures.
Once you have checked and adjusted the settings for your Facebook Page, you can move on to checking the settings for your Meta Business Suite account. Click on the “Account Settings” option in the left-hand menu to access these settings.
Within the “Account Settings” section, you can check and adjust various details such as your team members, connected pages and Instagram accounts, and more. Make sure to give the appropriate permissions to team members or add new team members if needed.
Now, go back to the main dashboard by clicking on the Meta Business Suite icon on the top left corner. Here, you can see important insights and analytics about your Facebook Page performance. Take some time to check the insights and adjust any settings if needed.
By checking and adjusting the settings in Meta Business Suite, you can ensure that your Facebook Page is set up correctly and optimized for success. Make sure to regularly check these settings to stay up-to-date with the latest features and options available.
How to Change Profile and Cover Images on Facebook Desktop
Changing your profile and cover images on Facebook desktop is a simple process that can help you personalize your page and make it more appealing to your audience. Follow the steps below to ensure that your page looks professional and captures the attention of your visitors.
- First, make sure you are logged into your Facebook account and on the dashboard of the page you want to change the images for.
- Click on the “Settings” option located in the top right corner of the page, next to the “Privacy” button.
- Under the “General” tab in the left menu, click on the “Edit” button next to the “Profile picture” or “Cover photo” section.
- A pop-up window will appear, giving you the option to either upload a new image or choose one from your existing photos or albums. Click on the option that suits your needs.
- If you choose to upload a new image, click on the “Upload Photo” button and select the image you want to use from your computer files. If you choose to select a photo from your existing ones, click on the photo you want and then click on the “Save” button.
- Once you have uploaded or selected the image, you will be taken to a crop and resize screen. Here, you can adjust the image to fit the desired dimensions by dragging the image or adjusting the slider. Once you are happy with the positioning and size of the image, click on the “Save” button.
- After saving the changes, you will be taken back to the settings page. You can now see the newly uploaded or selected image as your profile picture or cover photo.
- Finally, click on the “Save” button at the bottom right corner of the settings page to ensure that all the changes are applied to your page.
By following these simple steps, you can easily change your profile and cover images on Facebook desktop. Remember to choose images that are relevant to your page and represent your professional image or brand. These images can make a significant impact on the first impression you give to potential customers or clients, so it’s important to choose them wisely.
Insights into Your Facebook Page
Facebook provides valuable insights on how your page is performing and allows you to adjust settings according to your preferences. By giving you a suite of data and tools, these insights help you make informed decisions to enhance your social media presence.
To access the insights, you need to be the admin of the Facebook page. If you’re already an admin, here’s how you can check your page’s insights:
- Visit your Facebook page and ensure you’re on the desktop version.
- Click on the “Settings” option located in the top right corner of the page.
- In the left menu, click on “Insights.”
Once you’re on the Insights dashboard, you’ll find a wealth of data and details about your page. From here, you can choose different options to see the metrics that matter to you, such as page views, post reach, engagement, and more.
One important insight to look at is the “People” section. Here, you can see the demographics of your audience, including their age, gender, location, and language. This information can help you tailor your content and posts to better connect with your target audience.
Another valuable insight is understanding the reach of your posts. The “Reach” section gives you information about who is seeing your content, whether it’s your followers, their friends, or other Facebook users. This helps you adjust your posting strategy to maximize your reach and engagement.
You can also get insights into how your fans and followers interact with your page. The “Engagement” section provides data on likes, comments, shares, and clicks, giving you a clear picture of what type of content resonates with your audience.
Remember, privacy is important, and you have control over what insights you share with others. You can adjust the visibility of your insights by clicking on the “Settings” button on the Insights page.
By utilizing the insights Facebook provides, you can gain a professional edge and improve your business’s online presence. Make sure to regularly check your page’s insights to stay informed and make data-driven decisions.
Sources
When setting up your Facebook Page, there are several sources you can use to ensure your page is adjusted and set up correctly.
First, you need to go to the settings menu by clicking on the arrow button at the top right corner of your Facebook dashboard. From there, click on “Settings” and then select “Page.” This will bring you to the settings page for your Facebook Page.
Under the “Page” tab, you should already see the option to connect your Instagram account. If you’re already connected, you can toggle the button to the right to ensure that your Instagram account is linked to your Facebook Page. If not, you can click on the “Connect” button to link them together.
Next, you should check the privacy settings for your Facebook Page. To do this, go to the “Privacy” tab and adjust the settings according to your preference. This will determine who can see your page, post on your page, and view your page’s insights.
Within the “Settings” menu, there are also options to check and adjust everything from your profile picture and cover images to the meta tags and admin roles for your page. Make sure to give each section a thorough checking to ensure everything is set up correctly.
Another important source for setting up your Facebook Page is the Insights dashboard. From here, you can see detailed analytics about the engagement and performance of your page. This will give you valuable information about your users and help you make informed decisions about your content and strategy.
Finally, if you’re setting up a Facebook Page for a business or professional team, you may also want to create a suite of connected accounts. This could include Instagram, a Facebook Group, or other social media platforms. By connecting these accounts, you can more effectively manage and promote your online presence.
These sources will provide you with all the necessary tools to set up your Facebook Page correctly and effectively connect with your audience. Make sure to take the time to go through each option and adjust them to fit your needs and goals.


