

If you want to add a cool ribbon effect to your Photoshop design, then you’re in the right spot! In this tutorial, I will show you how to create a ribbon using Photoshop’s powerful tools and features. With just a few simple steps, you can make your design stand out and give it a professional touch.
First, open Photoshop and create a new document with the dimensions you desire. Make sure to have a white background, as it will represent the final background of your ribbon. Then, create a new layer by clicking on the “New Layer” icon in the Layers panel or by using the keyboard shortcut Ctrl+Shift+N. This layer will be used to create the ribbon shape.
Next, select the Pen tool from the toolbar. Make sure to set the Pen tool to “Path” mode in the options bar. Then, click on the canvas to create a point and click elsewhere to create another point. Continue doing this until you have created the shape of the ribbon. To close the shape, hold down the Ctrl key and click on the first point you created. This will create a closed path for the ribbon shape.
With the path selected, go to the Edit menu and choose “Free Transform” or simply use the keyboard shortcut Ctrl+T. This will open the Free Transform dialog where you can resize and rotate the shape as needed. Make sure to hold down the Shift key while transforming to maintain the proportions of the shape. Once you’re happy with the shape, click on the “Commit Transform” button to apply the changes.
CREATE A COOL RIBBON ICON IN PHOTOSHOP

In this tutorial, we will show you how to create a cool ribbon icon in Photoshop. Ribbons are a popular design element that can add a stylish touch to your projects. Whether you want to create a ribbon for a logo, website, or flyer, this tutorial will guide you through the steps.
Step 1: Set Up Your Document
Open Photoshop and create a new document. Set the width and height to your desired dimensions. In this example, we’ll use a 500px by 500px canvas size.
Step 2: Select the Ribbon Shape
From the toolbar, select the “Custom Shape Tool” (U). In the options bar, click on the shape dropdown menu and select the ribbon shape.
Step 3: Create the Ribbon Shape
Click and drag on the canvas to create the ribbon shape. Hold the Shift key while dragging to maintain proportions.
Step 4: Adjust the Ribbon Shape
If the ribbon shape is too large, go to “Edit” > “Free Transform” (Ctrl + T) to resize it. Click and drag the corner handles while holding the Shift key to maintain aspect ratio.
Step 5: Apply the Gradient Fill
Go to the Layers panel and double-click on the ribbon shape layer to open the Layer Style dialog. Check the “Gradient Overlay” option and click on the gradient preview to open the Gradient Editor.
Step 6: Create a Gradient
In the Gradient Editor, create a gradient that goes from black to white. You can add stops to the gradient by clicking below the gradient slider. Adjust the opacity of each stop to create a smooth transition.
Step 7: Finalize the Ribbon Icon
Click “OK” in the Gradient Editor and the Layer Style dialog to apply the gradient fill to the ribbon shape. You can now add any additional effects or adjustments to finalize the ribbon icon.
Step 8: Preview Your Ribbon Icon
You now have a cool ribbon icon made in Photoshop. Have fun experimenting with different shapes, gradients, and effects to create unique and eye-catching icons.
Remember to save your work and export the icon in a suitable format for your project. Congratulations on creating your own stylish ribbon icon!
Final Image Preview
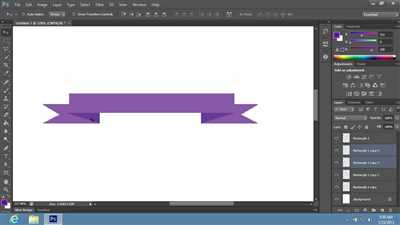
Once you have completed all the steps mentioned above, you are now ready to finalize the ribbon in Photoshop. Here is a preview of how your final image will look:

In this central part of the image, you can see the ribbon shape that we’ve made. The ribbon is represented by a cool gradient overlay, with stops set to black and white. This gives the ribbon a 3D effect and makes it stand out.
The ribbon is made up of a round brush shape with soft edges. To make it look more like a ribbon, we’ve also used the Warp Transform tool to bend it slightly. This gives the ribbon a more natural and flowing appearance.
To insert the icons and text on the ribbon, you can use the text tool and icon tool in your Photoshop editor. Make sure to have a white background for your icons and text so that they can be clearly seen against the ribbon.
Use the Layers panel to create a mask for each icon or text layer, and then position them on the ribbon. You can use the Ctrl + T (or Command + T on a Mac) shortcut to transform and rotate each icon or text layer to fit the shape of the ribbon. Hold the Shift key while transforming to maintain the proportions of the layer.
Once you are happy with the position and size of the icons and text, you can add a filter or overlay to give the ribbon a more customized look. You can experiment with different effects and blending modes to achieve the desired result.
With this final image preview, you can see how the ribbon has come together to create a visually appealing and attractive element for your flyer or website. Now you can close the brush editor and continue working on other parts of your design.
How Do I Make a Flyer in Photoshop
In this tutorial, we will walk through the steps to create a flyer in Photoshop. Whether you need a flyer for a business event, party, or promotion, Photoshop offers a range of tools and effects to help you design an eye-catching flyer.
Here’s how:
Step 1: Open Photoshop and create a new document with the dimensions you want for your flyer. Set the resolution to 300 pixels/inch to ensure a high-quality print.
Step 2: Set the background color or insert a background image for your flyer. To insert an image, go to “File” > “Open” and select the image you want to use. Then, drag the image onto your new document.
Step 3: Create the layout for your flyer. Use the shape tools, such as the rectangle or rounded rectangle tool, to create boxes for text or images. You can also use the text tool to insert your headline and other details.
Step 4: Select the layers you want to apply effects to. You can hold down the Ctrl key and click on each layer to select multiple layers at once.
Step 5: Apply effects to make your flyer visually appealing. For example, you can use the Overlay blending mode to give your images a cool spot effect. Go to “Layer” > “Layer Style” > “Blending Options” and select Overlay. Adjust the opacity as needed.
Step 6: Use the brush tool to add decorative elements to your flyer. You can find free brush sets online or create your own custom brushes. To select a brush, click on the Brush tool icon in the toolbar and choose a brush from the panel that opens.
Step 7: Insert icons or other graphics to enhance your flyer’s design. You can find free icon sets online or create your own icons using the shape tools.
Step 8: Add a ribbon or banner to make your flyer stand out. Use the Pen tool to create a custom shape for the ribbon. Then, go to “Edit” > “Free Transform” (or press Ctrl+T) to resize and position the ribbon. Use the Layer Mask tool to blend the ribbon with the background.
Step 9: Finally, add any additional text or visual elements to complete your flyer design. Make sure to proofread and double-check all the details.
Once you are satisfied with the final design, save your flyer as a high-resolution image file (e.g., JPEG, PNG) for printing or digital distribution.
Now you know how to make a flyer in Photoshop. Get creative and experiment with different effects, fonts, and colors to create a unique and eye-catching flyer for your next project!
Step 6: Finalize Your Ribbon Banner

Now that you have created the basic shape for your ribbon banner, it’s time to finalize the design and make it look even more professional. Follow these steps to add the finishing touches:
- Select the layer that represents your ribbon panel and open the Layer Style dialog.
- In the Layer Style dialog, go to the Gradient Overlay panel. Select a gradient that matches the background or flyer you are creating the ribbon for. You can also choose a gradient that complements the overall color scheme.
- Adjust the stops and opacity of the gradient to achieve the desired effect. Move the stops to change the color distribution and make the gradient blend smoothly.
- If you want to add a cool shadow effect to your ribbon, go to the Drop Shadow panel in the Layer Style dialog. Adjust the settings to create a soft and subtle shadow that gives depth to your ribbon.
- If you want to make your ribbon look more 3D, select the layer representing the ribbon panel, then go to Edit > Transform > Perspective. Drag the corner handles of the bounding box to create a perspective effect. This will make the ribbon look like it’s folding or bending.
- To add a highlight or spot to your ribbon, create a new layer on top of the ribbon layers. Use the Brush tool with a soft and round brush to paint a white shape or highlight. Then, set the blend mode of this layer to Overlay or another blending mode that gives the desired effect.
- Make sure to clean up any unnecessary layers or elements that you don’t need. Merge layers if needed and organize your layers in folders or groups for better management.
- Finally, close the Layer Style dialog and take a close look at your ribbon banner. Check if there are any parts that need further adjustments or refinements.
By following these steps, you can transform a simple shape into a stylish and eye-catching ribbon banner. Don’t be afraid to experiment with different effects, gradients, and shapes to achieve the desired look for your project.
Sources
When creating a ribbon in Photoshop, there are several sources you can use to make the process easier. Here are some essential sources:
Icons: You can use icons from various websites that offer free icon sets. These icons can be used as decorative elements for your ribbon.
Photoshop Transform Tool: This tool allows you to manipulate the shape and size of your ribbon. You can access it by selecting the layer that represents your ribbon and then pressing Ctrl+T.
Gradient Overlay: To give your ribbon a cool gradient effect, you can use the Gradient Overlay layer style. To do this, double-click on the layer representing your ribbon to open the Layer Style dialog, select “Gradient Overlay” from the list on the left, and then click on the gradient preview to open the Gradient Editor. From there, you can choose and customize your desired gradient.
Brush Tool: The Brush tool allows you to create various shapes and patterns. You can use a round brush with a size of 6 pixels to create the base shape of your ribbon. Make sure to set the brush mode to “Normal” and the opacity to 100%.
Spot Healing Brush Tool: To remove any unnecessary stops or spots on your ribbon, you can use the Spot Healing Brush tool. Simply select the tool, hold down the Alt key, and click on a clean spot to sample the surrounding area. Then, click and drag over the area you want to remove.
Layer Masks: Layer masks allow you to hide or reveal parts of a layer. To create a layer mask for your ribbon, select the layer and then click on the “Add Layer Mask” button at the bottom of the Layers panel. This will create a mask thumbnail next to the layer thumbnail. You can then use a black brush with a soft edge to hide or a white brush to reveal parts of the ribbon.
Final Touches: Once you’ve finalized your ribbon, you can add additional effects to make it stand out. You can try adding a drop shadow, inner shadow, or outer glow to give your ribbon more depth and dimension. Experiment with different layer styles and effects to achieve the desired look for your ribbon.
By using these sources and techniques in Photoshop, you can create a stunning and unique ribbon for your project.


