If you’re looking to create a unique and heartfelt gift for someone special or just want to add a touch of creativity to your wall decor, making heart-shaped pictures is an excellent choice. With the help of an easycollage maker, you can easily transform your favorite photos into beautiful heart-shaped masterpieces.
You might be wondering, “How do I go about creating these heart pictures?” Well, that’s exactly what we’re here to guide you through. Whether you’re a photography enthusiast or just getting started with capturing memories, this step-by-step tutorial will show you how to make stunning heart-shaped pictures that will leave a lasting impression.
First, choose the photos you want to use for your heart collage. They can be pictures of your loved ones, friends, or any special memories you hold dear. Once you’ve selected the photos, browse through the easycollage maker’s collection of heart-shaped templates and choose the one that best suits your style and preferences.
Next, it’s time to get creative with your photos. You can either use the pre-designed heart frame as it is or rotate it to fit the composition better. Don’t be afraid to play around with different poses, angles, and layouts to bring your pictures to life. Remember, this is your masterpiece, so make sure to make it as unique as you are!
Once you’re satisfied with the arrangement of your photos, the next step is to print them out. You can either do this at home using a photo printer or take them to a local print shop. Whichever way you choose, make sure to select a high-quality printing service to ensure that your heart pictures turn out vibrant and crisp.
Now that you have your heart-shaped photos printed, you can frame them and place them in a prominent place in your home or give them as a thoughtful gift to someone special. The beauty of heart pictures is that they evoke a sense of love and warmth, making them a perfect addition to any setting.
In conclusion, making heart pictures is a fun and easy way to turn your ordinary photos into a work of art that will bring joy to your life and the lives of your loved ones. So grab your camera, get creative, and start capturing those special moments that deserve a place in your heart.
- How to Shoot Photos with a Heart Bokeh the Easy Way
- Heart photo collage
- Life Colloquy
- Life Colloquy – Step-by-Step Guide:
- How to Print the Heart Photo Collage
- Step 1: Select Your Photos
- Step 2: Use the EasyCollage Website
- Step 3: Upload and Arrange Your Photos
- Step 4: Print and Enjoy
- How To Make Heart Map Art
- What You’ll Need
- Step 1: Choose the Map
- Step 2: Cut Out the Heart Shape
- Step 3: Print and Frame the Photo
- Step 4: Rotate and Frame
- Video:
- HEART SHAPED LOVE SCRAPBOOK | HANDMADE GIFTS |
How to Shoot Photos with a Heart Bokeh the Easy Way
If you’re looking to add a creative touch to your photos, why not try shooting them with a heart bokeh? With just a few simple steps, you can transform your ordinary pictures into unique pieces of art that are sure to impress your friends and loved ones.
First, you’ll need to select a heart-shaped bokeh maker. There are many different options available, ranging from easy-to-use collage templates to more sophisticated products that allow you to create your own heart-shaped lenses. Choose a bokeh maker that suits your needs and fits into your budget.
Once you have your bokeh maker, it’s time to shoot your photos. Find a subject or a scene that you want to capture and place the bokeh maker in front of your lens. Make sure that the heart shape is facing towards the camera, so that it will appear in the final picture.
Next, frame your shot and adjust your camera settings as necessary. You may need to rotate your bokeh maker or change the distance between the lens and the subject to achieve the desired effect. Take a few test shots to see how the heart bokeh looks in different positions and adjust accordingly.
When you’re happy with the way your photo looks, go ahead and take the shot. Keep in mind that the heart bokeh may not be very prominent in the picture, especially if you’re shooting in a well-lit environment. If you want to make the heart bokeh more pronounced, you can try shooting in darker conditions or using a larger bokeh maker.
After you’ve captured your heart bokeh photo, the fun doesn’t have to stop there. You can use photo editing software to enhance the heart-shaped bokeh or to create a collage with multiple heart bokeh pictures. Get creative and experiment with different effects and filters to make your pictures truly unique.
Once you’re satisfied with your heart bokeh photos, you can choose to print them out and frame them as a special gift for someone or display them in your own home. Alternatively, you can share them on social media or use them as a background for your phone or computer. The possibilities are endless!
In conclusion, shooting photos with a heart bokeh is a fun and easy way to add a touch of creativity to your pictures. With the right bokeh maker and a little bit of practice, you can capture beautiful and unique images that will bring a smile to your face and those who see them. So why wait? Grab your camera, pose, and let the heart-shaped magic work its charm!
Heart photo collage
If you’re looking for a creative way to make a heart-shaped photo collage, then EasyCollage is the perfect product for you. With EasyCollage, you can choose from a variety of frame options to create the perfect heart collage. Here’s a step-by-step guide on how to make a heart photo collage:
- Select the pictures you want to use for your heart-shaped collage. They can be pictures of your friends, family, or any other memorable moments.
- Using EasyCollage, choose the heart-shaped template that you like the most. There are different options available, so you can select the one that suits your style.
- Then, simply drag and drop your selected pictures onto the template. You can place them inside the heart or rotate them to create a more dynamic collage.
- Once you’re happy with the placement of your pictures, you can add another creative touch by using the EasyCollage’s bokeh effect. This will give your collage a more artistic look.
- When you’re done, you can preview your heart photo collage and make any changes if needed.
- Once you’re satisfied with the result, you can proceed to the next step and choose how you want your collage to be printed. EasyCollage offers different options, such as a high-quality print or a framed collage.
- If you’re making the heart photo collage as a gift, EasyCollage also offers the option to add a personal message or a map of a special location. This will make your gift even more unique and meaningful.
- Finally, add your selected product to the cart and follow the links to complete your purchase. EasyCollage will take care of the rest and deliver your heart photo collage right to your doorstep.
With EasyCollage, making a heart photo collage is a fun and easy process. Whether you’re creating it for yourself or as a gift for someone special, it’s a great way to capture and display the moments that have touched your heart.
Life Colloquy
Life is a collection of precious moments that we cherish and want to preserve forever. One way to capture and immortalize these memories is through photographs. With the advent of technology, it has become easier than ever to turn our everyday photos into works of art.
If you’re looking to add a creative touch to your photos, you can try making heart-shaped pictures. The process is easy, and the end product will truly stand out. To begin, you’ll need to select a photo that you want to transform into a heart shape. It could be a picture of yourself, your friends, or a beautiful landscape. The choice is yours!
Once you’ve chosen the photo, you can use a heart-shaped photo frame maker or a photo collage maker. There are many online tools available that allow you to upload your photos and choose from various heart-shaped frames or collage templates. Simply upload your photo and select the heart-shaped frame or collage template that best fits your photo.
If you’re feeling extra creative, you can also shoot your own photos with a heart-shaped bokeh maker. This tool allows you to create beautiful heart-shaped bokeh effects in your photos by adding a heart-shaped filter to your camera lens. Simply choose a setting in which you’d like the heart shape to appear, and then shoot away!
Once you have your heart-shaped photo, you can rotate it and place it in a collage with other pictures. This will create a beautiful and unique artwork that you can proudly display or gift to someone special. To create a heart-shaped collage, you can use an online collage maker that allows you to arrange your photos in the shape of a heart.
After you’ve created your heart-shaped collage, you can choose to print it out and frame it. Printing your heart-shaped collage is easy. Most online collage makers offer the option to save the collage as a high-resolution image file. You can then take this file to a printing service or print it at home using your own printer.
Life Colloquy – Step-by-Step Guide:
- Choose a photo that you want to turn into a heart shape
- Select a heart-shaped frame or collage template
- Upload your photo and place it into the frame or template
- Create a heart-shaped collage by arranging your photos in the shape of a heart
- Save your heart-shaped collage as a high-resolution image file
- Print your heart-shaped collage at a printing service or at home
By following these simple steps, you can easily turn your photos into heart-shaped masterpieces. Whether you want to create a unique gift for someone special or simply add a touch of creativity to your life, the possibilities are endless with heart-shaped pictures.
So, why wait? Start your own life colloquy now and map your precious moments into beautiful heart-shaped pictures!
How to Print the Heart Photo Collage
Creating a heart-shaped photo collage can be a fun and creative way to display your favorite memories. Whether you want to make it as a unique gift for someone special or simply as a decorative piece for your own home, the process is easy and enjoyable. In this guide, we will walk you through the steps to print a heart photo collage using the EasyCollage product.
Step 1: Select Your Photos
The first step is to choose the photos you want to include in your collage. These can be pictures of your friends, family, or any other images that hold special meaning to you. You can shoot new photos specifically for the collage or use ones that you’ve already taken.
Step 2: Use the EasyCollage Website
Next, visit the EasyCollage website and select the heart-shaped collage template from their wide range of options. This template will provide a frame in the shape of a heart, which you can then fill with your chosen photos.
Step 3: Upload and Arrange Your Photos
Upload your selected photos to the EasyCollage website and arrange them within the heart-shaped frame. You can rotate the photos, adjust their sizes, and place them in any order you prefer. Get creative with the positioning to create a visually appealing collage.
Step 4: Print and Enjoy
Once you’re satisfied with the arrangement of your photos, simply click the “Print” button. EasyCollage will take care of the printing and deliver the final product to your doorstep. Now you can proudly display your heart-shaped photo collage and relive those special moments every time you look at it.
Creating a heart photo collage is a great way to turn your pictures into a unique work of art. It’s a simple process that allows you to showcase your creativity and bring your memories to life. Whether you choose to make it for yourself or as a gift for someone you care about, the heart-shaped collage is sure to be a cherished piece that will be enjoyed for years to come.
How To Make Heart Map Art
If you’re looking for a creative way to display your travel memories or show your love for a particular place, making heart map art is a unique and memorable option. With just a few simple steps, you can turn a map into a heart-shaped picture that is not only a beautiful piece of art but also a meaningful symbol of a special location.
What You’ll Need
To make heart map art, you’ll need the following supplies:
- A printed map of the place you want to feature in your heart picture
- A photo of yourself or a loved one in a similar pose
- Scissors or a heart-shaped maker
- A frame to display your finished artwork
Step 1: Choose the Map
The first step is to choose the map of the place that holds a special meaning for you. It could be the city where you were born, a favorite vacation spot, or the place where you met your significant other. Look for a map with clear boundaries and easily recognizable landmarks.
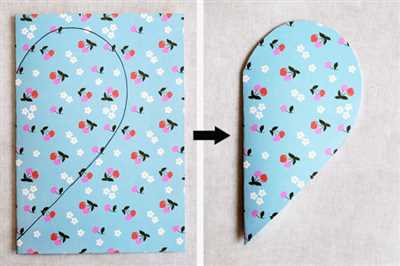
Step 2: Cut Out the Heart Shape
Using scissors or a heart-shaped marker, carefully cut out a heart shape from the printed map. Make sure to place the heart in a position where the desired location is in the center.
Step 3: Print and Frame the Photo
Print a photo of yourself or a loved one in a similar pose to the one featured on the map. Make sure the size of the photo fits well within the heart shape. Then, frame the photo and place it in the center of the heart-shaped cutout on the map.
Step 4: Rotate and Frame
If the heart shape is not aligned with the map, carefully rotate it until the landmarks and boundaries match up. Once everything is aligned, place the heart picture in a frame to protect and display your unique creation. Consider adding a little note or colloquy about the significance of the location to make it an even more personalized gift or keepsake.
Now that you know how to make heart map art, you can easily create a beautiful and meaningful masterpiece to commemorate a special place in your life. Whether you hang it in your own home or give it to friends or family, this easy-to-make collage is sure to be a conversation starter and a cherished reminder of the memories you’ve made in that special location.