

If you are an iOS developer and need to distribute your app to users for testing or for the App Store, you will need to create an IPA (iOS App Store Package) file. In this article, we will guide you on how to generate this file using Xcode.
First, open Xcode and select your project in the project navigator. Then, click on your project target and go to the “Build Settings” tab. In the “Build Options” section, make sure the “Enable Bitcode” option is set to “No” if you are using Xcode 10 or later.
Next, scroll down to the “Signing” section and specify the signing identity and provisioning profile you want to use for building the IPA file. If you don’t have any provisioning profiles yet, you can create them in the Apple Developer Portal.
Now, go to the “Product” menu and click “Archive” to generate an archive of your app. After the archive is created, the “Organizer” window will automatically open. Select the latest archive and click on the “Distribute App” button.
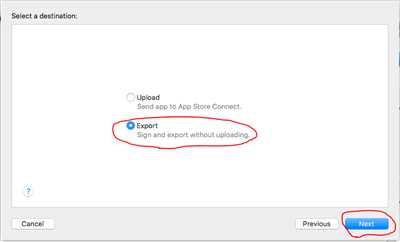
In the following dialog, choose the “Ad Hoc” method if you want to distribute the IPA file for testing. If you want to submit the app to the App Store, choose the “App Store Connect” method.
Specify the export options and click “Next”. In the “Destination” section, select “Export as an IPA” and choose the directory where you want to save the IPA file. Then, click “Export” to generate the IPA file.
That’s it! You have now successfully created an IPA file for your iOS app. You can use this file for testing on devices or distribute it to users through the App Store.
- How to export an Ad Hoc iOS ipa using Xcode
- Step 1: Set Up Xcode Workspace
- Step 2: Specify Export Settings
- Step 3: Run the Export
- Step 4: Distribute the Ad Hoc IPA
- 1 Example
- 1.1 Setting Up
- 1.2 Example Method
- iTunes Artwork
- Creating ipa Files for XCUITest Testing
- Using Xcodebuild
- Exporting IPA Using Xcode
- Additional Considerations
- Summary
- References
- Documentation
- Video:
- How to Install IPA File on iPhone | Without PC | No Jailbreak | iOS 17
How to export an Ad Hoc iOS ipa using Xcode
Exporting an Ad Hoc iOS ipa file using Xcode is a straightforward process. Follow the steps below to generate the ipa file for testing or distribution.
Step 1: Set Up Xcode Workspace
Create or open your Xcode workspace containing the iOS project you want to export. Make sure all the necessary files, including artwork, are in the project directory.
Step 2: Specify Export Settings
From the Xcode editor, select the desired scheme for building the application. If you have an xcuitest file, make sure to specify it in the Test Configuration section.
To generate the Ad Hoc ipa file, use the following xcodebuild command line arguments:
| Argument | Value |
|---|---|
| -scheme | Specify the scheme name |
| -destination | Specify the desired destination for the ipa file |
| -configuration | Specify the build configuration (e.g., Debug or Release) |
| CODE_SIGNING_ALLOWED=YES | Allow code signing |
| CODE_SIGNING_REQUIRED=NO | Signing is not required for Ad Hoc |
Step 3: Run the Export
Click on the Product menu in Xcode, then select Archive to build the application. Xcode will automatically detect if any issues need to be resolved before creating the archive.
Once the archive is generated, open the Organizer window and select the generated archive. Click on the Export button and choose the Ad Hoc option in the distribution method selection. Xcode will guide you through the necessary steps to export the ipa file.
Step 4: Distribute the Ad Hoc IPA
Once the ipa file is exported, you can distribute it for testing or share it with others for installation. The recommended method for distributing an Ad Hoc ipa file is using a tool like Shenzhen or uploading it to a server or file sharing service.
That’s it! Now you know how to export an Ad Hoc iOS ipa using Xcode. Make sure to follow the documentation and Apple’s guidelines for distributing applications outside of the App Store.
1 Example
To demonstrate how to create an .ipa file, let’s consider an example using Shenzhen and its associated settings. Shenzhen is a command-line tool that allows you to build iOS applications from your command line without using Xcode.
1.1 Setting Up
Before we dive into the example, make sure you have the necessary tools and dependencies installed, including Shenzhen. You can install Shenzhen by using the command:
gem install shenzhenIn this example, we will create an .ipa file using the xcuitest method. By specifying the xcargs argument, we can pass additional arguments when using xcodebuild.
1.2 Example Method
To generate the .ipa file, we will use the following method:
shenzhen ipa build --workspace MyApp.xcworkspace --scheme MyScheme --configuration Release --clean --xcargs 'CODE_SIGNING_ALLOWED=NO' --upload --submit 'MyApp' --verboseThis method will build the iOS application using the specified workspace, scheme, and configuration. The –clean option means that the build process will clean the targets before building. The –xcargs option allows us to pass additional arguments to xcodebuild. In this example, we are disabling code signing, which is needed for testing purposes.
The generated .ipa file will be stored in the current directory. If you want to distribute the .ipa file through TestFlight or iTunes, make sure to sign it with a valid provisioning profile and certificate.
That’s it! By following this example, you can easily generate an .ipa file for testing or distribution purposes. For more information and detailed documentation, refer to Shenzhen’s official documentation and the current Xcode documentation.
iTunes Artwork
To distribute an iOS application through the App Store, you need to include an iTunes Artwork file. This file serves as the visual representation of your application within iTunes and the App Store.
When building an iOS app using Xcode, you can automatically generate iTunes Artwork by following these steps:
1. Select your application target in Xcode.
2. Click on the “General” tab in the project editor.
3. In the “App Icons and Launch Images” section, you will find an option called “iTunes Artwork.” This is where you can specify the image file to use as your artwork.
4. By default, Xcode will use the base runner icon as the iTunes Artwork. However, you can choose a different image file if you want.
5. Make sure the selected image file meets the recommended specifications for iTunes Artwork.
6. Build your iOS app using the method of your choice, including Xcode or the command-line tool xcodebuild.
7. If you are using Xcode, make sure to select the signed version of your app target.
8. If you want to run an ad hoc or in-house testing version of your app, you can select the “Ad Hoc” option in the Xcode settings.
9. When building the app, Xcode will automatically generate the iTunes Artwork file and include it in the resulting .ipa file.
Note: iTunes Artwork is not required for running your app on a device during development or testing. It is only necessary when preparing your app for distribution through the App Store.
To include iTunes Artwork in your Xcode project:
1. Open your Xcode workspace or project.
2. Click on the target that you want to add the iTunes Artwork for.
3. In the project editor, go to the “Build Settings” tab.
4. In the “Search” bar, type “xcargs” to filter the displayed settings.
5. In the “Xcode Arguments” section, add the following argument: `-xcargs -itc_submit Run:iTunesConnect:Compress=NO`.
6. Clean and run the project, and Xcode will automatically generate the iTunes Artwork file.
If the iTunes Artwork file is not automatically generated, you can create one manually by following these steps:
1. Create a new directory in your project directory called “iTunesArtwork”.
2. Place your iTunes Artwork image file in this directory, naming it “iTunesArtwork.png”.
3. Clean and build your project, and Xcode will automatically detect and copy the iTunes Artwork file into the .app bundle.
By following these steps, you will ensure that your iOS application has a proper and visually appealing iTunes Artwork when submitting it to the App Store.
Creating ipa Files for XCUITest Testing
When it comes to testing iOS applications with XCUITest, creating an IPA file is an essential step. The IPA file is a binary package that contains all the assets and code necessary for running the application on an iOS device. In this guide, we will explain how to create IPA files for XCUITest testing.
Using Xcodebuild
One way to create an IPA file is by using the xcodebuild command line tool provided by Xcode. To do this, you will need to have Xcode and the necessary dependencies installed on your machine.
Here is an example command to build an IPA file:
xcodebuild -workspace MyApp.xcworkspace -scheme MyApp -configuration Release -sdk iphoneos -xcargs -allowProvisioningUpdates -allowProvisioningDeviceRegistration -allowProvisioningUpdatesAfterSigning buildThis command will build the iOS app and generate an IPA file in the specified output directory.
Alternatively, you can use tools like shenzhen or other third-party libraries to automate the IPA creation process.
Exporting IPA Using Xcode
Another way to create an IPA file is through Xcode’s user interface. Here are the steps to do so:
- Open your Xcode project.
- Select the target that you want to create an IPA file for.
- Go to Product > Archive to build the project.
- Once the build is complete, the Organizer window will open automatically.
- Click on the Archived App.
- Click on the Export button.
- Choose the App Store as the method of distribution.
- Select the provisioning profile to use for signing the app.
- Specify the destination folder where the IPA file will be saved.
- Click on the Export button to begin exporting the IPA file.
After following these steps, Xcode will generate the IPA file and save it to the specified destination folder.
Additional Considerations
When creating an IPA file for XCUITest testing, you may want to consider including additional arguments for the XCUITest runner. This can be done by modifying the build settings of your Xcode project.
For example, you can specify the -XCTest YourUITestsToRun option to run a specific set of UI tests during XCUITest testing.
It is also recommended to sign the IPA file with a provisioning profile that allows testing on physical devices.
Summary
Creating IPA files for XCUITest testing can be done through command line tools like xcodebuild or through Xcode’s user interface. By following the steps outlined in this guide, you can easily generate IPA files for testing your iOS applications with XCUITest.
References
| 1 | Building a macOS Application from the Command Line |
| 2 | How to create an IPA file for testing an Xcode project? |
| 3 | App Store Connect API Documentation |
Documentation
In order to generate an IPA file, you need to follow the steps below:
- Open Xcode: Launch Xcode and select your current project from the directory.
- Select Target: Click on the project runner and select the target you want to build.
- Specify Scheme: In the Xcode editor menu, choose “Product” and then “Scheme” to specify the scheme for building.
- Build Settings: Go to the “Build Settings” tab in the Xcode editor and make sure the correct configuration is selected.
- Export Options: Under the “Build Settings” tab, locate the “Export” section and click on the “Exports Options” button.
- Archive: On the “Exports Options” page, click on the “Archive” button to generate an archived version of your app.
- Derived Data: Once the archive process is complete, the archived file will be located in the DerivedData folder. Find the IPA file there.
- Export IPA: To export the IPA file, go to the “Product” menu and choose “Archive”, then click on the “Distribute App” option.
- Upload: In the dialog box that appears, choose the method through which you want to distribute your IPA file. Select “iOS App Store” if you want to distribute it through the App Store, or choose “Ad Hoc” to distribute it internally.
- Generate Distribution: Follow the prompts to select the appropriate provisioning profile and signing identity for the IPA file.
- Configure Xcodebuild: If necessary, modify the default Xcodebuild arguments by using the -xcargs option. This step is optional and depends on your specific requirements.
- Testing with XCUI: If you want to include UI testing with XCUI, specify the UI testing target and test files in the scheme editor.
- Building and Cleaning: Clean your project before building the IPA file to ensure a proper build without any leftover files or cached data.
- Artwork and Information: Make sure you have all the necessary artwork and information for your app, including the icon, screenshots, and app metadata.
- Build and Archive Workspace: If you’re working with a workspace instead of a project, use the “Build and Archive” option to generate the archive file.
- Testing before Distribution: It is recommended to test your app before distributing it to ensure it passes all necessary tests and functions properly.
- Creating an IPA file: After going through the steps mentioned above, Xcode will automatically generate an IPA file for you.
- Distribute through iTunes: To distribute your IPA file through iTunes, launch iTunes and connect your device. Then, select the “Apps” tab and click on the “Add” button to import the IPA file.
By following this documentation, you will be able to successfully generate an IPA file using Xcode.


