

WordPress is one of the most popular and user-friendly platforms for creating websites. It offers a wide range of features and functionalities that make it an ideal choice for beginners and advanced users alike. In this article, we will guide you through the step-by-step process of creating a website on WordPress, from choosing a domain name to customizing your site.
The first step you need to take is to choose a hosting provider. There are many hosting services available, but we recommend using a reliable and reputable hosting provider that specializes in WordPress hosting. This will ensure that your site is secure and has optimal performance.
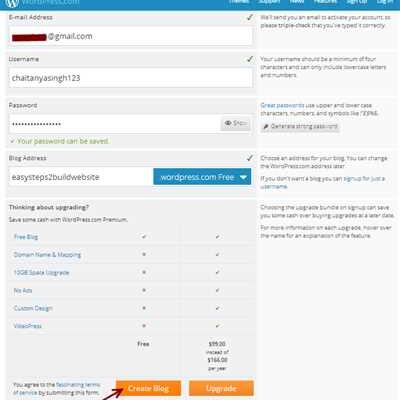
Once you have selected a hosting provider, you can start the process of installing WordPress on your hosting account. Most hosting providers have a one-click WordPress installation feature that makes the process quick and easy. After installing WordPress, you can log in to your admin dashboard to start customizing your site.
WordPress offers a wide range of free and premium themes that you can choose from. Themes control the appearance and layout of your site, so it’s important to choose a theme that suits your needs and preferences. You can browse through the available themes in the WordPress theme directory and install the one that you like. If you want more advanced customization options, you can also consider purchasing a premium theme.
After selecting a theme, you can start creating your site’s pages. WordPress allows you to create different types of pages, such as a homepage, about page, contact page, and more. You can also create a blog page to share your content with your users. Each page can be customized to include different elements, such as text, images, videos, and more.
If you want to add additional functionality to your site, you can install plugins. WordPress has a vast library of plugins that can help you enhance your site’s features and functionalities. From media galleries to e-commerce plugins, you can find a plugin for almost anything you need. Installing plugins is easy, and you can do it directly from your WordPress admin dashboard.
In conclusion, creating a website on WordPress is a straightforward process that anyone can do. By following the steps outlined in this article, you can create a website that meets your needs and provides an excellent user experience. Whether you are starting a blog, an online store, or a service-based website, WordPress is a good choice that includes all the key features you need to build a successful online presence.
Now that you know how to create a website on WordPress, it’s time to get started. Choose a hosting provider, install WordPress, select a theme, create your pages, and add the necessary plugins. Don’t forget to customize your site to make it unique and appealing to your target audience. Have fun building your WordPress website!
How to build a WordPress website
Building a WordPress website is a simple process that anyone can do. Whether you’re creating a blog, a business website, or an online store, WordPress is one of the most popular platforms for building websites. In this guide, we’ll take you through the steps to install, customize, and launch your WordPress site.
Step 1: Choose a hosting provider
Before you can create a WordPress website, you’ll need to find a hosting service that will host your site. There are many hosting services available, but some popular ones include Bluehost, SiteGround, and HostGator. Choose a hosting provider that best suits your needs.
Step 2: Install WordPress
After you have chosen a hosting provider, you will need to install WordPress on your domain. Most hosting services offer a one-click WordPress installation process, which makes it easy to get started.
Step 3: Customize your website
Once WordPress is installed, you can customize your website to fit your needs. This includes choosing a theme, installing plugins, and adding content to your pages. WordPress includes a wide range of free and premium themes and plugins that you can use to customize your site.
Step 4: Add content to your website
After customizing your website, it’s time to add content. Create pages and posts, add media such as images and videos, and customize your site’s navigation. The WordPress dashboard lets you easily manage and organize your content.
Step 5: Test and launch your website
Before launching your website, it’s important to test it to ensure everything is working correctly. You can use the preview function to see how your website will look to users. Once you’re satisfied, you can launch your site and start sharing it with the world.
Takeaway:
Building a WordPress website is a straightforward process that involves choosing a hosting provider, installing WordPress, customizing your website, adding content, and testing and launching your site. With the wide range of themes, plugins, and customization options available, you can create a website that meets your specific needs.
5 steps to create a website on WordPress
Creating a website on WordPress is a simple process that allows you to build a professional and functional site without the need for coding skills. Follow these 5 steps to get started:
Step 1: Choose a domain name and hosting services
The first step is to determine the name for your website, also known as a domain. Choose a name that is catchy, relevant to your content, and easy to remember. After selecting a domain name, you will need to find a hosting service provider that will host your site’s files and make it accessible on the internet.
Step 2: Install WordPress
After choosing a hosting service, you can install WordPress on your website. Many hosting services have a one-click installation process that includes WordPress. Follow the instructions provided by your hosting service to install WordPress efficiently.
Step 3: Customize your website with themes and plugins
When your WordPress installation is complete, you can start customizing your site’s appearance and functionality. WordPress provides a wide range of themes to choose from, both free and paid. Select a theme that matches your desired style and design. Additionally, you can enhance your site’s features by installing plugins. Plugins are add-on software that extends the functionality of your WordPress site. Use popular plugins that offer the specific functions you need for your website.
Step 4: Create pages and add content
With your WordPress site now set up with the desired theme and plugins, it’s time to start creating pages and adding content. Create essential pages such as Home, About, Services, and Contact. Each page should have unique and engaging content, appealing to your target users. You can also start a blog for regular updates and share valuable information. Take time to create quality content that provides value to the users.
Step 5: Test and launch your website
After setting up your website and adding content, it’s crucial to test your site’s functionality and appearance. Check for any errors or issues that need to be addressed. Make sure all links work correctly, and the media files are displayed properly. Once you are satisfied with your site’s performance, it’s time to launch it. Share your website with others, seek feedback, and make necessary adjustments based on the user’s experience.
Takeaway
Creating a website on WordPress is an efficient and cost-effective way to build a professional online presence. By following these 5 steps, you can create a website with ease, providing a good user experience for your visitors. Remember to choose a domain name, find a hosting service, install WordPress, customize your site with themes and plugins, and add engaging content. Test your site before launching it to ensure a seamless experience for your users.
Buy a domain for your website
When starting a website, one of the first steps you need to take is to buy a domain name. A domain name is the web address that users will type in their browsers to reach your site, like www.yoursite.com.
There are many domain name services available, among the most popular ones are WordPress.com, WordPress.org, and other hosting services. Each service varies in cost, so it’s important to choose the one that best fits your budget and needs.
If you choose to create your website using WordPress.org, the process to buy a domain is a bit different. After choosing a hosting service and installing WordPress, you need to buy a premium domain or use a free domain from the hosting service. Some hosting services include a free domain name when you buy a hosting plan, so be sure to check if yours offers this.
When you have a domain, you can then choose a theme for your website. WordPress includes a vast library of free and premium themes that you can use to customize the design of your site. You can find these themes in the WordPress dashboard under the “Appearance” tab.
If you are not sure which theme to choose, you can start by importing a demo theme. Demo themes are pre-designed templates that you can use as a starting point and customize to fit your needs. Importing a demo is easy, and WordPress provides step-by-step instructions on how to do it.
After importing a theme, you can customize it to make it look exactly how you want. WordPress has an easy-to-use dashboard that lets you customize various aspects of your site, including colors, fonts, and layout. You can also add pages, blog posts, and media to your site using the dashboard.
In addition to themes, WordPress offers a wide range of plugins that you can install to add more functionality to your site. Plugins are like apps for your website, and they can help you add features such as contact forms, social media sharing buttons, and SEO optimization.
Once you have customized your site and added all the necessary content, you’re ready to go live! You can now share your site with the world by clicking the “Publish” or “Save” button in the WordPress admin dashboard. Your website will then be accessible to users from your chosen domain name.
Remember, creating a good website takes time and effort, so be patient and take your time to build something that you’re proud of. And don’t forget to regularly update and maintain your website to ensure it remains secure and functional for your users.
Buy a hosting service and install your website on the Host
Once you have created your website on WordPress, whether it’s a personal blog, a business site, or an online store, you will need a hosting service to make it accessible to users on the internet. Hosting is like buying a plot of land where your website will reside.
Choosing the right hosting service is crucial because it determines the performance and reliability of your website. There are many hosting services available, each with its own features and price range. Some of the most popular hosting services include Bluehost, SiteGround, and HostGator, among others. You can find a variety of options by searching online or asking for recommendations.
After choosing a hosting service, you will need to sign up and choose a plan that suits your needs. Plans can vary in terms of storage, bandwidth, and additional features. Consider how many pages and media files you want to include on your website, as well as the expected number of users. It’s important to choose a plan that can accommodate your website’s needs while still being within your budget.
Once you have purchased a hosting plan, the next step is to install WordPress on your host. Most hosting services provide a simple one-click installation process for WordPress. This will create an admin dashboard for your website, where you can customize and manage your site.
Now that WordPress is installed, you can start building your website. You can choose from a wide range of themes, both free and premium, to give your website the desired look and functionality. Themes are like templates that determine the layout and design of your website. You can customize the theme to match your branding by changing colors, fonts, and adding your own content.
If you have a specific theme in mind, you can search for it directly from the WordPress dashboard. You can also browse through the theme directory on WordPress.org or explore premium theme marketplaces. Premium themes usually offer more advanced features and support.
After selecting a theme, you can now import demo content or start building your site from scratch. WordPress provides a user-friendly interface for creating pages, adding posts, and organizing your content. You can also extend the functionality of your website by installing plugins. Plugins are like apps that add specific features and enhance the performance of your website. They can be easily installed from the WordPress plugin directory.
Before making your website live, it’s a good idea to test it in a staging environment. This allows you to make any necessary changes without affecting the live site. You can do this by setting up a testing or development site on your hosting account. Once you are satisfied with the results, you can easily migrate your site to the main domain.
Now that your website is ready, you can share it with the world. Make sure to choose a good domain name that reflects your brand or the purpose of your website. You can either buy a domain from the hosting service or use a separate domain registrar. Each hosting service has its own process for connecting your domain to the website.
The cost of hosting services and domains can vary depending on the provider and the plan you choose. It’s important to compare prices and features to get the best value for your money. Some hosting services also offer additional services like security, backups, and customer support.
In conclusion, buying a hosting service and installing your website on the host is a crucial step in the process of creating a website on WordPress. It allows you to make your website accessible to users and gives you full control over its design and functionality. By following the steps outlined above, you can create a professional and engaging website that meets your needs and goals.
Choose and install a WordPress Theme
When starting to build your WordPress website, one of the first steps you’ll need to take is choosing and install a theme. The theme is a key component of your website as it will determine its overall look and feel.
WordPress offers a wide range of themes for you to choose from. You can find them on WordPress.org or on WordPress.com, depending on where your website is hosted. Both platforms provide a variety of free and premium themes, each offering something different in terms of design and functionality.
To choose a theme, you’ll first need to consider what you want your website to look like and what features or functions you’ll need. You can browse through different themes to find the one that best suits your needs. You can also use the “Live Demo” feature to see how each theme will look on your website.
Once you’ve found the perfect theme, you can proceed to install it. To install a theme on WordPress, go to your dashboard and navigate to “Appearance” > “Themes”. Click on the “Add New” button and then click on the “Upload Theme” button. Choose the theme file that you downloaded from either WordPress.org or WordPress.com and click on “Install Now”.
After the theme is installed, you can activate it by clicking on the “Activate” button. This will make the theme live on your website and your visitors will start seeing the new design.
It’s important to note that changing your theme will not affect your website’s content. All the pages and posts that you’ve created will still be there, but they might need some adjustments to fit into the new theme.
Installing a theme is a simple process, but it’s worth taking the time to find the right theme for your website. The theme you choose will have a significant impact on your website’s appearance and functionality, so it’s important to choose wisely.
The cost of a theme can vary. There are free themes available, but if you want more features and customization options, you may need to purchase a premium theme. Premium themes often come with additional support and regular updates.
In conclusion, choosing and installing a WordPress theme is an important step in creating your website. Take some time to explore different themes, consider your needs and preferences, and find the perfect theme to make your website stand out.
Customize the website exactly what you want

Once you have created your website using WordPress, you will want to customize it to exactly suit your needs and preferences. Customization allows you to personalize the look and feel of your site, ensuring that it stands out from other websites. In this section, we will walk you through the process of customizing your website, step by step.
The first step in customizing your website is to choose a theme. A theme is like a template for your site, providing the overall design and layout. WordPress offers a wide range of themes to choose from, both free and premium. You can browse through the available themes on the WordPress.org website or directly from your WordPress dashboard. Take your time to find the theme that best fits your content and style.
After choosing a theme, the next step is to customize it. WordPress provides a user-friendly customization interface that allows you to change various aspects of your site, such as the colors, fonts, background, and more. You can access the customization options by going to the “Appearance” section in your WordPress admin dashboard and selecting “Customize”. From there, you can make changes to your theme and see the results in real-time.
Customization also includes adding functionality to your website. WordPress offers a wide range of plugins that can be easily installed to add extra features and functionality. Some popular plugins include those for search engine optimization, contact forms, social media integration, and more. You can browse and install plugins from the WordPress.org plugin repository or directly from your WordPress dashboard.
If you have specific needs or want more control over your site, you may consider using a premium theme or hiring a web developer to create a custom theme for you. Premium themes often offer more advanced features and customization options. Hiring a web developer allows you to have a unique and tailored design that exactly matches your vision.
Once you have customized your website, it’s time to test it. WordPress lets you easily create and manage additional pages, such as a blog page or an about page. You can add content to these pages, including text, images, videos, and more. Make sure to save your changes and preview your site to see how it looks. If everything looks good, you’re ready to share your website with the world.
A key takeaway in the customization process is to find what works best for you. Experiment with different themes, plugins, and customization options to create a website that reflects your brand and serves your audience. Remember that you can always make changes and refine your site as needed.
As a final note, it’s worth mentioning that the cost of creating and customizing a website can vary depending on the options you choose. WordPress itself is free, but there may be costs associated with hosting, premium themes, plugins, and other services. Take the time to research and compare different options to find the best solution for your budget and needs.
In conclusion, creating a website on WordPress is a relatively straightforward process. However, the real power lies in the ability to customize your website exactly how you want it. With the right tools, themes, and plugins, you can create a unique and professional-looking website that stands out from the rest.
Start blog now
If you want to start a blog, then WordPress is the key to your success. With its user-friendly interface, extensive plugin library, and customizable themes, WordPress makes it easy to create and share your content with the world.
Here are 5 steps to help you get started with your WordPress blog:
- Choose a hosting service: The first step is to find a good hosting service to build your website on. There are many options available, but WordPress.com and WordPress.org are among the best sources for hosting your site.
- Install WordPress: Once you have your hosting service, you can install WordPress. This process includes creating an admin username and password, choosing a name for your site, and saving your settings.
- Select a theme: After installing WordPress, you can choose a theme for your blog. WordPress offers a wide variety of free and premium themes, each with its own unique look and feel.
- Customize your website: Once you have selected a theme, you can customize your website to make it your own. This includes choosing colors, adding a logo, and selecting different layout options.
- Create pages and import content: Now that your website is set up, you can start creating pages and importing content. You can create an About page, a Contact page, and any other pages you may need. You can also import content from other sources if you already have existing content.
After completing these steps, you will have a fully functional WordPress blog. However, there are still a few key things you should do to make your blog more popular among users:
- Write great content: Providing valuable and engaging content is the most important factor in making your blog popular. Take the time to plan and write high-quality articles that your readers will find useful.
- Share on social media: Use social media platforms to promote your blog and share your articles. This will help you reach a wider audience and attract more visitors to your site.
- Use plugins: WordPress has a wide range of plugins that can enhance the functionality of your blog. Consider using plugins for SEO, social media sharing, and other important functions.
- Test and optimize: Continuously test and optimize your blog to improve its performance. This includes analyzing your website’s traffic, user engagement, and conversion rates.
- Buy a domain name: If you want to take your blog to the next level, consider buying a domain name. Having your own domain name will make your blog look more professional and help with branding.
In conclusion, starting a blog on WordPress is a straightforward process that includes choosing a hosting service, installing WordPress, selecting a theme, customizing your website, and creating pages. To make your blog popular, focus on providing great content, sharing on social media, using plugins, testing and optimizing, and considering a domain name.
Share this
One of the best ways to increase the visibility of your WordPress website is to allow users to easily share your content on social media platforms. Fortunately, WordPress provides several plugins that make this task a breeze. Here are some steps to follow:
Step 1: Choose the best social sharing plugin
There are many social sharing plugins available in the WordPress.org plugin repository. Take some time to research and compare different options before choosing the one that suits your needs best.
Step 2: Install and activate the plugin
Once you have found the right social sharing plugin, go to your WordPress dashboard, click on “Plugins” in the left sidebar, then click “Add New”. Search for the plugin by name, and once you have found it, click “Install Now” and then “Activate”.
Step 3: Customize the settings
After activating the plugin, you will usually find a new section in the WordPress dashboard, which allows you to customize the appearance and behavior of the social sharing buttons. Configure the settings according to your preferences.
Step 4: Test the functionality
Once you have customized the settings, it is a good idea to test the social sharing buttons on different pages and posts of your website. This will ensure that they function correctly and look good on all devices.
Step 5: Share away!
Now that your social sharing plugin is up and running, users will be able to easily share your content with their friends and followers on social media. This can greatly increase the reach and visibility of your website.
Takeaway:
By providing social sharing buttons on your WordPress website, you make it easier for users to share your content, which can lead to increased traffic and engagement. Choose a popular and reliable social sharing plugin, customize the settings, test its functionality, and start sharing!
Sources: wordpress.org, wordpress.com
Key Takeaway
When creating a website on WordPress, one of the most important steps is choosing the right theme. WordPress provides a wide range of free and premium themes for you to choose from. You can browse through the WordPress.org theme directory or check out popular theme marketplaces to find the best theme for your website.
After choosing a theme, the next step is installing WordPress on your hosting service. You will need to have a domain name and hosting plan in place before you can start building your website. Once WordPress is installed, you can customize your site by adding pages, media, and other content to make it unique.
One of the key takeaways of using WordPress is that it includes a powerful plugin system. Plugins are small pieces of code that add additional functionality to your website. You can find thousands of plugins on the WordPress.org plugin directory, ranging from simple contact forms to complex e-commerce systems. Before installing a plugin, make sure to read reviews and check its compatibility with your theme and version of WordPress.
If you want to save time and still have a professional-looking website, you can use demo content. Many themes come with demo content that you can import into your site. This will populate your pages with sample text and images, which you can then replace with your own content. It’s a great way to quickly start building your website without having to create everything from scratch.
Another thing to consider is whether you want to use WordPress.com or self-hosted WordPress.org. WordPress.com is a hosted service where you can create a blog or website for free, while WordPress.org allows you to download and install the WordPress software on your own hosting service. Self-hosted WordPress.org gives you more control and flexibility, but it requires more technical knowledge and may involve additional costs for hosting and domain registration.
In conclusion, building a website on WordPress involves several key steps: choosing a domain name and hosting service, installing WordPress, selecting a theme, customizing your site, and adding plugins for additional functionality. Whether you are starting a personal blog or a business website, WordPress provides an easy-to-use platform with a wide range of options to suit your needs.


