

If you’re looking to get creative with your digital photos and make something fresh and well-blended, collages are a great way to go. Collages can be a fun gift or a way to add a piece of visual art to your home decor. With a few simple steps, you can learn how to make nice collages without the need for Photoshop or any other fancy tools. In this guide, we’ll show you how to make beautiful collages using the TurboCollage software.
TurboCollage is a one-step collage maker that’s perfect for beginners as well as those who prefer a more practical, no-fuss approach to collaging. You can use the software to set the size and format of your collage, arrange your photos, and even add text or overlay textures to give your collage a unique look. Whether you have just two photos or lots of images to work with, TurboCollage can help you create the perfect collage.
When making a collage, it’s always a good idea to have a theme in mind. This will help you decide on the layout and style of your collage. For example, if you’re making a collage for a photography magazine, you might want to include lots of photos and use a modern, magazine-style layout. On the other hand, if you’re making a collage as a gift for someone special, you might prefer a more inspirational or romantic theme.
To start making your collage, fire up TurboCollage and set the width and height of your collage. You can also choose whether to include a border around the edges of your photos or to mask the photos into different shapes. Once you’ve set the basic parameters, you can drag and drop your photos onto the canvas and arrange them as you like. TurboCollage has built-in guides and snap-to-grid lines to help you align your photos and make them look nice and neat.
Once you’ve placed your photos, you can start getting creative with the layout. You can add text or stock textures to your collage to give it a unique look. TurboCollage also has a feature that lets you export your collage as a JPG or PNG image, so you can easily share it via email or print it out and frame it. The final result will be a beautiful, well-blended collage that you can be proud of.
- An Inspirational Guide: How to Make a Collage
- Make a collage – 10 practical tips
- Create a Collage with Lots of Photos
- Step 1: Fire-Up TurboCollage
- Step 2: Set the Size of Your Collage
- Step 3 Add Pictures to Your Photo Collage
- Step 4 Use One-Step Built-In Tools To Get a Fresh Collage
- Step 5 Export the Collage to JPG
- Learn more
- Video:
- How to make interesting COLLAGE ART | MIX MEDIA techniques and ideas
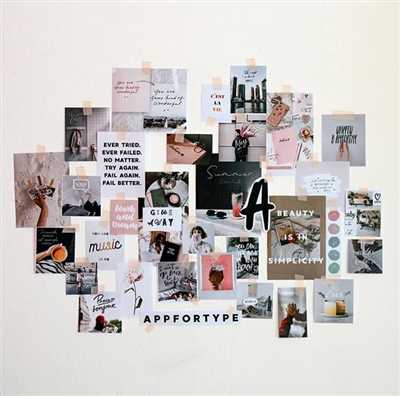
An Inspirational Guide: How to Make a Collage
Collaging is a popular art form that allows you to combine different pieces of images, textures, and text to create a unique and visually appealing composition. Whether you’re looking to make a gift for someone special or adding a modern touch to your photography, collages are a great way to showcase your creativity.
Here are 10 practical tips to help you learn how to make a collage:
1. Choose a theme: Before you start, decide on a theme for your collage. This will give you a clear direction and make it easier to find images that fit together well.
2. Collect your pictures: Gather the photos and images you want to include in your collage. You can use your own photos or find stock images online for a fresh look.
3. Get the right tools: There are many digital tools available for making collages, but one-step collage makers like TurboCollage are usually a good choice for beginners. These tools often have built-in templates and drag-and-drop features that make collage creation easy.
4. Arrange your images: Start by dragging and dropping your images onto the canvas. Experiment with different layouts and sizes until you find the one that suits your vision.
5. Add textures and overlays: To add more depth to your collage, consider including textures or overlays. These can be images of wood, fabric, or other materials that you overlay on top of your photos to create a more layered effect.
6. Mask the edges: To create a well-blended collage, make sure to mask the edges of your photos. This will help blend them together and give your collage a more cohesive look.
7. Use layers: Layers are a powerful tool in collage making. They allow you to add and manipulate different elements without affecting the rest of your composition. Experiment with using multiple layers to create depth and visual interest.
8. Export in the right format: When you’re happy with your collage, export it in a format that suits your needs. JPG is a common format for sharing and printing collages.
9. Resize if necessary: Depending on how you plan to use your collage, you may need to resize it. Consider the email or social media platform’s width restrictions if you’re sharing it online, or the desired print size if you’re making a physical copy.
10. Get creative: Don’t be afraid to think outside the box and try new techniques. Collaging is a versatile art form that can be as simple or as complex as you want it to be. Let your creativity run wild and see what unique creations you can come up with!
So, fire up your creative juices and start making beautiful collages that are sure to impress. Whether you’re a photography enthusiast or just looking for a fun hobby, collaging is a wonderful way to express yourself and create something truly inspirational.
Make a collage – 10 practical tips
Creating a collage is a great way to bring together your favorite images and create a visually appealing composition. Whether you’re looking to make a gift for a loved one or just want to add a creative touch to your home decor, collages can be a fun and unique way to display your photos. Here are 10 practical tips to help you create stunning collages using TurboCollage:
- Choose your theme: Before you start creating your collage, think about the theme or concept you want to convey. This will help you gather the right photos and give your collage a cohesive look.
- Get inspired: Don’t know where to start? Look for inspiration online or in magazines. Explore different collage styles and layouts to get ideas for your own composition.
- Gather your photos: Collect the images you want to use in your collage. You can use your own pictures or find stock photos online. Make sure the images are of high quality and reflect the theme you’ve chosen.
- Arrange your photos: Open TurboCollage and drag and drop your selected images onto the canvas. Use the built-in tools to resize and position the photos as desired. Experiment with different placements to find the most visually pleasing arrangement.
- Use layers: TurboCollage allows you to create collages with multiple layers. This means you can overlap images, create borders, and add text or other elements. Play around with layering to give your collage depth and visual interest.
- Add textures: To make your collage more unique, consider adding textures or patterns to the background or individual images. TurboCollage offers a variety of built-in textures that you can apply to enhance the overall look of your composition.
- Experiment with mask lines: TurboCollage also provides the option to add mask lines between images. These lines help create separation and add a professional touch to your collage. Try different mask line styles to find the one that best complements your layout.
- Export your collage: When you’re satisfied with your collage, export it as a high-resolution image. TurboCollage usually saves collages in the JPG format, but you can choose the file format you prefer. This way, you can share your creation via email, print it, or use it for various digital purposes.
- Don’t be afraid to get creative: Collaging is a versatile art form, so don’t be afraid to experiment and think outside the box. Add an unexpected element, mix different styles, or play with the size and shape of individual parts. Let your imagination run wild!
- Learn from others: If you’re new to collaging, spend some time studying the work of experienced collage artists. You can find tutorials, guides, and examples online that can help you expand your creative skills and learn new techniques.
Remember, making a collage is all about expressing your creativity and personal style. Have fun with the process, and enjoy the satisfaction of creating a well-blended piece that beautifully showcases your imagery!
Create a Collage with Lots of Photos
If you want to create a visually stunning collage packed with images, here is a step-by-step guide to help you create something amazing. Collages with lots of photos can be a great way to showcase a variety of pictures or create a collection of imagery that tells a story. Whether it’s for a personal project or a gift, collages can be a creative and fun way to display your photos.
- Find a collage-making tool: When it comes to making collages with lots of photos, you need a tool that’s easy to use and allows you to add and arrange pictures with ease. One-step collage creators like TurboCollage or Photoshop can be helpful in this regard.
- Choose the photos you want to include: Gather a collection of photos that you want to use in your collage. It’s always a good idea to choose more photos than you think you’ll need, as it gives you more options during the creative process.
- Create a collage with a theme: Decide on a theme or concept for your collage. This could be anything from a collection of images from a recent trip to a collage of images that evoke a certain mood or emotion. A theme will help guide your creative process and ensure your collage has a cohesive look.
- Set the size: Determine the size of your final collage. Consider whether you want to create a digital collage for sharing on social media or if you want to print it out and display it as a physical piece of art.
- Determine the layout: Drag and drop your chosen photos onto the canvas of the collage-making tool. Experiment with different layouts, such as grids or overlapping images, until you find a composition that you like.
- Adjust the images: Resize and reposition the photos as necessary. You may also want to add filters or adjust the colors to achieve a well-blended and cohesive look.
- Add textures or overlays: To give your collage a fresh and modern look, consider adding textures or overlays. These can be found in built-in libraries or you can create your own using inspirational images or patterns.
- Mask the edges: If you prefer a clean and polished look, you can mask the edges of your photos to create a seamless blend. This can be done by using the masking tools provided by the collage-making tool.
- Include text or graphics: If your collage tells a story or has a specific message, you can add text or graphics to enhance the overall impact. Use appropriate fonts and sizes that complement the images and theme of your collage.
- Export and share: When you’re satisfied with the final result, export your collage in a format such as JPG or PNG. You can then share it on social media or print it out and frame it as a unique piece of art.
Creating a collage with lots of photos may seem like a daunting task, but with the right tools and a little guidance, it can be a fun and rewarding experience. Don’t be afraid to get creative and experiment with different techniques and styles. Regardless of the tools you use, the most important thing is to enjoy the process and let your imagination run wild!
Step 1: Fire-Up TurboCollage
When it comes to creating beautiful and well-blended collages, TurboCollage is the go-to tool. With its practical features and easy-to-use interface, it provides a seamless collaging experience. Whether you’re a beginner or an experienced user, TurboCollage has all the tools you need to bring your creative vision to life.
First, you’ll need to download and install TurboCollage on your computer. Once that’s done, open the application to get started. You’ll be greeted with a modern and user-friendly interface that gives you quick access to all the necessary features.
It’s important to note that TurboCollage allows you to work with both digital photos and images from your personal collection. You can even access photos from your social media accounts or online platforms. This gives you the freedom to choose from a wide range of images.
When you have decided on the photos you want to use, drag and drop them into TurboCollage. You can arrange them in any order and resize them as needed. TurboCollage also provides a one-step option where it can automatically arrange your photos in a well-balanced layout.
To add a creative touch to your collage, you can use textures, overlays, and masks. These tools help blend the photos and give your collage a unique and artistic look. You can experiment with various textures and overlays to find the perfect combination that suits your theme.
Once you’re satisfied with the arrangement and overlay options, it’s time to finalize your collage. You can choose to export it as a high-resolution image file, such as JPG or PNG, which you can then print and frame or share digitally via email or social media.
TurboCollage makes collaging a breeze, even for beginners. Its user-friendly interface and wide range of features ensure that you can create stunning collages in just a few simple steps. So, fire up TurboCollage and let your creativity flow!
Step 2: Set the Size of Your Collage
When making collages, the size of your final piece is an important factor to consider. It determines how much space you have to arrange and fit all the images together. You have the freedom to choose any size you prefer, but there are a few practical tips you should keep in mind.
1. Access your collaging software or tool. If you don’t have one installed, you can use a free online collage maker like TurboCollage.
2. Open a new project or create a new canvas. Most collaging tools have a built-in option to set the size of your collage at the beginning. Choose the width and height that suits your needs. Whether you’re making a gift, creating a piece of art, or just having fun, the size should match your vision.
3. If you’re unsure about the size, consider the theme or imagery you want to include. If you have lots of images you want to add, a larger size may be more suitable. If you prefer a modern and minimalist look, a smaller size with a few well-blended pictures might be ideal.
4. Keep in mind the final format you want to export your collage in. If you’re planning to print it as a poster or frame it, you may want to choose a larger size with higher resolution. If you’re going to share it via email or social media, a smaller size in JPG format may be more practical.
5. Drag and drop the images you’ve chosen onto your collage canvas. Arrange them in a way that seems most appealing to you. Experiment with different layouts, angles, and lines. Don’t be afraid to get creative and step outside the box! Add textures, mask edges, or apply filters to make your collage more unique.
6. Remember to consider the aspect ratio of your images. If some of them are in portrait mode while others are landscape, they may not fit well together. You can crop or resize the pictures to better fit the collage.
7. If you’re working with stock photos or images you’ve taken yourself, try to find pictures that have a similar style or color palette. This will help create a more cohesive and harmonious composition.
By following these steps, you’ll be well on your way to creating beautiful and visually appealing collages. Don’t get discouraged if it takes some time to find the right size and arrangement. With practice, you’ll become more confident and efficient in the collaging process.
Step 3 Add Pictures to Your Photo Collage

Once you’ve created a fresh canvas and set the size of your collage, it’s time to add some pictures! Whether you prefer to use your own photos or stock images, this step will help bring your collage to life.
There are several tools and software options available to help you with the process of adding pictures to your collage. If you’re looking for a simple one-step solution, you can use TurboCollage, a digital collage maker that allows you to drag and drop your images onto the canvas. This user-friendly tool also offers built-in templates and the ability to export your collage in various formats, making it easy to share your creation via email or social media.
If you prefer a more creative and hands-on approach, Adobe Photoshop is a popular choice. With Photoshop, you have complete control over every aspect of your collage, from the placement and size of your photos to the overlay of textures and mask layers. Photoshop also provides access to a wide range of tools and filters, allowing you to experiment with different effects and styles.
When adding pictures to your collage, it’s important to think about the overall theme or mood you’re trying to achieve. You can arrange your photos in a grid-like fashion for a modern and orderly look, or overlap them and create jagged edges for a more artsy and unconventional feel. The choice is yours!
One helpful tip is to have a guide or inspiration in mind when selecting and arranging your photos. For example, if you’re creating a magazine-style collage, you might want to include text or lines to mimic the layout of a magazine page. If you’re making an inspirational collage, you could use images that evoke certain emotions or convey a particular message.
Don’t be afraid to get creative with your collage! Experiment with different sizes and placement of your photos. You can also mix and match elements from different photos to create a unique and well-blended piece of art. Consider using overlay and mask layers to add depth and textures to your collage.
If you don’t have access to Photoshop or other image editing software, you can still create a great collage using free online tools or smartphone apps. Many of these tools offer pre-designed templates and practical guides to help you learn the basics of collaging.
Remember, the key to a successful photo collage is to have fun and let your creativity shine. Whether you’re using high-resolution images or thrifted photographs, the combination of different parts and imagery will always create something special.
| Step 1 | Step 2 | Step 3 |
| Fire up your digital photography | Set the size and format of your collage | Add pictures to your photo collage |
| Get access to stock images or use your own | Choose a practical and inspirational theme | Experiment with placement and arrangement |
| Learn how to use Photoshop or other collage-making tools | Include text, lines, or overlay for added interest | Have fun and let your creativity shine |
Step 4 Use One-Step Built-In Tools To Get a Fresh Collage
When it comes to making collages, one of the final steps is to use some built-in tools to add the finishing touches to your creation. These tools can help you achieve a fresh, modern look for your collage, making it more visually appealing and well-blended. In this step, we will learn how to access and use these tools effectively.
1. Fire up your collaging software, whether it’s an online tool like TurboCollage or a desktop application like Photoshop. Once you have your software open, you should be able to find these built-in tools in the toolbar or menu.
2. One of the tools you should look for is the overlay or mask tool. This tool allows you to add layers or textures to your collage, giving it more depth and visual interest. Whether you prefer a practical or inspirational theme for your collage, these overlays can help you achieve the desired effect.
3. Another tool you should use is the text tool. Adding text to your collage can provide context or emphasize certain elements. You can use this tool to create captions, titles, or even quotes that complement the imagery in your collage.
4. If you have lots of images in your collage, you can use the drag and drop tool to arrange them more effectively. This tool allows you to easily move and reposition images, so you can find the perfect arrangement that suits your vision.
5. Finally, once you’re satisfied with your collage, you can use the export or save tool to save it in a format of your preference, such as JPG. This will allow you to share your collage via email or social media, or even print it out as a gift.
These one-step built-in tools can help you add the final touches to your collage, transforming it from a collection of images into a well-composed and visually appealing piece of art. With their help, you can ensure that lines are smooth, edges are not jagged, and everything flows together seamlessly. Remember to explore the different options available to you and don’t be afraid to get creative with your collage!
Step 5 Export the Collage to JPG
Once you’ve created a fresh and well-blended collage using the digital collaging tools and techniques mentioned in the previous steps, you are ready to export it as a JPG file to share or print. Here’s how:
- Make sure you have arranged all the parts of your collage just the way you want them. Whether you prefer a modern and clean look or a more eclectic and layered style, take the time to set everything in place.
- Resize your collage to the desired dimensions. Depending on where you plan to use it, such as for social media, a website, or as a gift, you may need to adjust the width and height accordingly. Most editing tools have a built-in resize function to help you with this.
- When you’re happy with the arrangement and size of your collage, it’s time to export it as a JPG file. Look for the export or save options in your editing software and choose the JPG format. This format is widely compatible and allows for high-quality imagery.
- Before saving, consider adding any final touches. You can include text, inspirational quotes, or textures to enhance the overall aesthetic. It’s also essential to check for any stray lines or jagged edges that might have been created during the collaging process.
- Export the collage by saving it as a JPG file. Choose a location on your computer where you can easily find it later. You can also set the image quality level based on your preferences and the intended use. Higher quality settings generally result in larger file sizes.
With these simple steps, you can create visually appealing collages and export them as JPG files. Once exported, you can share them via email, social media, or print them for display. Whether you want to learn more about collaging or just need a practical one-step guide, these tips should help you get started and create beautiful collages with ease.
Learn more
If you want to learn more about creating nice collages, there are a few tips and tricks you can follow to make your collages stand out.
1. Use high-quality photos: The quality of your pictures can make or break the final collage. Always try to get high-resolution images with sharp edges. If you’re looking for stock photos, there are plenty of websites where you can find creative and inspirational imagery.
2. Use a theme: Whether you prefer a modern or vintage look, having a theme can help you create a well-blended collage. You can use textures, lines, or overlay effects to give your collage a cohesive feel.
3. Arrange your photos: When making a collage, don’t just drag and drop your images onto a blank canvas. Take the time to arrange them in a visually appealing way. You can use layers and masks to add depth and create interesting compositions.
4. Play with size and format: Collages don’t always have to be square or rectangular. Experiment with different sizes and formats to create something unique. You can also add text or email your collage as a gift.
5. Use built-in tools: If you don’t have access to photoshop or other image editing software, there are plenty of one-step collage tools available online. TurboCollage is a popular option that allows you to easily create collages with lots of creative options.
Remember, making collages is a fun and creative process. Don’t be afraid to try new things and explore different techniques. With the right tools and a bit of practice, you can create beautiful collages that showcase your photography skills.
Now that you’ve learned some practical tips on how to make nice collages, it’s time to fire-up your creative side and start making your own masterpieces!


