

Google Sites is a free tool that allows you to create websites and share them with others. Whether you want to create a website for your business or a personal project, Google Sites provides you with a user-friendly platform to build, customize, and manage your site.
With Google Sites, you can easily add and arrange different types of content, such as text, images, videos, and forms, on your website. You can create pages, add headers and footers, and even incorporate custom themes to give your site a unique look and feel.
One of the great features of Google Sites is the ability to collaborate with others in real-time. You can easily invite team members to edit your site, and they can make changes and provide feedback without the need to save and send files back and forth.
When building your site, you can choose from different templates and layouts to create the structure and design that best fits your needs. You can add menus, dividers, and collapsible boxes to organize your content and make it easily accessible to your visitors.
In addition to the classic version of Google Sites, there is also a new version called “Google Sites with the latest version.” This version offers more features and options for customization, including the ability to add a banner image, color schemes, and site-wide settings.
Once you have finished building your site, you can publish it with just a few clicks. Google Sites provides you with a URL that you can share with others, and you can also customize your domain name if you prefer. You can also choose whether to make your site public or restrict access to specific individuals or groups.
Google Sites makes it easy to manage your site and keep track of changes. You can use the revision history feature to see a list of all the edits made to your site, and you can revert to previous versions if needed. You can also use the analytics feature to see how many visitors your site has received and where they are coming from.
Whether you are building a website for your business, school, or personal use, Google Sites is a powerful and intuitive tool that can help you create a professional-looking site in no time. Its user-friendly interface and extensive customization options make it a popular choice for individuals and organizations alike.
So, if you are looking to create a website, consider using Google Sites. It’s free, easy to use, and offers all the features you need to build and manage your site. Start creating your website today and see how Google Sites can help you reach your goals!
- Google Sites
- Questions about Google Sites
- Is Google Sites free
- Create a header
- Choose a theme
- Add text and media
- Text content:
- Images and other media:
- Menus and navigation:
- Collapsible sections:
- Tips:
- Incorporate Google elements
- Insert a Google Sites contact form
- Arrange columns and sections
- Add and manage pages
- Publish and collaborate
- Share the latest guidelines and policies with a remote workforce
- Add a site-wide footer
- Video:
- How to Create a Class Website for Teachers | Google Sites Tutorial
Google Sites
Google Sites is a solution provided by Google that allows you to quickly and easily create and manage websites. Whether you need to build an internal site for your employees or share information with the public, Google Sites can help you accomplish your goals.
With Google Sites, you can create pages and subpages, add content and elements to them, and arrange them in a way that makes sense for your site’s structure. You can choose a theme and customize the colors, header, footer, and banner to align with your brand or preferences.
The editor provided by Google Sites is easy to use and allows you to make changes site-wide or on specific pages. You can easily edit text, add images, embed YouTube videos, create forms, and incorporate other elements that enhance your site’s functionality.
Google Sites also provides options to collaborate with others on building your site. You can share access with team members and assign them different roles and permissions. This makes it easy to work together and ensure everyone is contributing to the site’s progress.
When it comes to managing your site’s content, Google Sites offers features like anchor menus, collapsible sections, and page-level permissions. These tools help you organize and present your information effectively.
If you have any questions or need help with Google Sites, you can refer to the Google Sites Help Center, which offers comprehensive guidelines and tips to assist you through the process. The help center covers everything from basic site setup to advanced customization options.
Google Sites is a powerful tool that can be used by individuals, teams, and organizations of all sizes. Whether you’re looking to create a simple site for personal use or a complex site for your business, Google Sites has the features and flexibility to meet your needs.
Questions about Google Sites
Here are some common questions about Google Sites:
1. What is Google Sites?
Google Sites is a free tool provided by Google that allows you to create and publish websites. It lets you create websites based on pre-designed templates or customize them according to your preferences.
2. How do I start building a site?
To start building a site, first, you need to sign in to your Google account. Then, go to sites.google.com and click on the “+” button to create a new site. You can choose a template or start from scratch.
3. How do I edit the content on my site?
To edit the content on your site, open the site in the Google Sites editor. Click on the elements you want to edit and make the necessary changes. You can add text, images, videos, forms, and other media elements to your site.
4. How can I customize the design of my site?
Google Sites provides various options to customize the design of your site. You can change the color, layout, and size of the elements. You can add a banner or header image, arrange the contents into columns, add dividers or anchor menus, and incorporate other design elements.
5. Can I collaborate with others on site editing?
Yes, Google Sites lets you collaborate with others in real-time. You can invite others, such as your employees or workforce, to edit the site. All the changes made by the collaborators will be automatically saved.
6. How do I publish my site?
To publish your site, click on the “Publish” button in the top-right corner of the Google Sites editor. You can choose to publish the site to a specific domain or make it public. You can also set up site-wide sharing and permissions.
7. How can I embed a YouTube video on my site?
To embed a YouTube video on your site, click on the “Insert” menu in the Google Sites editor. Then, select the “YouTube” option and enter the URL of the video. The video will be embedded on your site.
8. How do I create forms on my site?
To create forms on your site, click on the “Insert” menu and select the “Form” option. You can create custom forms with various fields and options. The responses to the form will be automatically collected and can be viewed in Google Forms.
9. What are some tips and guidelines for building effective sites?
Some tips and guidelines for building effective sites include organizing the content into sections, using clear headings and subheadings, keeping the design clean and professional, using appropriate colors, and making the site mobile-friendly.
10. How can I contact Google for help with Google Sites?
If you need help with Google Sites, you can visit the Google Sites Help Center for tutorials and FAQs. You can also contact Google support for assistance with specific issues or questions.
Is Google Sites free
Google Sites is a free website building solution provided by Google. Whether you want to create a website for your personal use or for your organization, Google Sites offers a user-friendly platform to help you get started.
With Google Sites, you can easily create and edit web pages using their drag-and-drop editor. This editor allows you to add text, images, videos, and other content to your site. You can also choose from a variety of themes to customize the look and feel of your site.
One of the great features of Google Sites is the ability to collaborate with others. You can invite other users to edit your site, making it easy to work on projects together. You can also hide specific pages or content items if you want to restrict access to certain information.
Google Sites also provides a variety of options for organizing and managing your site. You can create menus, subpages, and anchor links to help users navigate your site. You can also add a calendar, forms, and a contact gallery to your site, making it easy for visitors to interact with you.
Another advantage of Google Sites is its compatibility with other Google products, such as Google Calendar and Google Forms. You can easily embed these products into your site, allowing you to save time and streamline your workflow.
Google Sites also offers a mobile-friendly version, so your site will look great on any device. It automatically adjusts the size and layout of your site to fit the screen it’s being viewed on.
In summary, Google Sites is a free and user-friendly solution for creating and managing websites. Whether you’re a small business, a school, or a remote workforce, Google Sites has the tools and options you need to build a website that meets your needs.
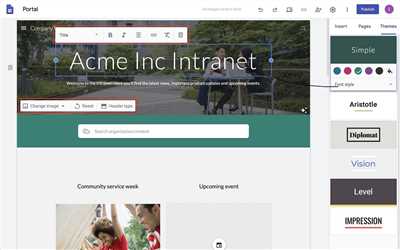
Create a header
A header is an important element of your Google Site, as it provides a visual identity and sets the tone for your entire website. It’s the first thing visitors see when they access your site, so it’s essential to make it attractive and informative.
To create a header, follow these steps:
- Click on the pencil icon to edit your Google Site.
- In the Google Sites editor, click on “Insert” in the top toolbar.
- Choose “Header” from the drop-down menu.
- There are three options for creating a header:
- Text: Enter the text you want to display in the header, such as the name of your site or a slogan.
- Image: Click on “Choose an image” to upload or select an image from your Google Drive or the web.
- Logo: If you have a logo for your site, click on “Choose an image” to upload or select an image from your Google Drive or the web.
- After selecting the type of header, customize it using the available options:
- Size: Adjust the size of the header by dragging the slider or entering specific dimensions.
- Color: Choose a color for the header background.
- Alignment: Select whether you want the header to be aligned to the left, center, or right of the page.
- Image Options: If you chose an image header, you can further customize it by selecting options like “Circle mask” or “Overlay color.”
- Once you’re satisfied with the header design, click on “Insert” to add it to your Google Site.
- Remember to save your changes and publish your site to make the header visible to visitors.
By following these steps, you can easily create an eye-catching header for your Google Site. Whether it’s a combination of text and images or a logo, the header will help to grab visitors’ attention and provide a clear visual representation of your site’s purpose.
Choose a theme
When building a website on Google Sites, one of the first steps is to choose a theme. The theme is what makes your site look unique and visually appealing. Google offers a variety of pre-designed themes that you can choose from.
To choose a theme, go to the “Edit” menu on your Google Sites page and click on “Change the theme.” This will open a menu with a variety of theme options to choose from. You can preview each theme by clicking on them, and once you find one that you like, simply click “Select” to apply it to your site.
The themes on Google Sites are designed to work well with the drag-and-drop editor. They have different sections and boxes where you can arrange your content, such as headers, footers, sidebars, and content areas. You can also customize the theme by changing the banner image, site-wide colors, and font sizes.
When choosing a theme, consider the purpose of your website and the type of content you want to incorporate. Think about what you want your site to look like and what kind of impression you want to make on your visitors. Consider how the theme will work with the content you have and whether it will be easy to navigate.
If you’re working with a team, it’s important to choose a theme that everyone agrees on and that accommodates their needs. Make sure the theme has options for collaboration, such as the ability to share and manage content. You may also want to consider a theme that is mobile-responsive, as many users access websites from their smartphones.
Once you choose a theme, you can further customize it by adding pages, forms, and other content based on your needs. Google Sites has options for creating contact forms, FAQs, and even custom pages. You can also add images and videos to make your site more visually appealing.
If you want to make changes to your theme in the future, you can always go back to the “Change the theme” menu and select a different one. Keep in mind that changing your theme will not delete any of your content, but it may rearrange some elements and require you to make adjustments.
Google Sites provides a user-friendly solution for creating websites, and choosing the right theme is an important step in the process. Take the time to explore the different theme options available and find one that best suits your needs and preferences. Remember, your website is a reflection of your brand or organization, so it’s worth investing time and effort into making it look professional and engaging.
Add text and media
When building a website on Google Sites, it’s important to know how to add text and media to your pages. This guide will walk you through the steps of adding different types of content to your site.
Text content:
To add text to your Google Sites website, go to the page you want to edit and click on the “Edit” button. Then, simply type your text directly into the content area. You can use the formatting options in the toolbar to change the font, size, and color of your text. Don’t forget to save your changes when you’re done.
Images and other media:
If you want to add images or other media files to your website, you can do so by clicking on the “Insert” menu and selecting the “Image” or “Media” option. You can then choose to upload an image or embed media from other sites like YouTube or Google Drive. Once you’ve added an image or media item, you can resize or reposition it as needed.
Menus and navigation:
Google Sites lets you create custom menus and navigation to help visitors navigate your site. You can add menus to the header or sidebar of your site and customize the links to point to specific pages or subpages. This makes it easy for users to find the content they’re looking for.
Collapsible sections:
If you have a lot of content on your pages and want to make it more organized, you can use collapsible sections. This allows you to hide certain sections of your page by default and let users expand them if they’re interested. To add a collapsible section, click on the “Insert” menu and select “Collapsible.” You can then add your content within the collapsible boxes.
Remember to follow Google’s guidelines when adding content to your Google Sites website. Make sure to respect copyright laws when using images or media from other sources, and ensure that your content is relevant and helpful to visitors.
Adding text and media to your Google Sites website is easy and can make a big difference in how your site looks and functions. Take the time to create engaging and informative content, and don’t be afraid to experiment with different layouts and styles. Happy site-building!
Tips:
- Create a site-wide header or banner that appears on all pages of your website to provide consistent branding.
- Use anchor links to allow users to navigate directly to specific sections on your pages.
- Consider incorporating forms into your site to collect feedback or contact information from visitors.
- Share FAQs or other helpful information about your products or services to provide answers to common questions.
- If you have multiple employees or a large group working on your site, collaborate using Google Drive to make it easier to edit and manage content.
- Moving content from the classic version of Google Sites to the new version can be done by copying and pasting the content into the new site.
Incorporate Google elements
Google Sites offers a variety of elements that you can incorporate into your website to enhance its functionality and appearance. These elements include:
Text: You can add text to your pages, create headers and subheadings, and format the text using different sizes, colors, and styles.
Images: Google Sites lets you add images to your pages, and you can also change the size and alignment of the images.
Links: You can add links to external websites or other pages within your site by clicking on the “Insert” menu and selecting the “Link” option.
Media: Google Sites lets you incorporate media elements such as videos from YouTube or images from Google Drive. You can embed these elements by clicking on the “Insert” menu, selecting the “Google Drive” option, and then choosing the media you want to add.
Forms: If you want to gather information from your site visitors, you can add a form to your site. Google Sites provides pre-built form templates that you can customize based on your needs.
Calendar: You can add a calendar to your site to display upcoming events or important dates. You can customize the calendar by clicking on it and selecting the “Edit” option.
Menus: Google Sites lets you create menus and submenus to organize your site’s content. This makes it easier for visitors to navigate through your site and find the information they need.
Collapsible sections: You can create collapsible sections on your pages to hide or show content based on the user’s preferences. This can be useful for displaying FAQs or additional information that users can access if they want.
Banner and footer: Google Sites offers options to customize the header and footer of your website. You can add a banner image at the top and include footer content at the bottom of your site.
By incorporating these Google elements into your site, you can create a custom and visually appealing website that suits your needs. Google Sites provides a user-friendly interface that allows you to make changes and updates to your site quickly and easily.
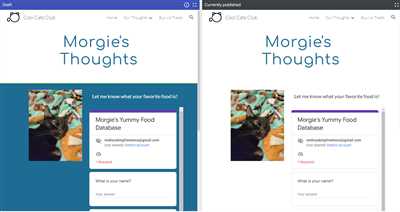
Insert a Google Sites contact form
If you’re building a website using Google Sites, adding a contact form is a quick and easy solution to collect information and answer any questions your visitors may have. With Google Sites, you can embed a custom contact form that automatically saves responses to a Google Drive spreadsheet.
To insert a contact form on your Google Sites website, follow these steps:
- First, go to the page where you want to insert the contact form. You can create a new page or edit an existing one.
- Click on the “Edit” button to open the site editor.
- In the top right corner of the editor, click on the “Insert” button.
- From the drop-down menu, navigate to “More gadgets”, and then select “Contact form”.
- A pop-up window will appear with options to customize your contact form. Here, you can choose the name and email address where the form responses will be sent.
- Click on the “Save” button to save your changes.
- Drag the contact form to the desired location on your page. You can also use the “Arrange” option to change the placement of the form.
- Click on the “Publish” button to make your changes live on your website.
Once your contact form is added, visitors to your Google Sites website can fill out the form and submit their information. As responses come in, they will be automatically saved to a Google Sheets spreadsheet, making it easier for you to manage and track the responses.
Using a contact form is a great way to collect information from your website visitors, whether it’s for customer inquiries, feedback, or support requests. It provides a convenient way for people to get in touch with you without having to manually send an email or make a phone call.
By following these simple steps, you can quickly add a contact form to your Google Sites website and start collecting information from your visitors. This feature is especially useful for businesses, organizations, and educational institutions that want to connect with their audience and provide a seamless communication experience.
Arrange columns and sections
Once you have created your website on Google Sites, you can arrange the columns and sections to customize the layout according to your preferences. This allows you to better organize your content and make it easy for users to navigate through your site.
To start arranging the columns and sections of your Google Site, follow these steps:
- First, click on the “Edit” button to enter the editing mode of your site.
- On the left side of the editor, you will see a panel with various options. Click on the “Insert” button to add elements to your site.
- In the “Insert” panel, you will find options such as text, image, YouTube video, and more. Choose the element you want to add to your site.
- Once you have selected an element, you can drag it to the desired location on your page. You can also resize the element by clicking and dragging its edges.
- If you want to add multiple columns to your site, you can choose the “Columns” option under the “Layout” section in the “Insert” panel. This allows you to divide your page into two or three columns.
- To add sections to your site, you can choose the “Divider” option under the “Layout” section in the “Insert” panel. This allows you to separate different parts of your page.
- If you want to further customize the sections, you can click on the section header and choose options like collapsing the section or changing its color.
- To hide the header, footer, or sidebar of your site, you can go to the “More” menu in the top right corner of the editor and click on “Site layout.” From there, you can toggle the visibility of these elements.
- To manage the site-wide settings and policies, including contact information and working hours, you can click on the “Manage site” button in the top right corner of the editor.
- Google Sites also allows you to collaborate with other users on your site. You can click on the “Share” button in the top right corner of the editor to invite others to view or edit your site.
By arranging columns and sections, you can create a website that is visually appealing and easy to navigate. Take advantage of the various customization options offered by Google Sites to make your site stand out.
Add and manage pages
When creating a website on Google Sites, it’s important to know how to add and manage pages. Pages are the individual sections of your site where you can add text, images, and other elements to create content.
To add a new page, simply click on the “Pages” option in the top menu bar and then click on the “+ Create page” button. This will bring up a pop-up window where you can enter the name and choose the template for your new page. There are options like “Web page,” “Announcement,” “File cabinet,” and more, so you can choose the one that best suits your needs.
Once you’ve created a new page, you can edit its content by clicking on the “Edit page” button. This will open the page in the site editor, where you can make changes to the text, images, and other elements. The editor is similar to a word processor, so you can easily format the text, change font size and color, insert images, and even add links to other pages or external websites.
If you want to organize your pages, you can create subpages by using the “New page” option under the three-dot menu next to a page name. This allows you to create a hierarchical structure for your site, making it easier to navigate and manage the content.
Google Sites also lets you quickly move pages around by dragging and dropping them in the sidebar. This is useful if you want to rearrange the order of your pages or move them to different sections of the site.
To incorporate site-wide elements, like a header or footer, you can use the “Insert” menu in the site editor. This allows you to add these elements to all pages on your site, ensuring a consistent look and feel throughout.
Another useful feature of Google Sites is the ability to add collapsible sections. This allows you to hide and show content, such as FAQs or other large blocks of text, to keep your site clean and organized.
If you need to add a specific element to your page, like a calendar or a form, you can use the “Insert” menu to choose from a variety of options. Google Sites integrates with other Google services, like Google Calendar and Google Forms, so you can easily embed these elements into your site.
To save time when creating new pages, you can also use the “Duplicate page” option under the three-dot menu next to a page name. This creates a copy of the page with the same content, which you can then edit as needed.
If you want to make site-wide changes, like changing the theme or layout of your site, you can do so by clicking on the “Themes, colors, and fonts” option in the top menu bar. This allows you to choose from a variety of pre-made themes or create a custom theme based on your preferences.
Google Sites also provides collaboration features, so you can work with others to create and manage your site. You can invite others to edit or view your site, and you can even see real-time changes as they are made.
In summary, adding and managing pages in Google Sites is a simple and intuitive process. With the ability to create subpages, insert various elements, and incorporate site-wide changes, Google Sites provides a flexible and customizable solution for creating websites.
Publish and collaborate
Google Sites makes it easy to publish and collaborate on your website. Whether you want to create a simple one-page site or a more complex site with multiple pages, Google Sites provides a user-friendly solution.
When you’re ready to publish your site, simply click on the “Publish” button. Google Sites will automatically generate a URL for your site, which you can share with others. You can also choose to publish your site to a custom domain, if you have one.
Collaboration is made easy with Google Sites. You can work together with others in real-time, making it perfect for teams and projects. You can invite others to edit your site by entering their email address, and they can make changes and additions as needed.
If you want to collaborate on a specific section of your site, you can easily create an anchor link to that section. Simply select the text or image you want to link to, and click the “Insert link” button. Then, choose “Link to anchor in the text” and insert a name for your anchor. When someone clicks on the link, they will be automatically scrolled to that section of the page.
Google Sites also provides a variety of templates to help you quickly create your site. You can choose from a range of pre-designed themes, or create your own custom design. The drag-and-drop editor lets you easily add text, images, videos, and more to your site.
If you need to incorporate forms into your site, Google Sites has a built-in form builder that allows you to create and embed forms directly on your pages. This is great for collecting information from visitors or creating surveys for your workforce.
Once your site is published, you can easily make changes and updates. Simply click on the “Edit” button to access the editor. You can rearrange sections, add or delete pages, change the theme or color scheme, and more.
If you want to make site-wide changes, Google Sites provides a global site header and footer. This allows you to add contact information, policies, FAQs, and other important information that will be displayed on every page of your site.
Google Sites also allows you to embed content from other Google services, such as Google Calendar, Google Drive, and YouTube. This means you can easily add a calendar of events, share documents, or embed videos directly on your site.
Google Sites offers a free version with limited features, as well as an enterprise version for businesses and organizations. The enterprise version provides additional features and tools to help you customize and optimize your site.
In conclusion, Google Sites is a powerful and user-friendly tool for creating and publishing websites. Its collaborative features make it easy to work together with others, and its flexible design options allow you to create a site that reflects your unique style and brand.
Share the latest guidelines and policies with a remote workforce
If you have a remote workforce and need to share the latest guidelines and policies with them, Google Sites is a great tool to use. With Google Sites, you can create a site to house all the important information in one place that can be accessed by your employees anytime and anywhere.
To start, go to the Google Sites page and click on “Start a new site” button. You can choose a blank template or use one of the pre-made templates available. Once you have selected a template, you can edit the title and click “Next” to begin customizing your site.
The drag and drop editor lets you easily rearrange the elements on your site, including text, images, and media. You can also insert a Google Calendar, Google Drive files, and other items to the pages of your site. If you like, you can change the color scheme and choose different options for the site-wide footer.
It’s important to organize your guidelines and policies in a clear and easily accessible way. One way to do this is by creating a main page for your guidelines and policies and then creating subpages for each topic. For example, you can have a main page called “Guidelines and Policies” and then subpages for “Code of Conduct”, “Security Procedures”, and “Remote Work Tips”.
To create subpages, go to the editor and click on “New Page” in the sidebar. You can name the subpage and choose whether it should be shown in the navbar or not. This will help your employees navigate through the content easily.
Google Sites allows you to create collapsible text boxes, which are great for FAQs or other long sections of text. To create a collapsible text box, go to the editor and click on the “Insert” tab. From there, click on “Dividers & Spacers” and select “Collapsible Text”. You can then customize the text box, including the title and contents.
Once you have finished building your site, click on “Publish” to make it live. You can also choose to publish it to a specific group of people, like your remote workforce, or keep it private for internal use only. Google Sites also lets you save different versions of your site, so you can go back to previous versions if needed.
By incorporating guidelines and policies into your Google Sites, you can ensure that your remote workforce has easy access to the latest information they need. Whether it’s about security procedures, code of conduct, or remote work tips, having a centralized location for these resources can help streamline communication and collaboration among your employees.
Add a site-wide footer
A site-wide footer is a section that appears at the bottom of all pages of your website. It can include information such as contact details, policies, FAQs, or links to other pages or websites. Adding a site-wide footer can help your visitors quickly access important information and navigate through your site.
To add a site-wide footer to your Google Sites website, follow these steps:
- Go to the Google Sites website where you want to add the footer.
- Click on the gear icon in the top right corner of the page to access the website settings.
- Select “Manage site” from the dropdown menu.
- In the left sidebar, click on “Themes, Colors, and Fonts”.
- Under the “Site Styles” tab, click on “Footer” to expand the options.
- In the “Footer Content” section, enter the text or HTML code that you want to appear in the footer.
- Use the options provided to customize the font, size, color, and alignment of the footer text.
- Click “Save” to apply the changes to your footer.
Once you have added a site-wide footer, it will automatically appear at the bottom of all pages on your website. You can customize the footer’s appearance and contents to match the theme and style of your website.
Here are some tips for creating an effective site-wide footer:
- Include important contact information, such as your email address or phone number.
- Add links to other pages on your website or external websites.
- Embed a contact form to make it easy for visitors to get in touch with you.
- Include links to your social media profiles or YouTube channel.
- Highlight any special announcements or upcoming events.
- Use dividers or columns to organize the footer’s contents.
- Add a link to your privacy policies or terms of service.
By adding a site-wide footer, you can provide valuable information to your website visitors and enhance their browsing experience. Take advantage of Google Sites’ features to create a professional and engaging footer for your website.


