

If you are looking for a solution to reduce unwanted noise in your home or office, soundproof panels can be a great option. These panels not only help in blocking the outside noise but also add an aesthetic appeal to your space. In this article, we will guide you on how to make soundproof panels for your own acoustic treatment project.
Before we jump into the process, let’s take a look at the tools and materials you’ll need. For this DIY project, you will need a range of materials such as burlap or sound-absorbing fabrics, acoustic foams or Zintra panels, eyelet kits, and a few other basic tools. Make sure you have all these items prepared before you start your project.
The first step in making soundproof panels is to design the panels according to your own taste and needs. You can choose from a variety of designs, such as geometric patterns or custom prints, depending on what works best for your space. Many acoustic specialists and architects recommend using soundproof panels from brands like Rossoacoustic or KnollTextiles, as they offer a wide range of colors and designs to choose from.
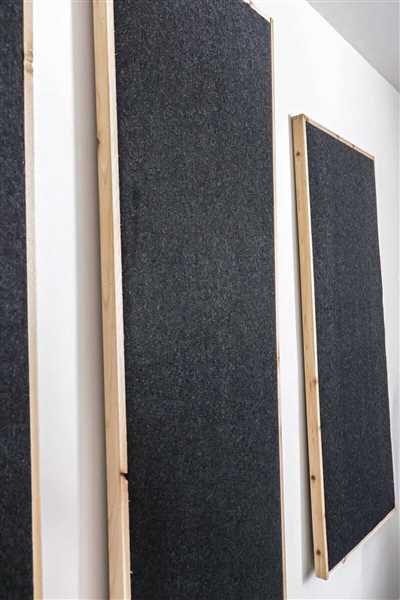
Once you have your designs ready, it’s time to start making the panels. Cut the burlap or sound-absorbing fabrics into rectangular pieces according to the desired size of your panels. A standard size of 23 inches in length and 47 inches in width is often preferred, but you can adjust the dimensions based on your needs and available space.
Next, you will need to prepare the Zintra or acoustic foam panels. These panels come in various thicknesses, so choose the one that suits your requirements. Place the cut fabric pieces on the panels and secure them using the eyelet kits. This will give your soundproof panels a neat and professional finish.
Once your panels are ready, it’s time to hang them on the walls. Depending on your preference, you can either mount them using hooks or simply glue them directly onto the wall. For a more decorative and adjustable option, you can use a three-finger center jolt system, which will allow you to move the panels around easily.
Remember, making soundproof panels is a major time and effort-consuming project. However, the results will be worth it, as you will enjoy a quieter and more peaceful environment in your home or office. So roll up your sleeves, gather your tools, and get ready to create your own soundproof panels!
23 Decorative Acoustic Panel Ideas
When it comes to making a soundproofing project, DIY is moment and the specialists will tell you their ideas on how to make your own decorative acoustic panels. Architects and designers have come up with a range of designs that would help you make the most of your space.
Depending on your design of choice, you may need tools like a jigsaw or a utility knife, and materials such as burlap or fabrics. KnollTextiles and Zintra are two major companies that offer a variety of colors and designs for acoustic panels.
In fact, making your own sound-absorbing panels can be a fun DIY project. There are 7 decorative acoustic panel ideas provided here to jolt your creativity and inspire you to create your own unique sound treatment for your home or office.
1. KnollTextiles – Cut
The Cut acoustic panels from KnollTextiles come in a range of colors and can be customized to any size or shape you need. These panels can be easily mounted on the walls and provide both sound absorption and a decorative element to your space.
2. Parentesit
The Parentesit acoustic panels by Arper are versatile and can be used as decorative pieces or to create a soundproofed space. The panels come in various geometric shapes and can be arranged and hung in different ways, depending on your design preference.
3. Zintra Acoustic Panels
Zintra offers a wide range of eyelet and hanging options for their decorative acoustic panels. These panels come in different colors and designs, allowing you to choose the perfect fit for your space.
4. Burlap Panels
If you’re looking for a more rustic and natural look, burlap panels are a great option. They can be easily cut to size and provide both sound absorption and a unique texture to your walls.
5. Rossoacoustic Panels
Rossoacoustic panels come in a variety of colors and designs, offering both a decorative element and sound-absorbing properties. These panels can be used to create a striking focal point in your space.
6. Line Acoustic Panels
Line panels offer a sleek and modern design, perfect for contemporary spaces. These panels can be arranged in various patterns to create a unique and visually appealing sound treatment.
7. DIY Panels
If you’re feeling handy, why not try making your own acoustic panels? There are plenty of tutorials available online that guide you through the process step by step. This way, you can customize the panels to your specific needs and design preferences.
When making your own acoustic panels, it’s important to prepare the materials and tools you’ll need beforehand. Depending on the design, you may need materials such as fabric, foam, or other sound-absorbing materials, as well as tools like a staple gun or a power drill.
These decorative acoustic panel ideas are just a starting point, and the possibilities are endless. Whether you’re looking for a bold and colorful design or a more subtle and understated look, there is a decorative acoustic panel out there that will suit your style.
| 1 | – | 7 |
| 8 | – | 14 |
| 15 | – | 21 |
| 22 | – | 23 |
How to Make Acoustic Panels the Major Design Moment of Your Project
When it comes to soundproofing your space, acoustical panels are your best friend. Not only do they help absorb excess noise, but they can also become a major design statement in your project. Whether you are an architect, a DIY enthusiast, or a homeowner looking to prepare your home for a sound-absorbing treatment, making your own acoustic panels can be a fun and rewarding project.
Step 1: Gather the necessary materials. To make your own acoustic panels, you will need a range of materials, including an acoustical fabric, a panel frame, adhesive, and tools such as a cutting knife and a tape measure. Popular fabric options include burlap, KnollTextiles, Zintra, and Rossoacoustic, depending on the design aesthetic you want to achieve.
Step 2: Measure and cut the fabric. Measure the length and width of your panel frame and cut the fabric accordingly. Remember to leave a few extra inches of fabric on all sides to ensure a snug fit when the panel is assembled.
Step 3: Attach the fabric to the panel frame. Lay the fabric over the frame, making sure it is centered and wrinkle-free. Use adhesive or an eyelet and finger to secure the fabric to the back of the frame. Trim any excess fabric if necessary.
Step 4: Hang the panels on your walls. Once your panels are ready, it’s time to hang them on your walls. Depending on your design ideas and the available space, you can arrange them in a geometric pattern or create a focal point by grouping them together in a specific area.
These DIY acoustic panels not only offer sound absorption but also a decorative element to your space. The wide range of fabrics and colors available allows you to choose a design that complements your existing decor or adds a pop of color and texture.
In fact, many architects and design specialists now consider acoustic panels as a major design moment in their projects. They have realized that these panels not only serve a functional purpose but can also enhance the overall aesthetics of a room.
So don’t let the sound-absorbing treatment be an afterthought in your project. Take the time to make acoustic panels that are not only functional but also visually stunning. With the right materials, tools, and design ideas, you can create a major design moment with your very own DIY acoustic panels.
Materials and Tools For DIY Sound Treatment Panels
If you are looking to improve the sound quality in your home or studio, making your own sound treatment panels can be a cost-effective solution. With a few materials and tools, you can create custom panels that not only enhance the aesthetics of your space but also absorb unwanted noise.
Here is a list of materials and tools you will need for this DIY project:
| 1. | Acoustic fabric or burlap |
| 2. | Acoustical panel |
| 3. | Geometric designs or patterns |
| 4. | Zintra acoustical panels |
| 5. | Finger-joint pine or MDF boards |
| 6. | Eyelet hanging hardware |
| 7. | Staple gun and staples |
| 8. | Measuring tape or ruler |
| 9. | Utility knife |
Depending on your design choice, you can select different colors and fabrics for your sound treatment panels. Acoustic fabric from KnollTextiles offers a range of options, and Rossoacoustic fabric provides a wide color palette to choose from.
To begin, measure the desired length and width of your panels. Cut the acoustical panel and fabric according to these measurements, leaving extra material on each side to wrap around the edge of the panel. Allow for an extra 2 inches to fold over the edge and staple to the back of the panel.
Prepare the geometric designs or patterns that you would like to add to your panels. These can be made from Zintra acoustical panels, finger-joint pine, or MDF boards. Cut these pieces to the desired shape and size, ensuring they fit within the dimensions of your panel.
Once all the materials are cut and prepared, lay the fabric face-down on a flat surface and place the acoustical panel on top. Fold the edges of the fabric over the panel and staple them to the back, ensuring the fabric is taut. Use a staple gun to secure the fabric in place.
If you are adding geometric designs, place them in the desired positions on top of the fabric-wrapped panel. Secure them with the staple gun, making sure they are firmly attached.
Finally, attach eyelet hanging hardware to the back of each panel. This will enable you to easily hang them on the walls of your space.
With these materials and tools, you can create your own custom sound treatment panels that will make a major difference in the acoustics of your home or studio. They not only look decorative but also serve a practical purpose in absorbing sound and improving the overall sound quality. Don’t hesitate to get creative with different fabrics, colors, and designs to match your style and sound-absorbing needs.
Step 1 Cut to length
When making soundproof panels, the first step is to cut the panels to the desired length. These panels, which are also known as acoustic panels or sound-absorbing panels, are a great DIY project to help improve the acoustics in your home or other space.
The panels can be made from a range of materials, depending on your design preferences and the level of sound treatment you’re aiming for. One popular option is the use of acoustical fabrics, such as those provided by KnollTextiles or Rossoacoustic. These fabrics come in a variety of colors and designs, including geometric patterns and solid colors, allowing you to choose a look that complements your space. Burlap is another option that is commonly used for making soundproof panels.
Once you have chosen the materials for your panels, the next step is to cut them to the desired length. The panels typically come in standard sizes, such as 2’x2′ or 2’x4′, but can also be custom-made to fit your specific needs. Measure the space where you plan to hang the panels and cut the materials accordingly.
Using a ruler or measuring tape, mark the desired length on the panel material. Then, using a sharp cutting tool, such as a utility knife or scissors, carefully cut along the marked line. Take your time and make sure to cut straight and even lines for a professional-looking result.
Depending on the design of your panels and the desired hanging method, you may also need to cut small holes or create eyelets for attaching the panels to the wall or ceiling. This will vary depending on the specific materials and hanging system you are using, so be sure to consult the instructions provided with your materials or seek guidance from specialists or architects who specialize in acoustic design.
Remember to take safety precautions when cutting the panels, such as wearing gloves and eye protection, especially if you are working with materials that may cause splinters or jolts. Once the panels are cut to length and prepared for hanging, you can move on to the next steps of your soundproof panel project.
Step 7: Prepare the panel for hanging
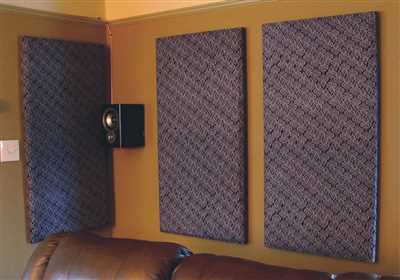
When it comes time to hang your DIY soundproof panel, there are a few steps you need to take to ensure it is ready for installation. The Rossoacoustic specialists from KnollTextiles have provided their expertise to help you make the most of your project.
Firstly, you will need to cut your sound-absorbing panel to the desired size. Depending on the design and acoustical treatment you want to achieve, the panel can be as large as three feet by six feet or as small as three feet by three feet. This is a major moment in your DIY project because the size of the panel will impact its effectiveness in reducing noise.
Next, you will want to choose a decorative fabric to cover the panel. Rossoacoustic panels come in a range of colors and designs, so you can select a fabric that complements your existing decor or adds a pop of color to your space. The fabric should be acoustically transparent, meaning it will not interfere with the panel’s sound-absorbing capabilities.
After selecting the fabric, it’s time to attach it to the panel. The Rossoacoustic panels have eyelet holes pre-drilled along the edges, making it easy to hang them using hooks or nails. Simply line up the center of the fabric with the center of the panel and use your finger or a tool to loop the fabric through the eyelets. This will ensure the fabric is securely attached to the panel and will not jolt or come loose over time.
Once the fabric is attached, you can hang the panel on your walls. Depending on the size and weight of the panel, you may need to use special hanging tools or consult with an architect or designer for assistance. It is important to ensure that the panels are hung securely and evenly to maximize their soundproofing properties.
With these steps, your soundproof panel is now ready to be hung in your home or office. The acoustic properties of the Rossoacoustic panels, combined with the decorative fabrics from KnollTextiles, make them a perfect choice for any soundproofing project. Enjoy the peace and quiet!


