

If you are an Android developer, you should package your app as an app bundle. Building an app bundle is a step in the process of creating a ready-to-publish Android app. By using the Android App Bundle format, you can easily manage and fill your app with various objects and resources.
To migrate your existing projects into app bundles, you should open your project in Android Studio. Then, on the main menu, click on “Build” and select “Generate Signed Bundle / APK”. A pop-up window will appear, where you can choose the “Android App Bundle” option and click “Next” to continue.
The next step is to fill in the required information, such as the key store path and the key store password. After filling in these details, click “Next” and choose the destination folder where the app bundle should be stored. You can also choose to let Android Studio automatically sign your app bundle by selecting the “Generate signed bundle / APK” option.
After clicking “Finish”, Android Studio will generate the app bundle file (.aab) for you. You can find this file in the location you specified earlier. The next step is to upload the app bundle to the Google Play Store. To do this, open the Google Play Console, navigate to your app, and click on “Release Management”. Then, click on “App Releases” and choose “Create Release”. From there, you can upload the app bundle file and follow the prompts to complete the release process.
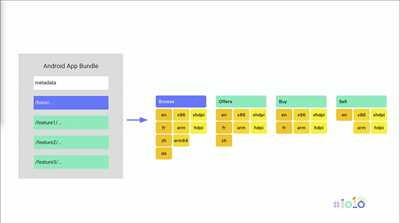
It’s important to note that the app bundle format allows the Play Store to automatically generate and serve optimized APKs to devices. This means that users will only download the code and resources they need on their specific device, resulting in smaller download sizes and faster downloads for your app.
To generate signed bundles from the command line, you can use the bundletool, which is a command-line tool provided by Google. To download the bundletool, go to the Android Developers website and search for “bundletool”. From there, download the bundletool file and unzip it. Then, in the command line, navigate to the directory where the bundletool is stored and run the command to generate the app bundle. This will create the app bundle (.aab) file that you can upload to the Play Store.
Today, the app bundle format is the recommended publishing format for Android apps. By following the steps outlined above, you can easily create and upload your app bundle to the Play Store, providing a better experience for your users and making it easier for them to install and update your app.
- How to Automatically Upload an Android App Bundle to the Play Store
- Step 1: Generate an Android App Bundle
- Step 2: Install bundletool
- Step 3: Upload the App Bundle to the Play Store
- Download installable APK files and other objects
- Step 1: Open Android Studio
- Step 2: Migrate to app bundle
- Step 3: Build the bundle
- Step 4: Generate installable APK files
- Step 5: Download the APK files
- Build an Android App Bundle aab from the command line
- Step 1: Install the Android SDK and bundletool
- Step 2: Generate an App Bundle from your project
- Step 3: Build an APK file from the App Bundle
- Step 4: Sign your App Bundle
- Step 5: Upload the App Bundle to the Google Play Store
- Additional Information
- How to Generate Signed AAB File in Android Studio
- Step 1: Build a Release Version of your App
- Step 2: Configure the Signing Key
- Step 3: Generate the Signed AAB file
- Other Tools for Working with AAB files
- Video:
- How to create an app bundle with dynamically linked libraries on macOS
How to Automatically Upload an Android App Bundle to the Play Store
If you are an Android developer, you know how important it is to get your app on the Play Store. With the introduction of app bundles, building and uploading your app has become even easier and more efficient. In this article, we will walk through the step-by-step process on how to automatically upload an Android app bundle to the Play Store.
Step 1: Generate an Android App Bundle
To begin, you should first generate an Android app bundle (AAB) file in Android Studio. An AAB file is the new format for distributing your app on the Play Store. To generate the AAB file, follow these steps:
- Open your Android project in Android Studio.
- Click on “Build” in the top menu.
- Select “Build Bundle(s) / APK(s)”.
- Click on “Build Bundle(s)”.
- Choose the “Android App Bundle” format.
- Click “Next” and fill in the necessary information.
- Click “Finish” to generate the AAB file.
Step 2: Install bundletool
After generating the AAB file, you will need to install bundletool. Bundletool is a command line tool that allows you to manipulate Android bundles. To install bundletool, follow these steps:
- Download the bundletool.jar file from the Android Developer website.
- Open a command line terminal.
- Navigate to the directory where you downloaded the bundletool.jar file.
- Run the following command to install bundletool:
java -jar bundletool.jar install-apks --apks=--output=
Step 3: Upload the App Bundle to the Play Store
Now that you have the app bundle and bundletool installed, you are ready to upload your app to the Play Store. To do this, follow these steps:
- Go to the Play Console website and sign in with your Google account.
- Click on “Create Application” and fill in the required information about your app.
- After creating the app, go to the “App releases” section.
- Click on “Create a new release” and choose “Internal test track”.
- Click on “Browse files” and select the generated app bundle (AAB) file.
- Wait for the upload to finish and click on “Review” to review the release details.
- Click on “Start rollout to internal testers” to make the app available to internal testers.
- Once the app is tested, you can click on “Run automated tests” and “Gradual rollout” to release it to the public.
And that’s it! Today, we learned how to automatically upload an Android app bundle to the Play Store. This new format offers many benefits, including smaller file sizes and the ability to dynamically generate APK files for different device configurations. Make sure to use app bundles for your future app releases to take advantage of these features and optimize the user experience on Android devices.
Download installable APK files and other objects
Once you have used bundletool to generate your Android App Bundle (AAB) file, you can easily obtain the individual installable APK files and other necessary objects from it. This process is essential because users typically download and install APK files on their Android devices.
Here is a step-by-step guide on how you can download the APK files and other required objects:
Step 1: Open Android Studio
First, open Android Studio on your computer and make sure you have the Android SDK installed.
Step 2: Migrate to app bundle
If you have an existing project that uses APK files, you should consider migrating it to app bundles. App bundles are a more efficient and flexible way to package your app. To migrate, simply click on “Build” in the menu, then select “Migrate to App Bundle…”.
Step 3: Build the bundle
Build the app bundle by clicking on “Build” in the menu, then selecting “Build Bundle(s) / APK(s)”, and finally choosing “Build Bundle(s)”. This process generates the AAB file containing all the necessary resources and code for your app.
Step 4: Generate installable APK files
After the bundle is built, you can generate individual installable APK files by using the bundletool command line. Run the following command:
bundletool build-apks --bundle=/path/to/your/app.aab --output=/path/to/output.apksReplace “/path/to/your/app.aab” with the path to your generated AAB file, and “/path/to/output.apks” with the desired path and file name for the output APK files.
Step 5: Download the APK files
Finally, download the APK files from the output location you specified in the previous step. You can now distribute these APK files to users who can install them on their Android devices.
Keep in mind that the APK files generated from your app bundle should be signed. Signing the APK files ensures their authenticity and integrity.
By following these steps, you can easily download the installable APK files and other necessary objects from your Android App Bundle.
Build an Android App Bundle aab from the command line
If you want to build an Android App Bundle (aab) from the command line, you can use the bundletool, an open-source command-line tool provided by Google. The bundletool allows you to build, inspect, and sign Android App Bundles.
Step 1: Install the Android SDK and bundletool
To begin, you should have the Android SDK installed on your computer. Make sure you have the necessary components, including the Android SDK Build-Tools and the Android SDK Platform for your target Android version. You can download these using the Android Studio SDK Manager.
Next, download the bundletool from the official GitHub repository. You can do this by clicking on the “Download” button on the homepage. After downloading, place the bundletool JAR file in a directory that is easily accessible from the command line.
Step 2: Generate an App Bundle from your project
After installing the necessary tools, navigate to your project directory using the command line. Then, run the following command:
./gradlew bundleThis command will generate an Android App Bundle (aab) file for your project. The generated aab file will be stored in the “app/build/outputs/bundle” directory of your project.
Step 3: Build an APK file from the App Bundle
If you need to generate APK files or other artifacts from the app bundle, you can use the bundletool. Run the following command:
java -jar bundletool.jar build-apks --bundle=/path/to/your.aab --output=/path/to/output.apksReplace “/path/to/your.aab” with the path to your generated app bundle and “/path/to/output.apks” with the desired output file path. This command will generate APK files from the app bundle and store them in the specified location.
Step 4: Sign your App Bundle
If you want to distribute your app on the Google Play Store, you should sign your app bundle with a trusted key. The bundletool can automate this process for you. Run the following command:
java -jar bundletool.jar build-apks --bundle=/path/to/your.aab --output=/path/to/signed.apks --ks=/path/to/your.keystore --ks-key-alias=your-alias --ks-pass=pass:your-key-store-password --key-pass=pass:your-key-passwordReplace “/path/to/your.aab” with the path to your generated app bundle, “/path/to/signed.apks” with the desired output file path, and “/path/to/your.keystore” with the path to your keystore file. Additionally, replace “your-alias” with the alias of your key, “your-key-store-password” with the password for your keystore, and “your-key-password” with the password for your key.
Step 5: Upload the App Bundle to the Google Play Store

After building and signing your app bundle, you can upload it to the Google Play Store. Log in to the Play Console and navigate to the “Release” section. Click on “Create release” and select the “Android App Bundle” format.
Fill in the necessary information and click on “Review” to proceed. The Play Console will automatically migrate the app bundle to APKs for supported devices. After review, click on “Save” to finish the process.
Additional Information
The Android App Bundle format offers many benefits, such as smaller APK sizes and dynamic delivery of features. By following the steps outlined above, you can easily build an Android App Bundle (aab) from the command line using the bundletool. This enables you to generate APK files and sign your app bundle for distribution on the Google Play Store.
Make sure to check the official documentation for updated instructions and additional features.
How to Generate Signed AAB File in Android Studio
Generating a signed Android App Bundle (AAB) file is an essential step when publishing your app to the Google Play Store. An AAB file is a more efficient format for storing objects in an Android package, compared to the traditional APK file format. In this guide, we will walk you through the process of generating a signed AAB file using Android Studio.
Before you begin, make sure you have the latest version of Android Studio installed on your computer. You can download and install Android Studio from the official website.
Step 1: Build a Release Version of your App
To generate a signed AAB file, you must first build a release version of your Android app. Open your project in Android Studio, and from the top menu, go to “Build” -> “Generate Signed Bundle / APK”.
A pop-up window will appear, where you can choose whether to generate a signed bundle (AAB) or a signed APK file. Select the “Android App Bundle (AAB)” option and click “Next”.
Step 2: Configure the Signing Key
In the next step, you need to configure the signing key for your app. If you already have a signing key, you can select the “Use existing” option and provide the necessary information.
If you don’t have a signing key, you can create a new one by clicking the “Create new” button. Fill in the required information, such as the keystore file location, password, and alias. Make sure to securely store your keystore file, as it will be used for signing future updates of your app.
Step 3: Generate the Signed AAB file
After configuring the signing key, Android Studio will generate the signed AAB file for your app. You should specify where the file should be stored on your computer.
Once the process is complete, you can find the signed AAB file in the specified location. This file is ready to be uploaded to the Google Play Store.
Note: Starting from today, the Google Play Store requires new apps to use the AAB format for publishing. Existing apps can still use the APK format, but it is recommended to migrate to AAB for improved app distribution and optimization.
Other Tools for Working with AAB files
If you need to extract or view the contents of an AAB file, you can use the bundletool command-line tool. Bundletool is provided by Google and can be downloaded from the Android Developers website.
By clicking the “Download bundletool” link, you can download the bundletool.jar file. This file can be used with various commands to manipulate AAB files and perform tasks such as extracting APK files, validating the format, and more.
Automatically Generate AAB File in Android Studio:
If you want Android Studio to automatically generate an AAB file every time you build your project, you can do so by modifying your build.gradle file. Add the following lines to the android block:
| android |
|---|
|
After making this change, Android Studio will automatically generate a signed AAB file whenever you build your project.
Now you know how to generate a signed AAB file in Android Studio. By following these steps, you can prepare your app for publishing in the Google Play Store and take advantage of the benefits offered by the AAB format.


