

If you’ve ever wondered how to make Android software, you’ve come to the right place! Android is one of the most popular mobile operating systems, and developing software for this platform can be a lucrative opportunity. Whether you want to build an app for a small clinic, a health and fitness app, or even a zoom-like application for video conferencing, this guide will provide you with the necessary steps to successfully develop your own Android software.
Step 1: Set up your development environment
The first step in developing Android software is to configure your development environment. This involves installing Android Studio, which is the official integrated development environment (IDE) for Android. Android Studio is available for Windows, Mac, and Linux, so you can choose the version that suits your device. Once you have Android Studio installed, you’ll also need to configure the Android SDK and the necessary emulators or physical devices to run your applications.
Step 2: Create a new project
Once your development environment is set up, the next step is to create a new Android project. In Android Studio, you can do this by selecting “Start a new Android Studio project” from the welcome window. This will open a dialog where you can specify the name of your project, the package name (e.g., com.myfirstapplication), and the location where the project will be stored on your computer.
Step 3: Build the user interface
After creating a new project, you can start building the user interface (UI) of your Android software. The UI is defined using XML files in Android, and you can use the Layout Editor in Android Studio to visually design your UI. This makes it easier to create the desired layout and position the different UI elements, such as buttons, text fields, and images, on the screen. You can also use code to create and configure UI elements programmatically.
Step 4: Write the code
The next step is to write the code that will make your Android software function. This involves creating classes and writing the necessary Java or Kotlin code to implement the desired functionality of your app. For example, if you’re building a health app, you might need to write code to track and display the user’s steps or enable the user to store and view their health data in a table.
Step 5: Test and debug
Once you have written the code, it’s important to test and debug your Android software to ensure that everything works as expected. Android Studio provides a built-in emulator that allows you to test your app on different virtual Android devices. You can also connect physical devices to your computer and run your app directly on them for testing. During the testing phase, you should pay attention to how your app performs on different devices and screen sizes, and make any necessary adjustments to ensure a smooth user experience.
Step 6: Build and deploy your app
After successfully testing your app, the final step is to build and deploy your Android software. Android Studio provides a simple and straightforward way to build an APK (Android Package) file, which is the file format used for distributing and installing Android apps. You can then distribute your app through various channels, such as the Google Play Store, or directly send the APK file to users.
By following these steps, you can successfully develop your own Android software. It’s important to note that developing Android software requires a combination of technical skills, creativity, and attention to detail. By providing a valuable and practical app to users, you can make a significant impact in the Android software market.
Note: This guide provides a high-level overview of the steps involved in making Android software. Each step can be more detailed and complex depending on the specific requirements of your project. It’s always a good idea to seek additional resources and tips, as well as join a team or community of Android developers, to enhance your knowledge and skills.
- Build your Android app Faster and Smaller than ever
- Build An Android App In A Day
- How to Make an Android App For Phones and Tablets
- Build Your First Android App
- Create New Project
- Select Empty Activity
- Configure Your Project
- Add Button to XML File in Split Window
- Enable viewBinding in build.gradle(app) file
- Code for Displaying Message
- Video:
- The FULL Beginner to Pro Roadmap for Android Development in 2023
Build your Android app Faster and Smaller than ever
Developing an Android application can be a complex and time-consuming process. However, by following a few simple steps and implementing some practical tips, you can build your Android app faster and smaller than ever before. In this article, we will provide you with an introduction to how you can achieve this goal.
The first step is to configure your development environment. Make sure you have the latest version of Android Studio installed on your Windows computer. This will provide you with a window to develop your app and an emulator to test it on a virtual device. Additionally, enable ViewBinding in your build.gradle file to have more control over your view hierarchy.
Next, create a new project by clicking on “File” > “New” > “New Project” in the Android Studio window. Select the “Empty Activity” template and give your project a name, such as “MyFirstApplication.” This will create a basic project structure for you to start with.
Now it’s time to start developing your Android app. In the project folder, navigate to the “app” folder and open the activity_main.xml file. Here, you can design the layout of your app by adding various UI elements like buttons, text views, and more. Use the XML tags to create the desired layout.
Once the layout is created, go to the MainActivity.java file and add code to handle the functionality of your app. For example, you can add code to display a message when a button is clicked or enable a specific function in your app.
After completing the development of your app, it’s time to test it on a real device or an emulator. Click on the “Run” button in the Android Studio window, and select your device or virtual device. If everything is set up correctly, your app will be installed and displayed on the selected device. Make sure to test it on different screen sizes, as your app should be compatible with various platforms, including phones and tablets.
Now that your app is successfully running, it’s time to optimize its size. One way to do this is by splitting your code into smaller, reusable classes. This can help reduce the size of your APK file and make your app load faster. Additionally, analyze your app’s architecture and remove any unnecessary dependencies or code.
Furthermore, take advantage of Android’s app bundle feature. This allows you to create and store different APK files for different device configurations, including screen resolutions and languages. By providing users with the right APK for their device, you can significantly reduce the app’s size and support costs.
In conclusion, by following these steps and implementing efficient practices, you can build your Android app faster and smaller than ever. Take the opportunity to care for your app’s health, split and configure your code, and optimize your resources. This will not only improve the user experience but also save you time and money in the long run.
| Steps | Description |
|---|---|
| Step 1 | Configure your development environment |
| Step 2 | Create a new project |
| Step 3 | Design the layout of your app |
| Step 4 | Add functionality to your app |
| Step 5 | Test your app on a real device or emulator |
| Step 6 | Optimize your app’s size |
By following these steps and implementing the tips provided, you can build your Android app faster and smaller, resulting in a better user experience and improved overall performance.
Build An Android App In A Day
Developing an Android app can seem like a complex and time-consuming process, but with the right tools and guidance, you can create a fully functional app in just a day. In this article, we will walk you through the steps to build an Android app using practical tips and useful resources.
First, you’ll need to set up your development environment. Install Android Studio, which is the official integrated development environment (IDE) for Android. This platform provides all the necessary tools and libraries to develop Android applications.
Once you have Android Studio installed, create a new project. You can choose different options such as the name of your app, the package name, and the minimum SDK version. Android Studio will automatically generate the basic project structure for you.
Next, enable ViewBinding in your project. This feature allows you to access views in your XML layout files directly from your code. To enable ViewBinding, open the build.gradle (app) file and add the following line to the android block:
buildFeatures { viewBinding true }
After enabling ViewBinding, you can start developing your application. Create a new XML file in the res/layout folder to define the user interface (UI) of your app. You can use different views and widgets to create buttons, text fields, image views, and more.
In the MainActivity file, you can add code to handle user interactions and define the logic of your app. For example, you can add a click listener to a button and display a message when it is clicked.
To test your app, you can run it on a virtual device or a physical Android device. Android Studio provides virtual devices that simulate different screen sizes and device configurations. To run your app on a virtual device, click on the “Run” button in the toolbar.
If everything is successfully set up, you will see your app running on the selected device. You can interact with it just like a real Android device.
As you progress with developing your app, you’ll want to split your code into separate classes to keep it organized and maintainable. For example, you can create a separate class for handling network requests or database operations.
Once you have created and tested your app, it’s time to build the final version. Go to Build > Build Bundle(s) / APK(s) > Build APK(s) in the Android Studio menu. This will generate an APK file that you can distribute and install on Android devices.
Before releasing your app to the Play Store or any other app store, make sure to consider the costs involved. There may be fees for publishing on certain platforms or for using specific services such as push notifications.
In conclusion, building an Android app in a day is very much possible if you follow the steps mentioned above. Android Studio provides a robust development environment, and with the right resources and a clear plan, you can develop your own Android app and make the most of the opportunity to reach a large user base.
Remember to continuously test, optimize, and improve your app based on user feedback. Join Android developer forums and communities to get support and stay updated with the latest trends in Android app development. Good luck on your journey to creating your first Android app!
How to Make an Android App For Phones and Tablets
Creating an Android app is a practical step for anyone looking to run their own small business or provide a service in today’s digital age. With the opportunity to reach millions of users on the Android platform, developing an app can open many doors for success. This guide will walk you through the steps of creating your first Android app for phones and tablets.
Step 1: Set Up Your Development Environment
To start developing your Android app, you need to have the necessary tools installed on your computer. First, download and install Android Studio, which is the official IDE for Android development. Once you have Android Studio open, you can configure the SDK and other settings according to your preferences.
Step 2: Create a New Project
To create a new project, click on the “Create New Project” button on the welcome window. Enter the name for your app (e.g., “MyFirstApplication”) and specify the package name (e.g., “com.myfirstapplication”). Select the minimum SDK version and the activity template. Android Studio will then create a new project folder with all the necessary files and folders.
Step 3: Design the User Interface
The next step is to design the user interface for your app. You can use XML files to define the layout and appearance of your app’s screens. Android Studio provides a visual editor for creating XML layouts, or you can directly edit the XML code. Take care to design a user-friendly and visually appealing interface that will provide a positive user experience.
Step 4: Implement App Functionality
Once you have the user interface created, you can start implementing the functionality of your app. This is done by adding code to handle user interactions, process data, and perform other tasks. Android Studio provides code templates and suggestions to help you write your code faster and with fewer errors.
Step 5: Test Your App
Before releasing your app, it is essential to thoroughly test it to ensure it functions as expected on different Android devices. You can use the Android Emulator to simulate different devices or connect a physical device for testing. Take care to check the app’s performance, responsiveness, and compatibility with different screen sizes.
Step 6: Build and Release Your App
When you are satisfied with your app, it’s time to build and release it. Android Studio will generate an APK (Android Package) file, which is the installation file for your app. You can then distribute this file through the Google Play Store or other app stores, or directly share it with users.
Conclusion
Creating an Android app for phones and tablets can be a rewarding and profitable experience. By following these steps and taking care to develop a high-quality and user-friendly app, you can make a significant impact in the digital world. Keep in mind that building successful apps often requires continuous learning, updates, and improvements. Stay connected with the Android developer community, and never stop exploring new opportunities for your app.
Build Your First Android App
Developing an Android app can be an exciting and rewarding experience. With the ever-growing popularity of Android devices, there is a high demand for new and innovative applications in the Google Play Store. If you have ever considered building your own app, now is the perfect time to start.
Before we start, here are a few tips to make the development process smoother:
- Carefully select the type of app you want to build and consider how it will add value to users.
- Take some time to configure your development environment. This includes installing Android Studio, the official IDE for Android development.
- Create a new Android project in Android Studio. This will provide you with an empty project folder structure where you can start building your app.
- Enable the developer options on your Android device and configure it to run apps from unknown sources. This will allow you to test your app on a physical device.
Now, let’s dive into the practical steps of building your first Android app:
- Create a new Android project in Android Studio. Specify a package name, minimum SDK version, and choose a blank activity template.
- In the project structure, you will find a file called
activity_main.xml. This file defines the layout of your app’s main activity. Add views to display the desired user interface on the screen. - In the
MainActivity.javafile, write the code to interact with the views and provide the desired functionality to your app. - Build and run your app on the Android emulator or a physical device. This will allow you to see how your app performs and make any necessary adjustments.
- Congratulations! You have successfully built your first Android app.
But we’re not done yet. Here are some additional steps you can take to make your app even better:
- Add more activities to create a multi-screen app. This will provide a smoother user experience and allow for more functionality.
- Configure your app’s manifest file to provide important information about your app, such as the permissions it requires and the minimum and target SDK versions.
- Split your app into smaller modules to improve build times and allow for easier maintenance.
- Consider adding a message service to your app, such as Firebase Cloud Messaging, to enable push notifications.
As you continue to develop your Android skills, you’ll discover even more opportunities to enhance and optimize your app. The Android platform provides a wide range of tools and libraries to help you create high-quality applications for smartphones, tablets, and other devices.
Remember, the most important thing is to have fun and enjoy the process of building your own Android app. With dedication and practice, you’ll be on your way to becoming a successful Android developer in no time!
Create New Project
Creating a new project in Android provides developers with an exciting opportunity to build innovative and user-friendly applications. With proper care and attention, you can enable your ideas to come to life and reach a wider audience.
To create a new project, you will need:
- A recent version of Android Studio installed on your computer.
- Properly configured SDK and emulator.
Follow these steps to create a new project:
- Open Android Studio and click on “Start a new Android Studio project”.
- Enter the name of your application, such as “MyFirstApplication”.
- Select a folder on your computer where the project files will be stored.
- Choose the form factors and platforms that your application will support, such as phones and tablets.
- Select the desired language for developing the app, such as Java or Kotlin.
- Select the desired architecture for your app’s code, such as MVC or MVVM.
- Choose the minimum SDK version required for your application to run.
- Select additional options, such as using ViewBinding or including a Google Play Store app signing key.
- Click on “Finish” to create the project.
Once the project is successfully created, Android Studio will generate an empty activity file (MainActivity) and the necessary project files. You can now start developing your application.
It is recommended to split your code into smaller classes and functions to make it more maintainable and easier to understand. You can add new activities, fragments, and other components to create the desired functionality for your app.
To display a message on the screen, you can use an XML file to define the layout and an activity file to handle the logic. By adding a TextView element to the XML layout and using the setText() function in the activity file, you can display a related message to the user.
In order to run and test your application, you will need either a physical Android device connected to your computer or a virtual device created in Android Studio. The emulator provides a practical way to test your app on different screen sizes and configurations.
Before deploying your app to the Google Play Store or other app stores, it is important to consider the costs and requirements related to app publication. You may need to pay developer fees and comply with certain guidelines and policies.
To build the app and generate the APK file, you can click on the “Build” menu and select “Build Bundle(s) / APK(s)”. Android Studio will handle the process and provide you with the necessary files.
Building your first Android software is an exciting journey that requires dedication and a team effort. With proper development and testing, your app can make a positive impact on the lives of its users.
Remember to document your code and provide comments for better code readability. This will help you, your team, and future developers understand the purpose and functionality of your code.
By following these steps and considering these tips, you can successfully create, develop, and deploy Android applications faster than ever before.
Select Empty Activity

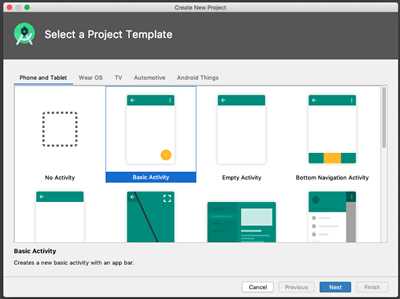
After successfully setting up the Android development environment, the next step in developing an Android software is to create a new project. To start, open Android Studio and click on “Create New Project”.
On the “Create New Project” window, select “Empty Activity” as the template for your new project. This template provides a blank canvas for you to develop your Android application from scratch.
By selecting the “Empty Activity” template, you can have full control over every aspect of your Android application’s code and design. This is especially useful for small projects or when you have a specific architecture in mind for your application.
Once you have selected the “Empty Activity” template, you will be prompted to provide a name and location for your project. Choose an appropriate name and folder to store your project files.
After creating the project, Android Studio will automatically generate the necessary files and classes for your empty activity. These files include the XML layout file, which defines the visual display of your activity, and the Java (or Kotlin) file, where you can configure the functionality and behavior of your activity.
To make it easier and faster to work with the code in your activity, you can enable ViewBinding, which allows you to access UI elements directly from the code. To enable ViewBinding, open the “build.gradle (app)” file and add the following code:
- android {
- …
- viewBinding {
- enabled = true
- }
- }
In addition to the generated files, the “Empty Activity” template also provides a basic structure for your activity’s code. This includes a onCreate() function, where you can initialize your activity and set up its initial state.
By selecting the “Empty Activity” template, you have the opportunity to build your Android software from the ground up, tailoring it exactly to your needs. This gives you much more flexibility and control over the final product.
If you ever need help or guidance during the development process, Android Studio provides a wide range of resources, including documentation, tutorials, and community support. Take advantage of these resources to make the most out of your Android development journey.
Configure Your Project
After creating your project in Android Studio, it is important to configure it properly to ensure a smooth development process. This section will guide you through the necessary steps to configure your project.
- Select the Target platforms: Before you start developing your Android application, it is essential to decide which platforms you want to target. Android offers a wide range of devices, including smartphones, tablets, and wearables. By selecting the target platforms, you can optimize your app’s interface and functionality for each device type.
- Create a new project: To create a new Android project, click on the “File” menu and select “New”. Then, choose “New Project”. This will open a dialog box where you can provide the necessary information, such as the project name, package name, and location. Carefully fill in the required details and click on the “Next” button.
- Configure your project’s architecture: Android Studio allows you to choose from different project architectures, such as MVC (Model-View-Controller), MVP (Model-View-Presenter), or MVVM (Model-View-ViewModel). Each architecture has its advantages and best practices. Select the most suitable architecture for your project.
- Configure the build.gradle file: The build.gradle file contains important configurations for your project, such as dependencies and version control. Open the build.gradle (app) file and update the necessary configurations based on your project’s requirements.
- Enable Data Binding: Data binding allows you to link the UI elements in your layout file with the corresponding data in your Java code. To enable data binding, open the build.gradle (app) file and add the following code in the android section:
android { ... dataBinding { enabled = true } } - Configure the Android Manifest: The Android Manifest file (AndroidManifest.xml) contains essential information about your application, such as permissions, activities, services, and intents. Provide the required permissions and configure other components as per your application’s functionality.
- Set up an Emulator: To test your application without a physical device, you can use the Android Emulator. Click on the “AVD Manager” button in the toolbar or select “Tools” > “AVD Manager”. Create a new virtual device or use an existing one to run your application on the emulator.
- Configure the layout files: Create the necessary layout files (.xml) to define the UI components of your application. Use the XML tags to add views, customize their attributes, and organize them based on your application’s requirements. Consider creating separate layout files for different screen sizes and orientations to ensure compatibility with various devices.
- Add an Introduction: Providing an introduction screen or a welcome message to users is a great way to engage them with your app. Create a new activity or a fragment to display an introductory message or a tutorial for first-time users.
- Build and run your app: Once you have successfully configured your project, it’s time to build and run your application. Click on the “Run” button in the toolbar or select “Run” from the “Run” menu. Android Studio will compile your code and launch your app on the selected device or emulator.
- Test on Physical Devices: While emulators provide a convenient way to test your app, it is also important to test it on physical devices. Physical devices may have different configurations and performance characteristics than emulators, providing you with an opportunity to see how your app performs in the real world.
By following these steps, you can configure your Android project efficiently and ensure a smooth development experience. Stay organized, test frequently, and don’t hesitate to seek support from the Android developer community if you encounter any difficulties.
Add Button to XML File in Split Window
In order to properly configure your Android application’s user interface, it is important to add a button to your XML layout file. This step is crucial for developing a fully functional app that allows users to interact with your software.
First, make sure you have the latest version of Android Studio installed on your computer. This will ensure that you have access to all the necessary tools and features to build your Android application.
Next, open your project in Android Studio and navigate to the res > layout folder. Here, you will find the XML files that dictate the layout and structure of your application’s user interface.
For simplicity, let’s assume you have an empty activity with a split window architecture. In the XML file related to the activity you are working on, you can add the following code to create a button:
Within this code, you can modify the attributes to fit the specific requirements of your project. The “button_id” attribute allows you to provide a unique identifier for this button, which can be useful for later referencing it in your Java code.
Once you have added the button to your XML file, click on the “Design” tab at the bottom of the Android Studio window to switch to the visual layout editor. Here, you will be able to see a graphical representation of your app’s user interface.
Faster than running the app on an actual Android device or emulator, the layout editor will display a preview of how your app will look on different screen sizes and orientations. This feature allows you to make design decisions and adjustments in a more practical and efficient manner.
After successfully adding the button to your XML file, it’s time to link it to the functionality you want it to provide. To do this, navigate to the Java file associated with your activity.
In the Java file, you can locate the onCreate function. This function is executed when the activity is created and is the perfect place to configure your button’s behavior.
Within this function, you can add the following code:
Button button = findViewById(R.id.button_id);
 button.setOnClickListener(new View.OnClickListener() {
 @Override
 public void onClick(View v) {
 // Add your desired functionality here
 }
 });
This code snippet retrieves the button from the XML file using its unique identifier and sets an OnClickListener for it. You can then add the desired functionality inside the onClick function.
Now, when the user taps on the button in your application, the code inside the onClick function will be executed.
Finally, you can run your application on a virtual device or an actual Android device to see the button in action. You may need to select the appropriate device platform and build the app before running it.
Congratulations! You have successfully added a button to your XML file, linked it to a function, and created a fully functional button in your Android application. Now you can expand upon this knowledge and continue developing more features and functionality for your mobile app.
Enable viewBinding in build.gradle(app) file
When developing an Android application, one of the most important things to consider is how to efficiently display views on the screen. Traditionally, developers would use the findViewById() method to locate and manipulate views in their XML layouts. However, this approach can be cumbersome and prone to errors.
Luckily, the introduction of viewBinding in Android has made this process much easier. ViewBinding is a feature that allows you to directly access views in your XML layout files without the need for findViewById(). This not only makes your code cleaner and faster, but also reduces the chances of encountering null pointer exceptions.
To enable viewBinding in your Android project, you first need to configure your build.gradle(app) file.
1. Open your project in Android Studio
2. Navigate to the build.gradle(app) file
3. Locate the android section in the file
4. Add the following code:
“`kotlin
android {
…
viewBinding {
enabled = true
}
}
5. Save the file
By adding this code, you are telling Android Studio to generate binding classes for your XML layout files. These binding classes will have the same name as your XML files but with the word “Binding” appended at the end. For example, if you have an XML layout file named activity_main.xml, the generated binding class will be named ActivityMainBinding.
Now that you have enabled viewBinding, you can start using it in your project. To do so, follow these steps:
1. Open the activity or fragment where you want to use viewBinding
2. Import the generated binding class
3. Initialize the binding object in the onCreate() method
4. Access the views using the binding object
An example of using viewBinding to display a message on a button click:
“`kotlin
import com.myfirstapplication.databinding.ActivityMainBinding
class MainActivity : AppCompatActivity() {
private lateinit var binding: ActivityMainBinding
override fun onCreate(savedInstanceState: Bundle?) {
super.onCreate(savedInstanceState)
binding = ActivityMainBinding.inflate(layoutInflater)
setContentView(binding.root)
binding.button.setOnClickListener {
val message = binding.editText.text.toString()
binding.textView.text = message
}
}
}
These steps demonstrate a practical way of utilizing viewBinding in your Android application. By enabling viewBinding and using the generated binding classes, you can access your views in a more efficient and error-free manner.
ViewBinding offers a great opportunity to improve the development process of Android applications. It not only helps to make your code more readable and maintainable, but also enhances the overall performance of your app. By leveraging the power of viewBinding, you can create applications that run faster and provide a better user experience.
In conclusion, enabling viewBinding in the build.gradle(app) file is a straightforward step to take when developing Android applications. By doing so, you unlock the benefits of viewBinding and ensure a smoother development process.
Code for Displaying Message
To display a message in an Android application, follow these steps:
- Create a new Android project in Android Studio.
- In the project folder, navigate to
app/java/com.example.myfirstapplicationand open theMainActivity.javafile. - Inside the
MainActivityclass, find theonCreatemethod and add the following code snippet:
Button button;
TextView textView;
String message = "Hello, World!";
button = findViewById(R.id.button);
textView = findViewById(R.id.textView);
button.setOnClickListener(new View.OnClickListener() {
@Override
public void onClick(View v) {
textView.setText(message);
});
- In the project folder, navigate to
app/res/layoutand open theactivity_main.xmlfile. - In the XML file, add the following code snippet to define a
TextViewand aButtonin the layout:
android:id="@+id/textView"
android:layout_width="wrap_content"
android:layout_height="wrap_content"
android:text="TextView"
tools:layout_editor_absoluteX="133dp"
tools:layout_editor_absoluteY="132dp"/>
android:id="@+id/button"
android:layout_width="wrap_content"
android:layout_height="wrap_content"
android:text="Button"
tools:layout_editor_absoluteX="133dp"
tools:layout_editor_absoluteY="192dp"/>
- Run the application on an Android device or emulator to see the message displayed when the button is clicked.
This code snippet shows how to implement a basic functionality of displaying a message in an Android application using a button and a textView. You can modify the message to be displayed by changing the value of the message variable. This is just an introduction to the topic, and more advanced and practical functions can be developed based on this basic code.


