Sticker collecting is a popular hobby that brings joy and excitement to people of all ages. Whether you are a preschooler or an adult, organizing and displaying your sticker collection in a fun and creative way can be a rewarding experience. In this article, we will explore a simple and inexpensive method to create your own sticker album.
The first thing you will need is a sturdy album or booklet to hold your stickers. You can find pre-made sticker albums at your local office supply store, but they can be quite expensive. So why not make your own? All you need are a few sheets of transparent paper, such as plastic binder sleeves or clear plastic pockets.
To start making your sticker album, cut the transparent sheets into the size of the pages you want for your album. You can decide how big or small you want each page to be. A good size is usually around three-by-three inches, but you can make them larger or smaller depending on the size of your stickers.
Now that you have the pages ready, it’s time to make them more interesting and reusable. The method we will be using is called layering. This involves putting multiple layers of transparent paper on top of each other, so you can easily remove and rearrange your stickers without damaging them or the page. To do this, simply stack two or three pages together and secure them with a bit of water along the edges. This will create a sticky layer that will hold your stickers in place.
Once your layered pages are dry, it’s time to start filling your album! Place a sticker on one of the layered pages and press it down firmly to ensure it sticks. Repeat this process for each sticker you want to add to your collection. You can organize your stickers by theme, color, or any other way you like. The great thing about this method is that if you decide to rearrange your stickers later on, all you need to do is peel them off and stick them somewhere else.
Creating a sticker album is a fantastic way to showcase your sticker collection and keep them safe and organized. With just a few simple materials and a little bit of creativity, you can make your own personalized album that will bring joy for years to come. So why wait? Gather your stickers, grab some transparent sheets, and start making your own sticker album today!
DIY Reusable Sticker Collecting Album
When I was a child, one of my favorite things to do was collect stickers. Whether they were from the Panini sticker books or just random stickers I came across, I loved adding them to my collection. However, I always struggled with finding a good way to store them. It seemed like they were always getting lost or damaged.
One day, I came across a solution that was both practical and fun – a DIY reusable sticker collecting album. Instead of using regular binders or sticker books that seemed flimsy and easily torn, I decided to create my own album using transparent plastic sleeves.
I found some office paper with a bit of thickness and cut it into small booklet-sized pages. Then, I inserted three plastic sleeves into each page, creating little windows to put my stickers in. I made sure to pick sturdy plastic sleeves so that they would be able to hold my sticker collection for years to come.
To make the album look more colorful and appealing, I put different colored sheets of paper between each page. This gave the album a layered effect, making it more interesting to look at. Plus, it made it easier to organize my stickers by theme or type.
The best part about this DIY sticker album is that it’s reusable. If I wanted to rearrange my stickers or add new ones, all I had to do was remove the plastic sleeves and swap them around. This was especially handy when I wanted to add stickers from new sets or remove ones that I had lost interest in.
Another advantage of this method is that it’s relatively inexpensive. The materials needed – plastic sleeves, office paper, and colored sheets – can be found at any office supply store or online. You can even repurpose old sheet protectors from binders that you no longer use.
As an Argentinian, one of the highlights of my sticker collection was getting stickers of famous soccer players like Diego Maradona. I remember layering different stickers of him on one page, making it look like he was performing different soccer moves. It was a creative way to showcase my favorite sports icons.
In the end, this DIY reusable sticker collecting album was a fun and practical way to store and display my sticker collection. It protected my stickers from water damage or getting lost, and it allowed me to easily add or remove stickers as my collection grew and changed. Whether you’re a preschooler just starting out with sticker collecting or a sticker enthusiast with years of collecting under your belt, this DIY album is a great way to keep your stickers organized and safe.
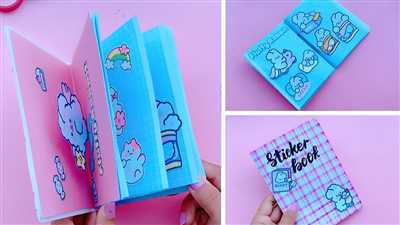
Making a Sticker Album
If you’re a sticker collector or have a preschooler who loves stickers, making a sticker album is a great DIY project that will help you organize and display your collection. Here is a simple method to make a sturdy and reusable album for your stickers.
You will need:
- Three transparent plastic binders with color-coded sleeves
- A few sheets of water-resistant paper, like the ones used in office supplies
- Scissors or a paper cutter
To start, cut the water-resistant paper into pages that fit the size of your binders. Depending on how many stickers you plan to collect, you can decide on the number of pages you want to make for each binder. It’s always a good idea to make a few extra.
Once you have your pages ready, you can start layering your stickers. If you have Panini or other expensive sticker sheets, it’s best to put them in the front part of the sleeves. For the rest of your stickers, you can arrange them in any way you like.
If you have a collection of stickers that are themed or belong to a specific category, you might want to organize them by placing them on separate pages. For example, you could have a “Football Legends” page where you put your Maradona stickers alongside other iconic players.
Another method is to make mini booklets within the sleeves. Cut the water-resistant paper into smaller parts and layer the stickers in them. Then, put these booklets into the sleeves. This way, you can easily flip through the booklet and see all the stickers without having to take them out of the sleeves.
You can also get creative and add some decorative elements to your album. For example, you can cut out windows on some of the pages to give a peek into the stickers underneath or use layered sheets to create a 3D effect.
Once you are done putting your stickers in the sleeves, put the pages into the binders. Make sure to place them in a way that allows you to easily flip through the pages and enjoy your collection.
With this method, you can easily add new stickers to your album without having to take anything out or ruin the previous pages. It’s a great way to keep your collection organized and protected for years to come.
Most expensive Panini sticker
When it comes to sticker albums, Panini is one of the most well-known brands. They have been making sticker collections for many years, and many people have fond memories of collecting and trading Panini stickers in their childhood.
One of the most expensive Panini stickers ever made is the Argentinian soccer player Diego Maradona. This sticker is highly sought after by collectors and can be quite difficult to find.
What makes this sticker so expensive? Well, there are a few things. First, the sticker itself is very rare. Panini only made a limited number of them, so they are hard to come by. Additionally, Maradona is one of the most iconic and beloved soccer players of all time, and his popularity adds to the value of this sticker.
The sticker itself is made of high-quality materials. It is printed on sturdy paper, and the image of Maradona is vibrant and full of color. The sticker is also layered, with a transparent layer on top to protect the image and give it a glossy finish.
Collectors who are lucky enough to find this sticker usually keep it in special binders or albums. They often use protective sleeves to keep the sticker in pristine condition. These sleeves are transparent and reusable, so the sticker can be safely removed and placed back in the album if desired.
While this sticker is undoubtedly expensive, there are other factors that can influence its price. For example, the condition of the sticker can greatly affect its value. A sticker that is in mint condition, with no creases or tears, will typically sell for more than one that is damaged.
So, if you’re a soccer fan and a collector, keep an eye out for this rare and valuable Diego Maradona Panini sticker. Who knows, you might just stumble upon the most expensive Panini sticker in the world!
Bath Drops – Bath Water Color Drops

One good method of putting together a sticker album is by using bath drops. If you have little ones who enjoy bath time, this could be a fun and reusable way to make a DIY panini-sticker collection. To start, you’ll need transparent sheets or pages, like the ones used for office booklet sleeves or three-ring binders.
Cut the sheets into the desired size for your album pages. Three-hole punching the sheets is one option for making them fit in binders, but you can also simply leave them loose and collect them in a box or folder. It’s a good idea to make the pages sturdy enough to withstand some handling, as kids can be rough with their things.
Next, get some bath drops. These are colored drops that you can add to the bath water to change its color. They can be found at most stores or online, and they come in a variety of colors. The drops are usually inexpensive and come in small bottles or packets.
To make the stickers, simply place a few drops of the desired color onto a sheet. If you want a layered effect, wait for the drops to dry before adding another layer. You can experiment with different colors and layering techniques to create unique designs.
Once the drops have dried, you can cut out shapes or patterns from the colored sheets, just like you would with paper stickers. If you want, you can also draw or write on the sheets before cutting them. The possibilities are endless!
Now you have your homemade bath drop stickers. They can be used in the bath or on windows, or you can decide to put them in your sticker album. Simply insert them into the transparent pages and voila! Your sticker collection is ready. You can also use the sheets to store other types of stickers, like ones from Panini or any other collection your child enjoys.
By layering the drops and using sturdy sheets, these DIY bath drop stickers can be made to last. They provide a fun and creative way for your preschooler to enjoy bath time while also adding to their sticker collection. So why not give it a try?
Method Three- Cut and Layered Paper
If you decide to make a sticker album using method Three- Cut and Layered Paper, you will need a few things. First, you will need a sturdy binder or notebook with sleeves. You can find these at an office supply store or make a DIY version using materials you already have at home.
Next, you will need to gather your sticker collection. Preschooler-sized sticker sheets work best for this method, as they are small enough to fit in the sleeves. Make sure to have a variety of stickers, as layering them will create a fun and colorful effect.
To start making your album, take a sheet of transparent paper and cut it down to fit the size of the sleeves. This will serve as the base for your layered stickers. You can use any type of transparent paper, such as parchment or tracing paper.
Now it’s time to start layering! Take one of your sticker sheets and cut out the individual stickers. Place them on the transparent paper, arranging them in a way that looks visually appealing to you. You can overlap them, stack them, or even create a scene by placing them side by side.
Once you’ve placed your stickers, take another sheet of transparent paper and layer it on top. This will protect your stickers and keep them in place. You can repeat this process as many times as you’d like to create multiple layered pages.
If you want to add some extra color to your album, you can use colored paper for the base or for additional layers. Cut the colored paper to fit the size of the sleeves and layer it with the transparent paper and stickers.
When you’re done with your layered pages, put them into the sleeves of your binder or notebook. You can arrange them in any order you’d like, creating your own custom sticker album. Now you have a unique and personalized way to display your sticker collection!
|
|