

Creating a progressive web app (PWA) is a great way to provide your users with a fast and reliable experience, even when they are offline. PWAs are web applications that can be installed on users’ devices and provide functionalities like push notifications and offline access to the content. In this article, we will tackle the steps required to create a PWA app.
First, let’s talk about what makes a PWA different from a traditional web app. Instead of relying solely on the network, PWAs utilize a service worker JS file and an offline HTML page to store the app’s specific content. This means that even if the user is not connected to the internet, they can still access certain parts of your app.
One of the advantages of creating a PWA is that it can work on any platform or device with a modern browser. There’s no need to go through the process of submitting your app to different app stores, which can be complex and time-consuming. With a PWA, you can provide a consistent experience to all your users, regardless of the device they are using.
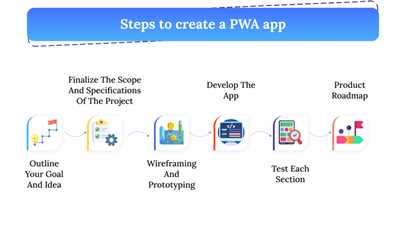
So, how can you create a PWA? Here is a summary of the steps you need to follow:
- Create a manifest file. This file contains metadata about your app, like its name, icons, and how it should be displayed when installed on a user’s device.
- Define a service worker. The service worker is a JavaScript file that runs in the background and handles tasks like caching and network requests. It allows your app to work offline and provide a fast experience to your users.
- Add the service worker to your app. Once you have defined the service worker, you need to register it in your app. This can be done by adding a script tag to your HTML file.
- Make your app installable. To make your app installable, you need to add a “beforeinstallprompt” event listener and show a prompt to the user to install the app.
- Customize the app’s appearance. You can customize how your app looks and behaves by adding CSS and JavaScript code to your HTML file.
By following these instructions, you can create a PWA that provides a reliable and fast experience to your users, even when they are offline. PWAs are a great way to elevate your web app to the next level and provide a more app-like experience to your users. So, don’t wait any longer and start building your own PWA today!
Build a PWA in Just 10 Minutes
If you are a web developer, you might already be aware of the advantages of building a Progressive Web App, or PWA. A PWA is a web app that can work offline using a set of web technologies. In this tutorial, we will show you how to quickly turn your web app into a PWA in just 10 minutes.
To build a PWA, we will be using a few tools and technologies. First, we need to add a special file called a service worker to our web app. The service worker is a JavaScript file that runs in the background and intercepts network requests. It can cache web pages and other files, allowing the PWA to load even when the network is not available.
Before adding the service worker, we must define a manifest file for our PWA. This file, called “manifest.json”, provides metadata about our app such as its name, icons, and how it should be displayed when installed on a user’s device. With the manifest file, users can download and install the PWA to their home screen, just like a native mobile app.
To add the manifest and service worker files, create a directory in your project called “offlinehtml”. Inside this directory, create a “manifest.json” file and a “service-worker.js” file.
Manifest file
The manifest file should contain the following values:
{
"name": "Your App Name",
"short_name": "App Name",
"icons": [
{
"src": "/offlinehtml/icon.png",
"sizes": "192x192",
"type": "image/png"
}
],
"start_url": "/offlinehtml/",
"display": "standalone",
"theme_color": "#ffffff",
"background_color": "#ffffff"
}
Service worker file
The service worker file should contain the following code:
self.addEventListener('install', function(event) {
event.waitUntil(
caches.open('app-cache').then(function(cache) {
return cache.addAll([
'/offlinehtml/',
'/offlinehtml/index.html',
'/offlinehtml/style.css',
'/offlinehtml/script.js'
]);
})
);
});
self.addEventListener('fetch', function(event) {
event.respondWith(
caches.match(event.request).then(function(response) {
return response || fetch(event.request);
})
);
});
After adding these files, you can save your changes and you are done! You have now created a simple PWA that can work offline and provides a native-like experience to your users.
Some of the advantages of PWAs include faster loading times, as the cached files are already downloaded, and the ability to receive notifications even when the app is not open. Furthermore, PWAs are supported by Google and can be referenced by their own unique URL, making them shareable and discoverable.
If you want to go beyond the basic PWA functionality, there are more advanced features you can tackle, such as adding push notifications or making the PWA work with specific devices or platforms. But for now, following these simple instructions will enable your app to work offline and provide a great user experience.
Remember, PWAs are not limited to just web pages – they can be used to create custom web apps or even convert existing apps into PWAs. And with the increasing number of tools and resources available, creating and running a PWA has never been easier.
Enabling HTTPS
When creating a progressive web app (PWA), it is essential to enable HTTPS for your web pages. HTTPS, or Hypertext Transfer Protocol Secure, ensures that data transmitted between the user’s browser and your web server is encrypted and secure.
To enable HTTPS, you need to obtain an SSL (Secure Sockets Layer) certificate for your domain. There are various SSL certificate providers available, and some even offer free certificates, such as Let’s Encrypt. Obtaining and installing a certificate can be a complex process, but it is a necessary step to secure your PWA.
HTTPS is crucial for PWAs because it allows for the use of powerful web features, such as service workers and push notifications. These features can significantly enhance the user experience by providing offline functionality and real-time updates. However, most modern web browsers only allow service workers and push notifications to be used on secure origins, which means your PWA must be served over HTTPS.
After enabling HTTPS, your PWA will also benefit from increased trust and security. Users are more likely to trust and engage with an app that is secured using HTTPS, as they know their data is protected. Additionally, some app stores, such as the Google Play Store, require PWAs to use HTTPS before they can be listed.
To enable HTTPS for your PWA, you will need to ensure that all the necessary files and resources are served securely. This includes the HTML files, manifest file, service worker JavaScript file, and any other assets like icons and offline HTML pages. You can achieve this by configuring your web server or using tools like Webpack to bundle and serve your assets over HTTPS.
By default, PWAs use a service worker to handle offline functionality and resource caching. The service worker is a JavaScript file that runs in the background and intercepts network requests made by the web page. It can cache and serve previously downloaded content, allowing the PWA to work offline or in low network conditions. However, the service worker file must be served over HTTPS to ensure a secure connection.
In addition to enabling HTTPS, you should also tackle other security-related aspects of your PWA. Make sure to check and define appropriate content security policies to prevent malicious code execution. You must also be aware of the limitations of your PWA when running on mobile devices, as they often have limited resources and battery life.
Enabling HTTPS is a critical part of building a PWA that works well and provides a fast and secure user experience. By securing your PWA, you can take advantage of the full range of web technologies and tools available, making your app more engaging and useful to users.
| Advantages of Enabling HTTPS for PWAs |
|---|
| Increased trust and security for users |
| Support for powerful web features like service workers and push notifications |
| Ability to list your PWA in app stores |
| Improved performance and speed |
| Enhanced offline functionality |
Defining your Web App Manifest
Creating a Progressive Web App (PWA) involves more than just building a fast and responsive web page. You must also define a web app manifest, a JSON file that provides the necessary information for your app to function properly on mobile devices and be installed by users.
The web app manifest is a collection of metadata values that specify how your app should behave when installed on a device, such as its name, description, icons, and the default display mode. It is like a blueprint that tells browsers and app stores how to display and interact with your PWA.
To create a web app manifest, you first need to define its basic properties. These include the app’s name, short_name, description, start_url, background_color, theme_color, display, and icons. The name property should provide a concise and descriptive name for your app, while the short_name property is a shorter version that displays when there is limited space, such as on a home screen.
The start_url property is the URL that users will be directed to when they launch your app. It should be a specific page within your PWA that provides a meaningful entry point for users. The background_color and theme_color properties define the colors that will be used to display your app in various contexts, such as during the app installation process or when the app is displayed in the task switcher.
The display property determines how your app should be displayed when installed. It can be set to values like “fullscreen”, “standalone”, “minimal-ui”, or “browser”, each providing a different level of control over the app’s appearance and functionality. Choose the appropriate value based on the goals and requirements of your app.
In addition to these basic properties, you can also define various icons for your app. Icons are essential for creating a consistent and recognizable brand presence across different devices and platforms. The web app manifest allows you to provide multiple icon options, each with different sizes and formats, to ensure that your app looks good in any context.
Defining a web app manifest can be done manually by editing a JSON file, but there are also tools available that simplify the process. One such tool is called the “Web App Manifest Generator”, provided by Google. It allows you to input your app’s details and generates the manifest file for you. There are also plugins and libraries available for popular build tools like Webpack, which can automatically generate the web app manifest as part of your build process.
Once the web app manifest is defined, you need to enable service worker support in your app. A service worker is a script that runs in the background and allows your PWA to work offline, provide notifications, and more. By enabling service worker support, you can ensure that your app remains functional even when the user is not connected to the internet, improving the user experience and making your app more versatile.
To enable service worker support, you need to include a JavaScript file called “service-worker.js” in your PWA’s HTML. This file contains the necessary instructions and code for the service worker to work correctly. You can reference the service worker file using the ![]()