

Creating a clone website can be a time-consuming and challenging process, but with careful planning and step-by-step execution, it is achievable. A clone website is an identical or similar replica of an existing website, which can be useful for various purposes like learning, testing, or creating a better version of the original site. In this article, we will explore the steps and challenges involved in making a clone website.
- Step 1: Sketch and Plan
- Step 2: Copy the HTML and CSS
- Step 3: Create the Layout and Styles
- Step 4: Link the Contents
- Step 5: Hide or Remove Unnecessary Parts
- In Conclusion
- How To Clone A Website In cPanel®
- Challenges while creating my first sketch for cloning a website
- YouTube Clone Layout
- CSS for the YouTube Clone
- Conclusion
- Sources
Step 1: Sketch and Plan
The first step in creating a clone website is to sketch and plan. Start by analyzing and understanding the structure, layout, and content of the original website. Take note of the different sections, such as the header, sidebar, and footer, and think about how these elements will be replicated in your clone website.
Step 2: Copy the HTML and CSS
Once you have a clear picture of what your clone website will look like, you can start copying the HTML and CSS code from the original site. Open the source code of the original website and find the relevant sections you want to clone. Copy the HTML code, including the parent and child elements, and the CSS styles associated with them.
Step 3: Create the Layout and Styles

With the HTML and CSS code copied, you can now create the layout and styles for your clone website. Use CSS flexbox or grid to position the elements in the desired locations. Adjust the width, height, background, and other properties to match the original’s appearance. Pay attention to details like font styles, colours, and length to make the clone as identical as possible.
Step 4: Link the Contents
Cloning a website goes beyond the visual appearance. It also involves replicating the functionality and content. Depending on the type of website you are cloning, you might need to link the database or cPanel® to maintain functionality, such as in an e-commerce site. Make sure to include the necessary scripts and connect the relevant servers to ensure that everything works smoothly.
Step 5: Hide or Remove Unnecessary Parts
It is common for a website to contain some elements or sections that are not required in the clone. Identify these unnecessary parts and hide or remove them using CSS or JavaScript. This will make your clone website look cleaner and more focused, without the clutter that might be present in the original site.
In Conclusion
Cloning a website may seem like a complex task, but by following the steps outlined above, you can create an identical or similar replica of an existing site. Just remember to plan and sketch your clone website, copy the HTML and CSS code, create the layout and styles, link the contents, and remove any unnecessary parts. With enough time and effort, you can successfully create your clone website.
How To Clone A Website In cPanel®
Cloning a website can be a useful way to create a new website with a similar design and structure as an existing one. In this guide, we will walk you through the steps to clone a website using cPanel®.
Step 1: Open cPanel®
To begin, log in to your hosting account and open cPanel®. This is where you will find the tools and features needed for cloning a website.
Step 2: Create a new database
Before starting the cloning process, it is important to create a new database to house the cloned website’s data. You can do this by navigating to the “Databases” section in cPanel® and using the “MySQL® Database Wizard” to create a new database.
Step 3: Copy the website files
Next, you will need to copy all the files from the original website to the new website’s directory. This can be done using an FTP client or File Manager in cPanel®. Ensure that you maintain the same folder structure and file names.
Step 4: Import the database
Once the files are copied, you will need to import the original website’s database into the new database you created in step 2. To do this, go to the “Databases” section in cPanel® and use the “phpMyAdmin” tool to import the SQL file.
Step 5: Update the configuration files
After importing the database, you will need to update the configuration files of the cloned website. These files usually contain important connection details for the database. You can access and edit these files using an FTP client or File Manager in cPanel®.
Step 6: Update links and URLs
Now that the website files and database are in place, you will need to update any links and URLs that point to the original website. This includes updating links within the website’s content, as well as any references in CSS, JavaScript, and other files.
Step 7: Test and finalize
Once you have completed all the steps above, you should thoroughly test the cloned website to ensure everything is working correctly. Check each page, form, and functionality to make sure it behaves as expected.
Conclusion
Cloning a website in cPanel® can be a time-consuming process, but it allows you to create a new website with a similar design and structure as an existing one. By following the steps outlined above, you can successfully clone a website and customize it according to your needs.
Challenges while creating my first sketch for cloning a website
When I started the process of cloning a website, I encountered several challenges. The first challenge was to create a sketch that would serve as a blueprint for the clone. I had to carefully analyze the original website and identify its different sections, layout, and dimensions. This required a keen eye for details and a good understanding of HTML and CSS.
One of the main challenges was to accurately reproduce the website’s layout. I had to pay close attention to the positioning of elements, such as the header, sidebar, and media properties. I also had to ensure that the width and height of the elements matched those of the original website. Adjusting the CSS styles took a lot of time and effort to achieve the desired outcome.
Another challenge I faced was with the website’s color scheme and background. I had to carefully select the right colors and ensure that they matched the original website. I also had to figure out how to hide certain elements that were not relevant to the clone. This involved modifying the code and using different CSS properties.
Furthermore, there were some technical challenges. I had to create a database for the clone website and link it to the necessary pages and scripts. This required knowledge of database management and PHP programming. I also had to make sure that the clone website had the same functionality as the original website, such as forms and interactive elements.
The cloning process was time-consuming, and there were moments when I felt overwhelmed. However, I learned that proper planning and step-by-step execution can make the process much easier. It is important to break down the cloning process into manageable steps and tackle them one at a time.
In conclusion, cloning a website is not an easy task, and it comes with its fair share of challenges. Creating an identical clone requires careful analysis, attention to detail, and skillful implementation of HTML and CSS. It also involves technical knowledge and problem-solving skills. However, with perseverance and determination, it is possible to successfully clone a website and learn a great deal in the process.
YouTube Clone Layout
Creating a clone of a website involves copying its layout, design, and functionality to create an identical or similar version. This article will guide you through the steps of cloning the layout of YouTube, one of the most popular video-sharing websites.
The first step in cloning the YouTube layout is to sketch out the different sections of the website. This includes the header, the main content area, the sidebar, and the footer. Take note of the dimensions, styles, and colors used in each section.
Once you have a plan in place, you can start creating the cloned layout. Start by opening a new HTML file and copying the HTML code from the YouTube website. This will include the parent divs, classes, and IDs used to structure the layout.
Next, you need to copy the CSS styles from the YouTube website. This includes the styles for the header, main content, sidebar, and footer. Pay attention to the classes and IDs used to apply these styles.
After copying the HTML and CSS code, you can make some adjustments to fit your cloned layout. You might need to change the dimensions, colors, or styles to match the original YouTube website. Use the inspect element feature in your browser to identify the properties and values you need to modify.
Once you have finished modifying the HTML and CSS code, you should have a cloned YouTube layout. However, it will only be a static layout and will not have the functionality of the original website.
To make the cloned layout more dynamic, you can add media files like images and videos, set up links to other websites or pages, and include scrolling functionality for the main content area and sidebar. This can be done using JavaScript and other web development technologies.
Another important aspect of cloning a website is copying its database and content. However, this is a more complex process and might require advanced knowledge of web development and database management. If you plan to clone a website like YouTube completely, you will need to replicate its database, users, videos, and other contents.
In conclusion, cloning a website like YouTube involves copying its layout, styles, and functionality. With the right steps and understanding of web development technologies, it is possible to create a clone layout that looks and works similar to the original website.
CSS for the YouTube Clone
To create a YouTube clone website, it is important to plan out the CSS styles that will be used. CSS, or Cascading Style Sheets, is a language used to describe the look and formatting of a document written in HTML. In this section, we will discuss the CSS styles required to create an identical layout to YouTube.
First, let’s talk about the overall layout of the YouTube clone website. The main content will be displayed in the center of the screen, with a sidebar on the left-hand side. The header will contain the logo, search bar, and other navigation elements. The footer will contain links to other pages and social media.
To begin, we need to create a parent container for our layout. We can set the width to 100% and use the max-width property to limit the width to a certain value, ensuring the website looks good on different screen sizes. We can also set the height to auto, allowing the content to determine the height of the container.
Next, we can style the header section. We can set the background color, font styles, and dimensions for the logo, search bar, and navigation elements. We can use flexbox or grid to align these elements in a responsive manner.
Moving on, we can style the main content section. We can set the background color and font styles for the videos, descriptions, and other contents. We can also set the width and height to ensure the content fits nicely within the container. If there is a need for scrolling, we can use the overflow property to allow vertical scrolling.
Now, let’s focus on the sidebar. We can set the background color and dimensions for the sidebar, as well as style the links and other elements within it. We can also set the position to fixed, allowing the sidebar to stay in place while scrolling.
Lastly, we can style the footer section. We can set the background color, font styles, and dimensions for the footer links and social media icons.
Cloning a website like YouTube can be a time-consuming process, but tools like WordPress, cPanel®, and Duplicator can make it easier. By using the code and styles outlined above, you can create a YouTube clone website that looks identical to the original.
In conclusion, the CSS styles for a YouTube clone website involve planning the layout, setting the dimensions and background colors for the different sections, and styling the various elements within those sections. By following the steps outlined above, you can create a clone website that closely resembles YouTube.
Conclusion
In conclusion, cloning a website can be a challenging task, but with the right plan and tools, it is possible to create an identical copy of a website. The process involves understanding the layout and design of the website, as well as the code and database behind it.
The first step in the cloning process is to sketch out the layout of the website, including the header, sidebar, and main content sections. This will give you a better idea of what elements to copy and where they should be placed.
Next, you will need to create a new WordPress site and install a theme that closely matches the original website. This will provide a similar visual background for the cloned site.
To copy the styles and media from the original website, you can use the inspect tool in your browser to view and copy the CSS code. Then, apply these styles to the appropriate elements in your cloned site.
Cloning the functionality of the original website might require some additional work. If the website has interactive features, such as an ecommerce platform or a login system, you will need to replicate those as well. This can be done by installing plugins or coding custom functionality.
One of the biggest challenges in cloning a website is dealing with the database. You will need to export the data from the original website’s database and import it into the cloned site. This can be done using tools like Duplicator or by manually exporting and importing the database.
Finally, you should test the cloned website on different screen sizes and devices to ensure that it looks and works as expected. Make any necessary adjustments to the CSS code to make the site responsive, adjusting the width and height of elements, and using media queries to hide or show content based on screen size.
In conclusion, cloning a website is a time-consuming process that requires careful attention to detail. However, it can be done with the right plan and tools. Just remember to respect the copyright and intellectual property rights of the original website’s owner and only use cloning techniques for educational or personal purposes.
Sources
When creating a clone website, it is helpful to have a plan in place and understand the steps needed to make an identical copy of a website. There are several resources available to assist with this process:
- Sketch or design plan: Before starting the cloning process, it is important to sketch out or have a design plan for how the cloned website should look. This will serve as a guide for creating the necessary sections and layout.
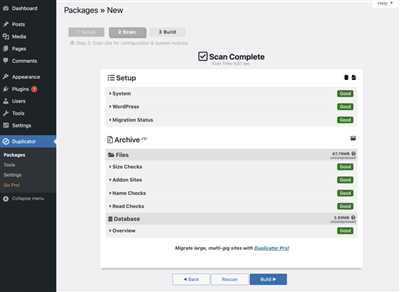
- WordPress Duplicator plugin: If the website being cloned is a WordPress site, the WordPress Duplicator plugin can be used to make the cloning process much easier. This plugin handles the copying of the database and files, making the cloning process less time-consuming.
- Inspect element: The ‘Inspect Element’ feature in web browsers can be used to view the HTML and CSS code of the website being cloned. This can be helpful for identifying the structure and styles used on the original website.
- Media sites: If the cloned website includes media such as images or videos, it might be necessary to open the media sites separately and download the files to be used on the cloned website.
- CSS styles: Copying the CSS styles used on the original website is important for ensuring that the cloned website has the same visual appearance. This can be done by inspecting the CSS code or using a browser extension that allows for easy copying of styles.
- Database and files: For non-WordPress websites, it is necessary to manually copy the database and files from the original website to the new server. This can be done using tools such as cPanel® or through FTP.
- Hide or remove links to parent website: After the cloning process is complete, it is important to hide or remove any links that point back to the original website. This can be done by modifying the HTML code or using a find-and-replace tool.
- Test and tweak: Once the cloned website is up and running, it is important to test all the functionality and make any necessary tweaks or adjustments. This includes checking that all the links work, the layout is consistent, and the media files display correctly.
In conclusion, cloning a website can be a complex process with various challenges along the way. However, with the right plan and resources, it is possible to create an identical clone of a website. Just remember to pay attention to the design, contents, layout, and styles of the original website, and make sure to test the cloned website thoroughly before it goes live.


