

Welcome to Etsy, the definitive online marketplace for small business owners, craft enthusiasts, and individual sellers! If you’re wondering how to get started, this clear and simple article will guide you through the steps.
First, sign up for an Etsy account. It’s free to register and only takes a few minutes. You’ll need to choose a username and password, as well as provide some basic information about yourself and your business.
Next, create your Etsy storefront. This is where you’ll showcase your products and connect with customers. You can customize your shop’s name, description, and even include a link to your official website or domain.
Now, it’s time to start selling! Select whether you’re an individual seller or a small business owner. You’ll also need to choose your billing and payment preferences. Etsy provides a secure platform for transactions, so you don’t have to worry about handling payments yourself.
When listing your items, be sure to include high-quality photos and a detailed description. This will help potential customers find and understand your products better. You can also offer different variations and options for each item, giving your customers more choices.
Don’t forget to set your prices and include any applicable fees. Etsy charges a small fee for each listing and takes a percentage of each sale, but it’s worth it for the exposure and support you’ll receive from the community.
Once your shop is set up, it’s time to promote your listings! Use social media, blogs, and other online sources to spread the word about your shop and products. Engage with customers, answer their questions, and provide excellent customer service.
As a beginner’s tip, it’s a good idea to become a paid member of Etsy. This will give you access to the Etsy Seller Handbook, which is full of useful tips and advice for running a successful Etsy shop.
Remember, Etsy is a global platform, so you can reach customers from all over the world. Make sure to consider international shipping options and any customs regulations that may apply to your products.
In conclusion, Etsy offers a fantastic opportunity to showcase your crafts and sell your unique products. Follow the steps outlined in this article, and you’ll be on your way to a successful Etsy shop in no time!
- How to open an Etsy shop – A Definitive Beginner’s Guide
- 7 Simple Steps to Start Selling on Etsy
- Step 1 Create a Free Account
- Sep 2 Select Preferences Open Your Storefront
- Step 3: Create Product Listings
- Step 4 Decide How You’ll Get Paid
- Step 5 Set up Billing
- Step 6 Customize Your Shop
- Step 7 Open Your Shop
- Register an Official Domain Name
- Don’t forget about the fees
- Become a small business member and save
- Sources
How to open an Etsy shop – A Definitive Beginner’s Guide
Are you looking to start your own online business? Etsy is a popular online marketplace where people from all over the world can buy and sell unique handmade items, vintage goods, and craft supplies. Opening an Etsy shop is a great way to showcase your creativity and turn your passion into a profitable venture. Whether you want to sell handmade jewelry, vintage clothing, or craft supplies, this definitive guide will walk you through the process step by step.
Step 1: Get Started
To get started, you’ll need to create an Etsy account. Click on the “Sell on Etsy” button and follow the simple sign-up process. If you already have an Etsy account as a buyer, you can easily become a seller as well; just click on the “Open a shop” link.
Step 2: Choose a Shop Name
Your shop name is an important part of your Etsy store’s branding. It should be catchy, memorable, and reflect your individual style. Don’t forget to check if your desired shop name is available, as you will need a unique name for your storefront.
Step 3: Set Up Your Shop
Once you’ve chosen a name, it’s time to set up your Etsy shop. Customize your store’s appearance by adding a logo or banner and writing a compelling description. Make sure to include relevant keywords to help people find your shop easily.
Step 4: List Your Items
The next step is to start listing your items for sale. Take high-quality photos of your products and write detailed descriptions that accurately represent your items. Don’t forget to include important details such as dimensions, color options, and materials used.
Step 5: Shipping and Billing
Etsy provides a shipping section where you can set your shipping rates and policies. You can choose to offer free shipping or charge a flat rate. In the billing section, you’ll need to link your bank account or credit card, so you can get paid for your sales. Etsy charges a small fee for each transaction.
Step 6: Get Paid
Once your shop is up and running, you’ll start receiving orders from customers. Etsy provides a secure platform for transactions, and you’ll receive payment directly to your chosen payment method. Make sure to keep track of your orders and provide excellent customer service to build a loyal customer base.
Opening an Etsy shop can be a rewarding experience that allows you to showcase your creativity and make money doing what you love. Whether you’re a seasoned business owner or a beginner with no prior selling experience, this definitive guide will give you the information and tips you need to succeed on Etsy. Don’t wait any longer – start your Etsy journey and turn your passion into a thriving online business today!
7 Simple Steps to Start Selling on Etsy
Are you looking to start your own online business and make some extra money? Etsy is a great platform where you can sell your handmade crafts, vintage items, and unique products to a large audience. Follow these 7 simple steps to get started on Etsy:
Step 1: Sign up for an Etsy account
To start selling on Etsy, you need to create an account. Click here to sign up and become a member of the Etsy community. It’s free and easy!
Step 2: Decide what to sell
Before you list your first product on Etsy, you need to decide what you want to sell. Do you make handmade crafts or do you have vintage items to offer? Take some time to brainstorm and find the right products for your Etsy shop.
Step 3: Create your Etsy shop
Once you’ve decided what to sell, it’s time to open your Etsy shop. Go to the Etsy website and click on the “Open Your Etsy Shop” link. Follow the step-by-step instructions to set up your shop and customize it to your liking.
Step 4: List your products
Now it’s time to list your products on Etsy. In the “Listings” section of your Etsy dashboard, click on the “Create a new listing” button. Fill in all the details of your product, upload clear photos, and give a detailed description to attract potential customers.
Step 5: Set your prices and shipping preferences
Determine the right price for your products and set your shipping preferences. Etsy provides many options for shipping, so choose what works best for you and your customers. Be clear about your shipping fees and policies to avoid any confusion during the transaction process.
Step 6: Manage your Etsy shop
As a seller on Etsy, you’ll need to stay on top of your shop and interact with customers regularly. Respond to questions and inquiries in a timely manner, and make sure to provide excellent customer service. This will help you build a loyal customer base and establish a good reputation on Etsy.
Step 7: Get paid and grow your business
Once you start making sales on Etsy, you’ll need to set up your billing and payment preferences. Choose a payment method that works for you and connect it to your Etsy shop. Etsy offers secure and reliable payment options, so you don’t have to worry about the financial side of your business.
Following these 7 simple steps will help you get started on Etsy and pave the way for your success as a small business owner. Don’t forget to check out the official Etsy Seller Handbook and other resources to find answers to any questions you may have along the way. Now, go ahead and start selling your unique products to people from all over the world!
Step 1 Create a Free Account
Creating a free account on Etsy is the first step to getting started on your journey to becoming a successful seller. To register for an account, simply follow these easy steps:
- Go to the official Etsy website.
- Click on the “Register” button located at the top right of the homepage.
- Fill in your personal information, including your name, email address, and secure password.
- Select your preferences, such as your language and country.
- Choose a unique shop name that represents your business or individual brand.
- Decide on your billing preferences and provide the necessary information for payment.
- Link your bank account to receive payments for your Etsy sales.
- Create your store by adding a clear and catchy description of your products or crafts.
- List your items with informative and appealing photos to attract potential customers.
- Customize your storefront to make it stand out from the competition.
- Save your changes and your Etsy store is now open for business!
By following these simple steps, you can start selling your crafts and other items on Etsy. Don’t worry about any upfront fees, as Etsy only charges a small fee for each listing and takes a percentage of each sale. You have the freedom to set your own prices and shipping preferences, making it easy to tailor your online business according to your needs. If you need any help along the way, Etsy provides many sources of support and tips to help you succeed. So don’t wait any longer, click here to get started on your Etsy journey!
Sep 2 Select Preferences Open Your Storefront
Once you’ve decided to start selling your products on Etsy, it’s time to open your own store. In this section, we’ll guide you through the steps to create and customize your storefront.
1. Select Your Preferences
Before you can open your store, you should select your preferences. This includes choosing your country and deciding whether you want to register as an individual or as a business owner. Once you’re done, click the “Open Your Etsy Shop” button.
2. Set Up Your Store
Once you’ve clicked the button, you’ll be taken to your store’s dashboard. Here, you can find many options to set up your store. You should start by giving your store a clear and catchy name that represents your brand. You’ll also need to create a clear and descriptive store description.
3. Create Your Listings
The next steps involve adding your products to your store. Upload photos of your items and write a compelling description for each. Be sure to include any relevant details such as size, material, and shipping information.
4. Customize Your Storefront
Now that your store is set up and your products are listed, it’s time to customize your storefront. Choose a domain name that suits your brand and customize the appearance of your store using the available templates. You can also edit your store policies, including your return and shipping policies.
5. Decide on Your Payment Preferences
In order to start selling, you’ll need to decide on your payment preferences. You can choose to accept major credit cards, PayPal, or other payment methods. Etsy also offers a “Direct Checkout” option, which allows buyers to make a transaction directly through Etsy.
7. Become an Etsy Seller
Once your store is fully customized, you’re ready to become an official Etsy seller! With your shop up and running, you can start promoting your products and attracting customers. Remember to follow our beginner’s guide and utilize our tips for successful selling.
Whether you’re a beginner or an experienced seller, Etsy is a great platform to showcase your crafts and sell unique products. With its easy setup process and many free features, you can start your online business with a small investment. Don’t worry if there are some fees involved, the potential for success is worth it!
So if you’re ready to start your Etsy journey, sign up now and open your store today!
Step 3: Create Product Listings
Once you’ve decided to start your own Etsy business, it’s time to create your product listings. This article will guide you through the process of setting up your store and listing your items for sale.
Before you begin creating your product listings, make sure to customize your store preferences and set up your billing information. To do this, click on the “Account” button and select “Preferences”. Here, you can customize your store name, set your payment preferences, and open your billing account.
When creating your listings, it’s important to provide a clear and detailed description of each item. Include important details such as size, material, color, and any other relevant information that your customers may need to know. You can also upload high-quality photos of your items to give potential buyers a better idea of what they are purchasing.
As an Etsy seller, you can choose to offer free shipping or charge for shipping. If you decide to offer free shipping, make sure to factor in the cost of shipping when setting your prices. If you choose to charge for shipping, be sure to provide accurate shipping costs based on your location and the destination country.
Once you have filled out all the necessary information for your listing, click on the “List Item” button to make your item live on your storefront. Customers can now see your product and purchase it if they are interested.
It is also important to remember that as an Etsy seller, you will need to answer any questions that potential customers may have about your products. Be prompt in responding and provide helpful and accurate information. This will help build trust with your customers and increase the likelihood of making a sale.
Now that you’ve created your product listings, you are well on your way to becoming a successful Etsy seller. Remember to regularly update your listings and add new items to keep your storefront fresh and appealing to customers. Happy selling!
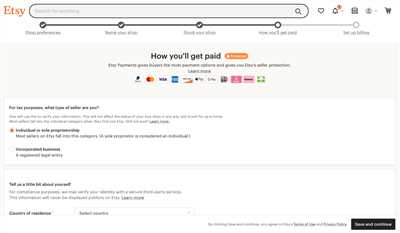
Step 4 Decide How You’ll Get Paid
Once you’ve set up your Etsy store and started listing your products, it’s time to think about how you’ll get paid for your sales. There are a few options available to you, so you’ll need to decide which one works best for your individual preferences and needs.
If you’re just starting out and don’t have a clear idea yet of how much money you’ll be making, you may want to choose the simplest option – Etsy Payments. With this method, customers can pay you directly through Etsy using various payment methods, and the funds will be deposited into your bank account. There are some small fees associated with Etsy Payments, but it’s a straightforward and hassle-free way to receive payments.
If you’re an experienced Etsy seller or if you’re selling in a country where Etsy Payments is not available, you can choose to use another payment method such as PayPal or accept payment on your own. Keep in mind that using multiple payment methods may require you to handle billing and transactions outside of Etsy, so make sure you’re familiar with the process before deciding.
Before you decide on a payment method, it’s also important to think about how you’ll handle shipping. Etsy provides a simple way to calculate shipping costs based on the weight and dimensions of your products, as well as your preferences for shipping carriers. You’ll need to set up your shipping profiles in your Etsy account and link them to your listings.
What’s more, don’t forget to customize your storefront and make it appealing to potential customers. Choose the right photos to showcase your products and create a compelling description for each listing. This is your chance to give buyers all the necessary information about your products and convince them to make a purchase.
Once you’ve made all the necessary decisions about your payment method, shipping, and store customization, it’s time to get your Etsy shop up and running. Register for an Etsy account, sign the definitive handbook for Etsy owners, and start implementing the tips and advice you’vе learned from this article. Don’t hesitate to edit and refine your store as you go along. The more effort you put into creating an attractive and user-friendly storefront, the more likely you are to attract customers and make sales.
So, don’t wait any longer! Start your Etsy journey today and enjoy the freedom and flexibility of running your own online store.
Step 5 Set up Billing
Once you’ve completed the previous steps, you’ll need to set up billing for your Etsy shop. This is an important part of running your online business, so don’t forget to follow these simple tips:
- Make sure you have a clear understanding of the fees and payments that Etsy will charge you. You can find all the information you need in the Etsy Seller Handbook or through other official sources.
- Decide on the payment methods you’ll offer to your customers. There are many options available, so choose well and select the ones that will work best for your customers and your small business.
- Register an Etsy Payments account. This will allow you to accept payments from your customers directly on Etsy, making the transaction process smooth and simple.
- Set up your billing information. You’ll need to provide your bank account details or credit card information so that Etsy can deposit your money and deduct any applicable fees.
- Create a billing profile. This will give you the option to save your payment preferences, making it easier for you to manage your billing in the future.
- Don’t forget to include any additional information required by your country or region for tax purposes. Etsy provides resources to help guide you through this process.
- Once you’ve completed these steps, your Etsy shop is now ready to sell! The next part of our beginner’s guide will give you tips on how to market your shop, attract more customers, and make your first sale.
With these steps, you’ll be well on your way to becoming a successful Etsy seller. Start by setting up your billing and then continue to follow our guide to create an online storefront, add item listings, and more. Whether you’re an individual seller or a small business owner, Etsy provides the platform and resources you need to get started on your journey.
Step 6 Customize Your Shop

Once you’ve set up your Etsy shop and become a member, it’s time to customize it to your preferences. This step-by-step guide will give you all the information you need to make your shop look and feel just right.
Before you begin, make sure you have some high-quality photos of your products. People are more likely to buy from a shop with clear and appealing photos, so take the time to showcase your items in the best light.
Here are some key steps to follow:
| 1. | Click on the “Shop Manager” section on the top right of your Etsy homepage. |
| 2. | Select “Settings” from the dropdown menu. |
| 3. | Under “Info & Appearance,” click on “Shop Preferences.” |
| 4. | In the “Shop name” section, choose a name that represents your store and the products you’re selling. Keep it simple and memorable. |
| 5. | Decide on your shop’s domain name, which will be something like “www.etsy.com/shop/yourshopname.” |
| 6. | Edit your “Shop Owner” section to include information about yourself and why you’re selling on Etsy. This will help customers feel more connected to you. |
| 7. | Set your shop’s payment preferences, including how you’ll receive money from Etsy buyers and any fees you’ll need to pay. |
| 8. | Customize your storefront by adding a banner and logo that reflect your brand. |
| 9. | Create listings for your products, including clear descriptions, pricing, and shipping information. |
| 10. | Don’t forget to link your bank account to your Etsy shop, so you can receive payments directly. |
| 11. | Save your changes and your shop is ready to welcome customers! |
By following these steps, you’ll have a fully customized Etsy shop that showcases your products and attracts buyers. If you have any questions along the way, don’t hesitate to consult Etsy’s definitive handbook or reach out to the official Etsy support for assistance.
Now that your shop is set up, it’s time to start selling and making money on Etsy. Good luck!
Step 7 Open Your Shop
Once you have registered and become a member on Etsy, it’s time to open your shop! This article will guide you through the process of setting up your online store on Etsy.
To get started, click on the “Open Your Shop” button on the Etsy homepage. If you’re a beginner, don’t worry – Etsy provides a simple and definitive guide to help you through the steps.
First, you’ll need to create a name for your shop. This name should be unique and reflect your business and the products or crafts you sell. You can also include your own name or whatever you find fitting.
Next, select your preferences for shipping, payments, and transaction. You’ll need to choose the country you’re located in, as well as the types of payments you want to accept from your customers.
Another important step is to customize your shop. Don’t forget to include a profile picture and a banner that represents your brand. You’ll also need to write a compelling and clear “About” section, where you can tell people more about your business and what sets you apart.
Now it’s time to list your products! Etsy allows you to have up to 4 listings for free, so take advantage of that. You can always add more listings later as your business grows. Make sure to take high-quality photos of your products that will attract potential customers.
When listing your products, there will be sections where you can add tags and descriptions to help people find your items. Use relevant keywords that accurately describe your products to increase visibility.
Once you’ve gone through all the steps, review and edit your shop to make sure everything is right. You’ll also have the option to save your progress and come back to it later if needed.
When you’re ready, click the “Open Your Shop” button! Congratulations! Your Etsy shop is now open! Now you can start making money with your small business and connect with customers from all around the world.
Don’t forget to check out the Etsy Seller Handbook and other sources for helpful tips and advice on how to succeed on Etsy. Good luck!
Register an Official Domain Name
Before you can start selling your crafts on Etsy and make money, you’ll need to register an official domain name for your business. This is an important step that all Etsy store owners should take to help give your shop a professional and definitive look.
Registering an official domain name is a simple and easy process. Here’s a beginner’s guide to help you get started:
- Sign in to your Etsy account and go to your Shop Manager.
- Click on the “Settings” tab, then select “Options”.
- In the “Listing Preferences” section, click on “Web Address”.
- Click on the “Register Domain” button.
- Decide whether you want to register a new domain or connect your existing domain.
- If you want to register a new domain, follow the steps provided to search for available domain names and choose the one that fits your business.
- If you want to connect your existing domain, follow the instructions to customize the settings and connect your domain to your Etsy storefront.
By registering an official domain name, you will have a dedicated web address for your Etsy store. This will make it easier for people to find and remember your shop. It will also help build trust with potential customers, as having an official domain name shows that you are a serious seller.
Don’t forget that Etsy offers a free Handbook that will guide you through the process of setting up your shop, creating listings, and making your first sales. The Handbook is a valuable resource for all Etsy sellers, whether you’re a beginner or an experienced seller looking to take your business to the next level.
So, take the first step and register an official domain name for your Etsy shop. It’s an important investment that will help you establish a professional online presence and attract more customers to your small business.
Don’t forget about the fees
When starting your Etsy shop, it’s important to remember that there are fees associated with selling on the platform. These fees help to support the Etsy marketplace and ensure that your shop and listings are seen by potential buyers.
As a beginner seller, it’s essential to familiarize yourself with the fees involved. The Etsy Seller Handbook is a great resource to get you started, providing step-by-step tips on how to set up your shop, create compelling listings, and more.
Here are some key points to remember about fees:
- Transaction fees: Etsy charges a small fee for each sale you make. This fee is a percentage of the total sale amount and helps cover the cost of processing the transaction. You can view the exact fee structure for your country on the official Etsy website.
- Listing fees: Each time you create a new listing, you’ll pay a small fee. This fee allows your item to be visible in the Etsy marketplace and helps attract potential buyers. Make sure to carefully edit and customize your listing description to maximize its impact and reach.
- Shipping fees: When setting up your shop, you’ll need to decide whether to offer free shipping or charge customers for shipping. Take into account your individual preferences, the nature of your business, and the shipping guidelines provided by Etsy. Clear shipping policies will help you find more satisfied customers.
- Payment processing fees: If you choose to receive payments through Etsy Payments, there will be a small processing fee for each transaction. This fee covers the cost of securely transferring the money from the buyer to your account. It’s a convenient and safe way to get paid.
It’s important to keep these fees in mind when deciding on the pricing of your items. Factor them into your costs to ensure that you’re making a profit from each sale. Remember, running a successful Etsy shop takes time and effort, but with the right tips and guidance, you can make your business thrive.
If you’re unsure about any part of the process, don’t worry. Etsy provides a comprehensive guide for sellers, and there’s a supportive community of experienced sellers who are willing to give advice and answer your questions. Take advantage of the resources available, and you’ll be well on your way to creating a successful Etsy shop.
Become a small business member and save
If you want to start your own business, Etsy is the perfect platform for you. With just a few simple steps, you can set up your own online store and start selling your products.
First, you’ll need to create an Etsy account. It’s free to sign up, and you’ll just need to provide some basic information, like your email address and a password. Once you’ve registered, you’re ready to get started.
Next, you’ll need to name your shop. This is an important part of establishing your brand, so take some time to come up with a name that reflects your style and the products you’ll be selling. Once you’ve decided on a name, you can customize your storefront to make it look just the way you want.
Now it’s time to start listing your items. Etsy provides a definitive guide, called the Etsy Handbook, that will help you through every step of the listing process. You’ll need to add clear photos and a detailed description of each item to attract customers. Don’t forget to include your preferences for shipping and billing.
Once your listings are live, you can start selling. Etsy charges a small transaction fee for each sale, so make sure to factor this into your pricing. You can choose to offer free shipping or set your own rates, depending on what works best for your business.
As an Etsy seller, you’ll have access to a supportive community of like-minded people. You can join forums, ask questions, and get tips from experienced sellers. Etsy also has a customer support team that is there to help you with any issues or questions you may have.
Becoming a small business member on Etsy has many benefits. Not only will you have the opportunity to sell your crafts and products to people all over the world, but you’ll also be able to save money. Etsy offers a variety of fees and options, so you can decide what works best for your individual business needs.
So if you’re ready to take the next step and start your own small business, sign up for an Etsy account today. It’s a simple and affordable way to turn your passion into a profitable venture.
Sources
Here are some sources to help you get started with Etsy:
| Source | Description |
|---|---|
| 1. Etsy Beginner’s Guide | A comprehensive guide for beginners on how to open an Etsy shop, create listings, set up your billing preferences, and more. |
| 2. Etsy Help Center | The official Etsy help center where you can find answers to many questions about selling on Etsy and managing your shop. |
| 3. Etsy Seller Handbook | A definitive resource for Etsy shop owners that provides tips, step-by-step guides, and advice on how to grow your business. |
| 4. Etsy Online Community | Join the Etsy online community to connect with other sellers, ask questions, and get valuable tips and advice. |
| 5. Etsy Seller Fees | Learn about the fees associated with selling on Etsy, including listing fees, transaction fees, and shipping fees. |
These sources will give you a clear understanding of what you need to do to start your Etsy shop and become a successful seller. Don’t forget to edit and optimize your shop’s name, description, and item listings before you open your shop to the public. Taking the time to do this will help you attract more customers and increase your chances of making sales.


